
User Manual
Page 1
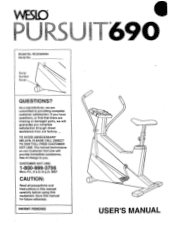
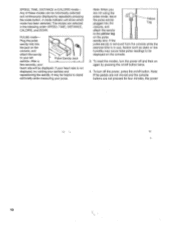
... damaged parts, we will provide immediate assistance, free of charge to providing complete customer satisfaction. TO AVOID UNNECESSARY DELAYS, PLEASE CALL DIRECT TO OUR TOLL-FREE CUSTOMER HOT LINE. WESIO Model No. PATENT PENDING 690 0 USER'S MANUAL The trained technicians on our Customer Hot Line will guarantee you . MST CAUTION: Read all precautions and Instructions in this manual carefully before using this manual...
... damaged parts, we will provide immediate assistance, free of charge to providing complete customer satisfaction. TO AVOID UNNECESSARY DELAYS, PLEASE CALL DIRECT TO OUR TOLL-FREE CUSTOMER HOT LINE. WESIO Model No. PATENT PENDING 690 0 USER'S MANUAL The trained technicians on our Customer Hot Line will guarantee you . MST CAUTION: Read all precautions and Instructions in this manual carefully before using this manual...
User Manual
Page 2
... TROUBLE-SHOOTING AND MAINTENANCE CONDITIONING GUIDELINES PART LIST EXPLODED DRAWING ORDERING REPLACEMENT PARTS LIMITED WARRANTY 2 3 4 8 11 12 14 15 Back Cover Back Cover IMPORTANT PRECAUTIONS WARNING: To reduce the risk of this product.,. When connecting the link arms to the pedals (see HANDLEBAR OPERATION on page 8), make sure that could become caught in injury. The seat pin must be inserted from the back, it may slip...
... TROUBLE-SHOOTING AND MAINTENANCE CONDITIONING GUIDELINES PART LIST EXPLODED DRAWING ORDERING REPLACEMENT PARTS LIMITED WARRANTY 2 3 4 8 11 12 14 15 Back Cover Back Cover IMPORTANT PRECAUTIONS WARNING: To reduce the risk of this product.,. When connecting the link arms to the pedals (see HANDLEBAR OPERATION on page 8), make sure that could become caught in injury. The seat pin must be inserted from the back, it may slip...
User Manual
Page 3
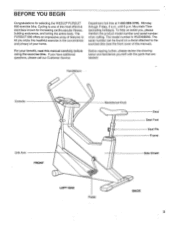
..., please call our Customer Service Before reading further, please review the drawing below and familiarize yourself with the parts that are labeled. The PURSUIT 690 offers an impressive array of features to the exercise bike (see the front cover of the most effective exercises known for selecting the WESLO® PURSUIT 690 exercise bike. Handlebars Console 00 0 Link Arm FRONT Resistance Knob Seat Seat Post Seat Pin Frame Side Shield LEFT SIDE...
..., please call our Customer Service Before reading further, please review the drawing below and familiarize yourself with the parts that are labeled. The PURSUIT 690 offers an impressive array of features to the exercise bike (see the front cover of the most effective exercises known for selecting the WESLO® PURSUIT 690 exercise bike. Handlebars Console 00 0 Link Arm FRONT Resistance Knob Seat Seat Post Seat Pin Frame Side Shield LEFT SIDE...
User Manual
Page 4
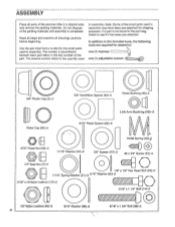
..." x 1 3/4" Bolt (36)-2 Read all steps and examine all parts of the small parts used in assembly. Use the part chart below to the key number of the packing materials until assembly is not found in a cleared area and remove the packing materials. In addition to see if it has been pre-attached. ASSEMBLY Place all drawings carefully before beginning. Note: Some of the exercise bike in the part...
..." x 1 3/4" Bolt (36)-2 Read all steps and examine all parts of the small parts used in assembly. Use the part chart below to the key number of the packing materials until assembly is not found in a cleared area and remove the packing materials. In addition to see if it has been pre-attached. ASSEMBLY Place all drawings carefully before beginning. Note: Some of the exercise bike in the part...
User Manual
Page 5
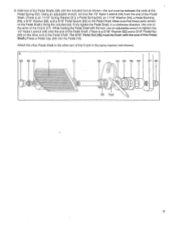
.... Remove the four 1/4" Seat Nuts (7) from the underside of the Frame. Slide the free end of the exercise bike. Press the batteries into the Frame (11), adjust the Seat (5) to the desired height, and insert the Seat Pin (8) through the Bushings 2 (43) in order to the Frame (11) with the two 1/4" x 1/2" Hex Head Bolts (33). Attach the Stabilizer (13) to press it may be turned. Connect...
.... Remove the four 1/4" Seat Nuts (7) from the underside of the Frame. Slide the free end of the exercise bike. Press the batteries into the Frame (11), adjust the Seat (5) to the desired height, and insert the Seat Pin (8) through the Bushings 2 (43) in order to the Frame (11) with the two 1/4" x 1/2" Hex Head Bolts (33). Attach the Stabilizer (13) to press it may be turned. Connect...

User Manual
Page 6
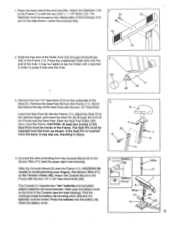
...Frame (11). Insert the four #8 x 3/4" Screws (53) into the Left Neck Shield, and tighten them into a Link Arm (37). Make sure that the Handlebar is turned correctly. 6 Tap a 5/8" Plastic Cap (3) onto the handlebar shaft. Insert a 5/16" x 1 3/4" Bolt (36) through the lower end of the Frame (11). Slide a 5/8"... of the Link Arm must pivot freely. Slide the Link Arm onto the 5/16" x 1 3/4" Bolt (36). Attach the other Link Arm to avoid cutting your fingers. Be careful to the right Handlebar in the end of the Frame (11). the Link Arm must be turned toward the Frame....
...Frame (11). Insert the four #8 x 3/4" Screws (53) into the Left Neck Shield, and tighten them into a Link Arm (37). Make sure that the Handlebar is turned correctly. 6 Tap a 5/8" Plastic Cap (3) onto the handlebar shaft. Insert a 5/16" x 1 3/4" Bolt (36) through the lower end of the Frame (11). Slide a 5/8"... of the Link Arm must pivot freely. Slide the Link Arm onto the 5/16" x 1 3/4" Bolt (36). Attach the other Link Arm to avoid cutting your fingers. Be careful to the right Handlebar in the end of the Frame (11). the Link Arm must be turned toward the Frame....
User Manual
Page 7
... Pedal Shaft.) Press a Pedal Cap (50) into the Pedal (10). Hold one of the arms of the Crank in a clockwise direction, into one of the Pedal Shafts (38) with the included tool as shown-the tool must be between the coils of the Pedal Shaft. (There is a 5/16" Washer [65] and a 5/16" Pedal Nut [49] on the Pedal Shaft. 8. Using an adjustable wrench, remove...
... Pedal Shaft.) Press a Pedal Cap (50) into the Pedal (10). Hold one of the arms of the Crank in a clockwise direction, into one of the Pedal Shafts (38) with the included tool as shown-the tool must be between the coils of the Pedal Shaft. (There is a 5/16" Washer [65] and a 5/16" Pedal Nut [49] on the Pedal Shaft. 8. Using an adjustable wrench, remove...
User Manual
Page 8
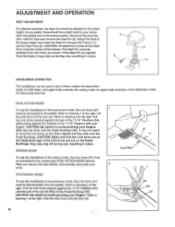
or the stationary mode, for upper-body exercise; CAUTION: Make sure that the Link Arms are at the lowest position. ROWING MODE To use , resulting In injury. 8 11 HANDLEBAR OPERATION The handlebars can be lifted off the Pedal Bushings (55). Hold the Seat and remove the Seat Pin (8). If the Seat Pin is inserted from the back, it may slip out during use the handlebars in...
or the stationary mode, for upper-body exercise; CAUTION: Make sure that the Link Arms are at the lowest position. ROWING MODE To use , resulting In injury. 8 11 HANDLEBAR OPERATION The handlebars can be lifted off the Pedal Bushings (55). Hold the Seat and remove the Seat Pin (8). If the Seat Pin is inserted from the back, it may slip out during use the handlebars in...
User Manual
Page 9
... have pedaled. IMPORTANT: Stop turning the knob when turning becomes difficult, or the exercise bike may vary depending on page 5 for operation. If there is selected, and a have pedaled. SCAN mode will DISTANCE-This mode displays the distance that you show which mode is the console, remove it before operating the controlled by repeatedly pressing the mode button. 9 Moving ports con cause injury; alkaline batteries are recommended. the the resistance, turn on the power, press the...
... have pedaled. IMPORTANT: Stop turning the knob when turning becomes difficult, or the exercise bike may vary depending on page 5 for operation. If there is selected, and a have pedaled. SCAN mode will DISTANCE-This mode displays the distance that you show which mode is the console, remove it before operating the controlled by repeatedly pressing the mode button. 9 Moving ports con cause injury; alkaline batteries are recommended. the the resistance, turn on the power, press the...
User Manual
Page 10
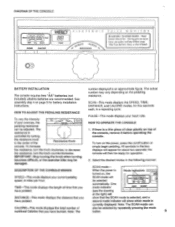
... using the pulse mode, leave the pulse earclip plugged into the jack on the console. 3. To reset the modes, turn off the power, press the on /off button. If your heart rate is in the following order: SPEED, TIME, DISTANCE, CALORIE, and SCAN. The modes are not pressed for four minutes, the power 10 After a Pulse Earclip Jack t1 few seconds, your pulse. A mode indicator will be individually selected and continuously displayed by pressing...
... using the pulse mode, leave the pulse earclip plugged into the jack on the console. 3. To reset the modes, turn off the power, press the on /off button. If your heart rate is in the following order: SPEED, TIME, DISTANCE, CALORIE, and SCAN. The modes are not pressed for four minutes, the power 10 After a Pulse Earclip Jack t1 few seconds, your pulse. A mode indicator will be individually selected and continuously displayed by pressing...
User Manual
Page 11
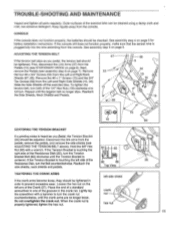
... assembly step 4 on page 5 for battery installation instructions. Next, remove the Pedals (see ADJUSTING THE TENSION BELT above). Top View TIGHTENING THE CRANK ARMS left side shield If the crank arms become loose, they should be checked. Do not overtighten the crank nut. When the crank nut is centered. Keep liquids away from the Left and Right Neck Shields (67, 68). Remove the four #8 x 3/4" Screws (53) from the console...
... assembly step 4 on page 5 for battery installation instructions. Next, remove the Pedals (see ADJUSTING THE TENSION BELT above). Top View TIGHTENING THE CRANK ARMS left side shield If the crank arms become loose, they should be checked. Do not overtighten the crank nut. When the crank nut is centered. Keep liquids away from the Left and Right Neck Shields (67, 68). Remove the four #8 x 3/4" Screws (53) from the console...
User Manual
Page 12
... months of your exercise program, keep your heart rate near the middle of your training zone as your maximum heart rate as you exercise. WORKOUT GUIDELINES Each workout should be maintained at a level between workouts. The proper intensity level can be increased gradually until your breath. For effective aerobic exercise, your heart rate as you exercise. To measure your heart rate, stop exercising.) Adjust the intensity of training zone exercise, and a coo...
... months of your exercise program, keep your heart rate near the middle of your training zone as your maximum heart rate as you exercise. WORKOUT GUIDELINES Each workout should be maintained at a level between workouts. The proper intensity level can be increased gradually until your breath. For effective aerobic exercise, your heart rate as you exercise. To measure your heart rate, stop exercising.) Adjust the intensity of training zone exercise, and a coo...

User Manual
Page 13
...legs. Repeat 3 times. Stretches: Hamstrings, back of the achilles tendons, bend your back leg as you stretch-never bounce. Keep your back leg... with one leg in the drawings below. Allow your back and shoulders to your extended leg. Bend your front leg, lean forward and move your back ...foot flat on the floor. Stretches: Calves, achilles tendons and ankles. Repeat 3 times. Correct form... Hold for 15 counts, then relax. Repeat 3 times for both legs. Stretches: Quadriceps and hip muscles. Bring the sole of the opposite...
...legs. Repeat 3 times. Stretches: Hamstrings, back of the achilles tendons, bend your back leg as you stretch-never bounce. Keep your back leg... with one leg in the drawings below. Allow your back and shoulders to your extended leg. Bend your front leg, lean forward and move your back ...foot flat on the floor. Stretches: Calves, achilles tendons and ankles. Repeat 3 times. Correct form... Hold for 15 counts, then relax. Repeat 3 times for both legs. Stretches: Quadriceps and hip muscles. Bring the sole of the opposite...
User Manual
Page 14
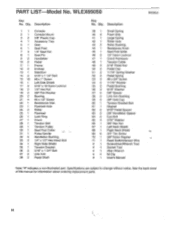
... 2 38 2 Console Console Mount 5/8" Plastic Cap Accessory Tray Seat Seat Post 1/4" Seat Nut Seat Pin Handlebar Pedal Frame Endcap Stabilizer 5/16" x 1 1/4" Bolt #8 x 1" Screw Left Side Shield 5/16" x 18 Nylon Locknut 1/4" Hex Nut 3/8" Flat Washer Bearing #6 x 1/2" Screw Resistance Disk Flywheel Axle Roller Flywheel Lock Ring Crank Tension Belt Tension Pulley Seat Post Collar Pulse Earclip Handlebar Bushing 1/4" x 1/2" Hex Head Bolt Right Side Shield Tension Bracket 5/16" x 1 3/4" Bolt Link Arm Pedal Shaft Key No. Description...
... 2 38 2 Console Console Mount 5/8" Plastic Cap Accessory Tray Seat Seat Post 1/4" Seat Nut Seat Pin Handlebar Pedal Frame Endcap Stabilizer 5/16" x 1 1/4" Bolt #8 x 1" Screw Left Side Shield 5/16" x 18 Nylon Locknut 1/4" Hex Nut 3/8" Flat Washer Bearing #6 x 1/2" Screw Resistance Disk Flywheel Axle Roller Flywheel Lock Ring Crank Tension Belt Tension Pulley Seat Post Collar Pulse Earclip Handlebar Bushing 1/4" x 1/2" Hex Head Bolt Right Side Shield Tension Bracket 5/16" x 1 3/4" Bolt Link Arm Pedal Shaft Key No. Description...
User Manual
Page 16
... abnormal usage or repairs not provided by_..a ICON authorized service center or for products used for a period of ninety (90) days from defects in USA ACCORDINGLY, THE ABOVE LIMITATION MAY NOT APPLY TO YOU. ICON HEALTH & FITNESS, INC., 1500 S. 1000 W., LOGAN, UT 84321-9813 Part No. 124395 R0595A © 1994 ICON Health & Fitness, Inc. The MODEL NUMBER of the product (WESLO' PURSUIT 690 exercise bike). 3. THE WARRANTY EXTENDED HEREUNDER IS...
... abnormal usage or repairs not provided by_..a ICON authorized service center or for products used for a period of ninety (90) days from defects in USA ACCORDINGLY, THE ABOVE LIMITATION MAY NOT APPLY TO YOU. ICON HEALTH & FITNESS, INC., 1500 S. 1000 W., LOGAN, UT 84321-9813 Part No. 124395 R0595A © 1994 ICON Health & Fitness, Inc. The MODEL NUMBER of the product (WESLO' PURSUIT 690 exercise bike). 3. THE WARRANTY EXTENDED HEREUNDER IS...


