

English Manual
Page 1
..., PLEASE CALL DIRECT TO OUR TOLL-FREE CUSTOMER HOT LINE. Write the serial number in the space above for future reference. The trained technicians on our customer hot line will guarantee complete satisfaction through direct assistance from our factory. MST USER'S MANUAL JAN 1 2001 ,Cf)- (IPAC-\\Y a Ibis manual beforeusl crOtet#0: Mar- As a manufacturer, we are missing or damaged parts, we will...
..., PLEASE CALL DIRECT TO OUR TOLL-FREE CUSTOMER HOT LINE. Write the serial number in the space above for future reference. The trained technicians on our customer hot line will guarantee complete satisfaction through direct assistance from our factory. MST USER'S MANUAL JAN 1 2001 ,Cf)- (IPAC-\\Y a Ibis manual beforeusl crOtet#0: Mar- As a manufacturer, we are missing or damaged parts, we will...

English Manual
Page 2
... t icercisa. TABLE OF CONTENTS IMPORTANT PRECAUTIONS BEFORE YOU BEGIN ASSEMBLY OPERATION AND ADJUSTMENT HOW TO FOLD AND MOVE THE TREADMILL MAINTENANCE AND TROUBLE-SHOOTING CONDITIONING GUIDELINES ORDERING REPLACEMENT PARTS LIMITED WARRANTY 2 4 5 7 10 12 14 Back Cover Back Cover Note: A PART LIST and an EXPLODED DRAWING are attached in a ntheMR Oro..., 4. 'ilerstal .treads ..1. 1 . . Remove the PART LIST and EXPLODED DRAWING before beginning assembly. 1,.r.4,gn " A errs frorfti mirt tw ft r. 1~~118tk „...
... t icercisa. TABLE OF CONTENTS IMPORTANT PRECAUTIONS BEFORE YOU BEGIN ASSEMBLY OPERATION AND ADJUSTMENT HOW TO FOLD AND MOVE THE TREADMILL MAINTENANCE AND TROUBLE-SHOOTING CONDITIONING GUIDELINES ORDERING REPLACEMENT PARTS LIMITED WARRANTY 2 4 5 7 10 12 14 Back Cover Back Cover Note: A PART LIST and an EXPLODED DRAWING are attached in a ntheMR Oro..., 4. 'ilerstal .treads ..1. 1 . . Remove the PART LIST and EXPLODED DRAWING before beginning assembly. 1,.r.4,gn " A errs frorfti mirt tw ft r. 1~~118tk „...
English Manual
Page 3
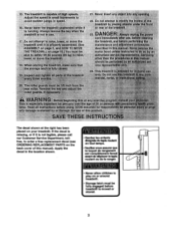
... . . ?.2. end, are e *roan maintenance an antes:: v eaCrineainligegneaga, e motor. Do notattempt tb.ra se!:: rC Pr:MOYethe :itritiied:(see ORDERING REPLACEMENT PARTS on or around treadmill. • Storage latch must be perto reserrtaj n riatte re K.. The treadmill is running. hood "instructed noii*.ed er han tea:p ouid be fully engaged before treadmill is not legible, please call our Customer Service Department, tollfree, to...
... . . ?.2. end, are e *roan maintenance an antes:: v eaCrineainligegneaga, e motor. Do notattempt tb.ra se!:: rC Pr:MOYethe :itritiied:(see ORDERING REPLACEMENT PARTS on or around treadmill. • Storage latch must be perto reserrtaj n riatte re K.. The treadmill is running. hood "instructed noii*.ed er han tea:p ouid be fully engaged before treadmill is not legible, please call our Customer Service Department, tollfree, to...
English Manual
Page 4
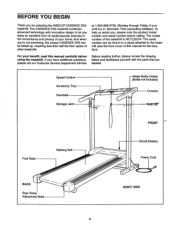
... with innovative design to the treadmill (see the front cover of your benefit, read this manual for selecting the WESLO® CADENCE DX5 treadmill. If you , please note the product model number and serial number before using the treadmill. The model number of other treadmills. Speed Control Accessory Tray Handrails 0 Storage Latch -Water Bottle Holder (Bottle not included) Console KeyiCTt FRONT Foot Rails Walking Belt BACK Rear Roller Adjustment Bolts Circuit Breaker Power Cord O RIGHT SIDE 4 BEFORE YOU BEGIN...
... with innovative design to the treadmill (see the front cover of your benefit, read this manual for selecting the WESLO® CADENCE DX5 treadmill. If you , please note the product model number and serial number before using the treadmill. The model number of other treadmills. Speed Control Accessory Tray Handrails 0 Storage Latch -Water Bottle Holder (Bottle not included) Console KeyiCTt FRONT Foot Rails Walking Belt BACK Rear Roller Adjustment Bolts Circuit Breaker Power Cord O RIGHT SIDE 4 BEFORE YOU BEGIN...
English Manual
Page 5
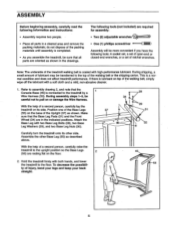
... assembly steps 1-3, be transferred to the floor. To decrease the possibili- 53 ty of the treadmill walking belt is completed. • As you have the following information and instructions: • Assembly requires two people. • Place all parts are in a cleared area and remove the packing materials; If there is lubricant on or damage the Wire Harness. Position one of the Base Legs...
... assembly steps 1-3, be transferred to the floor. To decrease the possibili- 53 ty of the treadmill walking belt is completed. • As you have the following information and instructions: • Assembly requires two people. • Place all parts are in a cleared area and remove the packing materials; If there is lubricant on or damage the Wire Harness. Position one of the Base Legs...
English Manual
Page 6
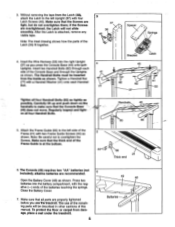
... the Latch (38) fit together. 4. Close the Battery Cover. 7. The zse of the remaining parts will not slide smoothly. Spacer 0 , Springs 4 41 77 Bracket Latch r - O 82 45 T...- 77 82 37 • 41 r 53 Tighten all four Handrail Bolts. Make sure that the Console Base(45) does not move. Note: The inset drawing shows how the parts of the Frame Guide is attached, remove any...
... the Latch (38) fit together. 4. Close the Battery Cover. 7. The zse of the remaining parts will not slide smoothly. Spacer 0 , Springs 4 41 77 Bracket Latch r - O 82 45 T...- 77 82 37 • 41 r 53 Tighten all four Handrail Bolts. Make sure that the Console Base(45) does not move. Note: The inset drawing shows how the parts of the Frame Guide is attached, remove any...

English Manual
Page 7
... plug illustrated in drawing 1 below. Some 2-pole receptacle outlet box covers are sold at 15 amps, with PERFORMANT LUBETN, a high-performance lubricant. Voltage surges, spikes, and noise interference can be connected to reduce the o. listed surge protector, rated at most hardware stores and department stores. A temporary adapter that is equipped with your home's power. Contact a qualified electrician to the walking belt...
... plug illustrated in drawing 1 below. Some 2-pole receptacle outlet box covers are sold at 15 amps, with PERFORMANT LUBETN, a high-performance lubricant. Voltage surges, spikes, and noise interference can be connected to reduce the o. listed surge protector, rated at most hardware stores and department stores. A temporary adapter that is equipped with your home's power. Contact a qualified electrician to the walking belt...
English Manual
Page 8
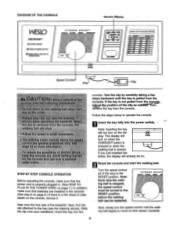
... the console. DIAGRAM OF THE CONSOLE Monitor Display WED STEP ®STEP" (1)INSERT SAFEKEY CV PRESS ON/RESET BUTTON CID RESET SPEED, THEN SET TO DESIRED LEVEL FITNESS GUIDE"' WARM UP MT NAN AMOSIC PRIKORMANCII WIT 13 2 1 / SPUD TIME BUT ► ► ,,,„ 130 1. 13,„ SO 7D If os no us j ON Speed Control Key Clip console. Next, find the clip attached to move at slow speed. Insert the key into the power switch...
... the console. DIAGRAM OF THE CONSOLE Monitor Display WED STEP ®STEP" (1)INSERT SAFEKEY CV PRESS ON/RESET BUTTON CID RESET SPEED, THEN SET TO DESIRED LEVEL FITNESS GUIDE"' WARM UP MT NAN AMOSIC PRIKORMANCII WIT 13 2 1 / SPUD TIME BUT ► ► ,,,„ 130 1. 13,„ SO 7D If os no us j ON Speed Control Key Clip console. Next, find the clip attached to move at slow speed. Insert the key into the power switch...
English Manual
Page 9
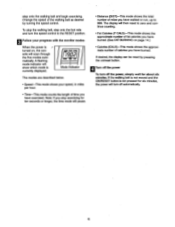
... RESET position. The display will pause. • Distance (DIST)-This mode shows the total number of calories you have burned. Eg Follow your speed, in miles per hour. • Time-This mode counts the length of the walking belt as desired by pressing the on , the console will turn the speed control to 999. Note: If you stop the walking belt, step onto the foot rails and turn off the power...
... RESET position. The display will pause. • Distance (DIST)-This mode shows the total number of calories you have burned. Eg Follow your speed, in miles per hour. • Time-This mode counts the length of the walking belt as desired by pressing the on , the console will turn the speed control to 999. Note: If you stop the walking belt, step onto the foot rails and turn off the power...
English Manual
Page 10
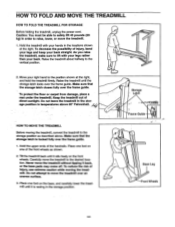
... the locations shown at the right, and hold the treadmill firmly. Place one of the handrails. Never move the treadmill to raise, lower, or move the treadmill over the frame guide. To reduce the risk of injury, use extreme caution while moving the treadmill, convert the treadmill to the vertical position. 2. Storage Latch •'-Ctored Frame Guide Base Leg Front Wheels n Tilt the treadmill back until the storage latch...
... the locations shown at the right, and hold the treadmill firmly. Place one of the handrails. Never move the treadmill to raise, lower, or move the treadmill over the frame guide. To reduce the risk of injury, use extreme caution while moving the treadmill, convert the treadmill to the vertical position. 2. Storage Latch •'-Ctored Frame Guide Base Leg Front Wheels n Tilt the treadmill back until the storage latch...
English Manual
Page 11
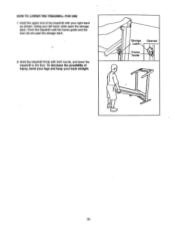
Hold the upper end of injury, bend your legs and keep your right hand as shown. Storage Latch Frame Guide Opened 0 O 11 Hold the treadmill firmly with your back straight. Pivot the treadmill until the frame guide and the foot rail are past the storage latch. 2. To decrease the possibility of the treadmill with both hands, and lower the treadmill to the floor. HOW TO LOWER THE TREADMILL FOR USE 1. Using your left hand, slide open the storage latch.
Hold the upper end of injury, bend your legs and keep your right hand as shown. Storage Latch Frame Guide Opened 0 O 11 Hold the treadmill firmly with your back straight. Pivot the treadmill until the frame guide and the foot rail are past the storage latch. 2. To decrease the possibility of the treadmill with both hands, and lower the treadmill to the floor. HOW TO LOWER THE TREADMILL FOR USE 1. Using your left hand, slide open the storage latch.
English Manual
Page 12
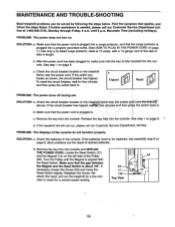
MAINTENANCE AND TROUBLE-SHOOTING Most treadmill problems can be replaced, see the-drarwilir above). b. Check the circuit breaker located on SOLUTION: a. c Tripped Reset PROBLEM: The power turns off during use SOLUTION: a. If the treadmill still will not run the treadmill for a few minutes to be solved by following the steps below. Make sure that the gap between the Magnet and the Reed Switch is needed, please call our...
MAINTENANCE AND TROUBLE-SHOOTING Most treadmill problems can be replaced, see the-drarwilir above). b. Check the circuit breaker located on SOLUTION: a. c Tripped Reset PROBLEM: The power turns off during use SOLUTION: a. If the treadmill still will not run the treadmill for a few minutes to be solved by following the steps below. Make sure that the gap between the Magnet and the Reed Switch is needed, please call our...
English Manual
Page 13
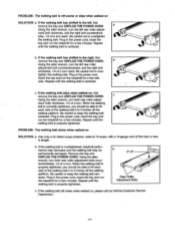
... the walking belt centered. b Using the alien wrench, turn the left rear roller adjustment bolt counterclockwise, and the right bolt clockwise, 1/4 of a turn both rear roller adjust- PROBLEM: The walking belt slows when walked on , please call our toll-free Customer Service Department. 14 Plug in length. Using the alien wrench, turn each . b. ment bolts clockwise, 1/4 of a turn the left , first remove the key and UNPLUG THE POWER CORD. Repeat until the walking belt is properly tightened. If the walking belt is overtightened, treadmill...
... the walking belt centered. b Using the alien wrench, turn the left rear roller adjustment bolt counterclockwise, and the right bolt clockwise, 1/4 of a turn both rear roller adjust- PROBLEM: The walking belt slows when walked on , please call our toll-free Customer Service Department. 14 Plug in length. Using the alien wrench, turn each . b. ment bolts clockwise, 1/4 of a turn the left , first remove the key and UNPLUG THE POWER CORD. Repeat until the walking belt is properly tightened. If the walking belt is overtightened, treadmill...
English Manual
Page 14
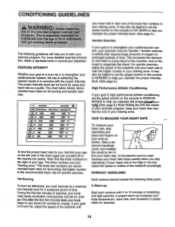
... or too low, adjust the speed or incline of the treadmill accordingly. For more detailed exercise information, obtain a reputable book or consult your body uses easily accessible carbohydrate calories for you to oxygenate the blood. The chart below shows recommended heart rates for a sustained period of the chart (ages are your training zone. your heart rate is high performance athletic conditioning, set the speed control on the left...
... or too low, adjust the speed or incline of the treadmill accordingly. For more detailed exercise information, obtain a reputable book or consult your body uses easily accessible carbohydrate calories for you to oxygenate the blood. The chart below shows recommended heart rates for a sustained period of the chart (ages are your training zone. your heart rate is high performance athletic conditioning, set the speed control on the left...
English Manual
Page 15
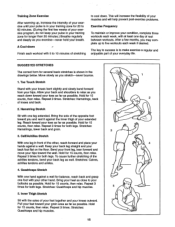
... (During the first few weeks of your exercise program, do not keep your pulse in your training zone for longer than 20 minutes.) Breathe regularly and deeply as you reach down Finish each week, with at least one leg in the drawings below. Toe Touch Stretch ...lower back and groin. 3 3. Move slowly as close to relax as well. Bring the sole of the other hand. Bring your heel as you and rest it against a wall for several basic stretches is to success is shown in front of the opposite foot toward the wall. SUGGESTED STRETCHES The correct form...
... (During the first few weeks of your exercise program, do not keep your pulse in your training zone for longer than 20 minutes.) Breathe regularly and deeply as you reach down Finish each week, with at least one leg in the drawings below. Toe Touch Stretch ...lower back and groin. 3 3. Move slowly as close to relax as well. Bring the sole of the other hand. Bring your heel as you and rest it against a wall for several basic stretches is to success is shown in front of the opposite foot toward the wall. SUGGESTED STRETCHES The correct form...
English Manual
Page 16
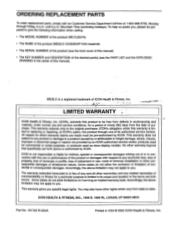
... center of ICON Health & Fitness, Inc. = LIMITED WARRANTY ICON Health & Fitness, Inc. (ICON), warrants this manual). DX5 treadmill) • The SERIAL NUMBER of the product (see the front cover of this manual) • The KEY NUMBER and DESCRIPTION of the desired part(s) (see the PART LIST and the EXPLODED DRAWING in lieu of any economic loss, loss of property, loss of revenues or profits, loss of enjoyment or use and service conditions, for...
... center of ICON Health & Fitness, Inc. = LIMITED WARRANTY ICON Health & Fitness, Inc. (ICON), warrants this manual). DX5 treadmill) • The SERIAL NUMBER of the product (see the front cover of this manual) • The KEY NUMBER and DESCRIPTION of the desired part(s) (see the PART LIST and the EXPLODED DRAWING in lieu of any economic loss, loss of property, loss of revenues or profits, loss of enjoyment or use and service conditions, for...

English Manual
Page 17
REMOVE THIS EXPLODED DRAWING AND PART LIST FROM THE MANUAL Save this EXPLODED DRAWING and PART LIST for future reference. .0" Note: Specifications are subject to change without notice. For information about ordering replacement parts, see the back cover of the User's Manual.
REMOVE THIS EXPLODED DRAWING AND PART LIST FROM THE MANUAL Save this EXPLODED DRAWING and PART LIST for future reference. .0" Note: Specifications are subject to change without notice. For information about ordering replacement parts, see the back cover of the User's Manual.

English Manual
Page 19
... Frame Guide Screw Console Base Console Screw Console Cover Battery Cover Console Assembly Speed Potentiometer Speed Control Knob Ground Screw/Belt Guide Screw Wire Harness Grommet Base Leg Belly Pan Fastener Belly Pan Upright Spacer Motor Tension Washer Left Foot Rail Frame Pivot Nut Belt Guide Wire Clip Right Foot Rail ;Guard Frame Guide Foot Reed Switch Bracket Right Endcap Rear Roller Adj. Bolt Roller Adjustment Washer Rear Roller Ground Wire Walking Platform Walking Belt Releaseable Tie Handrail Nut Cable Tie Clamp 8" Cable Tie Motor Star Washer Front Roller Nut Handrail Bolt Left...
... Frame Guide Screw Console Base Console Screw Console Cover Battery Cover Console Assembly Speed Potentiometer Speed Control Knob Ground Screw/Belt Guide Screw Wire Harness Grommet Base Leg Belly Pan Fastener Belly Pan Upright Spacer Motor Tension Washer Left Foot Rail Frame Pivot Nut Belt Guide Wire Clip Right Foot Rail ;Guard Frame Guide Foot Reed Switch Bracket Right Endcap Rear Roller Adj. Bolt Roller Adjustment Washer Rear Roller Ground Wire Walking Platform Walking Belt Releaseable Tie Handrail Nut Cable Tie Clamp 8" Cable Tie Motor Star Washer Front Roller Nut Handrail Bolt Left...


