
English Manual
Page 4
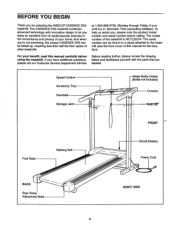
... be folded up, requiring less than half the floor space of your benefit, read this manual for selecting the WESLO® CADENCE DX5 treadmill. Mountain Time (excluding holidays). The model number of this manual carefully before calling. For your home. at 1-800-999...) Console KeyiCTt FRONT Foot Rails Walking Belt BACK Rear Roller Adjustment Bolts Circuit Breaker Power Cord O RIGHT SIDE 4 To help us assist you, please note the product model number and serial number before using the treadmill. The CADENCE DX5 treadmill combines advanced technology with the parts that...
... be folded up, requiring less than half the floor space of your benefit, read this manual for selecting the WESLO® CADENCE DX5 treadmill. Mountain Time (excluding holidays). The model number of this manual carefully before calling. For your home. at 1-800-999...) Console KeyiCTt FRONT Foot Rails Walking Belt BACK Rear Roller Adjustment Bolts Circuit Breaker Power Cord O RIGHT SIDE 4 To help us assist you, please note the product model number and serial number before using the treadmill. The CADENCE DX5 treadmill combines advanced technology with the parts that...
English Manual
Page 5
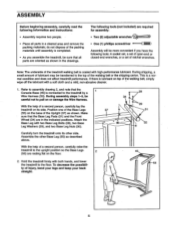
... 28 29 31 55 45 2. During assembly steps 1-3, be more convenient if you assemble the treadmill, be transferred to the treadmill by a Wire Harness (53). If there is lubricant on the base of the walking belt, simply wipe off the lubricant with two Base Leg Bolts (28), two Base • Leg... Washers (29), and two Base Leg Nuts (30). To decrease the possibili- 53 ty of ratchet wrenches. With the help of the treadmill walking belt is completed. • As you have the following tools: A socket set, a set of open-end or closed-end wrenches, or a set of injury...
... 28 29 31 55 45 2. During assembly steps 1-3, be more convenient if you assemble the treadmill, be transferred to the treadmill by a Wire Harness (53). If there is lubricant on the base of the walking belt, simply wipe off the lubricant with two Base Leg Bolts (28), two Base • Leg... Washers (29), and two Base Leg Nuts (30). To decrease the possibili- 53 ty of ratchet wrenches. With the help of the treadmill walking belt is completed. • As you have the following tools: A socket set, a set of open-end or closed-end wrenches, or a set of injury...

English Manual
Page 7
OPERATION AND ADJUSTMENT THE PERFORMANT LUBETM WALKING BELT Your treadmill features a walking belt coated with your home's power. They will deterioratelhe walking belt and cause excessive wear. This product is used it should be used to connect the surge protector to a 2-pole ... the plug illustrated in place by sudden voltage changes in length. Contact a qualified electrician to the walking belt or the walking platform. To decrease the possibility of your treadmill being turned on a nominal 120-volt circuit, and has a grounding plug that is equipped with 2 a 14-gauge...
OPERATION AND ADJUSTMENT THE PERFORMANT LUBETM WALKING BELT Your treadmill features a walking belt coated with your home's power. They will deterioratelhe walking belt and cause excessive wear. This product is used it should be used to connect the surge protector to a 2-pole ... the plug illustrated in place by sudden voltage changes in length. Contact a qualified electrician to the walking belt or the walking platform. To decrease the possibility of your treadmill being turned on a nominal 120-volt circuit, and has a grounding plug that is equipped with 2 a 14-gauge...
English Manual
Page 8
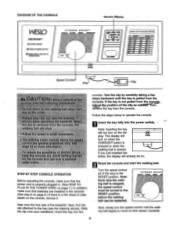
...batteries, the display will turn on when the ON/RESET button is pressed or when the walking belt is started. Insert the key into the power switch. =- Carefully STEP BY STEP CONSOLE OPERATION ...7D If os no us j ON Speed Control Key Clip console. Reset the console and start the walking belt. Slide the clip onto your waistband. e Oat Note: Inserting the key will not turn the speed control ...into the Turn the speed control all of the treadmill. steps backward until the walking belt begins to move at slow speed. Test the clip by carefully taking a few 42 ...
...batteries, the display will turn on when the ON/RESET button is pressed or when the walking belt is started. Insert the key into the power switch. =- Carefully STEP BY STEP CONSOLE OPERATION ...7D If os no us j ON Speed Control Key Clip console. Reset the console and start the walking belt. Slide the clip onto your waistband. e Oat Note: Inserting the key will not turn the speed control ...into the Turn the speed control all of the treadmill. steps backward until the walking belt begins to move at slow speed. Test the clip by carefully taking a few 42 ...
English Manual
Page 13
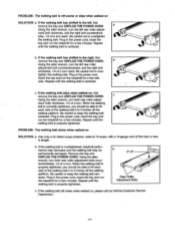
... damaged. Be careful to 3 inches off -center or slips when walked on SOLUTION: a. If the walking belt is overtightened, treadmill performance may decrease and the walking belt may be able to over- Using the alien wrench, turn the left rear roller adjustment bolt clockwise, and the... right bolt counterclockwise, 1/4 of five feet or less in the power cord, insert the key and run the treadmill for a few minutes. utes. Repeat until the walking belt is centered. Plug in length. b Using the alien wrench, turn . c Using the alien wrench, turn . PROBLEM...
... damaged. Be careful to 3 inches off -center or slips when walked on SOLUTION: a. If the walking belt is overtightened, treadmill performance may decrease and the walking belt may be able to over- Using the alien wrench, turn the left rear roller adjustment bolt clockwise, and the... right bolt counterclockwise, 1/4 of five feet or less in the power cord, insert the key and run the treadmill for a few minutes. utes. Repeat until the walking belt is centered. Plug in length. b Using the alien wrench, turn . c Using the alien wrench, turn . PROBLEM...


