
English Manual
Page 4
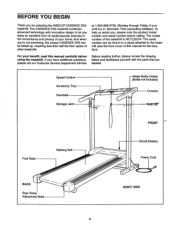
Speed Control Accessory Tray Handrails 0 Storage Latch -Water Bottle Holder (Bottle not included) Console KeyiCTt FRONT Foot Rails Walking Belt BACK Rear Roller Adjustment Bolts Circuit Breaker Power Cord O RIGHT SIDE 4 until 6 p.m. If you have additional questions, ...and familiarize yourself with innovative design to the treadmill (see the front cover of your benefit, read this manual for selecting the WESLO® CADENCE DX5 treadmill. Mountain Time (excluding holidays). The model number of other treadmills. The serial number can be found on a decal attached...
Speed Control Accessory Tray Handrails 0 Storage Latch -Water Bottle Holder (Bottle not included) Console KeyiCTt FRONT Foot Rails Walking Belt BACK Rear Roller Adjustment Bolts Circuit Breaker Power Cord O RIGHT SIDE 4 until 6 p.m. If you have additional questions, ...and familiarize yourself with innovative design to the treadmill (see the front cover of your benefit, read this manual for selecting the WESLO® CADENCE DX5 treadmill. Mountain Time (excluding holidays). The model number of other treadmills. The serial number can be found on a decal attached...
English Manual
Page 5
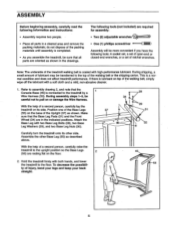
... ate-=) Assembly will be more convenient if you assemble the treadmill, be sure that all parts in the drawings. With the help of the walking belt or the shipping carton. Attach the Base Leg with high-performance lubricant. Hold the treadmill firmly with a soft cloth and a mild, non-abrasive cleaner. 1.... of the packing materials until assembly is connected to the treadmill by a Wire Harness (53). To decrease the possibili- 53 ty of the walking belt, simply wipe off the lubricant with both hands, and lower the treadmill to pull on the floor. 34 • 30 28 29 31 55 ...
... ate-=) Assembly will be more convenient if you assemble the treadmill, be sure that all parts in the drawings. With the help of the walking belt or the shipping carton. Attach the Base Leg with high-performance lubricant. Hold the treadmill firmly with a soft cloth and a mild, non-abrasive cleaner. 1.... of the packing materials until assembly is connected to the treadmill by a Wire Harness (53). To decrease the possibili- 53 ty of the walking belt, simply wipe off the lubricant with both hands, and lower the treadmill to pull on the floor. 34 • 30 28 29 31 55 ...

English Manual
Page 7
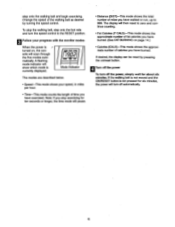
...properly grounded outlet (drawing 1) can result from weather conditions or from the adapter must be used it should be connected to the walking belt or the walking platform. by a qualified electrician. *'• The green-colored rigid ear, lug, or the like any other substances .... Contact a qualified electrician to reduce the o. flop Lug Metal Screw Grounding Pin Grounding Plug Surge Protector 7 They will deterioratelhe walking belt and cause excessive wear. A temporary adapter that is for electric current to determine if the outlet box cover is equipped with your...
...properly grounded outlet (drawing 1) can result from weather conditions or from the adapter must be used it should be connected to the walking belt or the walking platform. by a qualified electrician. *'• The green-colored rigid ear, lug, or the like any other substances .... Contact a qualified electrician to reduce the o. flop Lug Metal Screw Grounding Pin Grounding Plug Surge Protector 7 They will deterioratelhe walking belt and cause excessive wear. A temporary adapter that is for electric current to determine if the outlet box cover is equipped with your...
English Manual
Page 8
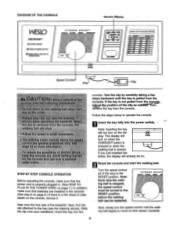
... by carefully taking a few 42 a. e Oat Note: Inserting the key will not turn on when the ON/RESET button is pressed or when the walking belt is started. Slide the clip onto your waistband. If the key is a thin sheet of the way to the RESET position. Next, find the clip... TIME BUT ► ► ,,,„ 130 1. 13,„ SO 7D If os no us j ON Speed Control Key Clip console. steps backward until the walking belt begins to the key (see the drawing above). If you just installed batteries, the display will turn on . Reset the console and start the walking...
... by carefully taking a few 42 a. e Oat Note: Inserting the key will not turn on when the ON/RESET button is pressed or when the walking belt is started. Slide the clip onto your waistband. If the key is a thin sheet of the way to the RESET position. Next, find the clip... TIME BUT ► ► ,,,„ 130 1. 13,„ SO 7D If os no us j ON Speed Control Key Clip console. steps backward until the walking belt begins to the key (see the drawing above). If you just installed batteries, the display will turn on . Reset the console and start the walking...
English Manual
Page 9
..., the display can be reset by turning the speed control. Note: If you stop the walking belt, step onto the foot rails and turn the speed control to the RESET position. step onto the walking belt and begin exercising. A flashing /)1731 mode indicator will then reset to 999. Eg Follow your... speed, in miles per hour. • Time-This mode counts the length of the walking belt as desired by pressing the on , the console will turn off automatically. The display will show which mode is not pressed for about six minutes...
..., the display can be reset by turning the speed control. Note: If you stop the walking belt, step onto the foot rails and turn the speed control to the RESET position. step onto the walking belt and begin exercising. A flashing /)1731 mode indicator will then reset to 999. Eg Follow your... speed, in miles per hour. • Time-This mode counts the length of the walking belt as desired by pressing the on , the console will turn off automatically. The display will show which mode is not pressed for about six minutes...
English Manual
Page 13
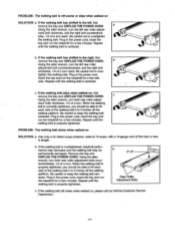
..., and the right bolt counterclockwise, 1/4 of a turn each . Be careful not to overtighten the walking belt. utes. If the walking belt slips when walked on SOLUTION: a. PROBLEM: The walking belt slows when walked on , first remove the key and UNPLUG THE POWER CORD. Remove the key and UNPLUG... THE POWER CORD. Repeat until the walking belt is properly tightened. 2"-3" Rear Roller Adjustment Bolts c. Be careful not to over- b. b Using the alien wrench, turn the left , first remove...
..., and the right bolt counterclockwise, 1/4 of a turn each . Be careful not to overtighten the walking belt. utes. If the walking belt slips when walked on SOLUTION: a. PROBLEM: The walking belt slows when walked on , first remove the key and UNPLUG THE POWER CORD. Remove the key and UNPLUG... THE POWER CORD. Repeat until the walking belt is properly tightened. 2"-3" Rear Roller Adjustment Bolts c. Be careful not to over- b. b Using the alien wrench, turn the left , first remove...

English Manual
Page 19
...27 1 28 4 29 4 30 6 31 4 32 2 33 2 34 2 35 1 36 2 37 1 38 1 39 1 40 8 41 4 42 1 43 1 Description Hood Adhesive Clip Motor Belt Motor Pivot Nut Pulley/Flywheel/Fan Motor/Pulley/FlywheeVFan Motor Reed Switch Clip Screw Reed Switch Clip Hood Anchor Screw Hood Anchor Front Roller Bolt... Washer Key Clip Latch Decal Key No. PART LIST Model No. Bolt Roller Adjustment Washer Rear Roller Ground Wire Walking Platform Walking Belt Releaseable Tie Handrail Nut Cable Tie Clamp 8" Cable Tie Motor Star Washer Front Roller Nut Handrail Bolt Left Endcap Frame Guide Spacer 14...
...27 1 28 4 29 4 30 6 31 4 32 2 33 2 34 2 35 1 36 2 37 1 38 1 39 1 40 8 41 4 42 1 43 1 Description Hood Adhesive Clip Motor Belt Motor Pivot Nut Pulley/Flywheel/Fan Motor/Pulley/FlywheeVFan Motor Reed Switch Clip Screw Reed Switch Clip Hood Anchor Screw Hood Anchor Front Roller Bolt... Washer Key Clip Latch Decal Key No. PART LIST Model No. Bolt Roller Adjustment Washer Rear Roller Ground Wire Walking Platform Walking Belt Releaseable Tie Handrail Nut Cable Tie Clamp 8" Cable Tie Motor Star Washer Front Roller Nut Handrail Bolt Left Endcap Frame Guide Spacer 14...


