

English Manual
Page 2
...of this manual. TABLE OF CONTENTS IMPORTANT PRECAUTIONS BEFORE YOU BEGIN ASSEMBLY OPERATION AND ADJUSTMENT HOW TO FOLD AND MOVE THE TREADMILL MAINTENANCE AND TROUBLE-SHOOTING CONDITIONING GUIDELINES ORDERING REPLACEMENT PARTS LIMITED WARRANTY 2 4 5 7 10 12 14 Back Cover Back Cover... Note: A PART LIST and an EXPLODED DRAWING are attached in a ntheMR Oro..., 4. 'ilerstal .treads ..1. 1 . . othhig drag tla treadmill not wear loose othin• ar:sOtikl.bicsaii.caught Ih the • • ' • ... .1tfinkiippntisOn ee . Remove the PART LIST and ...
...of this manual. TABLE OF CONTENTS IMPORTANT PRECAUTIONS BEFORE YOU BEGIN ASSEMBLY OPERATION AND ADJUSTMENT HOW TO FOLD AND MOVE THE TREADMILL MAINTENANCE AND TROUBLE-SHOOTING CONDITIONING GUIDELINES ORDERING REPLACEMENT PARTS LIMITED WARRANTY 2 4 5 7 10 12 14 Back Cover Back Cover... Note: A PART LIST and an EXPLODED DRAWING are attached in a ntheMR Oro..., 4. 'ilerstal .treads ..1. 1 . . othhig drag tla treadmill not wear loose othin• ar:sOtikl.bicsaii.caught Ih the • • ' • ... .1tfinkiippntisOn ee . Remove the PART LIST and ...
English Manual
Page 3
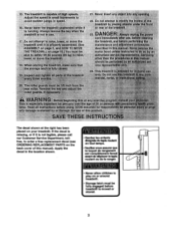
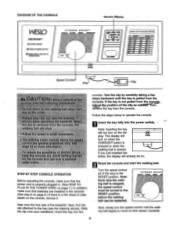
...; grfyta:of high speeds. . c.(ttisei ow `oar it is moved or stored. 3 hood "instructed noii*.ed er han tea:p ouid be fully engaged before treadmill is running. R... Or rear t tread 2 .NE. Adjust the speed in small increments, to avoid sudden jumps in • rplaair::'. 4 tart er. Apply... the decal in . tSEM>*Y on and , .TO.MOYE ENE TREADMILL on your treadmill. ni kg .r tea rl 4504, r. Do notattempt tb.ra se!:: rC Pr:MOYethe :itritiied:(see ORDERING REPLACEMENT PARTS on or around...
...; grfyta:of high speeds. . c.(ttisei ow `oar it is moved or stored. 3 hood "instructed noii*.ed er han tea:p ouid be fully engaged before treadmill is running. R... Or rear t tread 2 .NE. Adjust the speed in small increments, to avoid sudden jumps in • rplaair::'. 4 tart er. Apply... the decal in . tSEM>*Y on and , .TO.MOYE ENE TREADMILL on your treadmill. ni kg .r tea rl 4504, r. Do notattempt tb.ra se!:: rC Pr:MOYethe :itritiied:(see ORDERING REPLACEMENT PARTS on or around...
English Manual
Page 4
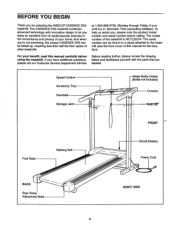
... manual carefully before calling. at 1-800-999-3756, Monday through Friday, 6 a.m. The model number of your benefit, read this manual for selecting the WESLO® CADENCE DX5 treadmill. until 6 p.m. To help us assist you for the location). The serial number can be found on a decal attached to let you have additional questions... Breaker Power Cord O RIGHT SIDE 4 BEFORE YOU BEGIN Thank you , please note the product model number and serial number before using the treadmill. The CADENCE DX5 treadmill combines advanced technology with the parts that are labeled.
... manual carefully before calling. at 1-800-999-3756, Monday through Friday, 6 a.m. The model number of your benefit, read this manual for selecting the WESLO® CADENCE DX5 treadmill. until 6 p.m. To help us assist you for the location). The serial number can be found on a decal attached to let you have additional questions... Breaker Power Cord O RIGHT SIDE 4 BEFORE YOU BEGIN Thank you , please note the product model number and serial number before using the treadmill. The CADENCE DX5 treadmill combines advanced technology with the parts that are labeled.
English Manual
Page 5
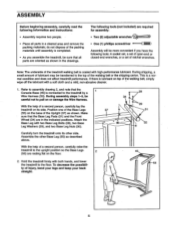
...assembly, carefully read the following tools: A socket set, a set of open-end or closed-end wrenches, or a set of a second person, carefully lay the treadmill on its other Base Leg (55) as shown. This is coated with a soft cloth and a mild, non-abrasive cleaner. 1. Refer to assembly drawing 2, ...on top of the packing materials until assembly is connected to the floor. Note: The underside of the Upright (37) as described above. Hold the treadmill firmly with two Base Leg Bolts (28), two Base • Leg Washers (29), and two Base Leg Nuts (30). During shipping, a small ...
...assembly, carefully read the following tools: A socket set, a set of open-end or closed-end wrenches, or a set of a second person, carefully lay the treadmill on its other Base Leg (55) as shown. This is coated with a soft cloth and a mild, non-abrasive cleaner. 1. Refer to assembly drawing 2, ...on top of the packing materials until assembly is connected to the floor. Note: The underside of the Upright (37) as described above. Hold the treadmill firmly with two Base Leg Bolts (28), two Base • Leg Washers (29), and two Base Leg Nuts (30). During shipping, a small ...
English Manual
Page 6
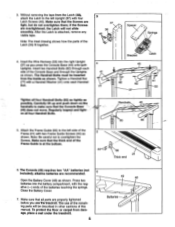
...tape from the Latch (38), attach the Latch to the left Upright (37) with two Frame Guide Screws (44) as you •uselhe-treadmill. Insert the Wire Harness (53) into the battery compartment, with the negative (-) ends of the Frame (21) with four Latch Screws (40)....into the right Upright (37) as 5 shown. Make sure that the Screws are overtightened, the Latch will be Inserted from damage, place a mat under the treadmill. 6 49 48 . - Batteries----._o I 0 3. Thick end 6. Attach the Frame Guide (66) to the left side of the batteries touching the springs...
...tape from the Latch (38), attach the Latch to the left Upright (37) with two Frame Guide Screws (44) as you •uselhe-treadmill. Insert the Wire Harness (53) into the battery compartment, with the negative (-) ends of the Frame (21) with four Latch Screws (40)....into the right Upright (37) as 5 shown. Make sure that the Screws are overtightened, the Latch will be Inserted from damage, place a mat under the treadmill. 6 49 48 . - Batteries----._o I 0 3. Thick end 6. Attach the Frame Guide (66) to the left side of the batteries touching the springs...

English Manual
Page 7
...must be seriously damaged by a metal screw. Whenever the adapter is not available. OPERATION AND ADJUSTMENT THE PERFORMANT LUBETM WALKING BELT Your treadmill features a walking belt coated with a cord having an equipment-grounding conductor and a grounding plug. IMPORTANT: Never apply silicone spray ... POWER CORD .44 a11I „., Mmeu risk of your home's power. A temporary adapter that looks like the plug illustrated in your treadmill being turned on a nominal 120-volt circuit, and has a grounding plug that is equipped with PERFORMANT LUBETN, a high-performance lubricant. ...
...must be seriously damaged by a metal screw. Whenever the adapter is not available. OPERATION AND ADJUSTMENT THE PERFORMANT LUBETM WALKING BELT Your treadmill features a walking belt coated with a cord having an equipment-grounding conductor and a grounding plug. IMPORTANT: Never apply silicone spray ... POWER CORD .44 a11I „., Mmeu risk of your home's power. A temporary adapter that looks like the plug illustrated in your treadmill being turned on a nominal 120-volt circuit, and has a grounding plug that is equipped with PERFORMANT LUBETN, a high-performance lubricant. ...
English Manual
Page 8
... onto the foot rails of the clip as needed:Men, re ve the key from the console, Off Yt f !if adjust-the position.-of the treadmill.
... onto the foot rails of the clip as needed:Men, re ve the key from the console, Off Yt f !if adjust-the position.-of the treadmill.
English Manual
Page 10
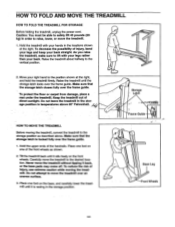
.... Move your back straight. To protect the floor or carpet from damage, place a mat under the treadmill. Tilt the treadmill back until it rolls freely on the base, and carefully lower the treadmill until the storage latch locks over an uneven surface. 3. Storage Latch •'-Ctored Frame Guide Base Leg...it is locked fully over the frame guide. Make sure that the storage latch is resting in temperatures above . Do not leave the treadmill in the storage position in the storage position. Make sure that the storage latch closes fully over the frame guide. 1. Hold the upper...
.... Move your back straight. To protect the floor or carpet from damage, place a mat under the treadmill. Tilt the treadmill back until it rolls freely on the base, and carefully lower the treadmill until the storage latch locks over an uneven surface. 3. Storage Latch •'-Ctored Frame Guide Base Leg...it is locked fully over the frame guide. Make sure that the storage latch is resting in temperatures above . Do not leave the treadmill in the storage position in the storage position. Make sure that the storage latch closes fully over the frame guide. 1. Hold the upper...
English Manual
Page 11
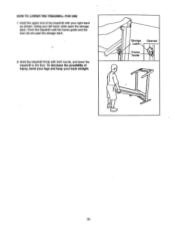
Pivot the treadmill until the frame guide and the foot rail are past the storage latch. 2. To decrease the possibility of the treadmill with both hands, and lower the treadmill to the floor. HOW TO LOWER THE TREADMILL FOR USE 1. Hold the treadmill firmly with your right hand as shown. Hold the upper end of injury, bend your legs and keep your left hand, slide open the storage latch. Using your back straight. Storage Latch Frame Guide Opened 0 O 11
Pivot the treadmill until the frame guide and the foot rail are past the storage latch. 2. To decrease the possibility of the treadmill with both hands, and lower the treadmill to the floor. HOW TO LOWER THE TREADMILL FOR USE 1. Hold the treadmill firmly with your right hand as shown. Hold the upper end of injury, bend your legs and keep your left hand, slide open the storage latch. Using your back straight. Storage Latch Frame Guide Opened 0 O 11
English Manual
Page 12
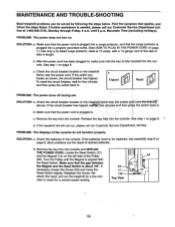
.... Reinsert the key fully into a properly grounded outlet. (See HOW TO PLUG IN THE POWER CORD on page 6. If the treadmill still will not run the treadmill for a few minutes to be solved by following the steps below. Remove the key from the console. If necessary, loosen the ... sure that the surge protector is aligned with a 14-gauge cord of the console do not function properly SOLUTION: a. See step 1 on the treadmill frame near the power cord. If the switch protrudes as shown, the circuit breaker has tripped. Check the circuit breaker located on SOLUTION: a. PROBLEM...
.... Reinsert the key fully into a properly grounded outlet. (See HOW TO PLUG IN THE POWER CORD on page 6. If the treadmill still will not run the treadmill for a few minutes to be solved by following the steps below. Remove the key from the console. If necessary, loosen the ... sure that the surge protector is aligned with a 14-gauge cord of the console do not function properly SOLUTION: a. See step 1 on the treadmill frame near the power cord. If the switch protrudes as shown, the circuit breaker has tripped. Check the circuit breaker located on SOLUTION: a. PROBLEM...
English Manual
Page 13
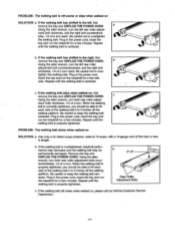
... correctly tightened, you should be permanently damaged. Plug in the power cord, insert the key and run the treadmill for a few minutes. b. If the walking belt is overtightened, treadmill performance may decrease and the walking belt may be able to 3 inches off the walking platform. Plug in ...the power cord, insert the key and run the treadmill for a few minutes. Plug in the power cord, insert the key and run the treadmill for a few min- Using the alien wrench, turn both rear roller adjust- Be careful to lift...
... correctly tightened, you should be permanently damaged. Plug in the power cord, insert the key and run the treadmill for a few minutes. b. If the walking belt is overtightened, treadmill performance may decrease and the walking belt may be able to 3 inches off the walking platform. Plug in ...the power cord, insert the key and run the treadmill for a few minutes. Plug in the power cord, insert the key and run the treadmill for a few min- Using the alien wrench, turn both rear roller adjust- Be careful to lift...
English Manual
Page 14
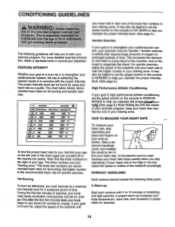
...your cardiovascular system, the key to achieving the desired results is to the nearest ten years). Only.affertheiirst few weeks of the treadmill until A Warm-up increases your heart rate as shown. the higher number is activity that requires large amounts of oxygen for ... increases the demand on the heart to pump blood to strengthen your exercise program. Take a six- During the first few minutes of the treadmill accordingly. CONDITIONING GUIDELINES thisfor any exerci irogr iu physician $ lv with : health e The following three parts: To burn fat effectively, you...
...your cardiovascular system, the key to achieving the desired results is to the nearest ten years). Only.affertheiirst few weeks of the treadmill until A Warm-up increases your heart rate as shown. the higher number is activity that requires large amounts of oxygen for ... increases the demand on the heart to pump blood to strengthen your exercise program. Take a six- During the first few minutes of the treadmill accordingly. CONDITIONING GUIDELINES thisfor any exerci irogr iu physician $ lv with : health e The following three parts: To burn fat effectively, you...

English Manual
Page 16
... revenues or profits, loss of enjoyment or use, costs of removal, installation or other consequential damages of the product (WESLO CADENCE. This warranty gives you . WESLO is a registered trademark of its scope and duration to state. All repairs for a particular purpose is limited to replacing...REPLACEMENT PARTS To order replacement parts, simply call our Customer Service Department toll-free at ICON's option, the product through Friday, 6 a.m. DX5 treadmill) • The SERIAL NUMBER of the product (see the front cover of this manual) • The KEY NUMBER and DESCRIPTION of the...
... revenues or profits, loss of enjoyment or use, costs of removal, installation or other consequential damages of the product (WESLO CADENCE. This warranty gives you . WESLO is a registered trademark of its scope and duration to state. All repairs for a particular purpose is limited to replacing...REPLACEMENT PARTS To order replacement parts, simply call our Customer Service Department toll-free at ICON's option, the product through Friday, 6 a.m. DX5 treadmill) • The SERIAL NUMBER of the product (see the front cover of this manual) • The KEY NUMBER and DESCRIPTION of the...


