
English Manual
Page 2
... in length. TABLE OF CONTENTS IMPORTANT PRECAUTIONS 2 BEFORE YOU BEGIN 4 ASSEMBLY 5 OPERATION AND ADJUSTMENT 7 HOW TO FOLD AND MOVE THE TREADMILL 10 MAINTENANCE AND TROUBLE-SHOOTING 12 CONDITIONING GUIDELINES 14 ORDERING REPLACEMENT PARTS Back Cover LIMITED WARRANTY Back Cover Note: A PART LIST and an... EXPLODED DRAWING are adequately informed of all warnings and precautions. 2. The treadmill should be used or where oxygen is not working properly.) 14. Do not wear loose clothing that all users of carrying 15...
... in length. TABLE OF CONTENTS IMPORTANT PRECAUTIONS 2 BEFORE YOU BEGIN 4 ASSEMBLY 5 OPERATION AND ADJUSTMENT 7 HOW TO FOLD AND MOVE THE TREADMILL 10 MAINTENANCE AND TROUBLE-SHOOTING 12 CONDITIONING GUIDELINES 14 ORDERING REPLACEMENT PARTS Back Cover LIMITED WARRANTY Back Cover Note: A PART LIST and an... EXPLODED DRAWING are adequately informed of all warnings and precautions. 2. The treadmill should be used or where oxygen is not working properly.) 14. Do not wear loose clothing that all users of carrying 15...
English Manual
Page 3
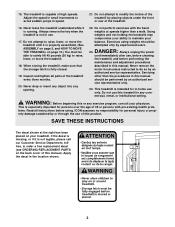
.... Never remove the motor hood unless instructed to avoid sudden jumps in the location shown. 3 lems. Read all parts of the treadmill. 16. SAVE THESE INSTRUCTIONS The decal shown at speeds higher than the procedures in use only. If the decal is missing, or...right has been placed on page 10.) You must be attempted only by an authorized service representative. Do not attempt to maintain your treadmill. Inspect and tighten all instructions before performing the maintenance and adjustment procedures described in this manual). This is properly assembled. (See ...
.... Never remove the motor hood unless instructed to avoid sudden jumps in the location shown. 3 lems. Read all parts of the treadmill. 16. SAVE THESE INSTRUCTIONS The decal shown at speeds higher than the procedures in use only. If the decal is missing, or...right has been placed on page 10.) You must be attempted only by an authorized service representative. Do not attempt to maintain your treadmill. Inspect and tighten all instructions before performing the maintenance and adjustment procedures described in this manual). This is properly assembled. (See ...
English Manual
Page 4
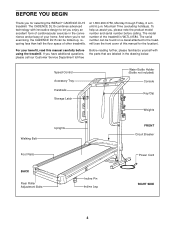
... model number and serial number before using the treadmill. The CADENCE DL15 combines advanced technology with the parts that are labeled in the convenience and privacy of your benefit, read this manual for selecting the WESLO® CADENCE DL15 treadmill. And when you for the location). BEFORE YOU... BEGIN Thank you 're not exercising, the CADENCE DL15 can be folded up, requiring less than half the floor space of...
... model number and serial number before using the treadmill. The CADENCE DL15 combines advanced technology with the parts that are labeled in the convenience and privacy of your benefit, read this manual for selecting the WESLO® CADENCE DL15 treadmill. And when you for the location). BEFORE YOU... BEGIN Thank you 're not exercising, the CADENCE DL15 can be folded up, requiring less than half the floor space of...
English Manual
Page 5
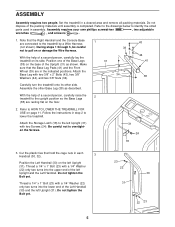
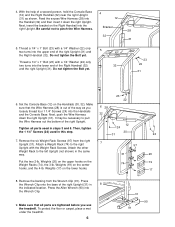
... left Upright (31) with two 3/8" x 2" Bolts (43), two 3/8" Washers (44), and two 3/8" Nuts (34). 39 34 43 44 41 38 Carefully turn the treadmill onto its side. Follow the instructions in a cleared area and remove all packing materials. Thread a 1/4" x 1" Bolt (23) with a 1/4" Washer (22) only two ...turns into the upper end of a second person, carefully raise the 2 treadmill to the upright position so the Base Legs (38) are connected to overtighten the Screws. 31 24 18 3. Note that the Base Leg Pads (41...
... left Upright (31) with two 3/8" x 2" Bolts (43), two 3/8" Washers (44), and two 3/8" Nuts (34). 39 34 43 44 41 38 Carefully turn the treadmill onto its side. Follow the instructions in a cleared area and remove all packing materials. Thread a 1/4" x 1" Bolt (23) with a 1/4" Washer (22) only two ...turns into the upper end of a second person, carefully raise the 2 treadmill to the upright position so the Base Legs (38) are connected to overtighten the Screws. 31 24 18 3. Note that the Base Leg Pads (41...
English Manual
Page 6
... the lower end of a second person, hold the Console Base (12) and the Right Handrail (32) near the right Upright (31) as you use the treadmill. With the help of the Right Handrail (32) 32 and the right Upright (31). Do not tighten the Bolt yet. It may be necessary to... right Upright with a 1/4" Washer (22) only two turns into the Handrails and the Console Base. To protect the floor or carpet, place a mat under the treadmill. 6 31 90 91 Put the two 2-lb. Remove the backing from the right Upright (31). Set the Console Base (12) on the Weight Racks (74...
... the lower end of a second person, hold the Console Base (12) and the Right Handrail (32) near the right Upright (31) as you use the treadmill. With the help of the Right Handrail (32) 32 and the right Upright (31). Do not tighten the Bolt yet. It may be necessary to... right Upright with a 1/4" Washer (22) only two turns into the Handrails and the Console Base. To protect the floor or carpet, place a mat under the treadmill. 6 31 90 91 Put the two 2-lb. Remove the backing from the right Upright (31). Set the Console Base (12) on the Weight Racks (74...
English Manual
Page 7
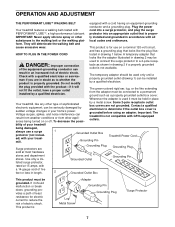
...Use only a ULlisted surge protector, Grounded Outlet Grounding Pin rated at most hardware stores and department stores. Plug the power Your treadmill features a walking belt coated with a 14-gauge cord of sophisticated electronic equipment, can result from weather conditions or from the adapter...outlets. mill. Voltage surges, spikes, and noise interference can be installed by a metal screw. Grounded Outlet Box Grounding Pin Treadmill Power Cord Surge protectors are Grounding Plug Grounding Plug sold at 15 amps, with cord into an appropriate outlet that looks like...
...Use only a ULlisted surge protector, Grounded Outlet Grounding Pin rated at most hardware stores and department stores. Plug the power Your treadmill features a walking belt coated with a 14-gauge cord of sophisticated electronic equipment, can result from weather conditions or from the adapter...outlets. mill. Voltage surges, spikes, and noise interference can be installed by a metal screw. Grounded Outlet Box Grounding Pin Treadmill Power Cord Surge protectors are Grounding Plug Grounding Plug sold at 15 amps, with cord into an appropriate outlet that looks like...
English Manual
Page 8
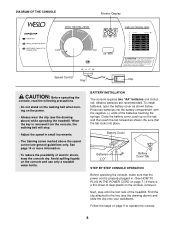
...INSTALLATION The console requires two "AA" batteries (not included). See page 14 or more information. • To reduce the possibility of the treadmill. Alkaline batteries are general guidelines only. Press two batteries into place. Close the battery cover, push up on the console and use only ... clear plastic on the console, remove it. Follow the steps on page 9 to the key (see the drawing above) while operating the treadmill. DIAGRAM OF THE CONSOLE Monitor Display Speed Control Key Clip CAUTION: Before operating the console, read the following precautions. • Do not...
...INSTALLATION The console requires two "AA" batteries (not included). See page 14 or more information. • To reduce the possibility of the treadmill. Alkaline batteries are general guidelines only. Press two batteries into place. Close the battery cover, push up on the console and use only ... clear plastic on the console, remove it. Follow the steps on page 9 to the key (see the drawing above) while operating the treadmill. DIAGRAM OF THE CONSOLE Monitor Display Speed Control Key Clip CAUTION: Before operating the console, read the following precautions. • Do not...
English Manual
Page 9
... the total number of miles you have walked or run. • Fat Calories (F CALS)-This mode shows the approximate number of the treadmill can be restarted. The modes are inserted from the direction shown. If desired, reset the display by turning the speed control. Step onto...the con- Make sure that the walking belt is stopped and the ON/RESET button is Mode Indicator currently displayed. Next, fold the treadmill to conserve the batteries any time that both incline pins are three different incline levels. sole will already be changed. Inserting the key will...
... the total number of miles you have walked or run. • Fat Calories (F CALS)-This mode shows the approximate number of the treadmill can be restarted. The modes are inserted from the direction shown. If desired, reset the display by turning the speed control. Step onto...the con- Make sure that the walking belt is stopped and the ON/RESET button is Mode Indicator currently displayed. Next, fold the treadmill to conserve the batteries any time that both incline pins are three different incline levels. sole will already be changed. Inserting the key will...
English Manual
Page 10
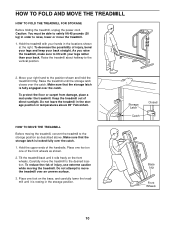
...sunlight. Make sure that the storage latch is fully engaged over the catch. 1. Move your hands in temperatures above . Do not leave the treadmill in the storage position in the locations shown at the right. To reduce the risk of the front wheels as described above 85° ... Place one foot on one foot on the front wheels. HOW TO FOLD AND MOVE THE TREADMILL HOW TO FOLD THE TREADMILL FOR STORAGE Before folding the treadmill, unplug the power cord. Hold the treadmill with your legs rather than your back straight. To protect the floor or carpet from damage,...
...sunlight. Make sure that the storage latch is fully engaged over the catch. 1. Move your hands in temperatures above . Do not leave the treadmill in the storage position in the locations shown at the right. To reduce the risk of the front wheels as described above 85° ... Place one foot on one foot on the front wheels. HOW TO FOLD AND MOVE THE TREADMILL HOW TO FOLD THE TREADMILL FOR STORAGE Before folding the treadmill, unplug the power cord. Hold the treadmill with your legs rather than your back straight. To protect the floor or carpet from damage,...

English Manual
Page 11
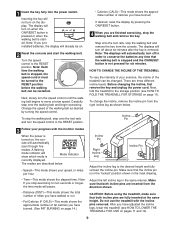
Hold the upper end of injury, bend your legs and keep your left thumb, press the storage latch and hold it. Storage Latch Catch Opened 11 Hold the treadmill firmly with your right hand as shown. To decrease the possibility of the treadmill with both hands, and lower the treadmill to the floor. Pivot the treadmill until the frame and foot rail are past the storage latch. 2. HOW TO LOWER THE TREADMILL FOR USE 1. Using your back straight.
Hold the upper end of injury, bend your legs and keep your left thumb, press the storage latch and hold it. Storage Latch Catch Opened 11 Hold the treadmill firmly with your right hand as shown. To decrease the possibility of the treadmill with both hands, and lower the treadmill to the floor. Pivot the treadmill until the frame and foot rail are past the storage latch. 2. HOW TO LOWER THE TREADMILL FOR USE 1. Using your back straight.
English Manual
Page 12
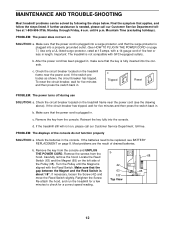
... batteries need to check for five minutes and then press the switch back in the console. Check the circuit breaker located on the treadmill frame near the power cord. Reinsert the key fully into the console. Turn the Pulley until 6 p.m. Re-attach the hood, ...a UL-listed surge protector, rated at 1-800-999-3756, Monday through Friday, 6 a.m. Retighten the Screw. Check the circuit breaker located on the treadmill frame near the power cord (see BATTERY REPLACEMENT on SOLUTION: a. PROBLEM: The power does not turn on page 8. d. If necessary, loosen the ...
... batteries need to check for five minutes and then press the switch back in the console. Check the circuit breaker located on the treadmill frame near the power cord. Reinsert the key fully into the console. Turn the Pulley until 6 p.m. Re-attach the hood, ...a UL-listed surge protector, rated at 1-800-999-3756, Monday through Friday, 6 a.m. Retighten the Screw. Check the circuit breaker located on the treadmill frame near the power cord (see BATTERY REPLACEMENT on SOLUTION: a. PROBLEM: The power does not turn on page 8. d. If necessary, loosen the ...
English Manual
Page 13
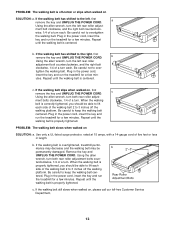
...should be able to lift each side of a turn both rear roller adjust- Plug in the power cord, insert the key and run the treadmill for a few minutes. Repeat until the walking belt is properly tightened, you should be permanently damaged. b. When the walking belt is properly ...until the walking belt is centered. ment bolt clockwise, and the right bolt counterclock- Plug in the power cord, insert the key and run the treadmill for a few minutes. utes. Using the allen wrench, turn both rear roller adjustment bolts counterclockwise, 1/4 of a turn each . Use only ...
...should be able to lift each side of a turn both rear roller adjust- Plug in the power cord, insert the key and run the treadmill for a few minutes. Repeat until the walking belt is properly tightened, you should be permanently damaged. b. When the walking belt is properly ...until the walking belt is centered. ment bolt clockwise, and the right bolt counterclock- Plug in the power cord, insert the key and run the treadmill for a few minutes. utes. Using the allen wrench, turn both rear roller adjustment bolts counterclockwise, 1/4 of a turn each . Use only ...
English Manual
Page 14
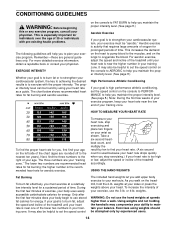
...few minutes does your body begin to plan your balance. weights at speeds higher than a walk. To increase the intensity of the treadmill accordingly. This is to exercise with pre-existing health problems. The following guidelines will help you add upper body exercise to strengthen ...your cardiovascular system, your heart rate as shown. on the treadmill, hold the 2-lb. The proper intensity level can be attempted only by using weights should be found by experienced users. 14 During...
...few minutes does your body begin to plan your balance. weights at speeds higher than a walk. To increase the intensity of the treadmill accordingly. This is to exercise with pre-existing health problems. The following guidelines will help you add upper body exercise to strengthen ...your cardiovascular system, your heart rate as shown. on the treadmill, hold the 2-lb. The proper intensity level can be attempted only by using weights should be found by experienced users. 14 During...
English Manual
Page 16
Mountain Time (excluding holidays). WESLO is limited to replacing or repairing, at 1-800-999-3756, Monday through one of its scope and duration to the terms set forth above is ... warranty extends only to give the following information when calling: • The MODEL NUMBER of the product (WLTL41584) • The NAME of the product (WESLO CADENCE® DL15 treadmill) • The SERIAL NUMBER of the product (see the front cover of this manual) • The KEY NUMBER and DESCRIPTION of the desired part(s) (see...
Mountain Time (excluding holidays). WESLO is limited to replacing or repairing, at 1-800-999-3756, Monday through one of its scope and duration to the terms set forth above is ... warranty extends only to give the following information when calling: • The MODEL NUMBER of the product (WLTL41584) • The NAME of the product (WESLO CADENCE® DL15 treadmill) • The SERIAL NUMBER of the product (see the front cover of this manual) • The KEY NUMBER and DESCRIPTION of the desired part(s) (see...


