
English Manual
Page 2
...4 ASSEMBLY 5 OPERATION AND ADJUSTMENT 7 HOW TO FOLD AND MOVE THE TREADMILL 10 MAINTENANCE AND TROUBLE-SHOOTING 12 CONDITIONING GUIDELINES 14 ORDERING REPLACEMENT PARTS Back Cover LIMITED WARRANTY Back Cover Note: A PART LIST and an EXPLODED DRAWING are used by persons weighing more amps. Do... protector away from moisture and dust. Never start the treadmill while you are standing on a surface that all times. 7. Remove the PART LIST and EXPLODED DRAWING before operating the treadmill. 1. It is turned off. treadmill. To protect the floor or carpet from damage, place...
...4 ASSEMBLY 5 OPERATION AND ADJUSTMENT 7 HOW TO FOLD AND MOVE THE TREADMILL 10 MAINTENANCE AND TROUBLE-SHOOTING 12 CONDITIONING GUIDELINES 14 ORDERING REPLACEMENT PARTS Back Cover LIMITED WARRANTY Back Cover Note: A PART LIST and an EXPLODED DRAWING are used by persons weighing more amps. Do... protector away from moisture and dust. Never start the treadmill while you are standing on a surface that all times. 7. Remove the PART LIST and EXPLODED DRAWING before operating the treadmill. 1. It is turned off. treadmill. To protect the floor or carpet from damage, place...
English Manual
Page 3
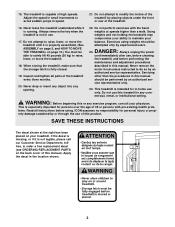
... before using weights should be attempted only by placing objects under the front or rear of this treadmill in this manual). lems. Read all parts of 35 or persons with the hand weights at the right has been placed on the back cover of high speeds. If ...legible, please call our Customer Service Department, tollfree, to raise, lower, or move the treadmill. 18. Do not attempt to order a free replacement decal (see ORDERING REPLACEMENT PARTS on your balance. When storing the treadmill, make sure that the storage latch is capable of this manual should be performed by or...
... before using weights should be attempted only by placing objects under the front or rear of this treadmill in this manual). lems. Read all parts of 35 or persons with the hand weights at the right has been placed on the back cover of high speeds. If ...legible, please call our Customer Service Department, tollfree, to raise, lower, or move the treadmill. 18. Do not attempt to order a free replacement decal (see ORDERING REPLACEMENT PARTS on your balance. When storing the treadmill, make sure that the storage latch is capable of this manual should be performed by or...
English Manual
Page 4
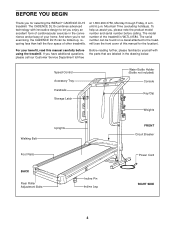
...CADENCE DL15 combines advanced technology with the parts that are labeled in the convenience and privacy of this manual carefully before calling. If you have additional questions, please call our Customer Service Department toll-free Before reading further, please familiarize yourself with innovative design to the treadmill... (see the front cover of your benefit, read this manual for selecting the WESLO® CADENCE DL15 treadmill. until 6 p.m. The model number of other treadmills. BEFORE YOU BEGIN Thank you for...
...CADENCE DL15 combines advanced technology with the parts that are labeled in the convenience and privacy of this manual carefully before calling. If you have additional questions, please call our Customer Service Department toll-free Before reading further, please familiarize yourself with innovative design to the treadmill... (see the front cover of your benefit, read this manual for selecting the WESLO® CADENCE DL15 treadmill. until 6 p.m. The model number of other treadmills. BEFORE YOU BEGIN Thank you for...
English Manual
Page 5
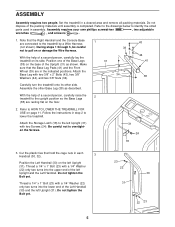
... two 3/8" x 2" Bolts (43), two 3/8" Washers (44), and two 3/8" Nuts (34). 39 34 43 44 41 38 Carefully turn the treadmill onto its side. Refer to the drawings below to identify the small parts used in step 2 to the left Upright (31). Do not tighten the Bolt yet. ASSEMBLY Assembly requires two people...
... two 3/8" x 2" Bolts (43), two 3/8" Washers (44), and two 3/8" Nuts (34). 39 34 43 44 41 38 Carefully turn the treadmill onto its side. Refer to the drawings below to identify the small parts used in step 2 to the left Upright (31). Do not tighten the Bolt yet. ASSEMBLY Assembly requires two people...
English Manual
Page 6
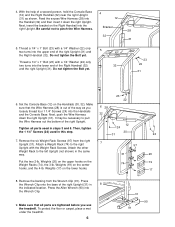
... the Handrail (32) and then insert it down the right Upright (31). Do not tighten the Bolt yet. 28 31 23 22 31 6. Tighten all parts are tightened before you loosely thread four 1 1/4" Screws (24) into the lower end of the right Upright (31) and 5 the Right Handrail (32). Then, tighten... (not shown) in 8 the indicated location. Press the Allen Wrench (90) into the right Upright. To protect the floor or carpet, place a mat under the treadmill. 6 31 90 91 Weights (20) on the upper hooks on the center hooks, and the 4-lb. Do not tighten the Bolt yet. Attach a Weight Rack...
... the Handrail (32) and then insert it down the right Upright (31). Do not tighten the Bolt yet. 28 31 23 22 31 6. Tighten all parts are tightened before you loosely thread four 1 1/4" Screws (24) into the lower end of the right Upright (31) and 5 the Right Handrail (32). Then, tighten... (not shown) in 8 the indicated location. Press the Allen Wrench (90) into the right Upright. To protect the floor or carpet, place a mat under the treadmill. 6 31 90 91 Weights (20) on the upper hooks on the center hooks, and the 4-lb. Do not tighten the Bolt yet. Attach a Weight Rack...

English Manual
Page 16
... to give the following information when calling: • The MODEL NUMBER of the product (WLTL41584) • The NAME of the product (WESLO CADENCE® DL15 treadmill) • The SERIAL NUMBER of the product (see the front cover of this manual). You may not apply to the original purchaser. ...Some states do not allow the exclusion or limitation of this manual) • The KEY NUMBER and DESCRIPTION of the desired part(s) (see the PART LIST and the EXPLODED DRAWING in connection with respect to the terms set forth above limitation may also have other warranty beyond ...
... to give the following information when calling: • The MODEL NUMBER of the product (WLTL41584) • The NAME of the product (WESLO CADENCE® DL15 treadmill) • The SERIAL NUMBER of the product (see the front cover of this manual). You may not apply to the original purchaser. ...Some states do not allow the exclusion or limitation of this manual) • The KEY NUMBER and DESCRIPTION of the desired part(s) (see the PART LIST and the EXPLODED DRAWING in connection with respect to the terms set forth above limitation may also have other warranty beyond ...


