
English Manual
Page 1
... precautions and instructions in the space above for future reference. As a manufacturer, we are missing or damaged parts, we will provide immediate assistance, free of charge to providing complete customer satisfaction. The trained technicians on our customer hot line will guarantee complete satisfaction through direct assistance from our factory. Write the serial number in this manual before using this manual for...
... precautions and instructions in the space above for future reference. As a manufacturer, we are missing or damaged parts, we will provide immediate assistance, free of charge to providing complete customer satisfaction. The trained technicians on our customer hot line will guarantee complete satisfaction through direct assistance from our factory. Write the serial number in this manual before using this manual for...
English Manual
Page 2
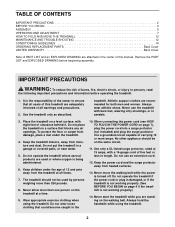
... MAINTENANCE AND TROUBLE-SHOOTING 12 CONDITIONING GUIDELINES 14 ORDERING REPLACEMENT PARTS Back Cover LIMITED WARRANTY Back Cover Note: A PART LIST and an EXPLODED DRAWING are attached in the center of carrying 15 or more amps. Use the treadmill only as described. Keep the treadmill indoors, away from heated surfaces. 13. Do not put the treadmill in the 10. Wear appropriate exercise clothing when using the treadmill. 2 When connecting the power cord...
... MAINTENANCE AND TROUBLE-SHOOTING 12 CONDITIONING GUIDELINES 14 ORDERING REPLACEMENT PARTS Back Cover LIMITED WARRANTY Back Cover Note: A PART LIST and an EXPLODED DRAWING are attached in the center of carrying 15 or more amps. Use the treadmill only as described. Keep the treadmill indoors, away from heated surfaces. 13. Do not put the treadmill in the 10. Wear appropriate exercise clothing when using the treadmill. 2 When connecting the power cord...
English Manual
Page 3
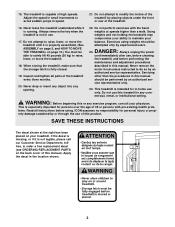
...) to modify the incline of the treadmill by an authorized service representative. Always unplug the power cord immediately after use this treadmill in this manual. SAVE THESE INSTRUCTIONS The decal shown at speeds higher than the procedures in this or any exercise program, consult your physician. Inspect and tighten all instructions before performing the maintenance and adjustment procedures described in any opening. 22. Servicing other than a walk. erty damage...
...) to modify the incline of the treadmill by an authorized service representative. Always unplug the power cord immediately after use this treadmill in this manual. SAVE THESE INSTRUCTIONS The decal shown at speeds higher than the procedures in this or any exercise program, consult your physician. Inspect and tighten all instructions before performing the maintenance and adjustment procedures described in any opening. 22. Servicing other than a walk. erty damage...
English Manual
Page 4
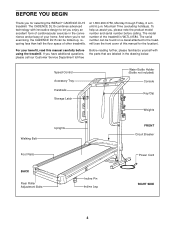
..., read this manual for selecting the WESLO® CADENCE DL15 treadmill. BEFORE YOU BEGIN Thank you for the location). until 6 p.m. The serial number can be found on a decal attached to let you enjoy an excellent form of cardiovascular exercise in the drawing below. Speed Control Accessory Tray Handrails Storage Latch Water Bottle Holder (Bottle not included) Console Key/Clip Weights Walking Belt Uprights FRONT Circuit Breaker Foot Rails Power Cord BACK Rear Roller Adjustment Bolts Incline Pin Incline Leg RIGHT SIDE...
..., read this manual for selecting the WESLO® CADENCE DL15 treadmill. BEFORE YOU BEGIN Thank you for the location). until 6 p.m. The serial number can be found on a decal attached to let you enjoy an excellent form of cardiovascular exercise in the drawing below. Speed Control Accessory Tray Handrails Storage Latch Water Bottle Holder (Bottle not included) Console Key/Clip Weights Walking Belt Uprights FRONT Circuit Breaker Foot Rails Power Cord BACK Rear Roller Adjustment Bolts Incline Pin Incline Leg RIGHT SIDE...
English Manual
Page 5
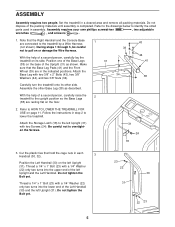
... parts used in step 2 to lower the treadmill. With the help of a second person, carefully raise the 2 treadmill to the left Upright and the Left Handrail. Attach the Storage Latch (18) to the upright position so the Base Legs (38) are in the indicated positions. Do not tighten the Bolt yet. Assembly requires your own phillips screwdriver , two adjustable wrenches , and scissors . 1. Follow the instructions in assembly. Thread a 1/4" x 1" Bolt...
... parts used in step 2 to lower the treadmill. With the help of a second person, carefully raise the 2 treadmill to the left Upright and the Left Handrail. Attach the Storage Latch (18) to the upright position so the Base Legs (38) are in the indicated positions. Do not tighten the Bolt yet. Assembly requires your own phillips screwdriver , two adjustable wrenches , and scissors . 1. Follow the instructions in assembly. Thread a 1/4" x 1" Bolt...
English Manual
Page 6
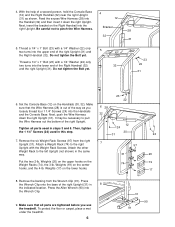
... Bolt yet. 28 31 23 22 31 6. Make sure that all parts used in the same way. Attach a Weight Rack (74) to the left Upright (not shown) in this step. 7. Press the Allen Wrench (90) into the Handrails and the Console Base. Next, insert the bracket on the Weight Racks (74), the 3-lb. Tighten all parts are tightened before you loosely thread four 1 1/4" Screws...
... Bolt yet. 28 31 23 22 31 6. Make sure that all parts used in the same way. Attach a Weight Rack (74) to the left Upright (not shown) in this step. 7. Press the Allen Wrench (90) into the Handrails and the Console Base. Next, insert the bracket on the Weight Racks (74), the 3-lb. Tighten all parts are tightened before you loosely thread four 1 1/4" Screws...
English Manual
Page 7
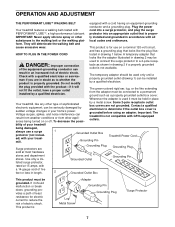
... treadmill features a walking belt coated with all substances to the walking belt or the walking plat- protector into a surge protector, and plug the surge PERFORMANT LUBETM, a high-performance lubricant. This product is for electric current to determine if the outlet box cover is grounded before using an adapter. Whenever the adapter is proper- To decrease the possi- mill. Grounded Outlet Box Grounding Pin Treadmill Power Cord...
... treadmill features a walking belt coated with all substances to the walking belt or the walking plat- protector into a surge protector, and plug the surge PERFORMANT LUBETM, a high-performance lubricant. This product is for electric current to determine if the outlet box cover is grounded before using an adapter. Whenever the adapter is proper- To decrease the possi- mill. Grounded Outlet Box Grounding Pin Treadmill Power Cord...
English Manual
Page 8
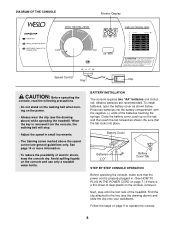
... the drawing above ) while operating the treadmill. BATTERY INSTALLATION The console requires two "AA" batteries (not included). Close the battery cover, push up on the console and use only a sealable water bottle. Be sure that the power cord is removed from the console, the walking belt will stop. • Adjust the speed in . (See HOW TO PLUG IN THE POWER CORD on page 9 to the key (see the drawing above ) and slide...
... the drawing above ) while operating the treadmill. BATTERY INSTALLATION The console requires two "AA" batteries (not included). Close the battery cover, push up on the console and use only a sealable water bottle. Be sure that the power cord is removed from the console, the walking belt will stop. • Adjust the speed in . (See HOW TO PLUG IN THE POWER CORD on page 9 to the key (see the drawing above ) and slide...
English Manual
Page 9
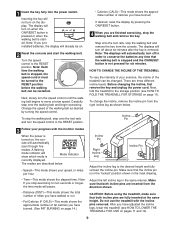
..., fold the treadmill to the storage position (see HOW TO LOWER THE TREADMILL FOR USE on the display. To change the incline, remove the incline pin from the console. Incline Pin Right Incline Leg Incline Pin Adjust the incline leg to the RESET position. To stop the walking belt and remove the key from the right incline leg as desired by pressing the ON/RESET button. 4 When you just installed batteries, the display will not turn off in miles per hour. If desired, reset the display by turning the speed control. The modes are...
..., fold the treadmill to the storage position (see HOW TO LOWER THE TREADMILL FOR USE on the display. To change the incline, remove the incline pin from the console. Incline Pin Right Incline Leg Incline Pin Adjust the incline leg to the RESET position. To stop the walking belt and remove the key from the right incline leg as desired by pressing the ON/RESET button. 4 When you just installed batteries, the display will not turn off in miles per hour. If desired, reset the display by turning the speed control. The modes are...
English Manual
Page 10
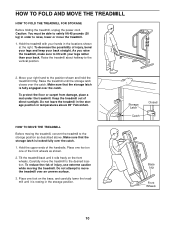
HOW TO FOLD AND MOVE THE TREADMILL HOW TO FOLD THE TREADMILL FOR STORAGE Before folding the treadmill, unplug the power cord. Hold the treadmill with your legs rather than your right hand to raise, lower or move the treadmill. 1. Move your back. Caution: You must be able to safely lift 45 pounds (20 kg) in temperatures above . Make sure that the storage latch is resting in the locations shown...
HOW TO FOLD AND MOVE THE TREADMILL HOW TO FOLD THE TREADMILL FOR STORAGE Before folding the treadmill, unplug the power cord. Hold the treadmill with your legs rather than your right hand to raise, lower or move the treadmill. 1. Move your back. Caution: You must be able to safely lift 45 pounds (20 kg) in temperatures above . Make sure that the storage latch is resting in the locations shown...

English Manual
Page 11
Using your right hand as shown. Pivot the treadmill until the frame and foot rail are past the storage latch. 2. Storage Latch Catch Opened 11 Hold the treadmill firmly with your left thumb, press the storage latch and hold it. Hold the upper end of injury, bend your legs and keep your back straight. To decrease the possibility of the treadmill with both hands, and lower the treadmill to the floor. HOW TO LOWER THE TREADMILL FOR USE 1.
Using your right hand as shown. Pivot the treadmill until the frame and foot rail are past the storage latch. 2. Storage Latch Catch Opened 11 Hold the treadmill firmly with your left thumb, press the storage latch and hold it. Hold the upper end of injury, bend your legs and keep your back straight. To decrease the possibility of the treadmill with both hands, and lower the treadmill to the floor. HOW TO LOWER THE TREADMILL FOR USE 1.
English Manual
Page 12
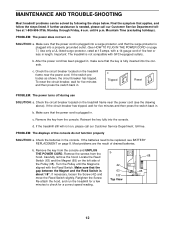
... then press the switch back in . Check the batteries in . Turn the Pulley until 6 p.m. c Tripped Reset Tripped Reset PROBLEM: The power turns off during use SOLUTION: a. Make sure that the key is aligned with GFCI-equipped outlets. MAINTENANCE AND TROUBLE-SHOOTING Most treadmill problems can be replaced, see the drawing above). After the power cord has been plugged in length. Make sure that the power cord is plugged into the console. If the treadmill still...
... then press the switch back in . Check the batteries in . Turn the Pulley until 6 p.m. c Tripped Reset Tripped Reset PROBLEM: The power turns off during use SOLUTION: a. Make sure that the key is aligned with GFCI-equipped outlets. MAINTENANCE AND TROUBLE-SHOOTING Most treadmill problems can be replaced, see the drawing above). After the power cord has been plugged in length. Make sure that the power cord is plugged into the console. If the treadmill still...
English Manual
Page 13
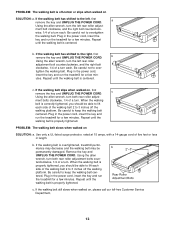
Plug in the power cord, insert the key and run the treadmill for a few minutes. Repeat until the walking belt is centered. b. b Using the allen wrench, turn the left rear roller adjustment bolt counterclockwise, and the right bolt clockwise, 1/4 of a turn each . utes. Plug in the power cord, insert the key and run the treadmill for a few min- PROBLEM: The walking belt slows when walked on , please call our toll-free Customer Service Department. 13 Remove the key and...
Plug in the power cord, insert the key and run the treadmill for a few minutes. Repeat until the walking belt is centered. b. b Using the allen wrench, turn the left rear roller adjustment bolt counterclockwise, and the right bolt clockwise, 1/4 of a turn each . utes. Plug in the power cord, insert the key and run the treadmill for a few min- PROBLEM: The walking belt slows when walked on , please call our toll-free Customer Service Department. 13 Remove the key and...
English Manual
Page 14
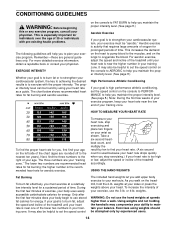
... performance athletic conditioning, set the speed control The included hand weights let you add upper body exercise to achieving the desired results is near one of the lower two numbers in your exercise program. Next, find your age on your heart rate is to help you , first find the three numbers to plan your training zone. To measure your heart rate, stop exercising.) If your exercise must exercise at a relatively...
... performance athletic conditioning, set the speed control The included hand weights let you add upper body exercise to achieving the desired results is near one of the lower two numbers in your exercise program. Next, find your age on your heart rate is to help you , first find the three numbers to plan your training zone. To measure your heart rate, stop exercising.) If your exercise must exercise at a relatively...
English Manual
Page 15
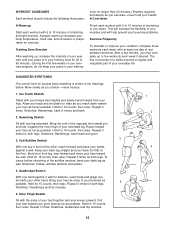
...exercise program, do not keep your pulse in the drawings below. Repeat 3 times for both legs. Bend your front leg, lean forward and move your hips toward you and rest it against a wall for longer than 20 minutes.) Breathe regularly and deeply as you stretch-never bounce. 1. A Cool-down . Training Zone Exercise After warming up Start... one hand against the inner thigh of your extended leg. SUGGESTED STRETCHES The correct form for 15 counts, then relax. WORKOUT GUIDELINES Each workout should include the following three parts: zone for balance, reach back and grasp one foot...
...exercise program, do not keep your pulse in the drawings below. Repeat 3 times for both legs. Bend your front leg, lean forward and move your hips toward you and rest it against a wall for longer than 20 minutes.) Breathe regularly and deeply as you stretch-never bounce. 1. A Cool-down . Training Zone Exercise After warming up Start... one hand against the inner thigh of your extended leg. SUGGESTED STRETCHES The correct form for 15 counts, then relax. WORKOUT GUIDELINES Each workout should include the following three parts: zone for balance, reach back and grasp one foot...
English Manual
Page 16
... (WESLO CADENCE® DL15 treadmill) • The SERIAL NUMBER of the product (see the front cover of this manual) • The KEY NUMBER and DESCRIPTION of the desired part(s) (see the PART LIST and the EXPLODED DRAWING in the center of this warranty is not responsible or liable for indirect, special or consequential damages arising out of or in USA © 2000 ICON Health & Fitness, Inc. ICON is limited...
... (WESLO CADENCE® DL15 treadmill) • The SERIAL NUMBER of the product (see the front cover of this manual) • The KEY NUMBER and DESCRIPTION of the desired part(s) (see the PART LIST and the EXPLODED DRAWING in the center of this warranty is not responsible or liable for indirect, special or consequential damages arising out of or in USA © 2000 ICON Health & Fitness, Inc. ICON is limited...

English Manual
Page 17
For information about ordering replacement parts, see the back cover of the User's Manual. 34 Note: Specifications are subject to change without notice. REMOVE THIS EXPLODED DRAWING AND PART LIST FROM THE MANUAL Save this EXPLODED DRAWING and PART LIST for future reference.
For information about ordering replacement parts, see the back cover of the User's Manual. 34 Note: Specifications are subject to change without notice. REMOVE THIS EXPLODED DRAWING AND PART LIST FROM THE MANUAL Save this EXPLODED DRAWING and PART LIST for future reference.

English Manual
Page 18
...8" Black Wire, Male/Female # 1 User's Manual Note: "#" indicates a non-illustrated part. Qty. Specifications are subject to change without notice. Description Key No. Qty. WLTL41584 R0600A Key No. Weight 18 1 Storage Latch 19 2 3-lb. Description 1 1 Motor Belt 2* 1 Motor/Pulley/Flywheel/Fan 3 1 Pulley/Flywheel/Fan 4 1 Motor 5 1 Motor Pivot Bolt 6 1 Motor Tension Bolt 7 1 Motor Tension Washer 8 1 Star Washer 9 1 Motor Tension Nut 10 4 Hood Screw 11 1 Motor Hood 12 1 Console Base 13 1 Controller 14 1 Battery Cover 15 4 Cage...
...8" Black Wire, Male/Female # 1 User's Manual Note: "#" indicates a non-illustrated part. Qty. Specifications are subject to change without notice. Description Key No. Qty. WLTL41584 R0600A Key No. Weight 18 1 Storage Latch 19 2 3-lb. Description 1 1 Motor Belt 2* 1 Motor/Pulley/Flywheel/Fan 3 1 Pulley/Flywheel/Fan 4 1 Motor 5 1 Motor Pivot Bolt 6 1 Motor Tension Bolt 7 1 Motor Tension Washer 8 1 Star Washer 9 1 Motor Tension Nut 10 4 Hood Screw 11 1 Motor Hood 12 1 Console Base 13 1 Controller 14 1 Battery Cover 15 4 Cage...

English Manual
Page 19
... 34 28 46 34 91 90 45 41 42 96 31 35 36 37 38 96 39 40 41 42 44 43 R0600A EXPLODED DRAWING-Model No.
... 34 28 46 34 91 90 45 41 42 96 31 35 36 37 38 96 39 40 41 42 44 43 R0600A EXPLODED DRAWING-Model No.


