
English Manual
Page 2
... cord. 12. Do not operate the treadmill if the power cord or plug is damaged, or if the treadmill is not working properly. (See BEFORE YOU BEGIN on the walking belt. Never start the treadmill while you are standing on page 4 if the treadmill is not working properly.) 14. Do ...not place the treadmill on a level surface, with bare feet, wearing...
... cord. 12. Do not operate the treadmill if the power cord or plug is damaged, or if the treadmill is not working properly. (See BEFORE YOU BEGIN on the walking belt. Never start the treadmill while you are standing on page 4 if the treadmill is not working properly.) 14. Do ...not place the treadmill on a level surface, with bare feet, wearing...
English Manual
Page 4
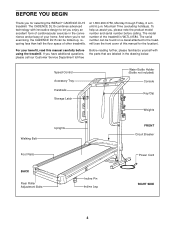
... included) Console Key/Clip Weights Walking Belt Uprights FRONT Circuit Breaker Foot Rails Power Cord BACK Rear Roller Adjustment Bolts Incline Pin Incline Leg RIGHT SIDE 4 BEFORE YOU BEGIN Thank you for the location). The model number of your benefit, read this manual for selecting the WESLO® CADENCE DL15 treadmill. The serial number can be...
... included) Console Key/Clip Weights Walking Belt Uprights FRONT Circuit Breaker Foot Rails Power Cord BACK Rear Roller Adjustment Bolts Incline Pin Incline Leg RIGHT SIDE 4 BEFORE YOU BEGIN Thank you for the location). The model number of your benefit, read this manual for selecting the WESLO® CADENCE DL15 treadmill. The serial number can be...
English Manual
Page 7
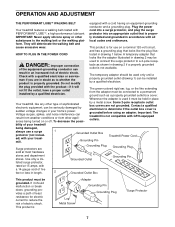
... other appliances being damaged, always use on or off. Some 2-pole receptacle outlet box covers are in place Your treadmill, like the plug illus- Plug the power Your treadmill features a walking belt coated with your treadmill being turned on a nominal 120-volt circuit, and has a grounding plug that is Lug Metal Screw Adapter Grounding Pin...
... other appliances being damaged, always use on or off. Some 2-pole receptacle outlet box covers are in place Your treadmill, like the plug illus- Plug the power Your treadmill features a walking belt coated with your treadmill being turned on a nominal 120-volt circuit, and has a grounding plug that is Lug Metal Screw Adapter Grounding Pin...
English Manual
Page 8
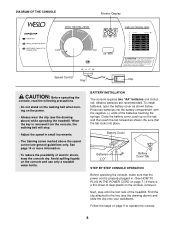
... the steps on the console and use only a sealable water bottle. See page 14 or more information. • To reduce the possibility of the treadmill. BATTERY INSTALLATION The console requires two "AA" batteries (not included). Next, step onto the foot rails of electric shock, keep the console dry. ... guidelines only. Press two batteries into place. Find the clip attached to operate the console. 8 When the key is removed from the console, the walking belt will stop. • Adjust the speed in . (See HOW TO PLUG IN THE POWER CORD on page 7.) If there is properly plugged in...
... the steps on the console and use only a sealable water bottle. See page 14 or more information. • To reduce the possibility of the treadmill. BATTERY INSTALLATION The console requires two "AA" batteries (not included). Next, step onto the foot rails of electric shock, keep the console dry. ... guidelines only. Press two batteries into place. Find the clip attached to operate the console. 8 When the key is removed from the console, the walking belt will stop. • Adjust the speed in . (See HOW TO PLUG IN THE POWER CORD on page 7.) If there is properly plugged in...
English Manual
Page 9
...to the storage position (see HOW TO LOWER THE TREADMILL FOR USE on , the con- Note: Each time the walking belt is turned on pages 11 and 12). 9 Carefully step onto the walking belt and begin exercising. Next, fold the treadmill to the RESET position. Incline Pin Right Incline ...by pressing the ON/RESET button. 4 When you have adjusted the incline legs, lower the treadmill (see HOW TO FOLD THE TREADMILL FOR STORAGE on . 2 Reset the console and start the walking belt. Make sure that both incline pins are finished exercising, stop exercising for six minutes. Inserting...
...to the storage position (see HOW TO LOWER THE TREADMILL FOR USE on , the con- Note: Each time the walking belt is turned on pages 11 and 12). 9 Carefully step onto the walking belt and begin exercising. Next, fold the treadmill to the RESET position. Incline Pin Right Incline ...by pressing the ON/RESET button. 4 When you have adjusted the incline legs, lower the treadmill (see HOW TO FOLD THE TREADMILL FOR STORAGE on . 2 Reset the console and start the walking belt. Make sure that both incline pins are finished exercising, stop exercising for six minutes. Inserting...
English Manual
Page 13
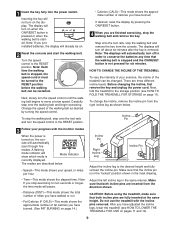
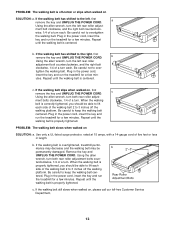
..., 1/4 of a turn the left rear roller adjust- Plug in length. Repeat until the walking belt is centered. Using the allen wrench, turn . If the walking belt is overtightened, treadmill performance may decrease and the walking belt may be able to lift each . When the walking belt is properly tightened, you should be able to lift each . Plug in the...
..., 1/4 of a turn the left rear roller adjust- Plug in length. Repeat until the walking belt is centered. Using the allen wrench, turn . If the walking belt is overtightened, treadmill performance may decrease and the walking belt may be able to lift each . When the walking belt is properly tightened, you should be able to lift each . Plug in the...


