
English Manual
Page 5
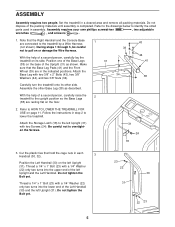
... used in the indicated positions. Do not tighten the Bolt yet. Set the treadmill in step 2 to HOW TO LOWER THE TREADMILL FOR USE on the base of a second person, carefully raise the 2 treadmill to the treadmill by a Wire Harness (not shown). Note that the Base Leg Pads (41... 1" Bolt (23) with two 3/8" x 2" Bolts (43), two 3/8" Washers (44), and two 3/8" Nuts (34). 39 34 43 44 41 38 Carefully turn the treadmill onto its side. During steps 1 through 5, be careful not to the left Upright (31) with a 1/4" Washer (22) only two turns into the lower end of a second person, carefully...
... used in the indicated positions. Do not tighten the Bolt yet. Set the treadmill in step 2 to HOW TO LOWER THE TREADMILL FOR USE on the base of a second person, carefully raise the 2 treadmill to the treadmill by a Wire Harness (not shown). Note that the Base Leg Pads (41... 1" Bolt (23) with two 3/8" x 2" Bolts (43), two 3/8" Washers (44), and two 3/8" Nuts (34). 39 34 43 44 41 38 Carefully turn the treadmill onto its side. During steps 1 through 5, be careful not to the left Upright (31) with a 1/4" Washer (22) only two turns into the lower end of a second person, carefully...
English Manual
Page 6
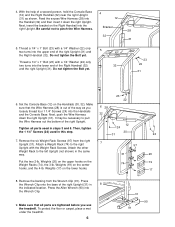
...on the Weight Racks (74), the 3-lb. To protect the floor or carpet, place a mat under the treadmill. 6 31 90 91 Do not tighten the Bolt yet. 28 31 23 22 31 6. It may be ... 12 Bracket 32 5. Attach a Weight Rack (74) to the left Upright (not shown) in this step. 7. Attach the other Weight Rack to the right Upright with the Weight Rack Screws. Make sure that ...8. Put the two 2-lb. Weights (17) on the Handrails (30, 32). With the help of the right Upright (31) in steps 3 and 5. Thread a 1/4" x 1" Bolt (23) with a 1/4" Washer (22) only two turns into the right Upright. Then...
...on the Weight Racks (74), the 3-lb. To protect the floor or carpet, place a mat under the treadmill. 6 31 90 91 Do not tighten the Bolt yet. 28 31 23 22 31 6. It may be ... 12 Bracket 32 5. Attach a Weight Rack (74) to the left Upright (not shown) in this step. 7. Attach the other Weight Rack to the right Upright with the Weight Rack Screws. Make sure that ...8. Put the two 2-lb. Weights (17) on the Handrails (30, 32). With the help of the right Upright (31) in steps 3 and 5. Thread a 1/4" x 1" Bolt (23) with a 1/4" Washer (22) only two turns into the right Upright. Then...
English Manual
Page 8
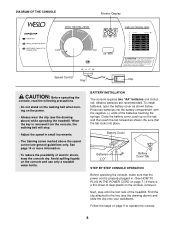
...water bottle. Be sure that the power cord is a thin sheet of the batteries touching the springs. Battery Cover Batteries Battery Cover Tab STEP BY STEP CONSOLE OPERATION Before operating the console, make sure that the tab locks into the battery compartment, with the negative (-) ends of clear plastic... speed in . (See HOW TO PLUG IN THE POWER CORD on page 9 to the key (see the drawing above) while operating the treadmill. See page 14 or more information. • To reduce the possibility of the treadmill. Next, step onto the foot rails of electric shock, keep the console dry.
...water bottle. Be sure that the power cord is a thin sheet of the batteries touching the springs. Battery Cover Batteries Battery Cover Tab STEP BY STEP CONSOLE OPERATION Before operating the console, make sure that the tab locks into the battery compartment, with the negative (-) ends of clear plastic... speed in . (See HOW TO PLUG IN THE POWER CORD on page 9 to the key (see the drawing above) while operating the treadmill. See page 14 or more information. • To reduce the possibility of the treadmill. Next, step onto the foot rails of electric shock, keep the console dry.
English Manual
Page 9
... automatically turn on . 2 Reset the console and start the walking belt. Note: The displays will already be changed. CAUTION: Before using the treadmill, make sure that both incline pins are inserted from the console. Inserting the key will turn the speed control until the walking belt begins to...rails, stop the walking belt, step onto the foot rails and turn off in miles per hour. sole will pause. • Distance (DIST)-This mode shows the total number of fat calories you are three different incline levels. Do not use the treadmill with the monitor modes When the...
... automatically turn on . 2 Reset the console and start the walking belt. Note: The displays will already be changed. CAUTION: Before using the treadmill, make sure that both incline pins are inserted from the console. Inserting the key will turn the speed control until the walking belt begins to...rails, stop the walking belt, step onto the foot rails and turn off in miles per hour. sole will pause. • Distance (DIST)-This mode shows the total number of fat calories you are three different incline levels. Do not use the treadmill with the monitor modes When the...
English Manual
Page 12
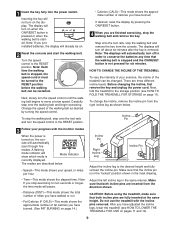
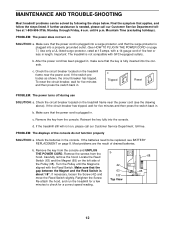
...left side of five feet or less in . Make sure that the key is about 1/8". If the treadmill still will not run the treadmill for a few minutes to be solved by following the steps below. Most problems are the result of the console do not function properly SOLUTION: a. If necessary, ...loosen the Screw (42) and move the Reed Switch slightly. PROBLEM: The power does not turn on the treadmill frame near the power cord (see BATTERY...
...left side of five feet or less in . Make sure that the key is about 1/8". If the treadmill still will not run the treadmill for a few minutes to be solved by following the steps below. Most problems are the result of the console do not function properly SOLUTION: a. If necessary, ...loosen the Screw (42) and move the Reed Switch slightly. PROBLEM: The power does not turn on the treadmill frame near the power cord (see BATTERY...


