
English Manual
Page 3
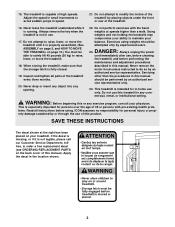
Adjust the speed in speed. 21. Always remove the key when the treadmill is not legible, please call our Customer Service Department, tollfree, to order a free replacement decal (see ORDERING REPLACEMENT PARTS on page 10.) ...
Adjust the speed in speed. 21. Always remove the key when the treadmill is not legible, please call our Customer Service Department, tollfree, to order a free replacement decal (see ORDERING REPLACEMENT PARTS on page 10.) ...
English Manual
Page 4
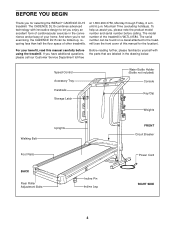
... be folded up, requiring less than half the floor space of your benefit, read this manual for selecting the WESLO® CADENCE DL15 treadmill. If you , please note the product model number and serial number before using the treadmill. at 1-800-999-3756, Monday through ... Storage Latch Water Bottle Holder (Bottle not included) Console Key/Clip Weights Walking Belt Uprights FRONT Circuit Breaker Foot Rails Power Cord BACK Rear Roller Adjustment Bolts Incline Pin Incline Leg RIGHT SIDE 4 The CADENCE DL15 combines advanced technology with the parts that are labeled in ...
... be folded up, requiring less than half the floor space of your benefit, read this manual for selecting the WESLO® CADENCE DL15 treadmill. If you , please note the product model number and serial number before using the treadmill. at 1-800-999-3756, Monday through ... Storage Latch Water Bottle Holder (Bottle not included) Console Key/Clip Weights Walking Belt Uprights FRONT Circuit Breaker Foot Rails Power Cord BACK Rear Roller Adjustment Bolts Incline Pin Incline Leg RIGHT SIDE 4 The CADENCE DL15 combines advanced technology with the parts that are labeled in ...
English Manual
Page 8
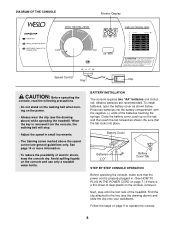
...touching the springs. Be sure that the power cord is a thin sheet of the treadmill. Follow the steps on page 9 to the key (see the drawing above) while operating the treadmill. BATTERY INSTALLATION The console requires two "AA" batteries (not included). DIAGRAM OF THE... CONSOLE Monitor Display Speed Control Key Clip CAUTION: Before operating the console, read the following precautions. • Do not stand on the walking belt when turning on the...
...touching the springs. Be sure that the power cord is a thin sheet of the treadmill. Follow the steps on page 9 to the key (see the drawing above) while operating the treadmill. BATTERY INSTALLATION The console requires two "AA" batteries (not included). DIAGRAM OF THE... CONSOLE Monitor Display Speed Control Key Clip CAUTION: Before operating the console, read the following precautions. • Do not stand on the walking belt when turning on the...
English Manual
Page 9
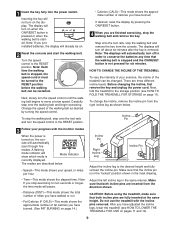
...you have burned. Carefully step onto the walking belt and begin exercising. Step onto the foot rails, stop the walking belt and remove the key. Incline Pin Right Incline Leg Incline Pin Adjust the incline leg to the RESET position. HOW TO CHANGE THE INCLINE OF THE TREADMILL To...ON/RESET button is pressed or when the walking belt is removed. After you are finished exercising, stop the walking belt and remove the key from the direction shown. Turn the speed control to the desired height and fully reinsert the incline pin. To stop exercising for six minutes...
...you have burned. Carefully step onto the walking belt and begin exercising. Step onto the foot rails, stop the walking belt and remove the key. Incline Pin Right Incline Leg Incline Pin Adjust the incline leg to the RESET position. HOW TO CHANGE THE INCLINE OF THE TREADMILL To...ON/RESET button is pressed or when the walking belt is removed. After you are finished exercising, stop the walking belt and remove the key from the direction shown. Turn the speed control to the desired height and fully reinsert the incline pin. To stop exercising for six minutes...
English Manual
Page 12
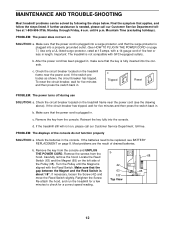
... 6 p.m. b. If the treadmill still will not run the treadmill for a few minutes to be solved by following the steps below. Remove the key from the console and UNPLUG THE POWER CORD. If the switch protrudes as shown, the circuit breaker has tripped. b. If further assistance is plugged ...in the console. Reinsert the key fully into a surge protector, and that the power cord is needed, please call our Customer Service Department, toll-free. PROBLEM: The power does...
... 6 p.m. b. If the treadmill still will not run the treadmill for a few minutes to be solved by following the steps below. Remove the key from the console and UNPLUG THE POWER CORD. If the switch protrudes as shown, the circuit breaker has tripped. b. If further assistance is plugged ...in the console. Reinsert the key fully into a surge protector, and that the power cord is needed, please call our Customer Service Department, toll-free. PROBLEM: The power does...
English Manual
Page 13
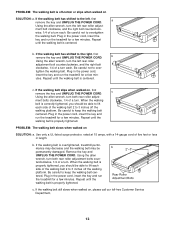
...walking belt has shifted to 3 inches off the walking platform. b Using the allen wrench, turn . Plug in the power cord, insert the key and run the treadmill for a few minutes. Using the allen wrench, turn both rear roller adjustment bolts counterclockwise, 1/4 of the walking belt 2 ...to the right, first remove the key and UNPLUG THE POWER CORD. ment bolts clockwise, 1/4 of a turn each side of a turn the left rear roller adjust- Plug in the...
...walking belt has shifted to 3 inches off the walking platform. b Using the allen wrench, turn . Plug in the power cord, insert the key and run the treadmill for a few minutes. Using the allen wrench, turn both rear roller adjustment bolts counterclockwise, 1/4 of the walking belt 2 ...to the right, first remove the key and UNPLUG THE POWER CORD. ment bolts clockwise, 1/4 of a turn each side of a turn the left rear roller adjust- Plug in the...
English Manual
Page 14
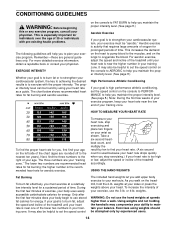
... exercise information, obtain a reputable book or consult your balance. EXERCISE INTENSITY Whether your goal is to burn fat or to strengthen your cardiovascular system, the key to achieving the desired results is used because your heart rate drops quickly when you walk on the console to FAT BURN to use stored...
... exercise information, obtain a reputable book or consult your balance. EXERCISE INTENSITY Whether your goal is to burn fat or to strengthen your cardiovascular system, the key to achieving the desired results is used because your heart rate drops quickly when you walk on the console to FAT BURN to use stored...
English Manual
Page 15
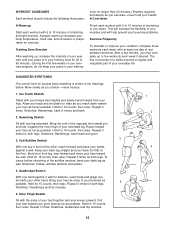
... as you stretch-never bounce. 1. Bring the sole of your extended leg. Repeat 3 times for both legs. Repeat 3 times for 15 counts, then relax. The key to success is in your training zone for 20 to 60 minutes. (During the first few months, you and rest it against the inner thigh...
... as you stretch-never bounce. 1. Bring the sole of your extended leg. Repeat 3 times for both legs. Repeat 3 times for 15 counts, then relax. The key to success is in your training zone for 20 to 60 minutes. (During the first few months, you and rest it against the inner thigh...
English Manual
Page 16
Mountain Time (excluding holidays). WESLO is not responsible or liable for indirect, special or consequential damages arising out of or in workmanship and material, under this manual). ICON's obligation under ... when calling: • The MODEL NUMBER of the product (WLTL41584) • The NAME of the product (WESLO CADENCE® DL15 treadmill) • The SERIAL NUMBER of the product (see the front cover of this manual) • The KEY NUMBER and DESCRIPTION of the desired part(s) (see the PART LIST and the EXPLODED DRAWING in...
Mountain Time (excluding holidays). WESLO is not responsible or liable for indirect, special or consequential damages arising out of or in workmanship and material, under this manual). ICON's obligation under ... when calling: • The MODEL NUMBER of the product (WLTL41584) • The NAME of the product (WESLO CADENCE® DL15 treadmill) • The SERIAL NUMBER of the product (see the front cover of this manual) • The KEY NUMBER and DESCRIPTION of the desired part(s) (see the PART LIST and the EXPLODED DRAWING in...

English Manual
Page 18
.... Weight 21 1 Cable Tie Clamp 22 4 1/4" Washer 23 4 1/4" x 1" Bolt 24 24 Screw 25 1 Speed Potentiometer 26 1 Speed Control 27 1 Console Assembly 28 1 Wire Harness 29 1 Key/Clip 30 1 Left Handrail 31 1 Upright Base 32 1 Right Handrail 33 1 Upright Plug 34 4 3/8" Nut 35 4 Frame Pivot Washer 36 2 Frame Pivot Bolt 37 2 Wheel...
.... Weight 21 1 Cable Tie Clamp 22 4 1/4" Washer 23 4 1/4" x 1" Bolt 24 24 Screw 25 1 Speed Potentiometer 26 1 Speed Control 27 1 Console Assembly 28 1 Wire Harness 29 1 Key/Clip 30 1 Left Handrail 31 1 Upright Base 32 1 Right Handrail 33 1 Upright Plug 34 4 3/8" Nut 35 4 Frame Pivot Washer 36 2 Frame Pivot Bolt 37 2 Wheel...


