
User Manual
Page 2
...TABLE OF CONTENTS LIMITED WARRANTY 2 IMPORTANT PRECAUTIONS 3 BEFORE YOU BEGIN 4 ASSEMBLY 5 CABLE DIAGRAMS 19 ADJUSTMENT 21 TROUBLE-SHOOTING AND MAINTENANCE 22 WEIGHT RESISTANCE CHART 23 ORDERING REPLACEMENT PARTS Back Cover Note: A PART LIST/EXPLODED DRAWING and a PART IDENTIFICATION CHART are attached in connection with the... to products used as store display models. ICON OF/DU CANADA, 900 de l'Industrie, St-Jérôme, QC J7Y 4B8 WEIDER is made must be free from the date of purchase. Some provinces do not allow the exclusion or limitation of incidental or consequential...
...TABLE OF CONTENTS LIMITED WARRANTY 2 IMPORTANT PRECAUTIONS 3 BEFORE YOU BEGIN 4 ASSEMBLY 5 CABLE DIAGRAMS 19 ADJUSTMENT 21 TROUBLE-SHOOTING AND MAINTENANCE 22 WEIGHT RESISTANCE CHART 23 ORDERING REPLACEMENT PARTS Back Cover Note: A PART LIST/EXPLODED DRAWING and a PART IDENTIFICATION CHART are attached in connection with the... to products used as store display models. ICON OF/DU CANADA, 900 de l'Industrie, St-Jérôme, QC J7Y 4B8 WEIDER is made must be free from the date of purchase. Some provinces do not allow the exclusion or limitation of incidental or consequential...
User Manual
Page 3
... important for personal injury or property damage sustained by or through the use only. Always wear athletic shoes for home use of the weight system are exercising, stop immediately and begin cooling down. Do not use the attachments. 14. Replace any exercise program, consult your ...physician. If the cables bind while you feel pain or dizziness while exercising, stop immediately and make sure that does not use the weight system in the appropriate location. 6. This is missing or illegible, please call our Customer Service Department at all of this manual and...
... important for personal injury or property damage sustained by or through the use only. Always wear athletic shoes for home use of the weight system are exercising, stop immediately and begin cooling down. Do not use the attachments. 14. Replace any exercise program, consult your ...physician. If the cables bind while you feel pain or dizziness while exercising, stop immediately and make sure that does not use the weight system in the appropriate location. 6. This is missing or illegible, please call our Customer Service Department at all of this manual and...
User Manual
Page 4
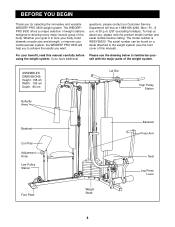
...Pulley Station Butterfly Arms Backrest Curl Pad Adjustment Knob Low Pulley Station Foot Plate Weight Stack Backrest Press Arm Seat Leg Press Lever 4 The WEIDER® PRO 9930 offers a unique selection of weight stations designed to achieve the results you want. To help you , please ...a decal attached to familiarise your goal is WESY99300. If you for selecting the innovative and versatile WEIDER® PRO 9930 weight system. For your cardiovascular system, the WEIDER® PRO 9930 will help us assist you to develop every major muscle group of the body. BEFORE YOU BEGIN...
...Pulley Station Butterfly Arms Backrest Curl Pad Adjustment Knob Low Pulley Station Foot Plate Weight Stack Backrest Press Arm Seat Leg Press Lever 4 The WEIDER® PRO 9930 offers a unique selection of weight stations designed to achieve the results you want. To help you , please ...a decal attached to familiarise your goal is WESY99300. If you for selecting the innovative and versatile WEIDER® PRO 9930 weight system. For your cardiovascular system, the WEIDER® PRO 9930 will help us assist you to develop every major muscle group of the body. BEFORE YOU BEGIN...
User Manual
Page 5
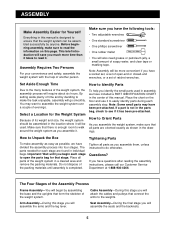
... the arms and the leg lever. The parts needed for each assembly step. Do not dispose of the packing materials until you assemble the weight system, make assembly as easy as you have the following tools: • Two adjustable wrenches • One standard screwdriver • One ... been pre-attached. ASSEMBLY Make Assembly Easier for Yourself Everything in this manual is designed to ensure that form the skeleton of the weight system. This brief introduction will save you will be used in assembly, we have questions after reading the assembly instructions, please call ...
... the arms and the leg lever. The parts needed for each assembly step. Do not dispose of the packing materials until you assemble the weight system, make assembly as easy as you have the following tools: • Two adjustable wrenches • One standard screwdriver • One ... been pre-attached. ASSEMBLY Make Assembly Easier for Yourself Everything in this manual is designed to ensure that form the skeleton of the weight system. This brief introduction will save you will be used in assembly, we have questions after reading the assembly instructions, please call ...
User Manual
Page 7
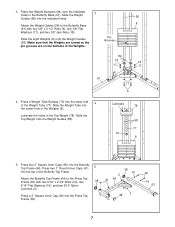
... Press Top Frame (63). 38 19 2 41 64 38 2 20 19 63 7 Press a 2" Square Inner Cap (38) into the lower end 4 of the Weight Tube (77). Make sure that the Weights are turned so the pin grooves are on the bottoms of the Butterfly Top Frame. Place two... 1" Round Inner Caps (41) 5 into the Butterfly Top Frame (64). Slide the eight Weights (8) onto the Weight Guides (58). Slide the Weight Tube into the indicated holes. Lubricate the holes in the Top Weight (78). Slide the Top Weight onto the Weight Guides (58). 17 6 Lubricate 78 58 77 76 8 5. Press two 2" Square Inner...
... Press Top Frame (63). 38 19 2 41 64 38 2 20 19 63 7 Press a 2" Square Inner Cap (38) into the lower end 4 of the Weight Tube (77). Make sure that the Weights are turned so the pin grooves are on the bottoms of the Butterfly Top Frame. Place two... 1" Round Inner Caps (41) 5 into the Butterfly Top Frame (64). Slide the eight Weights (8) onto the Weight Guides (58). Slide the Weight Tube into the indicated holes. Lubricate the holes in the Top Weight (78). Slide the Top Weight onto the Weight Guides (58). 17 6 Lubricate 78 58 77 76 8 5. Press two 2" Square Inner...
User Manual
Page 8
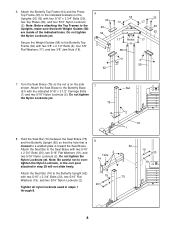
... Top Frame (64) with two 3/8" x 2 1/2" Bolts (6), four 3/8" 17 Holes 17 6 Flat Washers (17), and two 3/8" Jam Nuts (18). 58 2 2 59 62 7. Secure the Weight Guides (58) to the Butterfly Upright (62) with four 5/16" x 2 3/4" Bolts (20), two Top Plates (46), and four 5/16" Nylon Locknuts 18 20 20 17... 5/16" Nylon Locknuts (2). Hold the Seat Bar (74) between the Seat Brace (75) and the Butterfly Upright (62) so that the hole that both Weight Guides (58) 46 46 are inside of the indicated holes. Do not tighten the Nylon Locknuts yet. 75 Nut 2 61 1 8. Note: Be careful not...
... Top Frame (64) with two 3/8" x 2 1/2" Bolts (6), four 3/8" 17 Holes 17 6 Flat Washers (17), and two 3/8" Jam Nuts (18). 58 2 2 59 62 7. Secure the Weight Guides (58) to the Butterfly Upright (62) with four 5/16" x 2 3/4" Bolts (20), two Top Plates (46), and four 5/16" Nylon Locknuts 18 20 20 17... 5/16" Nylon Locknuts (2). Hold the Seat Bar (74) between the Seat Brace (75) and the Butterfly Upright (62) so that the hole that both Weight Guides (58) 46 46 are inside of the indicated holes. Do not tighten the Nylon Locknuts yet. 75 Nut 2 61 1 8. Note: Be careful not...
User Manual
Page 12
... Butterfly Top Frame (64) with a 5/16" x 1 3/4" Bolt (9) and a 5/16" Nylon 2 43 11 16 9 77 72 Locknut (2). 11 16 43 21. Attach the Pulley to the Weight Tube (77) with a 3/8" x 1 3/4" Bolt (22) and a 3/8" Nylon Locknut (4). 22 4 34 72 20. it should be threaded only two turns onto the end of the Cable...
... Butterfly Top Frame (64) with a 5/16" x 1 3/4" Bolt (9) and a 5/16" Nylon 2 43 11 16 9 77 72 Locknut (2). 11 16 43 21. Attach the Pulley to the Weight Tube (77) with a 3/8" x 1 3/4" Bolt (22) and a 3/8" Nylon Locknut (4). 22 4 34 72 20. it should be threaded only two turns onto the end of the Cable...

User Manual
Page 15
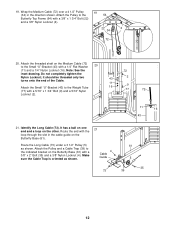
...3/8" x 3 1/4" Bolt (28), a 3/8" Flat Washer (17), and a 3/8" Nylon Locknut (4). Attach the "V" Pulley and a Long Cable Trap (14) to the small tube on the weight stack 32 in the Press Frame 31 (53). 39 Remove the 3/8" Nylon Locknut (4) from the Press Frame Upright (59). Attach the Pulley and a Cable Trap... onto the looped end of the Press Frame and that the Cable Trap is oriented as shown. 5 23 53 4 73 32. Note: Lift the Top Weight (78) on the Press Seat Frame (52) with a 3/8" x 3 1/4" Bolt (28), a 3/8" Flat Washer (17), and a 3/8" Nylon Locknut (4). Attach the Long Cable (73...
...3/8" x 3 1/4" Bolt (28), a 3/8" Flat Washer (17), and a 3/8" Nylon Locknut (4). Attach the "V" Pulley and a Long Cable Trap (14) to the small tube on the weight stack 32 in the Press Frame 31 (53). 39 Remove the 3/8" Nylon Locknut (4) from the Press Frame Upright (59). Attach the Pulley and a Cable Trap... onto the looped end of the Press Frame and that the Cable Trap is oriented as shown. 5 23 53 4 73 32. Note: Lift the Top Weight (78) on the Press Seat Frame (52) with a 3/8" x 3 1/4" Bolt (28), a 3/8" Flat Washer (17), and a 3/8" Nylon Locknut (4). Attach the Long Cable (73...
User Manual
Page 18
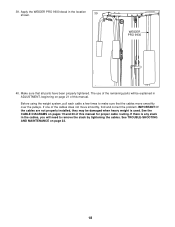
... any slack in the location 39 shown. If there is used. WEIDER PRO 9930 40. Before using the weight system, pull each cable a few times to remove the slack by tightening the cables. If one of this manual for proper cable routing. 39. Make ...
... any slack in the location 39 shown. If there is used. WEIDER PRO 9930 40. Before using the weight system, pull each cable a few times to remove the slack by tightening the cables. If one of this manual for proper cable routing. 39. Make ...
User Manual
Page 19
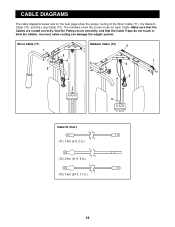
Short Cable (71) 1 Medium Cable (72) 2 2 4 1 4 5 3 3 5 Cable ID Chart (71) 1.9m (6 ft. 3 in.) (72) 3.5m (11 ft. 6 in.) (73) 7.6m (24 ft. 11 in.) 19 The numbers show the proper routing of the Short Cable (71), the Medium Cable (72), and the Long Cable (73). Make sure that the Cables are routed correctly, that the Pulleys move smoothly, and that the Cable Traps do not touch or bind the Cables. Incorrect cable routing can damage the weight system. CABLE DIAGRAMS The cable diagrams below and on the next page show the correct route for each Cable.
Short Cable (71) 1 Medium Cable (72) 2 2 4 1 4 5 3 3 5 Cable ID Chart (71) 1.9m (6 ft. 3 in.) (72) 3.5m (11 ft. 6 in.) (73) 7.6m (24 ft. 11 in.) 19 The numbers show the proper routing of the Short Cable (71), the Medium Cable (72), and the Long Cable (73). Make sure that the Cables are routed correctly, that the Pulleys move smoothly, and that the Cable Traps do not touch or bind the Cables. Incorrect cable routing can damage the weight system. CABLE DIAGRAMS The cable diagrams below and on the next page show the correct route for each Cable.

User Manual
Page 21
... the Lat Bar and the Long Cable with a Cable Clip (57). For some exercises, the Chain (55) should be performed. Make sure you insert the Weight Pin as far as an exercise is any slack in the correct starting position for the exercise to the Medium Cable (72) with two Cable... (45). 72 56 55 57 50 56 73 55 57 69 70 45 75 21 ADJUSTMENT The instructions below describe how each part of the weight system can be reduced. Important: When using an attachment, make sure that it is in the cables or the chain as it will be adjusted...
... the Lat Bar and the Long Cable with a Cable Clip (57). For some exercises, the Chain (55) should be performed. Make sure you insert the Weight Pin as far as an exercise is any slack in the correct starting position for the exercise to the Medium Cable (72) with two Cable... (45). 72 56 55 57 50 56 73 55 57 69 70 45 75 21 ADJUSTMENT The instructions below describe how each part of the weight system can be reduced. Important: When using an attachment, make sure that it is in the cables or the chain as it will be adjusted...
User Manual
Page 22
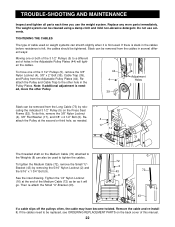
... (72), remove the Small "U"Bracket (43) by relocating the indicated 3 1/2" Pulley (5) on the Medium Cable (72) attached to the Weights (8) can stretch slightly when it is first used to the other Pulley. 44 4 39 Adjustment Holes 5 Slack can be removed from the ...3/8" x 2 1/2" Bolt (6). Note: If additional adjustment is felt, the cables should be used . The threaded shaft on the Press Seat Frame (52). The weight system can be cleaned using a damp cloth and mild non-abrasive detergent. TIGHTENING THE CABLES The type of the 3 1/2" Pulleys (5), remove the 3/8" Nylon Locknut (4),...
... (72), remove the Small "U"Bracket (43) by relocating the indicated 3 1/2" Pulley (5) on the Medium Cable (72) attached to the Weights (8) can stretch slightly when it is first used to the other Pulley. 44 4 39 Adjustment Holes 5 Slack can be removed from the ...3/8" x 2 1/2" Bolt (6). Note: If additional adjustment is felt, the cables should be used . The threaded shaft on the Press Seat Frame (52). The weight system can be cleaned using a damp cloth and mild non-abrasive detergent. TIGHTENING THE CABLES The type of the 3 1/2" Pulleys (5), remove the 3/8" Nylon Locknut (4),...
User Manual
Page 23
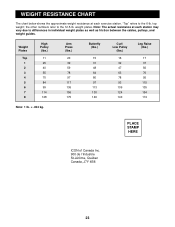
the other numbers refer to differences in individual weight plates as well as friction between the cables, pulleys, and weight guides. WEIGHT RESISTANCE CHART The chart below shows the approximate weight resistance at each exercise station. weight plates. Weight Plates Top 1 2 3 4 5 6 7 8 High Pulley (lbs.) 11 25 40 55 70 84 99 114 128 Arm Press (lbs.) 20... the 12.5-lb. PLACE STAMP HERE ICON of Canada Inc. 900 de l'Industrie St-Jérôme, Québec Canada, J7Y 4B8 23 top weight; "Top" refers to the 6-lb.
the other numbers refer to differences in individual weight plates as well as friction between the cables, pulleys, and weight guides. WEIGHT RESISTANCE CHART The chart below shows the approximate weight resistance at each exercise station. weight plates. Weight Plates Top 1 2 3 4 5 6 7 8 High Pulley (lbs.) 11 25 40 55 70 84 99 114 128 Arm Press (lbs.) 20... the 12.5-lb. PLACE STAMP HERE ICON of Canada Inc. 900 de l'Industrie St-Jérôme, Québec Canada, J7Y 4B8 23 top weight; "Top" refers to the 6-lb.
User Manual
Page 24
EST (excluding holidays). The MODEL NUMBER of the product (WEIDER® PRO 9930 weight system) 3. SERIAL NO. o Magazine o Friend/relative o Newspaper ad o Other o Store 7) What was the primary reason for purchasing this manual) 4. o No o Yes What other type of ...
EST (excluding holidays). The MODEL NUMBER of the product (WEIDER® PRO 9930 weight system) 3. SERIAL NO. o Magazine o Friend/relative o Newspaper ad o Other o Store 7) What was the primary reason for purchasing this manual) 4. o No o Yes What other type of ...
User Manual
Page 30
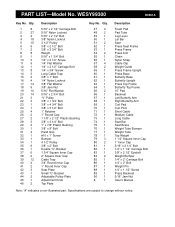
...2 42 3 43 1 44 2 45 1 46 2 Description 5/16" x 2 1/2" Carriage Bolt 5/16" Nylon Locknut 5/16" x 2 1/2" Bolt 3/8" Nylon Locknut 3 1/2" Pulley 3/8" x 2 1/2" Bolt 3/8" x 3 3/4" Bolt Weight 5/16" x 1 3/4" Bolt 1/4" x 2 1/2" Screw 1/4" Flat Washer 1/4" x 2 1/2" Carriage Bolt 1/4" x 3/4" Screw Long Cable Trap 3/8" x 1" Bolt 1/4" Nylon Locknut 3/8" Flat Washer 3/8" Jam Nut 5/16" Flat Washer ...Leg Lever Lat Bar Seat Press Seat Frame Press Frame Press Arm Chain Nylon Strap Cable Clip Weight Guide Press Frame Upright Press Base Butterfly Base Butterfly Upright Press Top Frame Butterfly Top Frame 10...
...2 42 3 43 1 44 2 45 1 46 2 Description 5/16" x 2 1/2" Carriage Bolt 5/16" Nylon Locknut 5/16" x 2 1/2" Bolt 3/8" Nylon Locknut 3 1/2" Pulley 3/8" x 2 1/2" Bolt 3/8" x 3 3/4" Bolt Weight 5/16" x 1 3/4" Bolt 1/4" x 2 1/2" Screw 1/4" Flat Washer 1/4" x 2 1/2" Carriage Bolt 1/4" x 3/4" Screw Long Cable Trap 3/8" x 1" Bolt 1/4" Nylon Locknut 3/8" Flat Washer 3/8" Jam Nut 5/16" Flat Washer ...Leg Lever Lat Bar Seat Press Seat Frame Press Frame Press Arm Chain Nylon Strap Cable Clip Weight Guide Press Frame Upright Press Base Butterfly Base Butterfly Upright Press Top Frame Butterfly Top Frame 10...


