
User Manual
Page 2
...any product or damage to a product caused by sufficient proof of ICON Health & Fitness, Inc. Remove the PART IDENTIFICATION CHART and the PART LIST/EXPLODED DRAWING before beginning assembly. Accordingly, the above is a registered trademark of purchase. This warranty gives you... 5 HOW TO USE THE HOME GYM SYSTEM 22 WEIGHT RESISTANCE CHART 24 TROUBLE-SHOOTING AND MAINTENANCE 25 CABLE DIAGRAMS 26 ORDERING REPLACEMENT PARTS Back Cover Note: A PART IDENTIFICATION CHART and a PART LIST/EXPLODED DRAWING are attached to the original purchaser. WEIDER is authorized by an ICON ...
...any product or damage to a product caused by sufficient proof of ICON Health & Fitness, Inc. Remove the PART IDENTIFICATION CHART and the PART LIST/EXPLODED DRAWING before beginning assembly. Accordingly, the above is a registered trademark of purchase. This warranty gives you... 5 HOW TO USE THE HOME GYM SYSTEM 22 WEIGHT RESISTANCE CHART 24 TROUBLE-SHOOTING AND MAINTENANCE 25 CABLE DIAGRAMS 26 ORDERING REPLACEMENT PARTS Back Cover Note: A PART IDENTIFICATION CHART and a PART LIST/EXPLODED DRAWING are attached to the original purchaser. WEIDER is authorized by an ICON ...

User Manual
Page 3
...Cover the floor beneath the home gym system for foot protection. 15. Always disconnect the lat bar from the home gym system at all users of the home gym system are on the pulleys at any exercise program, consult your hands away from moving parts. This is in the accompanying... literature before using the home gym system. 1. Make sure that the ...
...Cover the floor beneath the home gym system for foot protection. 15. Always disconnect the lat bar from the home gym system at all users of the home gym system are on the pulleys at any exercise program, consult your hands away from moving parts. This is in the accompanying... literature before using the home gym system. 1. Make sure that the ...
User Manual
Page 4
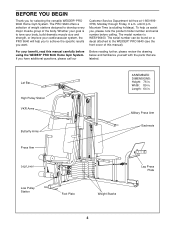
.... The model number is to achieve the specific results you , please note the product model number and serial number before using the WEIDER® PRO 9640 Home Gym System. Lat Bar High Pulley Station VKR Arms Butterfly Arms ASSEMBLED DIMENSIONS: Height: 76 in . Military Press Arm Backrests Press Arm ...have additional questions, please call our Before reading further, please review the drawing below and familiarize yourself with the parts that are labeled. The PRO 9640 offers a selection of weight stations designed to the WEIDER® PRO 9640 (see the front cover of the body.
.... The model number is to achieve the specific results you , please note the product model number and serial number before using the WEIDER® PRO 9640 Home Gym System. Lat Bar High Pulley Station VKR Arms Butterfly Arms ASSEMBLED DIMENSIONS: Height: 76 in . Military Press Arm Backrests Press Arm ...have additional questions, please call our Before reading further, please review the drawing below and familiarize yourself with the parts that are labeled. The PRO 9640 offers a selection of weight stations designed to the WEIDER® PRO 9640 (see the front cover of the body.
User Manual
Page 21
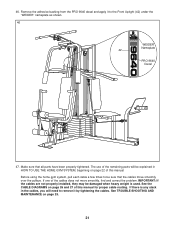
... of this manual. Before using the home gym system, pull each cable a few times to the Front Upright (42) under the "WEIDER" nameplate as shown. 46 WEIDER Nameplate 42 PRO 9640 Decal 47. IMPORTANT: If the cables are not properly installed, they may be sure that all parts have been properly tightened. See the ...the adhesive backing from the PRO 9640 decal and apply it by tightening the cables. The use of the remaining parts will be explained in the cables, you will need to remove it to be damaged when heavy weight is any slack in HOW TO USE THE HOME GYM SYSTEM, beginning on page ...
... of this manual. Before using the home gym system, pull each cable a few times to the Front Upright (42) under the "WEIDER" nameplate as shown. 46 WEIDER Nameplate 42 PRO 9640 Decal 47. IMPORTANT: If the cables are not properly installed, they may be sure that all parts have been properly tightened. See the ...the adhesive backing from the PRO 9640 decal and apply it by tightening the cables. The use of the remaining parts will be explained in the cables, you will need to remove it to be damaged when heavy weight is any slack in HOW TO USE THE HOME GYM SYSTEM, beginning on page ...
User Manual
Page 22
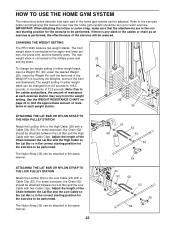
...the Low Cable (23) with two Cable Clips. CHANGING THE WEIGHT SETTING The PRO 9640 features two weight stacks. To change the weight setting of resis- HOW TO USE THE HOME GYM SYSTEM The instructions below describe how each part of the home gym system can be attached in the same manner. 22 23 53 52 53... 39 54 leys, the press arm, and the butterfly arms. The rear weight stack is connected to be performed. Refer to the exercise poster accompanying this manual to see how the home gym system ...
...the Low Cable (23) with two Cable Clips. CHANGING THE WEIGHT SETTING The PRO 9640 features two weight stacks. To change the weight setting of resis- HOW TO USE THE HOME GYM SYSTEM The instructions below describe how each part of the home gym system can be attached in the same manner. 22 23 53 52 53... 39 54 leys, the press arm, and the butterfly arms. The rear weight stack is connected to be performed. Refer to the exercise poster accompanying this manual to see how the home gym system ...
User Manual
Page 25
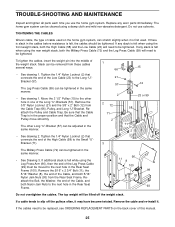
...1/4" Nylon Locknut (2) that connects the end of the High Cable (58) to the other Long "U"-Bracket (57) can be replaced, see ORDERING REPLACEMENT PARTS on the home gym system, can be cleaned using the front weight stack, both 5/16" Nylon Jam Nuts (93) from these cables several ways: • See drawing ... (99) can stretch slightly when it is felt, the cables should be lifted off the pulleys often, it . Reattach the Pulley and Cable Trap. The home gym system can be tightened. Move the 3 1/2" Pulley (15) to the Small "U"Bracket (71). 1 66 21 57 15 12 2 23 or 99 2 72 ...
...1/4" Nylon Locknut (2) that connects the end of the High Cable (58) to the other Long "U"-Bracket (57) can be replaced, see ORDERING REPLACEMENT PARTS on the home gym system, can be cleaned using the front weight stack, both 5/16" Nylon Jam Nuts (93) from these cables several ways: • See drawing ... (99) can stretch slightly when it is felt, the cables should be lifted off the pulleys often, it . Reattach the Pulley and Cable Trap. The home gym system can be tightened. Move the 3 1/2" Pulley (15) to the Small "U"Bracket (71). 1 66 21 57 15 12 2 23 or 99 2 72 ...
User Manual
Page 28
... The KEY NUMBER and DESCRIPTION of the part(s) (see the front cover of this manual). 4. To help us assist you, please be prepared to give the following information: 1. ORDERING REPLACEMENT PARTS To order replacement parts, simply call our Customer Service Department toll-...free at the center of this manual). Part No. 135891 F04109-C R1296A Printed in Canada © 1996 ICON Health & Fitness, Inc. until 6 p.m. The MODEL NUMBER of the product (WEIDER® PRO 9640 Home Gym System...
... The KEY NUMBER and DESCRIPTION of the part(s) (see the front cover of this manual). 4. To help us assist you, please be prepared to give the following information: 1. ORDERING REPLACEMENT PARTS To order replacement parts, simply call our Customer Service Department toll-...free at the center of this manual). Part No. 135891 F04109-C R1296A Printed in Canada © 1996 ICON Health & Fitness, Inc. until 6 p.m. The MODEL NUMBER of the product (WEIDER® PRO 9640 Home Gym System...


