

User Manual
Page 1
... of charge to you have questions, or if there are missing or damaged parts, we are committed to providing complete customer satisfaction. USER'S MANUAL Visit our website at www.weiderfitness.com new products, prizes, fitness tips, and much more! Write the serial number in this... manual before using this manual for future reference. TO AVOID UNNECESSARY DELAYS, PLEASE CALL DIRECT TO OUR TOLL-FREE CUSTOMER HOT LINE. Save this equipment. If you . Model No...
... of charge to you have questions, or if there are missing or damaged parts, we are committed to providing complete customer satisfaction. USER'S MANUAL Visit our website at www.weiderfitness.com new products, prizes, fitness tips, and much more! Write the serial number in this... manual before using this manual for future reference. TO AVOID UNNECESSARY DELAYS, PLEASE CALL DIRECT TO OUR TOLL-FREE CUSTOMER HOT LINE. Save this equipment. If you . Model No...

User Manual
Page 2
TABLE OF CONTENTS IMPORTANT PRECAUTIONS 3 BEFORE YOU BEGIN 4 ASSEMBLY 5 ADJUSTMENTS 22 WEIGHT RESISTANCE CHART 24 MAINTENANCE 25 CABLE DIAGRAMS 26 ORDERING REPLACEMENT PARTS Back Cover LIMITED WARRANTY Back Cover Note: A PART IDENTIFICATION CHART and a PART LIST/EXPLODED DRAWING are attached in the center of ICON IP, Inc. 2 WEIDER is a registered trademark of this manual. Remove the PART IDENTIFICATION CHART and the PART LIST/EXPLODED DRAWING before beginning assembly.
TABLE OF CONTENTS IMPORTANT PRECAUTIONS 3 BEFORE YOU BEGIN 4 ASSEMBLY 5 ADJUSTMENTS 22 WEIGHT RESISTANCE CHART 24 MAINTENANCE 25 CABLE DIAGRAMS 26 ORDERING REPLACEMENT PARTS Back Cover LIMITED WARRANTY Back Cover Note: A PART IDENTIFICATION CHART and a PART LIST/EXPLODED DRAWING are attached in the center of ICON IP, Inc. 2 WEIDER is a registered trademark of this manual. Remove the PART IDENTIFICATION CHART and the PART LIST/EXPLODED DRAWING before beginning assembly.
User Manual
Page 3
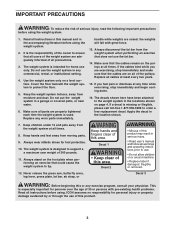
...in the locations shown on page 4. IMPORTANT PRECAUTIONS WARNING: To reduce the risk of this product may result in serious injury. • Read user's manual and follow all warnings and operating instructions prior to use. • Do not allow children on or around machine. • Replace label if damaged,... illegible, or removed. 12. Read all instructions in this manual and in a garage or covered patio, or near water. 6. The decals shown here have been attached to tip. Keep hands and fingers clear of ...
...in the locations shown on page 4. IMPORTANT PRECAUTIONS WARNING: To reduce the risk of this product may result in serious injury. • Read user's manual and follow all warnings and operating instructions prior to use. • Do not allow children on or around machine. • Replace label if damaged,... illegible, or removed. 12. Read all instructions in this manual and in a garage or covered patio, or near water. 6. The decals shown here have been attached to tip. Keep hands and fingers clear of ...

User Manual
Page 4
...70 in . The model number is to tone your body, build dramatic muscle size and strength, or improve your benefit, read this manual). If you , please note the product model number and serial number before using the weight system. until 6 p.m. Butterfly Arms Press ...manual, please call our Customer Service Department toll-free at 1-877-992-5999, Monday through Friday, 6 a.m. The serial number can be found on a decal attached to the weight system (see the front cover of weight stations designed to achieve the specific results you for selecting the versatile WEIDER® PRO 3750...
...70 in . The model number is to tone your body, build dramatic muscle size and strength, or improve your benefit, read this manual). If you , please note the product model number and serial number before using the weight system. until 6 p.m. Butterfly Arms Press ...manual, please call our Customer Service Department toll-free at 1-877-992-5999, Monday through Friday, 6 a.m. The serial number can be found on a decal attached to the weight system (see the front cover of weight stations designed to achieve the specific results you for selecting the versatile WEIDER® PRO 3750...
User Manual
Page 5
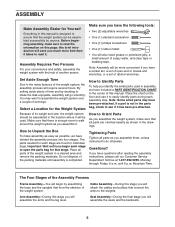
You may have a socket set, a set of this manual. If a part is enough room to walk around the weight system as shown in the drawings. Make sure that there is not in the parts ... petroleum jelly, a small amount of time and by assembling the base and the uprights that stage. ASSEMBLY Make Assembly Easier for Yourself Everything in this manual is designed to ensure that the weight system can be used in assembly, we have the following tools: • Two (2) adjustable wrenches • One (1) standard...
You may have a socket set, a set of this manual. If a part is enough room to walk around the weight system as shown in the drawings. Make sure that there is not in the parts ... petroleum jelly, a small amount of time and by assembling the base and the uprights that stage. ASSEMBLY Make Assembly Easier for Yourself Everything in this manual is designed to ensure that the weight system can be used in assembly, we have the following tools: • Two (2) adjustable wrenches • One (1) standard...
User Manual
Page 6
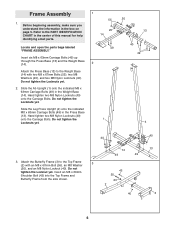
...). Hand tighten two M8 Nylon Locknuts (40) onto the Carriage Bolts. Before beginning assembly, make sure you understand the information in the center of this manual for help identifying small parts. 1 55 20 14 Locate and open the parts bags labeled "FRAME ASSEMBLY." Insert six M8 x 63mm Carriage Bolts (49) up...
...). Hand tighten two M8 Nylon Locknuts (40) onto the Carriage Bolts. Before beginning assembly, make sure you understand the information in the center of this manual for help identifying small parts. 1 55 20 14 Locate and open the parts bags labeled "FRAME ASSEMBLY." Insert six M8 x 63mm Carriage Bolts (49) up...
User Manual
Page 11
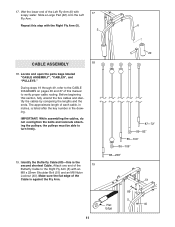
... of the Left Fly Arm (6) with the Right Fly Arm (5). 6 5 CABLE ASSEMBLY 18 18. Slide a Large Pad (22) onto the Left Fly Arm. Repeat this manual to the CABLE DIAGRAMS on pages 26 and 27 of the 19 Butterfly Cable to turn freely. 19. IMPORTANT: While assembling the cables, do not...
... of the Left Fly Arm (6) with the Right Fly Arm (5). 6 5 CABLE ASSEMBLY 18 18. Slide a Large Pad (22) onto the Left Fly Arm. Repeat this manual to the CABLE DIAGRAMS on pages 26 and 27 of the 19 Butterfly Cable to turn freely. 19. IMPORTANT: While assembling the cables, do not...
User Manual
Page 21
... Carriage Bolt. If there is used. Insert a Pad Tube (28) into the Leg Lever (15). Slide two Foam Pads (29) onto the ends of this manual for proper cable routing. Thread an M6 Nylon Locknut (44) with an M6 Washer (37) and an M6 x 63mm Machine Screw (64). Attach the other...
... Carriage Bolt. If there is used. Insert a Pad Tube (28) into the Leg Lever (15). Slide two Foam Pads (29) onto the ends of this manual for proper cable routing. Thread an M6 Nylon Locknut (44) with an M6 Washer (37) and an M6 x 63mm Machine Screw (64). Attach the other...
User Manual
Page 22
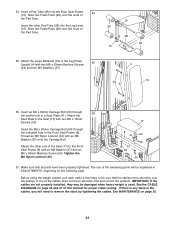
...) under the desired Weight (90). For some exercises, the Chain (34) should be attached in the same man- Refer to the exercise guide accompanying this manual to see how the weight system should be adjusted. CHANGING THE WEIGHT SETTING The weight system features two weight stacks. To change the weight setting...
...) under the desired Weight (90). For some exercises, the Chain (34) should be attached in the same man- Refer to the exercise guide accompanying this manual to see how the weight system should be adjusted. CHANGING THE WEIGHT SETTING The weight system features two weight stacks. To change the weight setting...

User Manual
Page 25
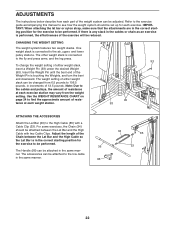
... ways: • See drawing 1. If you feel additional slack while using the other hole in the proper position and that connects the end of this manual. 25 Keep the Cable Traps for future use solvents. Remove the cable and re-install it may have become twisted. If any slack is felt...
... ways: • See drawing 1. If you feel additional slack while using the other hole in the proper position and that connects the end of this manual. 25 Keep the Cable Traps for future use solvents. Remove the cable and re-install it may have become twisted. If any slack is felt...

User Manual
Page 30
... Cable 90 16 Weight 91 2 M10 x 57mm Bolt 92 2 25mm Inner Cap 93 2 Weight Pin 94 2 Pulley Cover 95 1 M10 x 97mm Bolt 96 1 Handle # 1 User's Manual # 1 Exercise Guide # 2 Grease Packet Note: "#" indicates a non-illustrated part. WESY26331 R0904A Key No. Description Key No. Specifications are subject to change without notice. PART LIST...
... Cable 90 16 Weight 91 2 M10 x 57mm Bolt 92 2 25mm Inner Cap 93 2 Weight Pin 94 2 Pulley Cover 95 1 M10 x 97mm Bolt 96 1 Handle # 1 User's Manual # 1 Exercise Guide # 2 Grease Packet Note: "#" indicates a non-illustrated part. WESY26331 R0904A Key No. Description Key No. Specifications are subject to change without notice. PART LIST...

User Manual
Page 32
... or consequential damages. Some states do not allow limitations on how long an implied warranty lasts. The MODEL NUMBER of the product (WEIDER® PRO 3750 weight system) 3. The SERIAL NUMBER of the product (see the PART LIST and EXPLODED DRAWING attached at the center of merchantability or... the above limitation may not apply to give the following information: 1. The warranty extended hereunder is in lieu of any implied warranties of this manual) LIMITED WARRANTY ICON Health & Fitness, Inc. (ICON), warrants this product to be free from state to the terms set forth above is...
... or consequential damages. Some states do not allow limitations on how long an implied warranty lasts. The MODEL NUMBER of the product (WEIDER® PRO 3750 weight system) 3. The SERIAL NUMBER of the product (see the PART LIST and EXPLODED DRAWING attached at the center of merchantability or... the above limitation may not apply to give the following information: 1. The warranty extended hereunder is in lieu of any implied warranties of this manual) LIMITED WARRANTY ICON Health & Fitness, Inc. (ICON), warrants this product to be free from state to the terms set forth above is...


