
English Manual
Page 2
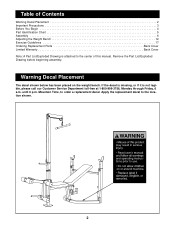
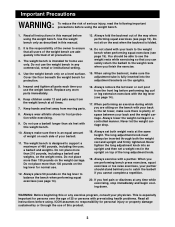
Warning Decal Placement The decal shown below has been placed on the weight bench. Apply the replacement decal to order a replacement decal. until 6 p.m. Remove the Part List/Exploded Drawing before beginning assembly. Mountain Time,...andoperatinginstructions prior to the center of Contents Warning Decal Placement 2 Important Precautions 3 Before You Begin 4 Part Identification Chart 5 Assembly 6 Adjusting the Weight Bench 12 Exercise Guidelines 17 Ordering Replacement Parts Back Cover Limited Warranty Back Cover Note: A Part List/Exploded Drawing is not legible, please call our...
Warning Decal Placement The decal shown below has been placed on the weight bench. Apply the replacement decal to order a replacement decal. until 6 p.m. Remove the Part List/Exploded Drawing before beginning assembly. Mountain Time,...andoperatinginstructions prior to the center of Contents Warning Decal Placement 2 Important Precautions 3 Before You Begin 4 Part Identification Chart 5 Assembly 6 Adjusting the Weight Bench 12 Exercise Guidelines 17 Ordering Replacement Parts Back Cover Limited Warranty Back Cover Note: A Part List/Exploded Drawing is not legible, please call our...
English Manual
Page 3
... ICON assumes no responsibility for persons over the age of serious injury, read the following important precautions before using the weight bench. 1. Use the weight bench only as described in a controlled manner. adjustment brackets on a level surface. 15. Do not use a barbell longer than...physician. If you are sitting on the leg lever for home use the weight bench. Use the weight bench only on the uprights. 5. The weight bench is plenty of this manual. 13. Always set a weight rest in any time while exercising, stop immediately and begin cooling down. When...
... ICON assumes no responsibility for persons over the age of serious injury, read the following important precautions before using the weight bench. 1. Use the weight bench only as described in a controlled manner. adjustment brackets on a level surface. 15. Do not use a barbell longer than...physician. If you are sitting on the leg lever for home use the weight bench. Use the weight bench only on the uprights. 5. The weight bench is plenty of this manual. 13. Always set a weight rest in any time while exercising, stop immediately and begin cooling down. When...
English Manual
Page 4
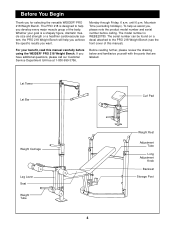
... the parts that are labeled. until 6 p.m. Mountain Time (excluding holidays). If you , please note the product model number and serial number before using the WEIDER® PRO 218 Weight Bench. The serial number can be found on a decal attached to help you achieve the specific results you develop every major muscle group of this manual...
... the parts that are labeled. until 6 p.m. Mountain Time (excluding holidays). If you , please note the product model number and serial number before using the WEIDER® PRO 218 Weight Bench. The serial number can be found on a decal attached to help you achieve the specific results you develop every major muscle group of this manual...
English Manual
Page 6
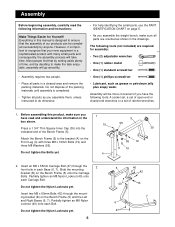
... Right Bases (6, 7). Insert an M8 x 55mm Carriage Bolt (47) through the mounting bracket (B) on page 5. • As you assemble the weight bench, make the task enjoyable, assembly will take time. Partially tighten an M8 Nylon Locknut (40) onto each Base (6, 7). However, it is important to... that your new equipment is completed. • Tighten all parts as you assemble them, unless instructed to the bracket (A) on the Bench Frame (5) onto the Carriage Bolts. Partially tighten an M8 Nylon Locknut (40) onto each Carriage Bolt. Assembly Before beginning assembly, carefully...
... Right Bases (6, 7). Insert an M8 x 55mm Carriage Bolt (47) through the mounting bracket (B) on page 5. • As you assemble the weight bench, make the task enjoyable, assembly will take time. Partially tighten an M8 Nylon Locknut (40) onto each Base (6, 7). However, it is important to... that your new equipment is completed. • Tighten all parts as you assemble them, unless instructed to the bracket (A) on the Bench Frame (5) onto the Carriage Bolts. Partially tighten an M8 Nylon Locknut (40) onto each Carriage Bolt. Assembly Before beginning assembly, carefully...

English Manual
Page 9
...of the Weight Tube. 30 21 3 40 55 Slide the Weight Stop (21) onto the Weight Tube (20). 20 29 29 57 55 56 42 12. Press a 1" Round Inner Cap (30) into the indicated hole in the Bench Frame ...Washer (55) and an M8 Nylon Locknut (40). Slide two Foam Pads (18) onto each end of the Weight Tube (20). Insert the Short Pad Tubes (17) through the holes in the bracket (E) on the Front Leg ... (42), two M8 Washers (55), a 13mm Spacer (56) and an M8 Nylon Locknut (40). Insert the Weight Tube (20) into the other end of the Seat (22) is pointing towards the Backrest (23). 10 22 63...
...of the Weight Tube. 30 21 3 40 55 Slide the Weight Stop (21) onto the Weight Tube (20). 20 29 29 57 55 56 42 12. Press a 1" Round Inner Cap (30) into the indicated hole in the Bench Frame ...Washer (55) and an M8 Nylon Locknut (40). Slide two Foam Pads (18) onto each end of the Weight Tube (20). Insert the Short Pad Tubes (17) through the holes in the bracket (E) on the Front Leg ... (42), two M8 Washers (55), a 13mm Spacer (56) and an M8 Nylon Locknut (40). Insert the Weight Tube (20) into the other end of the Seat (22) is pointing towards the Backrest (23). 10 22 63...
English Manual
Page 12
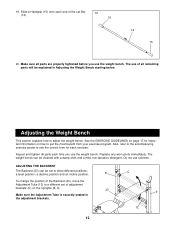
...most benefit from your exercise program. Replace any worn parts immediately. Do not use the weight bench. The use the weight bench. Also, refer to the accompanying exercise poster to adjust the weight bench. The weight bench can be cleaned with a damp cloth and a mild, non-abrasive detergent. Inspect and ...12 12 See the EXERCISE GUIDELINES on the Uprights (8, 9). 23 9 Make sure the Adjustment Tube is securely seated in Adjusting the Weight Bench starting below. ADJUSTING THE BACKREST The Backrest (23) can be set of adjustment brackets (C) on page 17 for each end of ...
...most benefit from your exercise program. Replace any worn parts immediately. Do not use the weight bench. The use the weight bench. Also, refer to the accompanying exercise poster to adjust the weight bench. The weight bench can be cleaned with a damp cloth and a mild, non-abrasive detergent. Inspect and ...12 12 See the EXERCISE GUIDELINES on the Uprights (8, 9). 23 9 Make sure the Adjustment Tube is securely seated in Adjusting the Weight Bench starting below. ADJUSTING THE BACKREST The Backrest (23) can be set of adjustment brackets (C) on page 17 for each end of ...
English Manual
Page 14
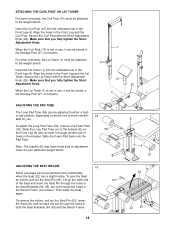
..., not shown). 1 10 4 ADJUSTING THE PAD TUBE The Long Pad Tube (59) can be adjusted to either a high or low position, depending on your particular weight bench. Slide the Long Pad Tube out of holes in the bracket. ADJUSTING THE SEAT INCLINE 18 Some exercises can be performed more comfort- 18 able... Front Leg and the Lat Tower. ATTACHING THE CURL POST OR LAT TOWER For some exercises, the Curl Post (10) must be attached to the weight bench. Slide the Foam Pad back onto the Pad Tube. Insert the Curl Post (10) into the indicated hole in the Front Leg and the Curl...
..., not shown). 1 10 4 ADJUSTING THE PAD TUBE The Long Pad Tube (59) can be adjusted to either a high or low position, depending on your particular weight bench. Slide the Long Pad Tube out of holes in the bracket. ADJUSTING THE SEAT INCLINE 18 Some exercises can be performed more comfort- 18 able... Front Leg and the Lat Tower. ATTACHING THE CURL POST OR LAT TOWER For some exercises, the Curl Post (10) must be attached to the weight bench. Slide the Foam Pad back onto the Pad Tube. Insert the Curl Post (10) into the indicated hole in the Front Leg and the Curl...
English Manual
Page 15
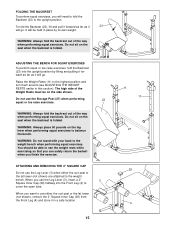
...(23), lift and pull it forward as far as it 23 will go . ADJUSTING THE BENCH FOR SQUAT EXERCISES To perform squat or toe raise exercises, fold the Backrest (23) into ...the backrest out of the way when performing squat exercises. You should be able to the weight bench. The high side of the Weight Rests must be held in place by lifting and pulling it forward as far as it ... you can safely return the barbell when you will go . When you want to the weight bench when performing squat exercises. FOLDING THE BACKREST To perform squat exercises, you finish the exercise...
...(23), lift and pull it forward as far as it 23 will go . ADJUSTING THE BENCH FOR SQUAT EXERCISES To perform squat or toe raise exercises, fold the Backrest (23) into ...the backrest out of the way when performing squat exercises. You should be able to the weight bench. The high side of the Weight Rests must be held in place by lifting and pulling it forward as far as it ... you can safely return the barbell when you will go . When you want to the weight bench when performing squat exercises. FOLDING THE BACKREST To perform squat exercises, you finish the exercise...
English Manual
Page 20
... to give the following information when calling: • The MODEL NUMBER of the product (WEBE20780) • The NAME of the product (WEIDER® PRO 218 Weight Bench) • The SERIAL NUMBER of the product (see the front cover of this manual). ICON's obligation under normal use , costs of ...of purchase. Accordingly, the above limitation may not apply to you . ICON HEALTH & FITNESS, INC., 1500 S. 1000 W., LOGAN, UT 84321-9813 WEIDER is made must be received by sufficient proof of purchase. This warranty extends only to you . until 6 p.m. All returns must be pre-authorized ...
... to give the following information when calling: • The MODEL NUMBER of the product (WEBE20780) • The NAME of the product (WEIDER® PRO 218 Weight Bench) • The SERIAL NUMBER of the product (see the front cover of this manual). ICON's obligation under normal use , costs of ...of purchase. Accordingly, the above limitation may not apply to you . ICON HEALTH & FITNESS, INC., 1500 S. 1000 W., LOGAN, UT 84321-9813 WEIDER is made must be received by sufficient proof of purchase. This warranty extends only to you . until 6 p.m. All returns must be pre-authorized ...

English Manual
Page 22
... 24 1 25 2 26 1 27 1 28 1 29 5 30 2 31 6 32 2 33 2 34 2 35 2 Description Lat Tower Weight Carriage Leg Lever Front Leg Bench Frame Left Base Right Base Left Upright Right Upright Curl Post Weight Rest Adjustment Tube Left Backrest Tube Lat Bar Handgrip Cable Clip Short Pad Tube Foam Pad M8... x 16mm Bolt Weight Tube Weight Stop Seat Backrest Curl Pad Long Adjustment Knob Short ...
... 24 1 25 2 26 1 27 1 28 1 29 5 30 2 31 6 32 2 33 2 34 2 35 2 Description Lat Tower Weight Carriage Leg Lever Front Leg Bench Frame Left Base Right Base Left Upright Right Upright Curl Post Weight Rest Adjustment Tube Left Backrest Tube Lat Bar Handgrip Cable Clip Short Pad Tube Foam Pad M8... x 16mm Bolt Weight Tube Weight Stop Seat Backrest Curl Pad Long Adjustment Knob Short ...


