

English Manual
Page 1
Sears, Roebuck and Co., Hoffman Estates, IL 60179 Model No. 831.15392.3 Serial No. Serial Number Decal (under seat) • Assembly • Adjustments • Part List and Drawing WEIGHT SYSTEM EXERCISER User's Manual CAUTION Read all precautions and instructions in the space above for future reference. Save this equipment. Write the serial number in this manual before using this manual for future reference.
Sears, Roebuck and Co., Hoffman Estates, IL 60179 Model No. 831.15392.3 Serial No. Serial Number Decal (under seat) • Assembly • Adjustments • Part List and Drawing WEIGHT SYSTEM EXERCISER User's Manual CAUTION Read all precautions and instructions in the space above for future reference. Save this equipment. Write the serial number in this manual before using this manual for future reference.

English Manual
Page 2
... placed on the resistance system. Keep hands and fingers clear of this area. 2 Remove the PART IDENTIFICATION CHART and PART LIST/EXPLODED DRAWING before beginning assembly. TABLE OF CONTENTS WARNING DECAL PLACEMENT 2 IMPORTANT PRECAUTIONS 3 BEFORE YOU BEGIN 4 ASSEMBLY 5 ADJUSTMENTS 13 CABLE DIAGRAM 17 EXERCISE GUIDELINES 18 ORDERING REPLACEMENT PARTS Back Cover FULL ONE-YEAR WARRANTY Back Cover Note: A PART IDENTIFICATION CHART and a PART LIST/EXPLODED DRAWING are attached in the location shown. Apply...
... placed on the resistance system. Keep hands and fingers clear of this area. 2 Remove the PART IDENTIFICATION CHART and PART LIST/EXPLODED DRAWING before beginning assembly. TABLE OF CONTENTS WARNING DECAL PLACEMENT 2 IMPORTANT PRECAUTIONS 3 BEFORE YOU BEGIN 4 ASSEMBLY 5 ADJUSTMENTS 13 CABLE DIAGRAM 17 EXERCISE GUIDELINES 18 ORDERING REPLACEMENT PARTS Back Cover FULL ONE-YEAR WARRANTY Back Cover Note: A PART IDENTIFICATION CHART and a PART LIST/EXPLODED DRAWING are attached in the location shown. Apply...

English Manual
Page 3
... adjust the resistance bar assembly to the horizontal position and make sure that does not require it. 19. If the cables bind as described in use only. Replace all times. Use the resistance system only as you purchase the optional lat bar, always disconnect it from the resistance system at a time. 4. The top frame is secure before using the resistance system. 1. If you are exercising, stop...
... adjust the resistance bar assembly to the horizontal position and make sure that does not require it. 19. If the cables bind as described in use only. Replace all times. Use the resistance system only as you purchase the optional lat bar, always disconnect it from the resistance system at a time. 4. The top frame is secure before using the resistance system. 1. If you are exercising, stop...

English Manual
Page 4
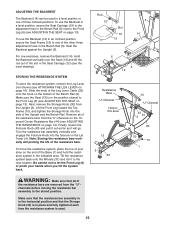
... in . Fulcrum Knob Upright Storage Knob Backrest Curl Pad Curl Bar Leg Lever Top Frame Lat Tower High Pulley Resistance Bars "U"-Channel Low Pulley Base Plate Seat Seat Knob 4 The resistance system offers a selection of stations designed to tone your body, build dramatic muscle size and strength, or improve your benefit, read this manual, call 1-800-4-MY-HOME® (1-800-469-4663). Before reading further, please review the drawing below...
... in . Fulcrum Knob Upright Storage Knob Backrest Curl Pad Curl Bar Leg Lever Top Frame Lat Tower High Pulley Resistance Bars "U"-Channel Low Pulley Base Plate Seat Seat Knob 4 The resistance system offers a selection of stations designed to tone your body, build dramatic muscle size and strength, or improve your benefit, read this manual, call 1-800-4-MY-HOME® (1-800-469-4663). Before reading further, please review the drawing below...
English Manual
Page 5
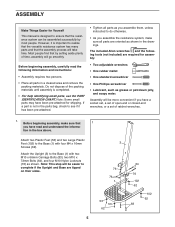
... x 72mm Bolts (64), and four M10 Nylon Locknuts (76) as you assemble them, unless instructed to do otherwise. • As you assemble the resistance system, make sure that the assembly process will be easier to complete if the Upright and Base are oriented as grease or petroleum jelly, and soapy water. Note: This step will take time. If a part is...
... x 72mm Bolts (64), and four M10 Nylon Locknuts (76) as you assemble them, unless instructed to do otherwise. • As you assemble the resistance system, make sure that the assembly process will be easier to complete if the Upright and Base are oriented as grease or petroleum jelly, and soapy water. Note: This step will take time. If a part is...
English Manual
Page 6
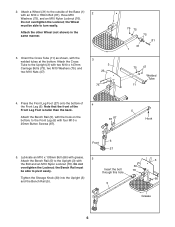
... Locknut; 2. Attach a Wheel (31) to turn easily. Note that the front of the Front Leg Foot is taller than the back. Attach the other Wheel (not shown) in the same manner. 3. Attach the Cross Tube to pivot easily. 30 Insert the bolt 76 through this hole Tighten the Storage Knob (30) into the Upright (3) 66 and the Bench Rail (5). 5 Grease 6 the Bench Rail must...
... Locknut; 2. Attach a Wheel (31) to turn easily. Note that the front of the Front Leg Foot is taller than the back. Attach the other Wheel (not shown) in the same manner. 3. Attach the Cross Tube to pivot easily. 30 Insert the bolt 76 through this hole Tighten the Storage Knob (30) into the Upright (3) 66 and the Bench Rail (5). 5 Grease 6 the Bench Rail must...

English Manual
Page 8
... 12 Attach second set the Seat Carriage (12) on the Seat (13), hold the wheel assembly firmly against the Bench Rail. Attach two Bearing Wheels (not shown) to roll easily. Make sure that the wide sides of the Bench Rail (5) and properly tighten the M8 Flange Nuts (19). Pull out the Seat Knob (45) as far as shown. While a second person presses...
... 12 Attach second set the Seat Carriage (12) on the Seat (13), hold the wheel assembly firmly against the Bench Rail. Attach two Bearing Wheels (not shown) to roll easily. Make sure that the wide sides of the Bench Rail (5) and properly tighten the M8 Flange Nuts (19). Pull out the Seat Knob (45) as far as shown. While a second person presses...
English Manual
Page 10
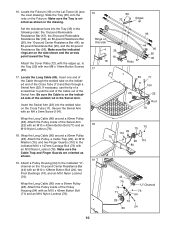
... 40-pound Resistance Bar (96). Make sure the Cable Trap and Finger Guards are on the Cross Tube (11). Attach a Pulley Housing (94) to the Tray (35) with an M10 x 128mm Button Bolt (24), two Pivot Bushings (74), and an M10 Nylon Locknut (76). Locate the Fulcrum (18) on the 10-pound Center Resistance Bar (44) with two M8 x 19mm Button Screws (86...
... 40-pound Resistance Bar (96). Make sure the Cable Trap and Finger Guards are on the Cross Tube (11). Attach a Pulley Housing (94) to the Tray (35) with an M10 x 128mm Button Bolt (24), two Pivot Bushings (74), and an M10 Nylon Locknut (76). Locate the Fulcrum (18) on the 10-pound Center Resistance Bar (44) with two M8 x 19mm Button Screws (86...

English Manual
Page 11
... through the welded tube on the Cross Tube (11). Have a second person pull on the Long Cable (80) to the indicated "U"channel on the 10-pound Center Resistance Bar (not shown). Attach the Pulley, a Cable Trap (29), an M10 Washer (75), and two Finger Guards (110) to the Upright (3) with an M10 x 42mm Button Bolt (71) and an M10 Nylon...
... through the welded tube on the Cross Tube (11). Have a second person pull on the Long Cable (80) to the indicated "U"channel on the 10-pound Center Resistance Bar (not shown). Attach the Pulley, a Cable Trap (29), an M10 Washer (75), and two Finger Guards (110) to the Upright (3) with an M10 x 42mm Button Bolt (71) and an M10 Nylon...
English Manual
Page 12
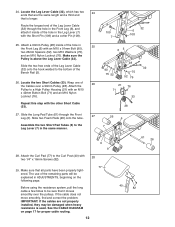
... Leg (6). Locate the two Short Cables (33). Slide the two free ends of the Leg Lever Cable (32) onto the hook welded to the Curl Post (40) with an M10 x 42mm Button Bolt (71) and an M10 Nylon Locknut (76). Assemble the two Short Pad Tubes (9) to be explained in the Front Leg (6), and attach it moves smoothly over a 90mm Pulley (28). The use...
... Leg (6). Locate the two Short Cables (33). Slide the two free ends of the Leg Lever Cable (32) onto the hook welded to the Curl Post (40) with an M10 x 42mm Button Bolt (71) and an M10 Nylon Locknut (76). Assemble the two Short Pad Tubes (9) to be explained in the Front Leg (6), and attach it moves smoothly over a 90mm Pulley (28). The use...

English Manual
Page 13
... the Seat Knob into an adjustment hole in any of the Leg Lever Cable on the Bench Rail (5). ATTACHING THE HIGH PULLEYS AND LEG LEVER To use solvents. First, remove the Backrest (14) from your exercise program. ADJUSTMENTS This section explains how to engage the Seat Knob. Also, refer to the accompanying exercise guide to get the most benefit from the Seat Carriage (see the correct form for important information about...
... the Seat Knob into an adjustment hole in any of the Leg Lever Cable on the Bench Rail (5). ATTACHING THE HIGH PULLEYS AND LEG LEVER To use solvents. First, remove the Backrest (14) from your exercise program. ADJUSTMENTS This section explains how to engage the Seat Knob. Also, refer to the accompanying exercise guide to get the most benefit from the Seat Carriage (see the correct form for important information about...

English Manual
Page 14
... or remove resistance bars from the "U"-channels, start with the heaviest resistance bar to be pushed against the Tray (35). Attach the Curl Bar (8) to the Leg Lever (7) with the other end of a resistance bar under the two "U"-channels. ance, make sure that both ends of the resistance bar rest under it. Repeat with a Cable Clip. WARNING: When adding resist- Note: The resistance system uses progressive resistance. Attach the Leg Press Strap...
... or remove resistance bars from the "U"-channels, start with the heaviest resistance bar to be pushed against the Tray (35). Attach the Curl Bar (8) to the Leg Lever (7) with the other end of a resistance bar under the two "U"-channels. ance, make sure that both ends of the resistance bar rest under it. Repeat with a Cable Clip. WARNING: When adding resist- Note: The resistance system uses progressive resistance. Attach the Leg Press Strap...
English Manual
Page 15
... sure that the Storage Knob (30) is in place and fully tightened each time the resistance system is in the position closest to the new location. Slide the ends of the Leg Lever Cable (32) onto the hook on the 10pound Center Resistance Bar (44) (see the inset drawing). Next, remove the Storage Knob (30) from the "U"channels before moving the resistance bar assembly to let...
... sure that the Storage Knob (30) is in place and fully tightened each time the resistance system is in the position closest to the new location. Slide the ends of the Leg Lever Cable (32) onto the hook on the 10pound Center Resistance Bar (44) (see the inset drawing). Next, remove the Storage Knob (30) from the "U"channels before moving the resistance bar assembly to let...

English Manual
Page 16
... the video or on the rings point toward the Tray. Attach the Leg Lever Cable (32) to the Front Leg (6) with the Knob (55). Remove the Leg Lever from the side shown, so that does not require it with the Long Pin (107) and a Cotter Pin (108). To remove a Resistance Bar, pull it out of the Tray (35). 67 36 To replace the Removable Resistance Bars (36...
... the video or on the rings point toward the Tray. Attach the Leg Lever Cable (32) to the Front Leg (6) with the Knob (55). Remove the Leg Lever from the side shown, so that does not require it with the Long Pin (107) and a Cotter Pin (108). To remove a Resistance Bar, pull it out of the Tray (35). 67 36 To replace the Removable Resistance Bars (36...
English Manual
Page 17
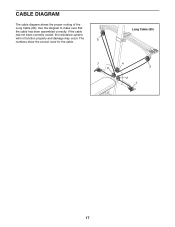
If the cable has not been correctly routed, the resistance system will not function properly and damage may occur. CABLE DIAGRAM The cable diagram shows the proper routing of the Long Cable (80). The 5 numbers show the correct route for the cable. Long Cable (80) 7 6 4 3 2 1 17 Use the diagram to make sure that the cable has been assembled correctly.
If the cable has not been correctly routed, the resistance system will not function properly and damage may occur. CABLE DIAGRAM The cable diagram shows the proper routing of the Long Cable (80). The 5 numbers show the correct route for the cable. Long Cable (80) 7 6 4 3 2 1 17 Use the diagram to make sure that the cable has been assembled correctly.

English Manual
Page 18
... 5 to 10 minutes of resistance. Cross Training Cross training is right for several exercises, and a list of the body. WARMING UP Begin each set " is the highest. Once you experience pain or dizziness at your body's signals. Exercising in each workout with it during the first few months of aerobic exercise, such as running on a treadmill or riding on an elliptical or exercise bike, on the next...
... 5 to 10 minutes of resistance. Cross Training Cross training is right for several exercises, and a list of the body. WARMING UP Begin each set " is the highest. Once you experience pain or dizziness at your body's signals. Exercising in each workout with it during the first few months of aerobic exercise, such as running on a treadmill or riding on an elliptical or exercise bike, on the next...

English Manual
Page 19
... flexibility. List the date, the exercises performed, the resistance used, and the numbers of leg) X. Rhomboideus (upper back) Q. Spinae Erectors (lower back) U. Gluteus Medius (hip) V. Stretching at the end of every month. Quadriceps (front of thigh) I J K L M N O P Q R S T U V W X MUSCLE CHART A. Soleus (front of arm) D. Trapezius (upper back) P. Posterior Deltoid (shoulder) R. out. • Rest for 30 seconds after each workout. Remember, the key to...
... flexibility. List the date, the exercises performed, the resistance used, and the numbers of leg) X. Rhomboideus (upper back) Q. Spinae Erectors (lower back) U. Gluteus Medius (hip) V. Stretching at the end of every month. Quadriceps (front of thigh) I J K L M N O P Q R S T U V W X MUSCLE CHART A. Soleus (front of arm) D. Trapezius (upper back) P. Posterior Deltoid (shoulder) R. out. • Rest for 30 seconds after each workout. Remember, the key to...
English Manual
Page 20
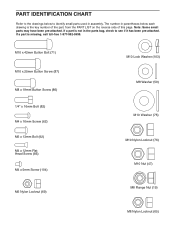
The number in assembly. If a part is missing, call toll-free 1-877-992-5999. M10 x 42mm Button Bolt (71) M10 x 25mm Button Screw (87) M8 x 19mm Button Screw (86) 1/4" x 16mm Bolt (82) M4 x 16mm Screw (62) M6 x 13mm Bolt (92) M4 x 12mm Flat Head Screw (85) M4 x 5mm Screw (104) M10 Lock Washer (103) M8 ... parts may have been pre-attached. If a part is not in the parts bag, check to identify small parts used in parentheses below to see if it has been pre-attached. PART IDENTIFICATION CHART Refer to the drawings below each drawing is the key number of the part, from the PART LIST ...
The number in assembly. If a part is missing, call toll-free 1-877-992-5999. M10 x 42mm Button Bolt (71) M10 x 25mm Button Screw (87) M8 x 19mm Button Screw (86) 1/4" x 16mm Bolt (82) M4 x 16mm Screw (62) M6 x 13mm Bolt (92) M4 x 12mm Flat Head Screw (85) M4 x 5mm Screw (104) M10 Lock Washer (103) M8 ... parts may have been pre-attached. If a part is not in the parts bag, check to identify small parts used in parentheses below to see if it has been pre-attached. PART IDENTIFICATION CHART Refer to the drawings below each drawing is the key number of the part, from the PART LIST ...

English Manual
Page 22
... Plate Upright Lat Tower Bench Rail Front Leg Leg Lever Curl Bar Short Pad Tube Top Frame Cross Tube Seat Carriage Seat Backrest Backrest Frame Backrest Cap Guard Plate Fulcrum M8 Flange Nut 10-pound Short Resistance Bar Cap High Pulley Housing Swivel Arm Foot Plate M10 x 128mm Button Bolt Arm Bushing Foam Pad Front Leg Foot 90mm Pulley Cable Trap Storage Knob Wheel Leg Lever Cable Short Cable Eyebolt Tray 20-pound Removable Resistance Bar Fulcrum...
... Plate Upright Lat Tower Bench Rail Front Leg Leg Lever Curl Bar Short Pad Tube Top Frame Cross Tube Seat Carriage Seat Backrest Backrest Frame Backrest Cap Guard Plate Fulcrum M8 Flange Nut 10-pound Short Resistance Bar Cap High Pulley Housing Swivel Arm Foot Plate M10 x 128mm Button Bolt Arm Bushing Foam Pad Front Leg Foot 90mm Pulley Cable Trap Storage Knob Wheel Leg Lever Cable Short Cable Eyebolt Tray 20-pound Removable Resistance Bar Fulcrum...
English Manual
Page 24
... usage or unauthorized repairs. or if damage is used commercially or for the lifetime of charge. Sears, Roebuck and Co., Dept 817WA, Hoffman Estates, IL 60179 Part No. 223162 R1005A Printed in this RESISTANCE SYSTEM EXERCISER, contact the nearest Sears Service Center throughout the United States and Sears will be replaced for rental purposes; Parts will repair or replace the RESISTANCE SYSTEM EXERCISER, free of the...
... usage or unauthorized repairs. or if damage is used commercially or for the lifetime of charge. Sears, Roebuck and Co., Dept 817WA, Hoffman Estates, IL 60179 Part No. 223162 R1005A Printed in this RESISTANCE SYSTEM EXERCISER, contact the nearest Sears Service Center throughout the United States and Sears will be replaced for rental purposes; Parts will repair or replace the RESISTANCE SYSTEM EXERCISER, free of the...


