
English Manual
Page 2
...to use . ¥ Do not allow children on or around machine. ¥ Replace label if damaged, illegible, or removed. ! WEIDER is a registered trademark of this manual. Table of Contents Warning Decal Placement 2 Important Precautions 3 Before You Begin 4 Part Identification Chart 5... Assembly 6 Adjusting the Weight Bench 14 Exercise Guidelines 17 Muscle Chart 18 Ordering Replacement Parts Back Cover Limited Warranty Back Cover Note: A Part List/Exploded Drawing...
...to use . ¥ Do not allow children on or around machine. ¥ Replace label if damaged, illegible, or removed. ! WEIDER is a registered trademark of this manual. Table of Contents Warning Decal Placement 2 Important Precautions 3 Before You Begin 4 Part Identification Chart 5... Assembly 6 Adjusting the Weight Bench 14 Exercise Guidelines 17 Muscle Chart 18 Ordering Replacement Parts Back Cover Limited Warranty Back Cover Note: A Part List/Exploded Drawing...
English Manual
Page 3
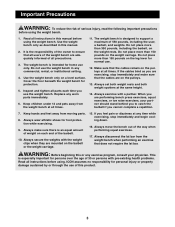
... place more than 300 pounds, including the barbell, on a level surface. Always make sure that all users of the weight bench are performing bench press exercises, squat exercises, or toe raise exercises, your physician. Always secure the weights with the weight clips when they are... on the pulleys at all precautions. 3. This is especially important for normal use the weight bench. Inspect and tighten all instructions before using the weight bench. 1. The weight bench is the responsibility of the owner to ensure that the cables are mounted on the weight carriage....
... place more than 300 pounds, including the barbell, on a level surface. Always make sure that all users of the weight bench are performing bench press exercises, squat exercises, or toe raise exercises, your physician. Always secure the weights with the weight clips when they are... on the pulleys at all precautions. 3. This is especially important for normal use the weight bench. Inspect and tighten all instructions before using the weight bench. 1. The weight bench is the responsibility of the owner to ensure that the cables are mounted on the weight carriage....
English Manual
Page 4
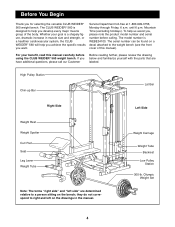
... relative to right and left sideÓ are labeled. Mountain Time (excluding holidays). To help you for selecting the versatile CLUB WEIDER¨ 560 weight bench. they do not correspond to a person sitting on a decal attached to help us assist you, please note the product ...model number and serial number before using the CLUB WEIDER¨ 560 weight bench. until 6 p.m. For your goal is WEBE34100. If you want. The serial number can be found on the bench; The CLUB WEIDER¨ 560 is designed to the weight bench (see the front cover of the body. The ...
... relative to right and left sideÓ are labeled. Mountain Time (excluding holidays). To help you for selecting the versatile CLUB WEIDER¨ 560 weight bench. they do not correspond to a person sitting on a decal attached to help us assist you, please note the product ...model number and serial number before using the CLUB WEIDER¨ 560 weight bench. until 6 p.m. For your goal is WEBE34100. If you want. The serial number can be found on the bench; The CLUB WEIDER¨ 560 is designed to the weight bench (see the front cover of the body. The ...
English Manual
Page 6
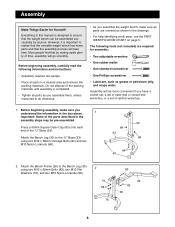
The following information and instructions: ¥ Assembly requires two people. ¥ Place all parts are required for Yourself! Attach the Bench Frame (26) to the Bench Leg (30) using two M10 x 58mm Carriage Bolts (84) and two M10 Nylon Locknuts (68). 30 68 33 68 84 63 2. Most ... and remove the packing materials. Do not dispose of the packing materials until assembly is designed to do otherwise. ¥ As you assemble the weight bench, make sure you understand the information in the box above. 1 Important: Some of time, assembly will take time. Press a 50mm Square Outer Cap...
The following information and instructions: ¥ Assembly requires two people. ¥ Place all parts are required for Yourself! Attach the Bench Frame (26) to the Bench Leg (30) using two M10 x 58mm Carriage Bolts (84) and two M10 Nylon Locknuts (68). 30 68 33 68 84 63 2. Most ... and remove the packing materials. Do not dispose of the packing materials until assembly is designed to do otherwise. ¥ As you assemble the weight bench, make sure you understand the information in the box above. 1 Important: Some of time, assembly will take time. Press a 50mm Square Outer Cap...
English Manual
Page 7
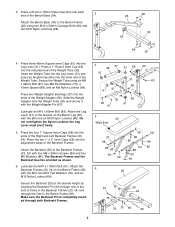
... Backrest must pivot freely. 5. Press two Weight Adapter Bushings (37) into the indicated end of the Weight Adapter (36). Attach the Backrest (25) to the Bench Frame (26) using an M8 x 58mm Bolt (87), two M8 Flat Washers (75), a 10mm Spacer (88), and an M8 Nylon Locknut (69). Lubricate the M10...) and press an Angled Cap (66) onto the other end of the Backrest Frames. 3. Attach the Backrest Frames (23, 24) to the bracket on the Bench Leg (30) with the Bolt, two M10 Flat Washers (76), and an M10 Nylon Locknut (68). Insert the Weight Tube into the adjustment tubes of...
... Backrest must pivot freely. 5. Press two Weight Adapter Bushings (37) into the indicated end of the Weight Adapter (36). Attach the Backrest (25) to the Bench Frame (26) using an M8 x 58mm Bolt (87), two M8 Flat Washers (75), a 10mm Spacer (88), and an M8 Nylon Locknut (69). Lubricate the M10...) and press an Angled Cap (66) onto the other end of the Backrest Frames. 3. Attach the Backrest Frames (23, 24) to the bracket on the Bench Leg (30) with the Bolt, two M10 Flat Washers (76), and an M10 Nylon Locknut (68). Insert the Weight Tube into the adjustment tubes of...
English Manual
Page 8
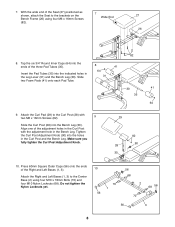
... 16mm Screws (82). 9 Slide the Curl Post (28) into the holes in the Leg Lever (31) and the Bench Leg (30). Align one of the Right and Left Bases (1, 3). Slide 64 31 two Foam Pads (41) onto ... Screws (82). 26 82 8. Tighten the Curl Post Adjustment Knob (90) into the Bench Leg (30). 7. Tap the six 3/4Ó Round Inner Caps (64) into the indicated holes in the Curl Post and ...ends of the Seat (27) positioned as shown, attach the Seat to the brackets on the 7 Wide End 27 Bench Frame (26) using four M10 x 78mm Bolts (70) and four M10 Nylon Locknuts (68). Make sure you fully...
... 16mm Screws (82). 9 Slide the Curl Post (28) into the holes in the Leg Lever (31) and the Bench Leg (30). Align one of the Right and Left Bases (1, 3). Slide 64 31 two Foam Pads (41) onto ... Screws (82). 26 82 8. Tighten the Curl Post Adjustment Knob (90) into the Bench Leg (30). 7. Tap the six 3/4Ó Round Inner Caps (64) into the indicated holes in the Curl Post and ...ends of the Seat (27) positioned as shown, attach the Seat to the brackets on the 7 Wide End 27 Bench Frame (26) using four M10 x 78mm Bolts (70) and four M10 Nylon Locknuts (68). Make sure you fully...
English Manual
Page 13
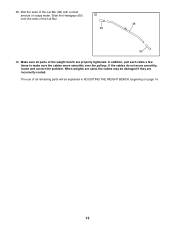
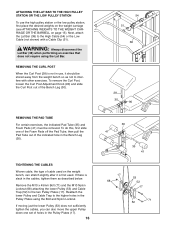
In addition, pull each cable a few times to make sure the cables move smoothly, locate and correct the problem. The use of the weight bench are properly tightened. If the cables do not move smoothly over the pulleys. 25. Make sure all parts of all remaining parts will be damaged if they are used, the cables may be explained in ADJUSTING THE WEIGHT BENCH, beginning on page 14. 13 When weights are incorrectly routed. Slide the Handgrips (60) 25 onto the ends of soapy water. Wet the ends of the Lat Bar (38) with a small amount of the Lat Bar. 38 60 60 26.
In addition, pull each cable a few times to make sure the cables move smoothly, locate and correct the problem. The use of the weight bench are properly tightened. If the cables do not move smoothly over the pulleys. 25. Make sure all parts of all remaining parts will be damaged if they are used, the cables may be explained in ADJUSTING THE WEIGHT BENCH, beginning on page 14. 13 When weights are incorrectly routed. Slide the Handgrips (60) 25 onto the ends of soapy water. Wet the ends of the Lat Bar (38) with a small amount of the Lat Bar. 38 60 60 26.
English Manual
Page 14
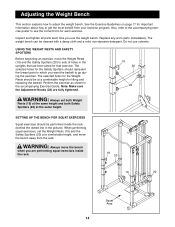
...for important information about how to sets of holes in the accompanying Exercise Guide. SETTING UP THE BENCH FOR SQUAT EXERCISES Squat exercises should be at a comfortable height, and move the bench when you want the barbell to which you are performing squat exercises inside the rack (behind ...the dotted line in the picture). Also, refer to the accompanying exercise poster to adjust the weight bench. Do not use the weight bench. Note: Make sure the Adjustment Knobs (22) are best suited for that exercise. The selected holes for the Weight Rests ...
...for important information about how to sets of holes in the accompanying Exercise Guide. SETTING UP THE BENCH FOR SQUAT EXERCISES Squat exercises should be at a comfortable height, and move the bench when you want the barbell to which you are performing squat exercises inside the rack (behind ...the dotted line in the picture). Also, refer to the accompanying exercise poster to adjust the weight bench. Do not use the weight bench. Note: Make sure the Adjustment Knobs (22) are best suited for that exercise. The selected holes for the Weight Rests ...
English Manual
Page 15
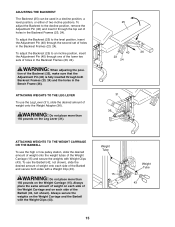
... of weight onto the weight tubes of holes in the Backrest Frames (23, 24). ADJUSTING THE BACKREST The Backrest (25) can be used in the Bench Frame (26). WARNING: Do not place more than 150 pounds on the Weight Carriage and the Barbell with Weight Clips (43). WARNING: When adjusting the...
... of weight onto the weight tubes of holes in the Backrest Frames (23, 24). ADJUSTING THE BACKREST The Backrest (25) can be used in the Bench Frame (26). WARNING: Do not place more than 150 pounds on the Weight Carriage and the Barbell with Weight Clips (43). WARNING: When adjusting the...
English Manual
Page 16
... on the weight carriage (see ATTACHING WEIGHTS TO THE WEIGHT CARRIAGE OR THE BARBELL on the weight bench, can also move the upper Pulley down one of the Foam Pads off the Pad Tube, then... certain exercises, the indicated Pad Tube (35) and Foam Pads (41) must be stored away from the weight bench so as described below. Remove the M10 x 45mm Bolt (71) and the M10 Nylon Locknut (68) attaching ...Bar (38) to interfere with a Cable Clip (51). To do this, first slide one set of the Bench Leg (30). Reattach the lower Pulley and Cable Trap to the two Pulley Plates (17). If moving just the...
... on the weight carriage (see ATTACHING WEIGHTS TO THE WEIGHT CARRIAGE OR THE BARBELL on the weight bench, can also move the upper Pulley down one of the Foam Pads off the Pad Tube, then... certain exercises, the indicated Pad Tube (35) and Foam Pads (41) must be stored away from the weight bench so as described below. Remove the M10 x 45mm Bolt (71) and the M10 Nylon Locknut (68) attaching ...Bar (38) to interfere with a Cable Clip (51). To do this, first slide one set of the Bench Leg (30). Reattach the lower Pulley and Cable Trap to the two Pulley Plates (17). If moving just the...
English Manual
Page 20
... must be prepared to give the following information when calling: ¥ The MODEL NUMBER of the product (WEBE34100) ¥ The NAME of the product (CLUB WEIDER¨ 560 weight bench) ¥ The SERIAL NUMBER of the product (see the PART LIST and the EXPLODED DRAWING at one of its authorized service centers with respect...
... must be prepared to give the following information when calling: ¥ The MODEL NUMBER of the product (WEBE34100) ¥ The NAME of the product (CLUB WEIDER¨ 560 weight bench) ¥ The SERIAL NUMBER of the product (see the PART LIST and the EXPLODED DRAWING at one of its authorized service centers with respect...
English Manual
Page 22
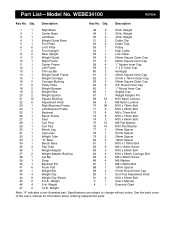
... 22 6 Adjustment Knob 23 1 Right Backrest Frame 24 1 Left Backrest Frame 25 1 Backrest 26 1 Bench Frame 27 1 Seat 28 1 Curl Post 29 1 Curl Pad 30 1 Bench Leg 31 1 Leg Lever 32 1 Weight Tube 33 1 ÒUÓ Base 34 1 Bench Base 35 3 Pad Tube 36 1 Weight Adapter 37 2 Weight Adapter Bushing 38 1 Lat Bar...
... 22 6 Adjustment Knob 23 1 Right Backrest Frame 24 1 Left Backrest Frame 25 1 Backrest 26 1 Bench Frame 27 1 Seat 28 1 Curl Post 29 1 Curl Pad 30 1 Bench Leg 31 1 Leg Lever 32 1 Weight Tube 33 1 ÒUÓ Base 34 1 Bench Base 35 3 Pad Tube 36 1 Weight Adapter 37 2 Weight Adapter Bushing 38 1 Lat Bar...


