
English Manual
Page 1
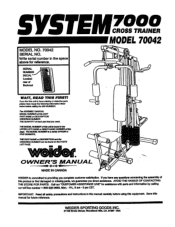
...; • OWNER^ S MANUAL MADE IN CANADA WEIDER is committed to providing you have any questions concerning the assembly of Bacicrest IIICITOSS TRAINER MODEL 70042 I ,• WAIT, READ THIS FIRST! IMPORTANT: Read all safety precautions and instructions in the space above for assistance with parts and information by calling our toll free number 1-800.225-0653, Mon. - Write serial number in this manual carefully before using this...
...; • OWNER^ S MANUAL MADE IN CANADA WEIDER is committed to providing you have any questions concerning the assembly of Bacicrest IIICITOSS TRAINER MODEL 70042 I ,• WAIT, READ THIS FIRST! IMPORTANT: Read all safety precautions and instructions in the space above for assistance with parts and information by calling our toll free number 1-800.225-0653, Mon. - Write serial number in this manual carefully before using this...

English Manual
Page 2
... Contents Important Safety Precautions Introduction Assembly Steps Maintenance Tips Conditioning Guide Parts List Ordering Parts 1 1 2 7-25 2 26-27 3-5 6 IMPORTANT SAFETY PRECAUTIONS WARNING: To reduce the risk of serious injury, read the important safety precautions before using. Weider assumes mv responsibility for individuals over the age of 35 or persons with pre-existing health problems. Read all instructions before using this equipment. 1. Readallinstructions in...
... Contents Important Safety Precautions Introduction Assembly Steps Maintenance Tips Conditioning Guide Parts List Ordering Parts 1 1 2 7-25 2 26-27 3-5 6 IMPORTANT SAFETY PRECAUTIONS WARNING: To reduce the risk of serious injury, read the important safety precautions before using. Weider assumes mv responsibility for individuals over the age of 35 or persons with pre-existing health problems. Read all instructions before using this equipment. 1. Readallinstructions in...
English Manual
Page 3
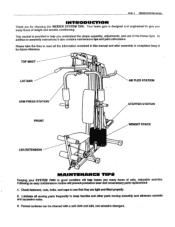
... moving parts frequently to keep it also contains maintenance tips and parts information. TOP MAST LAT BAR AB FLEX STATION ARM PRESS STATION FRONT STEPPER STATION fll WEIGHT STACK LEG EXTENSION 11 MAINTENANCE TIPS Keeping your. Following an easy maintenance routine will help you understand the simple assembly, adjustments, and use of the Home Gym. Check fasteners, nuts, bolts, and caps to help insure you many hours of safe, enjoyable exercise. Lubricate...
... moving parts frequently to keep it also contains maintenance tips and parts information. TOP MAST LAT BAR AB FLEX STATION ARM PRESS STATION FRONT STEPPER STATION fll WEIGHT STACK LEG EXTENSION 11 MAINTENANCE TIPS Keeping your. Following an easy maintenance routine will help you understand the simple assembly, adjustments, and use of the Home Gym. Check fasteners, nuts, bolts, and caps to help insure you many hours of safe, enjoyable exercise. Lubricate...

English Manual
Page 4
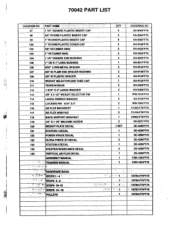
70042 PART LIST :., .:: :: : DIAGRAM. WEIGHT SELECTOR TUBE GUIDE ROD SEAT BACKREST LEG EXTENSION TUBE PAD BAR 3/4" X 121/2' PAD BAR 3/4" X 1312' FOAM ROLLER 3" X 53/4' FOAM ROLLER 21/4' X 6" ARM PRESS ASSEMBLY ' ARM PRESS BUSHING ARM PRESS CAP PEC-DECK ARM U-BRACKET ARM PRESS HANDLE PULLEY BRACKET PULLEY TRAP BRACKET FOAM ROLLER 31/4' X 7' STEPPER PEDAL 1" X r RIGHT STEPPER PEDAL 1"X 3" LEFT RESISTANCE CYLINDER CYLINDER MOUNTING BRACKET FOOT PADS PEC-DECK CABLE -12r LONG WEIGHT STACK CABLE 79' LONG LEG EXTENSION CABLE 49" LONG LAT BAR „ 1 1 1 1 1 1 1 1 1 1 1 ...
70042 PART LIST :., .:: :: : DIAGRAM. WEIGHT SELECTOR TUBE GUIDE ROD SEAT BACKREST LEG EXTENSION TUBE PAD BAR 3/4" X 121/2' PAD BAR 3/4" X 1312' FOAM ROLLER 3" X 53/4' FOAM ROLLER 21/4' X 6" ARM PRESS ASSEMBLY ' ARM PRESS BUSHING ARM PRESS CAP PEC-DECK ARM U-BRACKET ARM PRESS HANDLE PULLEY BRACKET PULLEY TRAP BRACKET FOAM ROLLER 31/4' X 7' STEPPER PEDAL 1" X r RIGHT STEPPER PEDAL 1"X 3" LEFT RESISTANCE CYLINDER CYLINDER MOUNTING BRACKET FOOT PADS PEC-DECK CABLE -12r LONG WEIGHT STACK CABLE 79' LONG LEG EXTENSION CABLE 49" LONG LAT BAR „ 1 1 1 1 1 1 1 1 1 1 1 ...
English Manual
Page 6
... 113 3/8' X 51/2" WEIGHT SELECTOR PIN 114 LARGE RUBBER WASHER 115 LOCKINGPIN 5/16" X 5" 116 AB FLEX BACKREST 117 AB FLEX ARM PAD 118 BACK SUPPORT BRACKET 119 1/4" X11/4" MACHINE SCREW 120 WEIGHT PLATE DECAL 121 STATION1 DECAL --- 122 ' POWER STACK DECAL 123 ULTRA FORCE XT DECAL 124 STATION 2 DECAL 125 STEPPERRESISTANCE DECAL 125 VERTICAL AB FLEX DECAL ASSEMBLY MANUAL - -' _ ' TRAINING MANUAL .. .. . _ . .e i.,.*.. hARDWARE SAGS.. -S-TEPS1-4 `' . 1 "STEPS 5-9:._ ' 2.2 f 4'. 4_-.?_ ' SS...
... 113 3/8' X 51/2" WEIGHT SELECTOR PIN 114 LARGE RUBBER WASHER 115 LOCKINGPIN 5/16" X 5" 116 AB FLEX BACKREST 117 AB FLEX ARM PAD 118 BACK SUPPORT BRACKET 119 1/4" X11/4" MACHINE SCREW 120 WEIGHT PLATE DECAL 121 STATION1 DECAL --- 122 ' POWER STACK DECAL 123 ULTRA FORCE XT DECAL 124 STATION 2 DECAL 125 STEPPERRESISTANCE DECAL 125 VERTICAL AB FLEX DECAL ASSEMBLY MANUAL - -' _ ' TRAINING MANUAL .. .. . _ . .e i.,.*.. hARDWARE SAGS.. -S-TEPS1-4 `' . 1 "STEPS 5-9:._ ' 2.2 f 4'. 4_-.?_ ' SS...
English Manual
Page 7
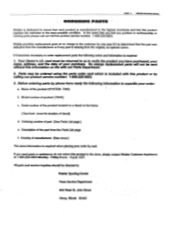
... call our toll free product service number: 1-800-225-0653. CST. PAGE 6 WEIDER SPORTING GOODS ORDERING PARTS. Weider provides replacement parts at 1-800-225-0653 Monday - If it is determined that you need parts or assistance do not return this product or by mail. Your Owner's I.D. Name of the part from the Parts List page f. Description of the product (SYSTEM 7000) b. No charge replacement parts will not...
... call our toll free product service number: 1-800-225-0653. CST. PAGE 6 WEIDER SPORTING GOODS ORDERING PARTS. Weider provides replacement parts at 1-800-225-0653 Monday - If it is determined that you need parts or assistance do not return this product or by mail. Your Owner's I.D. Name of the part from the Parts List page f. Description of the product (SYSTEM 7000) b. No charge replacement parts will not...
English Manual
Page 9
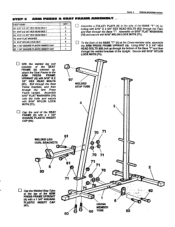
... BOLTS (61). PAGE • WEIDER SPORTING GOODS STEP 2 ARM PRESS & SEAT.FRAMR.ASSEMBLY- PART NAME , 60 6/16" X 2 1/4" HEX HEAD BOLT 61 St16" X 21/2' HEX HEAD BOLT 62 5/16X23/4' HEX HEAD BOLT 70 5/16' FLAT WASHER 71 5/16" NYLON LOCK NUT 93 11/2' SQUARE PLASTIC INSERT CAP 97 11/4' SQUARE PLASTIC INSERT CAP Ci 2 2 u Assemble a PULLEY PLATE (6) to the ARM PRESS FRAME UPRIGHT (4) with 5/16' X 2 3/4' HEX HEAD BOLTS...
... BOLTS (61). PAGE • WEIDER SPORTING GOODS STEP 2 ARM PRESS & SEAT.FRAMR.ASSEMBLY- PART NAME , 60 6/16" X 2 1/4" HEX HEAD BOLT 61 St16" X 21/2' HEX HEAD BOLT 62 5/16X23/4' HEX HEAD BOLT 70 5/16' FLAT WASHER 71 5/16" NYLON LOCK NUT 93 11/2' SQUARE PLASTIC INSERT CAP 97 11/4' SQUARE PLASTIC INSERT CAP Ci 2 2 u Assemble a PULLEY PLATE (6) to the ARM PRESS FRAME UPRIGHT (4) with 5/16' X 2 3/4' HEX HEAD BOLTS...

English Manual
Page 10
.../2" HEX HEAD BOLT (61) up through the Rear Base and then through the Upright and then the Brace. Assemble the upper Brace with 5/16" NYLON LOCK NUTS (71). PAGE 9 W9DER SPORTING GOODS STEP 3 STEPPER Aiiiiiiiii : 61 5/16" X 2 1/2" HEX HEAD BOLT 62 5/16" X 2 3/4" HEX HEAD BOLT 70 5/16" FLAT WASHER 71 5/16' NYLON LOCK NUT BRACE ASSEMBLY i:i 1 1 1 _ 2 Attach the end...
.../2" HEX HEAD BOLT (61) up through the Rear Base and then through the Upright and then the Brace. Assemble the upper Brace with 5/16" NYLON LOCK NUTS (71). PAGE 9 W9DER SPORTING GOODS STEP 3 STEPPER Aiiiiiiiii : 61 5/16" X 2 1/2" HEX HEAD BOLT 62 5/16" X 2 3/4" HEX HEAD BOLT 70 5/16" FLAT WASHER 71 5/16' NYLON LOCK NUT BRACE ASSEMBLY i:i 1 1 1 _ 2 Attach the end...

English Manual
Page 11
...). (SEE DETAIL A.) Attach a SEAT MOUNTING PLATE (11) to the front hole of the SEAT FRAME (5) by bolting with a 1/4" X 2" CARRIAGE BOLT (80) down through the Arm Press Bracket and then through the Welded Stop Tube. PAGE 10 WEIDER SPORTING GOODS ID Assemble 5/16" FLAT WASHERS (70) onto two 5/16" X 2 3/4" HEX HEAD BOLTS (62) and attach the TOP FRAME (8) to the ARM PRESS FRAME UPRIGHT(4) byboltingdoon.through...
...). (SEE DETAIL A.) Attach a SEAT MOUNTING PLATE (11) to the front hole of the SEAT FRAME (5) by bolting with a 1/4" X 2" CARRIAGE BOLT (80) down through the Arm Press Bracket and then through the Welded Stop Tube. PAGE 10 WEIDER SPORTING GOODS ID Assemble 5/16" FLAT WASHERS (70) onto two 5/16" X 2 3/4" HEX HEAD BOLTS (62) and attach the TOP FRAME (8) to the ARM PRESS FRAME UPRIGHT(4) byboltingdoon.through...
English Manual
Page 13
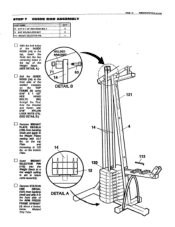
... the ARM PRESS FRAME UPRIGHT (4) about 4 Inches below Welded Stop Tube. on the top Plate and increasing to 125 lbs. WELDED B C 71 65 14 DETAIL B 14 it DETAIL A 14 12 12 PAGE 12 WEIDER SPORTING GOODS ri i I 121 0 4 0 113 STEP 7 GUIDE ROD ASSEMBLY 65 5/16' X 1 1/2" HEX HEAD BOLT 2 71 5/16" NYLON LOCK NUT 2 113 WEIGHT SELECTOR PIN 1 El With the bolt holes...
... the ARM PRESS FRAME UPRIGHT (4) about 4 Inches below Welded Stop Tube. on the top Plate and increasing to 125 lbs. WELDED B C 71 65 14 DETAIL B 14 it DETAIL A 14 12 12 PAGE 12 WEIDER SPORTING GOODS ri i I 121 0 4 0 113 STEP 7 GUIDE ROD ASSEMBLY 65 5/16' X 1 1/2" HEX HEAD BOLT 2 71 5/16" NYLON LOCK NUT 2 113 WEIGHT SELECTOR PIN 1 El With the bolt holes...

English Manual
Page 14
... 13 WEIDER SPORTING GOODS STEP 8 SEAT & BACKREST ASSEMBLY 44:4Viik ii i i: r:: . .n,.." Attach the BACKREST (16) to 86 the SEAT MOUNTING PLATES (11) on one 21/4" X r FOAM ROLLER (21). u Insert the PAD BAR (19) into the Seat. E ire, 81 1/4' X 3/4' MACHINE SCREW 4 82 1/4' X 21/2' MACHINE SCREW 2 86 1/4' FLAT WASHER 2 82 u Attach the SEAT (15) to the ARM PRESS FRAME UPRIGHT (4) by assembling 1/4' FLAT WASHERS (86) on two 1/4" X 2 1/2' MACHINE SCREWS (82) and bolting through the...
... 13 WEIDER SPORTING GOODS STEP 8 SEAT & BACKREST ASSEMBLY 44:4Viik ii i i: r:: . .n,.." Attach the BACKREST (16) to 86 the SEAT MOUNTING PLATES (11) on one 21/4" X r FOAM ROLLER (21). u Insert the PAD BAR (19) into the Seat. E ire, 81 1/4' X 3/4' MACHINE SCREW 4 82 1/4' X 21/2' MACHINE SCREW 2 86 1/4' FLAT WASHER 2 82 u Attach the SEAT (15) to the ARM PRESS FRAME UPRIGHT (4) by assembling 1/4' FLAT WASHERS (86) on two 1/4" X 2 1/2' MACHINE SCREWS (82) and bolting through the...
English Manual
Page 15
...STEP 10 ARM PRESS ASSEMBLY PAGE 14 wEIDER SPORTING GOODS PART NAmE ... -"' tily 81 1/4' X 3/4' MACHINE SCREW 4 87 1/4' NYLON LOCK NUT 4 88 #8 SHEET METAL SCREW 2 Lift the Arm Press unit over the end of the TOP FRAME (8) and align on both sides of the Arm Press Cap. These Bushings will have to the bracket by bolting With four 1/4' X 3/4" MACHINE SCREWS (81) down through the top of the Arm Press...Secure the ARM PRESS CAP (24) to be held tight as complete assembly is placed on the TOP FRAME (8). 81 81 I Press the ARM PRESS CAP (24) on the Top Frame. u Remove POWER STACK DECAL ...
...STEP 10 ARM PRESS ASSEMBLY PAGE 14 wEIDER SPORTING GOODS PART NAmE ... -"' tily 81 1/4' X 3/4' MACHINE SCREW 4 87 1/4' NYLON LOCK NUT 4 88 #8 SHEET METAL SCREW 2 Lift the Arm Press unit over the end of the TOP FRAME (8) and align on both sides of the Arm Press Cap. These Bushings will have to the bracket by bolting With four 1/4' X 3/4" MACHINE SCREWS (81) down through the top of the Arm Press...Secure the ARM PRESS CAP (24) to be held tight as complete assembly is placed on the TOP FRAME (8). 81 81 I Press the ARM PRESS CAP (24) on the Top Frame. u Remove POWER STACK DECAL ...
English Manual
Page 17
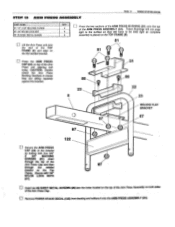
... assembly is completed. PAGE 16 WEIDER SPORTING GOODS 22 123 87 90 25 25 • WHEN DOING BUTTERFLY EXERCISES THE PEC-DECK LOCK PINS (115) SHOULD BE REMOVED. 83 eloo»»)) 1 2 87 03 DETAIL A Fasten with a 1/4" X 1 1/2" HEX HEAD BOLT (83) through the welded Tube on each leg of the ARM PRESS ASSEMBLY (22). 83 CD u Insert the legs of the ARM PRESS ASSEMBLY...
... assembly is completed. PAGE 16 WEIDER SPORTING GOODS 22 123 87 90 25 25 • WHEN DOING BUTTERFLY EXERCISES THE PEC-DECK LOCK PINS (115) SHOULD BE REMOVED. 83 eloo»»)) 1 2 87 03 DETAIL A Fasten with a 1/4" X 1 1/2" HEX HEAD BOLT (83) through the welded Tube on each leg of the ARM PRESS ASSEMBLY (22). 83 CD u Insert the legs of the ARM PRESS ASSEMBLY...
English Manual
Page 19
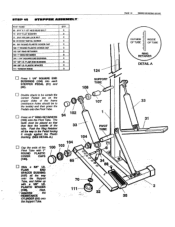
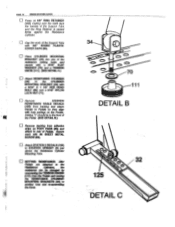
... Pivot Tube. STEP WI STEPPER ASSEMBLY: PART NAME QTY 65 5/16' X 1 1/2" HEX HEAD BOLT 2 70 5/16" FLAT WASHER 2 71 5/16" NYLON LOCK NUT 2 88 48 SHEET METAL SCREW 2 94 5/8" ROUND PLASTIC COVER CAP 2 100 1' ROUND PLASTIC COVER CAP 2 102 5/8' RING RETAINER 2 103 1' RING RETAINER 2 104 11/4* SQUARE END BUSHING 4 107 5/8" I .O. PLASTIC SPACER 2 111 TENSION KNOB 2 124 Press 1 1/4" SQUARE END...
... Pivot Tube. STEP WI STEPPER ASSEMBLY: PART NAME QTY 65 5/16' X 1 1/2" HEX HEAD BOLT 2 70 5/16" FLAT WASHER 2 71 5/16" NYLON LOCK NUT 2 88 48 SHEET METAL SCREW 2 94 5/8" ROUND PLASTIC COVER CAP 2 100 1' ROUND PLASTIC COVER CAP 2 102 5/8' RING RETAINER 2 103 1' RING RETAINER 2 104 11/4* SQUARE END BUSHING 4 107 5/8" I .O. PLASTIC SPACER 2 111 TENSION KNOB 2 124 Press 1 1/4" SQUARE END...
English Manual
Page 20
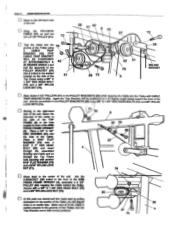
... re-assembling the Knob. 34 T 70 SETTING RESISTANCE: After Pedals are attached to the Resistance Cylinders, the resistance can be changed by unscrewing the TENSION KNOBS. (111) from the Pedals andmoving the RESISTANCE CYUNDER MOUNTING BRACKETS (34) to STEPPER UPRIGHT (3) just above the Resistance Cylinder Mounting Tube. u Cap the ends of Pedals. Setting 'I shouldbe to rear of the Support Tube with hole settings on FOOT. PADS (35) and attach to...
... re-assembling the Knob. 34 T 70 SETTING RESISTANCE: After Pedals are attached to the Resistance Cylinders, the resistance can be changed by unscrewing the TENSION KNOBS. (111) from the Pedals andmoving the RESISTANCE CYUNDER MOUNTING BRACKETS (34) to STEPPER UPRIGHT (3) just above the Resistance Cylinder Mounting Tube. u Cap the ends of Pedals. Setting 'I shouldbe to rear of the Support Tube with hole settings on FOOT. PADS (35) and attach to...
English Manual
Page 22
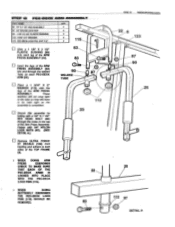
... ARM PRESS FRAME UPRIGHT (4). Moving to the right-hand side of the unit, fasten the loop-end of the Cable to the side of the 51 Top Frame using 79 a CABLE TRAP BRACKET (42) (THE 0 CABLE TRAP BRACKET WILL BE POSITIONED AT APPROXIMATELY A 42 45 DEGREE ANGLE ) and bolt the assembly to the PULLEY... u Bring the P EC-DEC K CABLE (37) up and set into a 31/2' PULLEY (51). 73 Trap the Cable into the loop of the Cable: Place a 5t16° FLAT WASHER 170) Onto a 5/16° X 3" HEX HEAD BOLT (63) and Insert through the assembled Bushing and Cable and on through the Top Frame hole ...
... ARM PRESS FRAME UPRIGHT (4). Moving to the right-hand side of the unit, fasten the loop-end of the Cable to the side of the 51 Top Frame using 79 a CABLE TRAP BRACKET (42) (THE 0 CABLE TRAP BRACKET WILL BE POSITIONED AT APPROXIMATELY A 42 45 DEGREE ANGLE ) and bolt the assembly to the PULLEY... u Bring the P EC-DEC K CABLE (37) up and set into a 31/2' PULLEY (51). 73 Trap the Cable into the loop of the Cable: Place a 5t16° FLAT WASHER 170) Onto a 5/16° X 3" HEX HEAD BOLT (63) and Insert through the assembled Bushing and Cable and on through the Top Frame hole ...
English Manual
Page 23
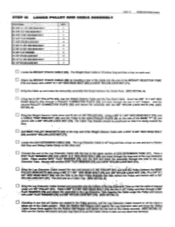
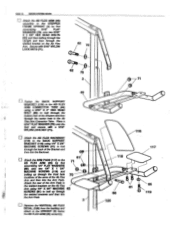
... slack is 491long andhas a loop on one endand a Rubber Ball Stop and Sliding Cable Clamp on each end. Connect the end of the Leg Extension Cable with a 3/8" NYLON LOCK NUT (79). STEP 16 LOWER PULLEY.AND CABLE ASSEMBLY PART NAME ' '' .: :''' 65 5/16" X 1 1/2" HEX HEAD BOLT 66 5/16" X 2' HEX HEAD BOLT 68 5/16" X 3/4" HEX HEAD BOLT 70 5/16" FLAT WASHER 71 5/16' NYLON LOCK NUT...
... slack is 491long andhas a loop on one endand a Rubber Ball Stop and Sliding Cable Clamp on each end. Connect the end of the Leg Extension Cable with a 3/8" NYLON LOCK NUT (79). STEP 16 LOWER PULLEY.AND CABLE ASSEMBLY PART NAME ' '' .: :''' 65 5/16" X 1 1/2" HEX HEAD BOLT 66 5/16" X 2' HEX HEAD BOLT 68 5/16" X 3/4" HEX HEAD BOLT 70 5/16" FLAT WASHER 71 5/16' NYLON LOCK NUT...
English Manual
Page 25
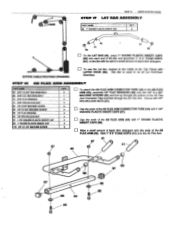
... CABLE ROUTING DRAWING To use the Lat Bar, connect to the Bar with LATCH HOOK (89). STEP 18 AB FLEX ARM ASSEMBLY 62 5/16" X 23/4' HEX HEAD BOLT 66 5/16* X 2' HEX HEAD BOLT 70 5/16' FLAT WASHER 71 5/16' NYLON LOCK NUT 81 1/4" X 3/4* MACHINE SCREW 85 1/4' X 2 3/4' MACHINE SCREW 86 1/4" FLAT WASHER 87 1/4" NYLON LOCK NUT 97 1 1/4' SQUARE PLASTIC INSERT CAP 99 r ROUND PLASTIC INSERT CAP 119 1/4" X1114' MACHINE SCREW u To attach...
... CABLE ROUTING DRAWING To use the Lat Bar, connect to the Bar with LATCH HOOK (89). STEP 18 AB FLEX ARM ASSEMBLY 62 5/16" X 23/4' HEX HEAD BOLT 66 5/16* X 2' HEX HEAD BOLT 70 5/16' FLAT WASHER 71 5/16' NYLON LOCK NUT 81 1/4" X 3/4* MACHINE SCREW 85 1/4' X 2 3/4' MACHINE SCREW 86 1/4" FLAT WASHER 87 1/4" NYLON LOCK NUT 97 1 1/4' SQUARE PLASTIC INSERT CAP 99 r ROUND PLASTIC INSERT CAP 119 1/4" X1114' MACHINE SCREW u To attach...
English Manual
Page 26
...) to the AB FLEX ARM CONNECTOR TUBE (44) es using 1/4" X 3/4" MACHINE 45 SCREWS (81) to bolt up through the welded brackets and then into the Ann Pads 3 Remove the VERTICAL AB FLEX DECAL (126) from the backing and attach to the UPRIGHT (3) below the AB FLEX ARM (45) assembly. Attach the AB FLEX BACKREST (116) to the BACK SUPPORT BRACKET (118) using 1/4' X 3/4" MACHINE SCREWS (81) to bolt through the back...
...) to the AB FLEX ARM CONNECTOR TUBE (44) es using 1/4" X 3/4" MACHINE 45 SCREWS (81) to bolt up through the welded brackets and then into the Ann Pads 3 Remove the VERTICAL AB FLEX DECAL (126) from the backing and attach to the UPRIGHT (3) below the AB FLEX ARM (45) assembly. Attach the AB FLEX BACKREST (116) to the BACK SUPPORT BRACKET (118) using 1/4' X 3/4" MACHINE SCREWS (81) to bolt through the back...
English Manual
Page 28
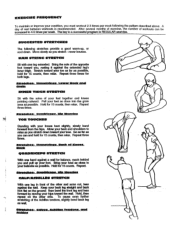
...legs. Repeat three times. Back of rest between workouts is REGULAR exercise. Rack QUADRICEPS STRETCH With one leg...slowly bend forward from the hips. Lower Back and SWUM INNER THIGH STRETCH...a good warm-up your foot. The key to your buttocks as you stretch down ...workouts can and hold for 15 counts, then relax. After several months of exercise, the number of the Achilles tendons, slightly bend back leg...leg in front of the opposite foot toward your toes. A day of Knees. EXERCISE FREQUENCY To maintain or improve your condition, you must workout 2-3 times per week. Move...
...legs. Repeat three times. Back of rest between workouts is REGULAR exercise. Rack QUADRICEPS STRETCH With one leg...slowly bend forward from the hips. Lower Back and SWUM INNER THIGH STRETCH...a good warm-up your foot. The key to your buttocks as you stretch down ...workouts can and hold for 15 counts, then relax. After several months of exercise, the number of the Achilles tendons, slightly bend back leg...leg in front of the opposite foot toward your toes. A day of Knees. EXERCISE FREQUENCY To maintain or improve your condition, you must workout 2-3 times per week. Move...


