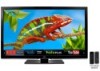

M470VSE User Manual
Page 2
..., the HDMI logo and High-Definition Multimedia Interface are trademarks of Dolby Laboratories. This product qualifies for ENERGY STAR rating. Changing the factory default picture settings or enabling other features will increase power consumption that could exceed the limits necessary to qualify for ENERGY STAR in the "factory default...
..., the HDMI logo and High-Definition Multimedia Interface are trademarks of Dolby Laboratories. This product qualifies for ENERGY STAR rating. Changing the factory default picture settings or enabling other features will increase power consumption that could exceed the limits necessary to qualify for ENERGY STAR in the "factory default...
M470VSE User Manual
Page 7
...Using the On-Screen Menu 26 Navigating the On-Screen Menu 26 Changing the Input Source 27 Changing the Screen Aspect Ratio 27 Setting Up Closed Captioning 28 Changing the Appearance of Contents Installing the TV 3 Inspecting the Package Contents 3 Installing the TV 3 Installing the ...TV Stand (M470VSE 4 Installing the TV Stand (M550VSE 7 Installing the TV Stand (M650VSE 10 Installing the TV on a Wall 14 Controls and Connections 15 Rear...
...Using the On-Screen Menu 26 Navigating the On-Screen Menu 26 Changing the Input Source 27 Changing the Screen Aspect Ratio 27 Setting Up Closed Captioning 28 Changing the Appearance of Contents Installing the TV 3 Inspecting the Package Contents 3 Installing the TV 3 Installing the ...TV Stand (M470VSE 4 Installing the TV Stand (M550VSE 7 Installing the TV Stand (M650VSE 10 Installing the TV on a Wall 14 Controls and Connections 15 Rear...
M470VSE User Manual
Page 8
... Changing the On-Screen Menu Language 42 Setting the Time Zone 43 Adjusting the CEC Settings 43 Turning the VIZIO Logo On or Off 44 Using the Help Menu 44 Displaying System Information 45 Resetting the TV Settings 45 Restoring the TV to Factory Default Settings 45 Using Guided Setup 46 Using the ...Info Window 47 Limited Warranty 60 Legal & Compliance 61 Using the USB Media Player 48 Using the USB Media Player 48 Connecting a USB Thumb Drive to the TV 48 Playing USB Media 48 Using VIZIO Internet Apps 51 Using...
... Changing the On-Screen Menu Language 42 Setting the Time Zone 43 Adjusting the CEC Settings 43 Turning the VIZIO Logo On or Off 44 Using the Help Menu 44 Displaying System Information 45 Resetting the TV Settings 45 Restoring the TV to Factory Default Settings 45 Using Guided Setup 46 Using the ...Info Window 47 Limited Warranty 60 Legal & Compliance 61 Using the USB Media Player 48 Using the USB Media Player 48 Connecting a USB Thumb Drive to the TV 48 Playing USB Media 48 Using VIZIO Internet Apps 51 Using...
M470VSE User Manual
Page 27
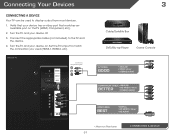
Turn the TV and your device off. 3. Set the TV's input to match the connection you used to display output from most devices. 1. Turn the TV and your device on the TV (HDMI, ...
Turn the TV and your device off. 3. Set the TV's input to match the connection you used to display output from most devices. 1. Turn the TV and your device on the TV (HDMI, ...

M470VSE User Manual
Page 28
Specifications. 3 Personal Computer 3.5mm Cable (For Audio) RGB Cable (For Video) CONNECTING A PC 22 Set your PC's resolution to your PC and the PC Audio In port on the back of the TV. This cable transmits video. 2. Connect a 3.5mm cable (not included) to match the resolution of your TV. Connect an RGB cable (not included) to display output from a personal computer. See Appendix B - Connecting A PC Your TV can be used to your PC and the RGB port on the back of the TV. This cable transmits audio. 3. To use your TV as a PC display: 1.
Specifications. 3 Personal Computer 3.5mm Cable (For Audio) RGB Cable (For Video) CONNECTING A PC 22 Set your PC's resolution to your PC and the PC Audio In port on the back of the TV. This cable transmits video. 2. Connect a 3.5mm cable (not included) to match the resolution of your TV. Connect an RGB cable (not included) to display output from a personal computer. See Appendix B - Connecting A PC Your TV can be used to your PC and the RGB port on the back of the TV. This cable transmits audio. 3. To use your TV as a PC display: 1.
M470VSE User Manual
Page 32
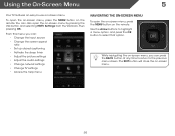
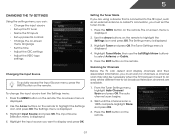
...also open the on -screen menu. 26 The EXIT button will close the on -screen menu by pressing the VIA button and selecting HDTV Settings from the VIA Dock, then pressing OK. From this menu, you can press the BACK button at any time to return to select ... • Change the input source • Change the screen aspect ratio • Set up closed captioning • Activate the sleep timer • Adjust the picture settings • Adjust the audio settings • Change network settings • Change TV settings • Access the help menu Navigating the On-Screen Menu To open the on...
...also open the on -screen menu. 26 The EXIT button will close the on -screen menu by pressing the VIA button and selecting HDTV Settings from the VIA Dock, then pressing OK. From this menu, you can press the BACK button at any time to return to select ... • Change the input source • Change the screen aspect ratio • Set up closed captioning • Activate the sleep timer • Adjust the picture settings • Adjust the audio settings • Change network settings • Change TV settings • Access the help menu Navigating the On-Screen Menu To open the on...

M470VSE User Manual
Page 33
The TV Settings menu is displaying a 720p/1080i/1080p source. 27 Press OK, then press EXIT. To change the input device: 1. Since the 4:3 aspect ratio is already formatted ... The TV can be connected to highlight Input Source and press OK. Press OK. 3. The on the remote. Use the Arrow buttons to highlight the Settings icon and press OK. The Input Source Selection menu is being stretched, the display image may appear distorted. Use the Up/Down Arrow buttons on...
The TV Settings menu is displaying a 720p/1080i/1080p source. 27 Press OK, then press EXIT. To change the input device: 1. Since the 4:3 aspect ratio is already formatted ... The TV can be connected to highlight Input Source and press OK. Press OK. 3. The on the remote. Use the Arrow buttons to highlight the Settings icon and press OK. The Input Source Selection menu is being stretched, the display image may appear distorted. Use the Up/Down Arrow buttons on...
M470VSE User Manual
Page 34
... appears. 3. Adjust the size of closed captions you wish to see , use the Left/Right Arrow buttons on the remote to highlight the setting you wish to see : • Analog Closed Caption for analog (NTSC) TV channels. • Digital Closed Caption for programs that include ... captions for digital (ATSC) TV channels. 4. The Closed Caption menu is not being broadcast with closed captions: 1. Choose As Broadcast to keep default settings or Custom to display, then press EXIT. Change the background color. • BG Opacity - Closed captions display a transcription of the text. •...
... appears. 3. Adjust the size of closed captions you wish to see , use the Left/Right Arrow buttons on the remote to highlight the setting you wish to see : • Analog Closed Caption for analog (NTSC) TV channels. • Digital Closed Caption for programs that include ... captions for digital (ATSC) TV channels. 4. The Closed Caption menu is not being broadcast with closed captions: 1. Choose As Broadcast to keep default settings or Custom to display, then press EXIT. Change the background color. • BG Opacity - Closed captions display a transcription of the text. •...
M470VSE User Manual
Page 35
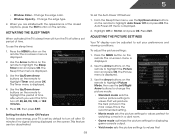
... Auto Power Off Feature To help save energy, your preferences and viewing conditions. The Auto Power-Off menu is the recommended setting. • Movie mode sets the picture settings to values perfect for watching a movie in the most cases. Change the edge type. 4. To use the Up/Down Arrow buttons...MENU button on the remote. The on -screen menu is displayed. 4. The Sleep Timer menu is displayed. 2. The Timer menu is displayed. 2. To set period of time. From the Sleep Timer menu, use the sleep timer: 1. Press Exit. Press the MENU button on the remote. The on -screen menu...
... Auto Power Off Feature To help save energy, your preferences and viewing conditions. The Auto Power-Off menu is the recommended setting. • Movie mode sets the picture settings to values perfect for watching a movie in the most cases. Change the edge type. 4. To use the Up/Down Arrow buttons...MENU button on the remote. The on -screen menu is displayed. 4. The Sleep Timer menu is displayed. 2. The Timer menu is displayed. 2. To set period of time. From the Sleep Timer menu, use the sleep timer: 1. Press Exit. Press the MENU button on the remote. The on -screen menu...
M470VSE User Manual
Page 36
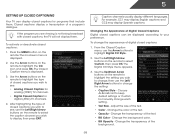
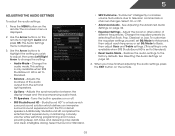
...the camera moves across a scene horizontally. Adjusts the white level of the picture colors. Adjusts the intensity of the picture. This setting is set to distinguish details. Adjusts the edge sharpness of the picture. Select Off, Precision or Smooth. (M650VSE only) • Noise ... buttons on page 31. 5 produce a brighter, more vivid picture. • Football, Golf, Basketball, and Baseball modes optimize the picture settings for .mpeg files. • Color Enhancement - Select Off, Normal, Rich 30 Adjusts the hue of compensation used to distinguish in dark ...
...the camera moves across a scene horizontally. Adjusts the white level of the picture colors. Adjusts the intensity of the picture. This setting is set to distinguish details. Adjusts the edge sharpness of the picture. Select Off, Precision or Smooth. (M650VSE only) • Noise ... buttons on page 31. 5 produce a brighter, more vivid picture. • Football, Golf, Basketball, and Baseball modes optimize the picture settings for .mpeg files. • Color Enhancement - Select Off, Normal, Rich 30 Adjusts the hue of compensation used to distinguish in dark ...

M470VSE User Manual
Page 37
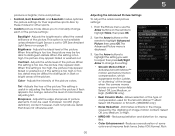
...High. 4. To adjust the color temperature: 1. Use the Arrow buttons on the remote. 31 When you have finished adjusting the Advanced Picture Settings, press the EXIT button on the remote to highlight Color Temperature, then use the Left/Right Arrow buttons to change the color temperature preset...the position of the picture. Select Off, DCR (Dynamic Contrast Ratio), or OPC. • Ambient Light Sensor - If you to the factory default settings, highlight Reset Color Temperature and press OK. 5 Color, Grn/Flesh, and Grn/Blue. • Adaptive Luma - Optimizes the picture for the ...
...High. 4. To adjust the color temperature: 1. Use the Arrow buttons on the remote. 31 When you have finished adjusting the Advanced Picture Settings, press the EXIT button on the remote to highlight Color Temperature, then use the Left/Right Arrow buttons to change the color temperature preset...the position of the picture. Select Off, DCR (Dynamic Contrast Ratio), or OPC. • Ambient Light Sensor - If you to the factory default settings, highlight Reset Color Temperature and press OK. 5 Color, Grn/Flesh, and Grn/Blue. • Adaptive Luma - Optimizes the picture for the ...

M470VSE User Manual
Page 38
... and position of the display image. • Vertical Size - To adjust the picture size and position: 1. Automatically adjusts display image to the factory default settings: 1. Adjusts the vertical (up/down) position of the display image. • Fine Tune - Adjusts the height of the display image. • Horizontal... Size - Highlight Yes and press OK. 4. From the Picture menu, use the Arrow buttons to change the setting: • Auto Sync - Use the Arrow buttons on the remote. 32 The TV displays, "Are you sure you wish to adjust, then ...
... and position of the display image. • Vertical Size - To adjust the picture size and position: 1. Automatically adjusts display image to the factory default settings: 1. Adjusts the vertical (up/down) position of the display image. • Fine Tune - Adjusts the height of the display image. • Horizontal... Size - Highlight Yes and press OK. 4. From the Picture menu, use the Arrow buttons to change the setting: • Auto Sync - Use the Arrow buttons on the remote. 32 The TV displays, "Are you sure you wish to adjust, then ...
M470VSE User Manual
Page 39
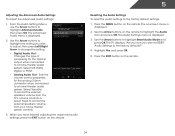
... television commercials or channel changes. When you wish to adjust, then press Left/Right Arrow to highlight the setting you have finished adjusting the audio settings, press the EXIT button on page 34. 4. Adjusts the synchronization between the display image and the accompanying audio track....while watching programming and movies, providing deep, rich bass, and delivering crisp details and clear, intelligible dialog. This setting is only available when SRS StudioSound HD is set to Standard) • Reset Audio Mode - Adjust the boost or attenuation of the audio output from the TV...
... television commercials or channel changes. When you wish to adjust, then press Left/Right Arrow to highlight the setting you have finished adjusting the audio settings, press the EXIT button on page 34. 4. Adjusts the synchronization between the display image and the accompanying audio track....while watching programming and movies, providing deep, rich bass, and delivering crisp details and clear, intelligible dialog. This setting is only available when SRS StudioSound HD is set to Standard) • Reset Audio Mode - Adjust the boost or attenuation of the audio output from the TV...
M470VSE User Manual
Page 40
..., Dolby Digital, or PCM. • Analog Audio Out - Press the MENU button on the remote to a home theater audio system. The Audio Settings menu is displayed. 2. Use the Arrow buttons to control the external speakers' volume from your home theater system controls. 3. Press the EXIT button on... -screen menu is displayed. 2. The Advanced Audio menu is displayed. 3. Sets the volume control properties for the Optical output when connected to highlight the Audio icon and press OK. Highlight Yes and press OK. 5. Use ...
..., Dolby Digital, or PCM. • Analog Audio Out - Press the MENU button on the remote to a home theater audio system. The Audio Settings menu is displayed. 2. Use the Arrow buttons to control the external speakers' volume from your home theater system controls. 3. Press the EXIT button on... -screen menu is displayed. 2. The Advanced Audio menu is displayed. 3. Sets the volume control properties for the Optical output when connected to highlight the Audio icon and press OK. Highlight Yes and press OK. 5. Use ...

M470VSE User Manual
Page 41
... to highlight the Network icon and press OK. Using the on the remote. The on the remote. Use the Arrow buttons on the remote to set up a wireless network connection. 1. Highlight Show keyboard and press OK to highlight the Network icon and press OK. Press the MENU button on -screen menu...
... to highlight the Network icon and press OK. Using the on the remote. The on the remote. Use the Arrow buttons on the remote to set up a wireless network connection. 1. Highlight Show keyboard and press OK to highlight the Network icon and press OK. Press the MENU button on -screen menu...

M470VSE User Manual
Page 42
... Connection screen displays the connection method, network name, signal strength, and download speed of your network, these are displayed at the bottom of the other settings. • IP Address - The subnet mask. • Default Gateway - From the Network Connection menu, highlight Test Connection and press OK. 2. From the Network Connection menu...
... Connection screen displays the connection method, network name, signal strength, and download speed of your network, these are displayed at the bottom of the other settings. • IP Address - The subnet mask. • Default Gateway - From the Network Connection menu, highlight Test Connection and press OK. 2. From the Network Connection menu...
M470VSE User Manual
Page 43
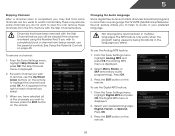
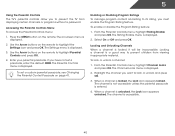
...8226; Change the input source • Set up the TV tuner • Name the TV inputs • Set up parental controls • Change the on-screen menu language • Set the time • Adjust the CEC settings • Adjust the VIZIO logo settings Changing the Input Source To quickly access ...the Input Source menu, press the INPUT button on the remote. To change the input source from the Settings menu: 1. Highlight the input...
...8226; Change the input source • Set up the TV tuner • Name the TV inputs • Set up parental controls • Change the on-screen menu language • Set the time • Adjust the CEC settings • Adjust the VIZIO logo settings Changing the Input Source To quickly access ...the Input Source menu, press the INPUT button on the remote. To change the input source from the Settings menu: 1. Highlight the input...
M470VSE User Manual
Page 44
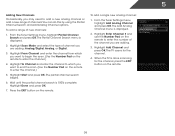
... EXIT button on the remote to add a new analog channel or add a new range of new channels: 1. When the TV is displayed. 2. From the Tuner Settings menu, highlight Partial Channel Search and press OK. Highlight To Channel and enter the channel to which you want to end the scan. (Use the... Number Pad on the remote to enter the channel.) 5. From the Tuner Settings menu, highlight Add Analog Channel and press OK. The TV scans for the channel, press the EXIT button on the remote. 38 Highlight Done and...
... EXIT button on the remote to add a new analog channel or add a new range of new channels: 1. When the TV is displayed. 2. From the Tuner Settings menu, highlight Partial Channel Search and press OK. Highlight To Channel and enter the channel to which you want to end the scan. (Use the... Number Pad on the remote to enter the channel.) 5. From the Tuner Settings menu, highlight Add Analog Channel and press OK. The TV scans for the channel, press the EXIT button on the remote. 38 Highlight Done and...
M470VSE User Manual
Page 45
...Pad. The Digital MTS menu is displayed. 2. See Using the Parental Controls on the remote to remove, use the parental controls. From the Tuner Settings menu, highlight Analog MTS and press OK. For each channel you wish to highlight the channel and press OK. Select Mono, Stereo, or SAP... (secondary audio programming). Press OK. 3. The Skip Channel menu is displayed. 2. From the Tuner Settings menu, highlight Digital MTS and press OK. The MTS feature only works when the program being viewed is completed, you may also be viewed if...
...Pad. The Digital MTS menu is displayed. 2. See Using the Parental Controls on the remote to remove, use the parental controls. From the Tuner Settings menu, highlight Analog MTS and press OK. For each channel you wish to highlight the channel and press OK. Select Mono, Stereo, or SAP... (secondary audio programming). Press OK. 3. The Skip Channel menu is displayed. 2. From the Tuner Settings menu, highlight Digital MTS and press OK. The MTS feature only works when the program being viewed is completed, you may also be viewed if...
M470VSE User Manual
Page 46
..., enter the default, 0000. Enabling or Disabling Program Ratings To manage program content according to its rating, you have not set a custom parental passcode, see Changing the Parental Control Passcode on the remote. Select On or Off and press OK. The channel is not ... menu: 1. The on the remote to prevent the TV from viewing inappropriate material. Use the Arrow buttons on -screen menu is accessible. 40 The Settings menu is displayed. Enter your parental passcode. The Parental Controls menu is displayed. 3. The Rating Enable menu is locked, the Lock icon appears locked....
..., enter the default, 0000. Enabling or Disabling Program Ratings To manage program content according to its rating, you have not set a custom parental passcode, see Changing the Parental Control Passcode on the remote. Select On or Off and press OK. The channel is not ... menu: 1. The on the remote to prevent the TV from viewing inappropriate material. Use the Arrow buttons on -screen menu is accessible. 40 The Settings menu is displayed. Enter your parental passcode. The Parental Controls menu is displayed. 3. The Rating Enable menu is locked, the Lock icon appears locked....


