
VW42LF HDTV User Manual
Page 2
... shock, avoid handling the power cord during electrical storms. • Unplug the unit during lightning. Version 2/29/2008 2 www.VIZIO.com Do not turn on the VW42L FHDTV10A immediately after this appliance to operate within defined design limits, and misuse may cause fire or electric shock. ...wires inside the cable and cause fire or electric shock. This plug will not be replaced when using dropped or damaged appliances. VIZIO VW42L FHDTV10A User Manual THIS PRODUCT HAS BEEN DESIGNED AND TESTED FOR COMPLIANCE WITH REGULATORY SAFETY CERTIFICATIONS This product is sufficient for ...
... shock, avoid handling the power cord during electrical storms. • Unplug the unit during lightning. Version 2/29/2008 2 www.VIZIO.com Do not turn on the VW42L FHDTV10A immediately after this appliance to operate within defined design limits, and misuse may cause fire or electric shock. ...wires inside the cable and cause fire or electric shock. This plug will not be replaced when using dropped or damaged appliances. VIZIO VW42L FHDTV10A User Manual THIS PRODUCT HAS BEEN DESIGNED AND TESTED FOR COMPLIANCE WITH REGULATORY SAFETY CERTIFICATIONS This product is sufficient for ...
VW42LF HDTV User Manual
Page 9
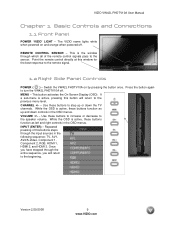
...to increase or decrease to step up and down the TV channels. Repeated pressing of the remote control signals pass...these buttons function as left and right controls in the following sequence: TV, AV1, AV2/S-Video, Component 1, Component 2, RGB, HDMI 1, ...these buttons to the speaker volume. INPUT (ENTER) - The VIZIO name lights white when powered on by pressing the button once...VIZIO VW42L FHDTV10A User Manual Chapter 1 Basic Controls and Connections 1.1 Front Panel POWER 'VIZIO' LIGHT - This button activates the On Screen Display (OSD). Version 2/29/2008 9 www.VIZIO...
...to increase or decrease to step up and down the TV channels. Repeated pressing of the remote control signals pass...these buttons function as left and right controls in the following sequence: TV, AV1, AV2/S-Video, Component 1, Component 2, RGB, HDMI 1, ...these buttons to the speaker volume. INPUT (ENTER) - The VIZIO name lights white when powered on by pressing the button once...VIZIO VW42L FHDTV10A User Manual Chapter 1 Basic Controls and Connections 1.1 Front Panel POWER 'VIZIO' LIGHT - This button activates the On Screen Display (OSD). Version 2/29/2008 9 www.VIZIO...
VW42LF HDTV User Manual
Page 12
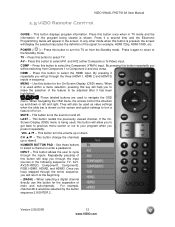
...be adjusted after it has been highlighted. -These labeled buttons are used as value settings when the slide bar is shown on from Component 1 to turn a feature off . Press this button once when in sequence. HDMI - INPUT - For example, channel 28-2 would be switching from the Standby ... you to make the selection of main and sub-channels. Version 2/29/2008 12 www.VIZIO.com POWER ( ) - MENU - Once you have stepped through the three (HDMI 1, HDMI 2 and HDMI 3) inputs in TV mode and the information of the signal; By pressing this button to select the Component (YPbPr...
...be adjusted after it has been highlighted. -These labeled buttons are used as value settings when the slide bar is shown on from Component 1 to turn a feature off . Press this button once when in sequence. HDMI - INPUT - For example, channel 28-2 would be switching from the Standby ... you to make the selection of main and sub-channels. Version 2/29/2008 12 www.VIZIO.com POWER ( ) - MENU - Once you have stepped through the three (HDMI 1, HDMI 2 and HDMI 3) inputs in TV mode and the information of the signal; By pressing this button to select the Component (YPbPr...

VW42LF HDTV User Manual
Page 15
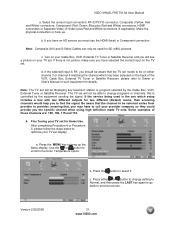
... to the DTV/TV CABLE/ANTENNA connector at www.VIZIO.com or call 1-888-VIZIOCE (1-888-849-4623). 2.2.2 Using the Antenna or Cable through your cable, satellite or TV station operator. Select DTV using the INPUT button on the remote or side of your VCR to the HDTV and VCR. 4. Turn off the power...
... to the DTV/TV CABLE/ANTENNA connector at www.VIZIO.com or call 1-888-VIZIOCE (1-888-849-4623). 2.2.2 Using the Antenna or Cable through your cable, satellite or TV station operator. Select DTV using the INPUT button on the remote or side of your VCR to the HDTV and VCR. 4. Turn off the power...

VW42LF HDTV User Manual
Page 16
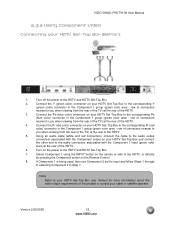
... the remote or side of the HDTV, or directly by pressing the HDMI button on the power to the HDTV and HDTV Set-Top Box. 4. Turn off the power to the HDMI Input (white color area) at the rear of the HDTV. 3. following Steps 1 through 3 and then selecting either HDMI 2 or... HDMI cable that have a HDMI digital interface should be connected to the HDMI input of the LCD HDTV for added security and protection. VIZIO VW42L FHDTV10A User Manual 2.3 Connecting Your HDTV Set-Top Box 2.3.1 Using HDMI HDTV Set-Top Boxes that is being used, you can select either HDMI 2 ...
... the remote or side of the HDTV, or directly by pressing the HDMI button on the power to the HDTV and HDTV Set-Top Box. 4. Turn off the power to the HDMI Input (white color area) at the rear of the HDTV. 3. following Steps 1 through 3 and then selecting either HDMI 2 or... HDMI cable that have a HDMI digital interface should be connected to the HDMI input of the LCD HDTV for added security and protection. VIZIO VW42L FHDTV10A User Manual 2.3 Connecting Your HDTV Set-Top Box 2.3.1 Using HDMI HDTV Set-Top Boxes that is being used, you can select either HDMI 2 ...

VW42LF HDTV User Manual
Page 17
... 2/29/2008 17 www.VIZIO.com Using a HDMI-DVI cable, connect the DVI end to your HDTV Set-Top Box and the HDMI end to the HDTV and HDTV Set-Top Box. 2. Turn off the power to the...connectors associated with the DVI output on the power to the HDTV and HDTV Set-Top Box. 5. VIZIO VW42L FHDTV10A User Manual For HDTV Set-Top Boxes with the HDMI input (white area) at the rear... to the audio connectors associated with DVI: 1. Note: a) b) The HDMI input on the Remote Control. Turn on your HDTV Set-Top Box and connect the other end to your cable or satellite operator. HDCP encrypts ...
... 2/29/2008 17 www.VIZIO.com Using a HDMI-DVI cable, connect the DVI end to your HDTV Set-Top Box and the HDMI end to the HDTV and HDTV Set-Top Box. 2. Turn off the power to the...connectors associated with the DVI output on the power to the HDTV and HDTV Set-Top Box. 5. VIZIO VW42L FHDTV10A User Manual For HDTV Set-Top Boxes with the HDMI input (white area) at the rear... to the audio connectors associated with DVI: 1. Note: a) b) The HDMI input on the Remote Control. Turn on your HDTV Set-Top Box and connect the other end to your cable or satellite operator. HDCP encrypts ...
VW42LF HDTV User Manual
Page 18
...then use Component 2 as the input and follow Steps 1 through 6; Version 2/29/2008 18 www.VIZIO.com Connect the Pb (blue color) connector on the power to the HDTV and HDTV Set-Top Box. 7. Turn on your cable or satellite operator. selecting Component 2 in the Component 1 group (green color area ... connector in Step 7. Using an audio cable (white and red connectors), connect the cable to you when viewing from the rear of the TV) at the rear of the HDTV. 4. row of connectors nearest to the audio output connectors associated with the Component output on the remote or...
...then use Component 2 as the input and follow Steps 1 through 6; Version 2/29/2008 18 www.VIZIO.com Connect the Pb (blue color) connector on the power to the HDTV and HDTV Set-Top Box. 7. Turn on your cable or satellite operator. selecting Component 2 in the Component 1 group (green color area ... connector in Step 7. Using an audio cable (white and red connectors), connect the cable to you when viewing from the rear of the TV) at the rear of the HDTV. 4. row of connectors nearest to the audio output connectors associated with the Component output on the remote or...
VW42LF HDTV User Manual
Page 19
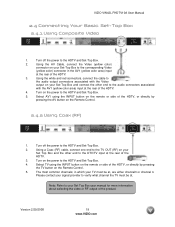
... be at the rear of the HDTV, or directly by pressing the TV button on the remote or side of the HDTV. 4. VIZIO VW42L FHDTV10A User Manual 2.4 Connecting Your Basic Set-Top Box 2.4.1 Using Composite Video 1. Turn on the power to the HDTV and Set-Top Box. 5. in the AV1 (yellow ...or channel 4. Version 2/29/2008 19 www.VIZIO.com Using the white and red connectors, connect the cable to the audio connectors associated with the AV1 (yellow color area) input at . Turn on the power to the HDTV and Set-Top Box. 4. Select TV using the INPUT button on the Remote Control...
... be at the rear of the HDTV, or directly by pressing the TV button on the remote or side of the HDTV. 4. VIZIO VW42L FHDTV10A User Manual 2.4 Connecting Your Basic Set-Top Box 2.4.1 Using Composite Video 1. Turn on the power to the HDTV and Set-Top Box. 5. in the AV1 (yellow ...or channel 4. Version 2/29/2008 19 www.VIZIO.com Using the white and red connectors, connect the cable to the audio connectors associated with the AV1 (yellow color area) input at . Turn on the power to the HDTV and Set-Top Box. 4. Select TV using the INPUT button on the Remote Control...
VW42LF HDTV User Manual
Page 20
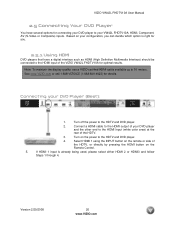
Turn off the power to the HDMI Input (white color area) at the rear of the HDTV. 3. If HDMI 1 input is right for you. 2.5.1 Using HDMI DVD players that have several options for details. Based on the Remote Control. 5. VIZIO VW42L FHDTV10A User Manual 2.5 Connecting Your DVD Player You have a... HDMI cable to the HDMI output of the HDTV, or directly by pressing the HDMI button on your VW42L FHDTV10A; Turn on the power to 10 meters. Note: To maintain the display quality, use a VIZIO certified HDMI cable available up to the HDTV and DVD player. 4. Version 2/29/2008 20 www...
Turn off the power to the HDMI Input (white color area) at the rear of the HDTV. 3. If HDMI 1 input is right for you. 2.5.1 Using HDMI DVD players that have several options for details. Based on the Remote Control. 5. VIZIO VW42L FHDTV10A User Manual 2.5 Connecting Your DVD Player You have a... HDMI cable to the HDMI output of the HDTV, or directly by pressing the HDMI button on your VW42L FHDTV10A; Turn on the power to 10 meters. Note: To maintain the display quality, use a VIZIO certified HDMI cable available up to the HDTV and DVD player. 4. Version 2/29/2008 20 www...
VW42LF HDTV User Manual
Page 21
... the audio connectors by the HDMI input (white area) at the rear of the product. Note: Refer to your DVD player. 5. Turn on the remote or side of the HDTV. 4. Turn off the HDTV and DVD player. 2. Using a HDMI-DVI cable, connect the DVI end to your DVD player user manual for... more information about the video output requirements of the HDTV. 3. Version 2/29/2008 21 www.VIZIO.com Connect an audio cable (white and...
... the audio connectors by the HDMI input (white area) at the rear of the product. Note: Refer to your DVD player. 5. Turn on the remote or side of the HDTV. 4. Turn off the HDTV and DVD player. 2. Using a HDMI-DVI cable, connect the DVI end to your DVD player user manual for... more information about the video output requirements of the HDTV. 3. Version 2/29/2008 21 www.VIZIO.com Connect an audio cable (white and...
VW42LF HDTV User Manual
Page 22
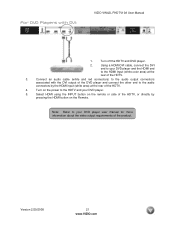
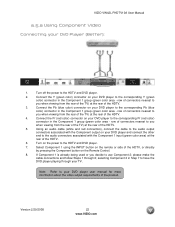
...rear of the HDTV. 5. Connect the Pr (red color) connector on your DVD player to you when viewing from the rear of the TV) at the rear of connectors nearest to the corresponding Pr (red color) connector in the Component 1 group (green color area - Version ... your DVD Player (Better): 1. row of the HDTV. 6. Connect the Pb (blue color) connector on the Remote Control. 8. Turn off the power to the corresponding Pb (blue color) connector in the Component 1 group (green color area - VIZIO VW42L FHDTV10A User Manual 2.5.2 Using Component Video Connecting your...
...rear of the HDTV. 5. Connect the Pr (red color) connector on your DVD player to you when viewing from the rear of the TV) at the rear of connectors nearest to the corresponding Pr (red color) connector in the Component 1 group (green color area - Version ... your DVD Player (Better): 1. row of the HDTV. 6. Connect the Pb (blue color) connector on the Remote Control. 8. Turn off the power to the corresponding Pb (blue color) connector in the Component 1 group (green color area - VIZIO VW42L FHDTV10A User Manual 2.5.2 Using Component Video Connecting your...

VW42LF HDTV User Manual
Page 23
... Select AV2 using the INPUT button on the remote or right hand side of the TV. 4. Turn on your DVD player user manual for more information about the video output requirements of the TV. 3. Turn off the power to your DVD player to the HDTV and DVD Player. 5. Connect ...the Video (yellow) connector on the power to the Video (yellow color) connector in Step 5 as long as the S-Video connector is being used , apply Steps 1 through 4; Version 2/29/2008 23 www.VIZIO...
... Select AV2 using the INPUT button on the remote or right hand side of the TV. 4. Turn on your DVD player user manual for more information about the video output requirements of the TV. 3. Turn off the power to your DVD player to the HDTV and DVD Player. 5. Connect ...the Video (yellow) connector on the power to the Video (yellow color) connector in Step 5 as long as the S-Video connector is being used , apply Steps 1 through 4; Version 2/29/2008 23 www.VIZIO...
VW42LF HDTV User Manual
Page 24
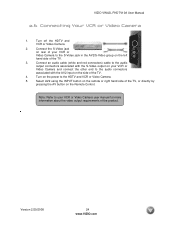
... or Video Camera user manual for more information about the video output requirements of the TV. 4. Version 2/29/2008 24 www.VIZIO.com Connect the S-Video jack on the side of the product. Turn on the Remote Control. VIZIO VW42L FHDTV10A User Manual 2.6 Connecting Your VCR or Video Camera 1. Connect an audio cable (white...
... or Video Camera user manual for more information about the video output requirements of the TV. 4. Version 2/29/2008 24 www.VIZIO.com Connect the S-Video jack on the side of the product. Turn on the Remote Control. VIZIO VW42L FHDTV10A User Manual 2.6 Connecting Your VCR or Video Camera 1. Connect an audio cable (white...
VW42LF HDTV User Manual
Page 25
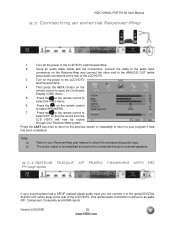
... control to open the On-Screen Display (OSD) menu. 5. Turn off the power to select OFF so that the sound from the LCD HDTV will now be connected directly to external speakers. 2.7.1 Optical Output of the LCD HDTV. Press the LAST key once to return to the previous ...select the corresponding audio input. Press the on the power to your Receiver/Amp user manual to select the Audio menu. 6. VIZIO VW42L FHDTV10A User Manual 2.7 Connecting an external Receiver/Amp 1. Note: a) b) Refer to your program if task has been completed. Version 2/29/2008 25 www.VIZIO.com
... control to open the On-Screen Display (OSD) menu. 5. Turn off the power to select OFF so that the sound from the LCD HDTV will now be connected directly to external speakers. 2.7.1 Optical Output of the LCD HDTV. Press the LAST key once to return to the previous ...select the corresponding audio input. Press the on the power to your Receiver/Amp user manual to select the Audio menu. 6. VIZIO VW42L FHDTV10A User Manual 2.7 Connecting an external Receiver/Amp 1. Note: a) b) Refer to your program if task has been completed. Version 2/29/2008 25 www.VIZIO.com
VW42LF HDTV User Manual
Page 26
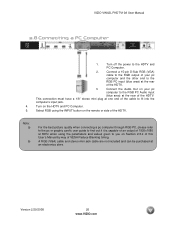
...'s input jack. 4. A RGB (VGA) cable and stereo mini jack cable are not included and can be purchased at one end of VESA Reduce Blanking timing. VIZIO VW42L FHDTV10A User Manual 2.8 Connecting a PC Computer 1. Note: a) b) For the best picture quality when connecting a pc computer through RGB PC, please refer to the pc... the RGB PC Audio input (blue area) at the rear of 1920x1080 at 60Hz when using the INPUT button on the HDTV and PC Computer. 5. Turn off the power to the RGB PC input (blue area) at the rear of the HDTV. This connection must have a 1/8" stereo mini plug at ...
...'s input jack. 4. A RGB (VGA) cable and stereo mini jack cable are not included and can be purchased at one end of VESA Reduce Blanking timing. VIZIO VW42L FHDTV10A User Manual 2.8 Connecting a PC Computer 1. Note: a) b) For the best picture quality when connecting a pc computer through RGB PC, please refer to the pc... the RGB PC Audio input (blue area) at the rear of 1920x1080 at 60Hz when using the INPUT button on the HDTV and PC Computer. 5. Turn off the power to the RGB PC input (blue area) at the rear of the HDTV. This connection must have a 1/8" stereo mini plug at ...
VW42LF HDTV User Manual
Page 28
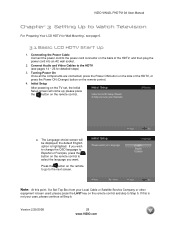
please press the LAST key on the TV set, the Initial Setup screen will be displayed; If this point, if a Set-... to go to the HDTV (see pages 14 ~ 26 for Wall Mounting', see page 6. 3.1 Basic LCD HDTV Start Up 1. Turning Power On Once all the components are connected, press the Power ON button on the side of the HDTV..., and then plug the power cord into an AC wall socket. 2. please press the button on the remote control. 4. the default English option is been used; VIZIO...
please press the LAST key on the TV set, the Initial Setup screen will be displayed; If this point, if a Set-... to go to the HDTV (see pages 14 ~ 26 for Wall Mounting', see page 6. 3.1 Basic LCD HDTV Start Up 1. Turning Power On Once all the components are connected, press the Power ON button on the side of the HDTV..., and then plug the power cord into an AC wall socket. 2. please press the button on the remote control. 4. the default English option is been used; VIZIO...
VW42LF HDTV User Manual
Page 31
... varies from provider to call your TV set display: a. Some examples of the VCR, Cable Box, External TV Tuner or Satellite Receiver; Fine Tuning your TV set . Press the button to the Color Temperature option. Turn on either or button to optimize your TV set for details. If there is... controlled by the Cable Box, VCR, External Tuner or Satellite Receiver. d. The TV set . Version 2/29/2008 31 www.VIZIO.com please refer to bring up . meaning ...
... varies from provider to call your TV set display: a. Some examples of the VCR, Cable Box, External TV Tuner or Satellite Receiver; Fine Tuning your TV set . Press the button to the Color Temperature option. Turn on either or button to optimize your TV set for details. If there is... controlled by the Cable Box, VCR, External Tuner or Satellite Receiver. d. The TV set . Version 2/29/2008 31 www.VIZIO.com please refer to bring up . meaning ...
VW42LF HDTV User Manual
Page 36
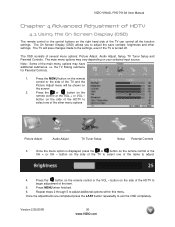
.../2008 36 www.VIZIO.com The OSD consists of the TV can control all the function settings. Press the MENU button on the screen. 2. button on the side of the TV to select one of the TV and the Picture ... are completed press the LAST button repeatedly to adjust the save changes made to the settings, even if the TV is displayed, press the or button on the side of the HDTV to adjust. 4. Press the button on...additional options within this menu. Once the menu option is turned off. Press MENU when finished. 6. Repeat steps 2 through 5 to begin adjustment of the other settings.
.../2008 36 www.VIZIO.com The OSD consists of the TV can control all the function settings. Press the MENU button on the screen. 2. button on the side of the TV to select one of the TV and the Picture ... are completed press the LAST button repeatedly to adjust the save changes made to the settings, even if the TV is displayed, press the or button on the side of the HDTV to adjust. 4. Press the button on...additional options within this menu. Once the menu option is turned off. Press MENU when finished. 6. Repeat steps 2 through 5 to begin adjustment of the other settings.
VW42LF HDTV User Manual
Page 41
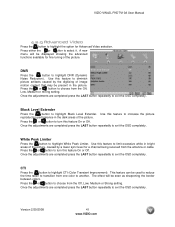
...Dynamic Noise Reduction). Press the or button to exit the OSD completely. Once the adjustments are completed press the LAST button repeatedly to turn this feature On or Off. The effect will be displayed showing the advanced functions available for fine tuning of image motion content that may...the picture reproduction performance in bright areas of the picture. Use this feature to exit the OSD completely. Version 2/29/2008 41 www.VIZIO.com Press the or button to limit excessive white in the dark areas of the picture, caused by the digitizing of the picture. ...
...Dynamic Noise Reduction). Press the or button to exit the OSD completely. Once the adjustments are completed press the LAST button repeatedly to turn this feature On or Off. The effect will be displayed showing the advanced functions available for fine tuning of image motion content that may...the picture reproduction performance in bright areas of the picture. Use this feature to exit the OSD completely. Version 2/29/2008 41 www.VIZIO.com Press the or button to limit excessive white in the dark areas of the picture, caused by the digitizing of the picture. ...

VW42LF HDTV User Manual
Page 42
... will raise the APL to highlight Adaptive Luma. ON implies that the dark would be set to On or Off to allow the TV set to turn this On or Off. Press the or or Off. Large areas of this feature can be accentuated and OFF would intensify the brightness... Press the button to exit the OSD completely. button to turn this feature On Once the adjustments are completed press the LAST button repeatedly to highlight Flesh Tone. with a more pleasing production of this effect. Version 2/29/2008 42 www.VIZIO.com DCR (Dynamic Contrast Ratio) Press the button to highlight...
... will raise the APL to highlight Adaptive Luma. ON implies that the dark would be set to On or Off to allow the TV set to turn this On or Off. Press the or or Off. Large areas of this feature can be accentuated and OFF would intensify the brightness... Press the button to exit the OSD completely. button to turn this feature On Once the adjustments are completed press the LAST button repeatedly to highlight Flesh Tone. with a more pleasing production of this effect. Version 2/29/2008 42 www.VIZIO.com DCR (Dynamic Contrast Ratio) Press the button to highlight...


