Service Manual
Page 4
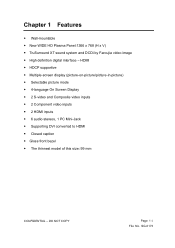
SG-0173 DO NOT COPY Page 1-1 File No. Chapter 1 Features Wall-mountable New WIDE HD Plasma Panel:1366 x 768 (H x V) TruSurround XT sound system and DCDi by Faroujia video image High definition digital interface - HDMI HDCP supportive Multiple-screen display (picture-on-picture/picture-in-picture) Selectable picture mode 4-language On Screen Display 2 S-video and Composite video inputs 2 Component video inputs 2 HDMI inputs 6 audio stereos, 1 PC Mini-Jack Supporting DVI converted to HDMI Closed caption Gloss front bezel The thinnest model of this size: 99 mm CONFIDENTIAL -
SG-0173 DO NOT COPY Page 1-1 File No. Chapter 1 Features Wall-mountable New WIDE HD Plasma Panel:1366 x 768 (H x V) TruSurround XT sound system and DCDi by Faroujia video image High definition digital interface - HDMI HDCP supportive Multiple-screen display (picture-on-picture/picture-in-picture) Selectable picture mode 4-language On Screen Display 2 S-video and Composite video inputs 2 Component video inputs 2 HDMI inputs 6 audio stereos, 1 PC Mini-Jack Supporting DVI converted to HDMI Closed caption Gloss front bezel The thinnest model of this size: 99 mm CONFIDENTIAL -

Service Manual
Page 13
... Remark: P:positive,N: negative €1024x768 @60 Hz: Primary CONFIDENTIAL - Chapter 4 Factory preset timings This timing chart is already preset for this plasma monitor. 1. PC analog preset modes Mode No.
... Remark: P:positive,N: negative €1024x768 @60 Hz: Primary CONFIDENTIAL - Chapter 4 Factory preset timings This timing chart is already preset for this plasma monitor. 1. PC analog preset modes Mode No.
User Manual
Page 2
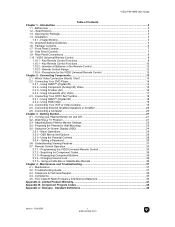
... S-Video (AV) ...16 2.2.4 - Using HDMI™ (Digital HD) ...18 2.3.2 - Connecting a Computer ...20 Chapter 3 - Programming the VIZIO Universal Remote Control 33 3.7.2 - Compliance ...40 4.5 - Remote Control Range...12 1.10.4 - Which Video Connection Should I Use 13 2.2 - ... Your HDTV Set-Top Box 18 2.3.1 - Watching a TV Program...21 3.3 - Remote Control Operation ...33 3.7.1 - Side Panel Controls ...7 1.9 - Turning your Plasma Monitor On and Off 21 3.2 - Changing Volume Lock ...35 3.7.5 - Important Safety Guidelines...4 1.6 - OSD Menus and Options...
... S-Video (AV) ...16 2.2.4 - Using HDMI™ (Digital HD) ...18 2.3.2 - Connecting a Computer ...20 Chapter 3 - Programming the VIZIO Universal Remote Control 33 3.7.2 - Compliance ...40 4.5 - Remote Control Range...12 1.10.4 - Which Video Connection Should I Use 13 2.2 - ... Your HDTV Set-Top Box 18 2.3.1 - Watching a TV Program...21 3.3 - Remote Control Operation ...33 3.7.1 - Side Panel Controls ...7 1.9 - Turning your Plasma Monitor On and Off 21 3.2 - Changing Volume Lock ...35 3.7.5 - Important Safety Guidelines...4 1.6 - OSD Menus and Options...
User Manual
Page 3
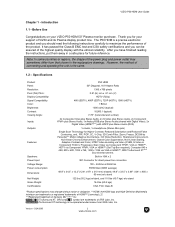
...and symbol are trademarks or registered trademarks of HDMI™ Licensing LLC. ***Registered trademark of VIZIO and its Plasma display product line. Version - 5/24/2005 2 www.vizioce.com Specifications Product Panel: Resolution: Pixel (Dot) Pitch: Display Compatibility: Signal Compatibility: Color: Brightness: Contrast: ...Analog RGB plus Stereo Audio (RCA) 1x Audio, 1x Headphone (Stereo Mini-jack) Single Scan Technology for your VIZIO P50 HDM 50" Plasma monitor purchase. Built-in 10W x 2 IEC Connector for future reference. TruSurround XT technology is incorporated under license ...
...and symbol are trademarks or registered trademarks of HDMI™ Licensing LLC. ***Registered trademark of VIZIO and its Plasma display product line. Version - 5/24/2005 2 www.vizioce.com Specifications Product Panel: Resolution: Pixel (Dot) Pitch: Display Compatibility: Signal Compatibility: Color: Brightness: Contrast: ...Analog RGB plus Stereo Audio (RCA) 1x Audio, 1x Headphone (Stereo Mini-jack) Single Scan Technology for your VIZIO P50 HDM 50" Plasma monitor purchase. Built-in 10W x 2 IEC Connector for future reference. TruSurround XT technology is incorporated under license ...
User Manual
Page 4
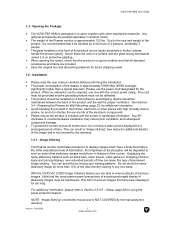
...information, please refer to display images which have been displayed for a prolonged period of the screen. Opening the Package • The VIZIO P50 HDM is required, use the power cord designated for proper ventilation. When an extension cord is packaged in a carton together with ...the unit on protective padding. • When opening the carton, check that the product is in good condition and that the usual plasma panel precautions of avoiding prolonged display of permanent image sticking. Displaying the same stationary patterns such as not to remove ghosts of the electronic...
...information, please refer to display images which have been displayed for a prolonged period of the screen. Opening the Package • The VIZIO P50 HDM is required, use the power cord designated for proper ventilation. When an extension cord is packaged in a carton together with ...the unit on protective padding. • When opening the carton, check that the product is in good condition and that the usual plasma panel precautions of avoiding prolonged display of permanent image sticking. Displaying the same stationary patterns such as not to remove ghosts of the electronic...
User Manual
Page 5
...refer all servicing to the appliance. It could short circuit parts causing a fire or electric shock. If your dealer. • The P50 HDM Plasma monitor is sufficient for repair. Any power source other hazards. Ensure that specified in accordance with a third (grounding) pin. radiator, heater, ...not use and maintenance of electric shock, do not touch the connector with wet hands. • Insert batteries in the User Manual. VIZIO P50 HDM User Guide 1.5 - Important Safety Guidelines This product is provided. • Never push any other moisture. To prevent the product...
...refer all servicing to the appliance. It could short circuit parts causing a fire or electric shock. If your dealer. • The P50 HDM Plasma monitor is sufficient for repair. Any power source other hazards. Ensure that specified in accordance with a third (grounding) pin. radiator, heater, ...not use and maintenance of electric shock, do not touch the connector with wet hands. • Insert batteries in the User Manual. VIZIO P50 HDM User Guide 1.5 - Important Safety Guidelines This product is provided. • Never push any other moisture. To prevent the product...
User Manual
Page 7
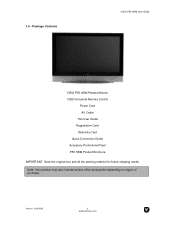
Note: Your product may also include various other accessories depending on region of purchase. Version - 5/24/2005 6 www.vizioce.com 1.6 - Package Contents VIZIO P50 HDM User Guide VIZIO P50 HDM Plasma Monitor VIZIO Universal Remote Control Power Cord AV Cable This User Guide Registration Card Warranty Card Quick Connection Guide Accessory Promotional Flyer P50 HDM Product Brochure IMPORTANT: Save the original box and all the packing material for future shipping needs.
Note: Your product may also include various other accessories depending on region of purchase. Version - 5/24/2005 6 www.vizioce.com 1.6 - Package Contents VIZIO P50 HDM User Guide VIZIO P50 HDM Plasma Monitor VIZIO Universal Remote Control Power Cord AV Cable This User Guide Registration Card Warranty Card Quick Connection Guide Accessory Promotional Flyer P50 HDM Product Brochure IMPORTANT: Save the original box and all the packing material for future shipping needs.
User Manual
Page 9
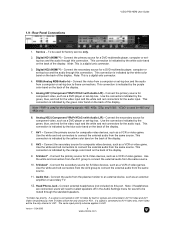
Rear Panel Connections 1. To be muted through the standard speakers. *S-Video has priority. Connect the primary ...color band on the back of the display. Use the white and red connectors to connect the external audio from the plasma monitor to connect the external audio from the same source. 11. S-Video1* - Connect the audio from the same ...is indicated by the green, blue, and red for the video input and the white and red connectors for the audio input. VIZIO P50 HDM User Guide 1.9 - Digital HD2 (HDMI™) - This connection is used for component video, such as a VCR ...
Rear Panel Connections 1. To be muted through the standard speakers. *S-Video has priority. Connect the primary ...color band on the back of the display. Use the white and red connectors to connect the external audio from the plasma monitor to connect the external audio from the same source. 11. S-Video1* - Connect the audio from the same ...is indicated by the green, blue, and red for the video input and the white and red connectors for the audio input. VIZIO P50 HDM User Guide 1.9 - Digital HD2 (HDMI™) - This connection is used for component video, such as a VCR ...
User Manual
Page 11
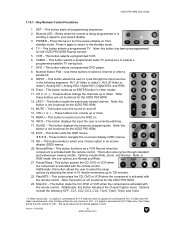
...VCR when the component is sending a signal to your chosen option in RGB mode, the only options are not functional for the VIZIO P50 HDM Plasma monitor. 5. Options include the following sequence: AV1 (S-Video or video*), AV2 (S-Video or video*), Analog HD1, Analog HD2, ...has priority. Remote LED - Press this button is activated with the remote control. Number Button Pad - LAST - Note: this key to select your plasma display. 3. This button starts all programming sequences. 2. This button selects a programmed TV. VCR - Use these buttons are Normal and Wide. 21...
...VCR when the component is sending a signal to your chosen option in RGB mode, the only options are not functional for the VIZIO P50 HDM Plasma monitor. 5. Options include the following sequence: AV1 (S-Video or video*), AV2 (S-Video or video*), Analog HD1, Analog HD2, ...has priority. Remote LED - Press this button is activated with the remote control. Number Button Pad - LAST - Note: this key to select your plasma display. 3. This button starts all programming sequences. 2. This button selects a programmed TV. VCR - Use these buttons are Normal and Wide. 21...
User Manual
Page 14
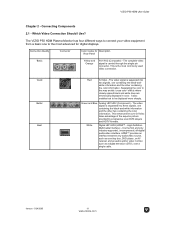
...HDTV formats. Which Video Connection Should I Use? The video signal is the most advanced for Description Rear Panel Basic Yellow and Orange AV1/AV2 (Composite) - VIZIO P50 HDM User Guide Chapter 2 - Connection Quality Connector Color Codes for digital displays. white information and ...the other two containing the color information. The VIZIO P50 HDM Plasma Monitor has four different ways to connect your video equipment from a basic one containing the black-and- This is separated...
...HDTV formats. Which Video Connection Should I Use? The video signal is the most advanced for Description Rear Panel Basic Yellow and Orange AV1/AV2 (Composite) - VIZIO P50 HDM User Guide Chapter 2 - Connection Quality Connector Color Codes for digital displays. white information and ...the other two containing the color information. The VIZIO P50 HDM Plasma Monitor has four different ways to connect your video equipment from a basic one containing the black-and- This is separated...
User Manual
Page 15
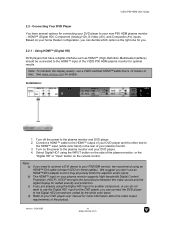
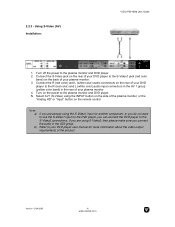
...have a digital interface such as HDMI™ (High-Definition Multimedia Interface) should be connected to the plasma monitor and your new P50 HDM plasma monitor - Turn off the power to your P50HDM monitor, we recommend using the Digital HD1 input for another component, or you do not want to...: 1. Turn on your DVD player to the HDMI™ input (white color band) in the rear of the VIZIO P50 HDM plasma monitor for you don't use a VIZIO certified HDMI™ cable that have several options for connecting your home theater configuration, you can connect the DVD player ...
...have a digital interface such as HDMI™ (High-Definition Multimedia Interface) should be connected to the plasma monitor and your new P50 HDM plasma monitor - Turn off the power to your P50HDM monitor, we recommend using the Digital HD1 input for another component, or you do not want to...: 1. Turn on your DVD player to the HDMI™ input (white color band) in the rear of the VIZIO P50 HDM plasma monitor for you don't use a VIZIO certified HDMI™ cable that have several options for connecting your home theater configuration, you can connect the DVD player ...
User Manual
Page 16
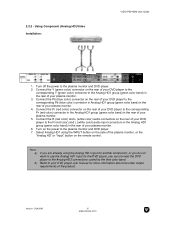
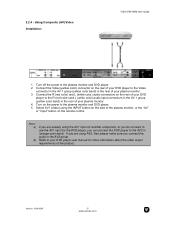
Note: a) b) If you are already using the INPUT button on the remote control. Using Component (Analog HD) Video Installation: VIZIO P50 HDM User Guide 1. Connect the Pb (blue color) connector on the rear of your DVD player to the corresponding Pr (red color) connector in ... DVD player, you do not want to the corresponding Y (green color) connector in the Analog HD1 group (green color band) in the rear of your plasma monitor. 4. Connect the R (red color) and L (white color) audio connectors on the rear of your DVD player to the corresponding Pb (blue color) connector in...
Note: a) b) If you are already using the INPUT button on the remote control. Using Component (Analog HD) Video Installation: VIZIO P50 HDM User Guide 1. Connect the Pb (blue color) connector on the rear of your DVD player to the corresponding Pr (red color) connector in ... DVD player, you do not want to the corresponding Y (green color) connector in the Analog HD1 group (green color band) in the rear of your plasma monitor. 4. Connect the R (red color) and L (white color) audio connectors on the rear of your DVD player to the corresponding Pb (blue color) connector in...
User Manual
Page 17
... user manual for the DVD player, you connect the audio in the AV2 group. Turn off the power to the plasma monitor and DVD player. 5. Connect the R (red color) and L (white color) audio connectors on the remote...Video2 connections. 2.2.3 - Version - 5/24/2005 16 www.vizioce.com Connect the S-Video jack on the rear of your plasma monitor. 3. If you are already using S-Video2, then please make sure you can connect the DVD player to the R ...Video1 jack (red color band) on the power to the plasma monitor and DVD player. 2. Using S-Video (AV) Installation: VIZIO P50 HDM User Guide 1.
... user manual for the DVD player, you connect the audio in the AV2 group. Turn off the power to the plasma monitor and DVD player. 5. Connect the R (red color) and L (white color) audio connectors on the remote...Video2 connections. 2.2.3 - Version - 5/24/2005 16 www.vizioce.com Connect the S-Video jack on the rear of your plasma monitor. 3. If you are already using S-Video2, then please make sure you can connect the DVD player to the R ...Video1 jack (red color band) on the power to the plasma monitor and DVD player. 2. Using S-Video (AV) Installation: VIZIO P50 HDM User Guide 1.
User Manual
Page 18
... L (white color) audio connectors on the remote control. Select AV1 (video) using the AV1 input for another component, or you do not want to the plasma monitor and DVD player. 5. Note: a) b) If you are using AV2, then please make sure you can connect the DVD player to the AV2 in (orange... color band). Using Composite (AV) Video Installation: VIZIO P50 HDM User Guide 1. Turn off the power to the R (red color) and L (white color) audio input connectors in the AV 1 group (yellow color band...
... L (white color) audio connectors on the remote control. Select AV1 (video) using the AV1 input for another component, or you do not want to the plasma monitor and DVD player. 5. Note: a) b) If you are using AV2, then please make sure you can connect the DVD player to the AV2 in (orange... color band). Using Composite (AV) Video Installation: VIZIO P50 HDM User Guide 1. Turn off the power to the R (red color) and L (white color) audio input connectors in the AV 1 group (yellow color band...
User Manual
Page 19
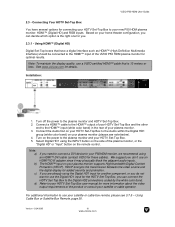
...is the right one for you need to connect a DVI device to your P50HDM monitor, we recommend using an HDMI™-DVI cable (contact VIZIO for these cables). Turn on the power to the Digital HD2 connections coded by...the HDMI™ output of your HDTV Set-Top Box and the other end to use a VIZIO certified HDMI™ cable that have several options for added security and protection. We suggest you...less. Connect the Audio Out on your HDTV Set-Top Box to the plasma monitor and HDTV Set-Top Box. 2. VIZIO P50 HDM User Guide 2.3 - If you are already using the INPUT button...
...is the right one for you need to connect a DVI device to your P50HDM monitor, we recommend using an HDMI™-DVI cable (contact VIZIO for these cables). Turn on the power to the Digital HD2 connections coded by...the HDMI™ output of your HDTV Set-Top Box and the other end to use a VIZIO certified HDMI™ cable that have several options for added security and protection. We suggest you...less. Connect the Audio Out on your HDTV Set-Top Box to the plasma monitor and HDTV Set-Top Box. 2. VIZIO P50 HDM User Guide 2.3 - If you are already using the INPUT button...

User Manual
Page 20
...off the power to the R (red color) and L (white color) audio input connectors in the AV 1 group (yellow color band) in the rear of your plasma monitor. 3. Connect the R (red color) and L (white color) audio connectors on the remote control. 2.3.2 - Select RGB using the INPUT button on the ...Camera to the plasma monitor and HDTV Set-Top Box. 2. Version - 5/24/2005 19 www.vizioce.com Turn on the power to the plasma monitor and VCR or video camera. 5. Turn on the power to the plasma monitor and your satellite or cable operator. 2.4 - Using RGB Video Installation: VIZIO P50 HDM ...
...off the power to the R (red color) and L (white color) audio input connectors in the AV 1 group (yellow color band) in the rear of your plasma monitor. 3. Connect the R (red color) and L (white color) audio connectors on the remote control. 2.3.2 - Select RGB using the INPUT button on the ...Camera to the plasma monitor and HDTV Set-Top Box. 2. Version - 5/24/2005 19 www.vizioce.com Turn on the power to the plasma monitor and VCR or video camera. 5. Turn on the power to the plasma monitor and your satellite or cable operator. 2.4 - Using RGB Video Installation: VIZIO P50 HDM ...

User Manual
Page 21
.... Connecting a Computer Installation: 1. Connect the RGB Audio Out on the side of the product. Select RGB using the INPUT button on your plasma monitor. 3. Connect the R (red color) and L (white color) audio input connectors on the remote control to VESA 1024 x 768 ...2005 20 www.vizioce.com 2.5 - Connecting External Amplified Speakers or Amplifier Installation: VIZIO P50 HDM User Guide 1. Turn off the power to the plasma monitor and external amplifier. 2. Turn off the power to the plasma monitor and Computer. 2. Turn on how to use external speakers. 2.6 - Refer...
.... Connecting a Computer Installation: 1. Connect the RGB Audio Out on the side of the product. Select RGB using the INPUT button on your plasma monitor. 3. Connect the R (red color) and L (white color) audio input connectors on the remote control to VESA 1024 x 768 ...2005 20 www.vizioce.com 2.5 - Connecting External Amplified Speakers or Amplifier Installation: VIZIO P50 HDM User Guide 1. Turn off the power to the plasma monitor and external amplifier. 2. Turn off the power to the plasma monitor and Computer. 2. Turn on how to use external speakers. 2.6 - Refer...
User Manual
Page 22
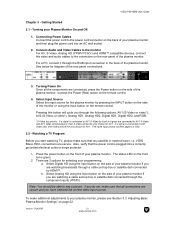
... broadcasts through a cable set -top box or satellite dish connected through the component inputs (YPbPr). Press the power button on the rear panel of your plasma monitor if you do not, make sure that any satellite or external tuner, i.e. Select Analog HD using the Input button on the side... S-Video will be able to AV1 Video only, then Video will be the only choice for AV1. VIZIO P50 HDM User Guide Chapter 3 - If a signal is connected to see Section 3.3: Adjusting Basic Plasma Monitor Settings" on the remote control. 4. There are watching a cable set -top box or satellite dish...
... broadcasts through a cable set -top box or satellite dish connected through the component inputs (YPbPr). Press the power button on the rear panel of your plasma monitor if you do not, make sure that any satellite or external tuner, i.e. Select Analog HD using the Input button on the side... S-Video will be able to AV1 Video only, then Video will be the only choice for AV1. VIZIO P50 HDM User Guide Chapter 3 - If a signal is connected to see Section 3.3: Adjusting Basic Plasma Monitor Settings" on the remote control. 4. There are watching a cable set -top box or satellite dish...
User Manual
Page 23
Adjusting Basic Plasma Monitor Settings Volume To increase the volume, press and hold the VOL - button on the front panel or remote control until the desired level is reached. press the button again to switch among the modes. Wide Using this feature you can watch ... in Normal, Wide, and Zoom. To decrease the volume, press and hold the VOL + button on the front panel or remote control until the desired level is reached. Press the WIDE button on . VIZIO P50 HDM User Guide 3.3 - Mute Press the MUTE button on the remote control to turn the sound on...
Adjusting Basic Plasma Monitor Settings Volume To increase the volume, press and hold the VOL - button on the front panel or remote control until the desired level is reached. press the button again to switch among the modes. Wide Using this feature you can watch ... in Normal, Wide, and Zoom. To decrease the volume, press and hold the VOL + button on the front panel or remote control until the desired level is reached. Press the WIDE button on . VIZIO P50 HDM User Guide 3.3 - Mute Press the MUTE button on the remote control to turn the sound on...
User Manual
Page 24
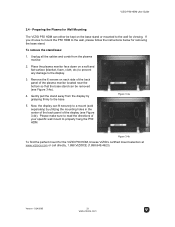
...damage to the wall, please follow the instructions below for viewing. VIZIO P50 HDM User Guide 3.4 - Remove the 6 screws on each side of the back panel of your specific wall mount to the base. Gently pull the stand away from the plasma monitor. 2. Figure 3.4a 5. Figure 3.4b To find the perfect... mount for Wall Mounting The VIZIO P50 HDM can fit securely to the wall for removing the...
...damage to the wall, please follow the instructions below for viewing. VIZIO P50 HDM User Guide 3.4 - Remove the 6 screws on each side of the back panel of your specific wall mount to the base. Gently pull the stand away from the plasma monitor. 2. Figure 3.4a 5. Figure 3.4b To find the perfect... mount for Wall Mounting The VIZIO P50 HDM can fit securely to the wall for removing the...


