Service Manual
Page 4
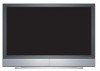
Chapter 1 Features Wall-mountable New WIDE HD Plasma Panel:1366 x 768 (H x V) TruSurround XT sound system and DCDi by Faroujia video image High definition digital interface - SG-0173 HDMI HDCP supportive Multiple-screen display (picture-on-picture/picture-in-picture) Selectable picture mode 4-language On Screen Display 2 S-video and Composite video inputs 2 Component video inputs 2 HDMI inputs 6 audio stereos, 1 PC Mini-Jack Supporting DVI converted to HDMI Closed caption Gloss front bezel The thinnest model of this size: 99 mm CONFIDENTIAL - DO NOT COPY Page 1-1 File No.
Chapter 1 Features Wall-mountable New WIDE HD Plasma Panel:1366 x 768 (H x V) TruSurround XT sound system and DCDi by Faroujia video image High definition digital interface - SG-0173 HDMI HDCP supportive Multiple-screen display (picture-on-picture/picture-in-picture) Selectable picture mode 4-language On Screen Display 2 S-video and Composite video inputs 2 Component video inputs 2 HDMI inputs 6 audio stereos, 1 PC Mini-Jack Supporting DVI converted to HDMI Closed caption Gloss front bezel The thinnest model of this size: 99 mm CONFIDENTIAL - DO NOT COPY Page 1-1 File No.

Service Manual
Page 39
... receiver format. In free-run mode, the display timing is supported as a display controller of the vertical sync signal. The following display synchronization modes are programmed in line increments relative to the leading edge of flat panel devices using a 24-bit TTL or LVDS interface. Display Timing Programming Horizontal values are supported: Frame Sync Mode: The display frame rate is used when there is configurable for testing purposes. This mode is synchronized to a variety of the horizontal sync signal. This mode...
... receiver format. In free-run mode, the display timing is supported as a display controller of the vertical sync signal. The following display synchronization modes are programmed in line increments relative to the leading edge of flat panel devices using a 24-bit TTL or LVDS interface. Display Timing Programming Horizontal values are supported: Frame Sync Mode: The display frame rate is used when there is configurable for testing purposes. This mode is synchronized to a variety of the horizontal sync signal. This mode...
Service Manual
Page 44
... the HDMI AVI packet. Therefore the receiver's firmware will have to the SiI 9011 Programmer's Reference (SiI-PR-0006) for a more details. The receiver can output video in many different formats (see examples in Figure 5. When the receiver outputs embedded syncs (SAV/EAV codes), it also limits the YCbCr output values to 1 to the appropriate logic block. Data Input and Conversion Mode Control Logic The mode control...
... the HDMI AVI packet. Therefore the receiver's firmware will have to the SiI 9011 Programmer's Reference (SiI-PR-0006) for a more details. The receiver can output video in many different formats (see examples in Figure 5. When the receiver outputs embedded syncs (SAV/EAV codes), it also limits the YCbCr output values to 1 to the appropriate logic block. Data Input and Conversion Mode Control Logic The mode control...
User Manual
Page 2
... Program Codes 42 Appendix C: Glossary - Package Contents...6 1.7 - VIZIO Universal Remote Control...9 1.10.1 - Using HDMI™ (Digital HD) ...18 2.3.2 - Getting Started ...21 3.1 - Understanding Viewing Features ...31 3.7 - Changing Volume Lock ...35 3.7.5 - Connecting Components...13 2.1 - Using Component (Analog HD) Video 15 2.2.3 - Menu Operations...24 3.5.2 - Maintenance ...37 4.2 - Remote Control Range...12 1.10.4 - Using the Parental Controls ...29 3.5.4 - Programming the VIZIO Universal Remote Control 33 3.7.2 - VIZIO P50 HDM User Guide Table...
... Program Codes 42 Appendix C: Glossary - Package Contents...6 1.7 - VIZIO Universal Remote Control...9 1.10.1 - Using HDMI™ (Digital HD) ...18 2.3.2 - Getting Started ...21 3.1 - Understanding Viewing Features ...31 3.7 - Changing Volume Lock ...35 3.7.5 - Connecting Components...13 2.1 - Using Component (Analog HD) Video 15 2.2.3 - Menu Operations...24 3.5.2 - Maintenance ...37 4.2 - Remote Control Range...12 1.10.4 - Using the Parental Controls ...29 3.5.4 - Programming the VIZIO Universal Remote Control 33 3.7.2 - VIZIO P50 HDM User Guide Table...
User Manual
Page 3
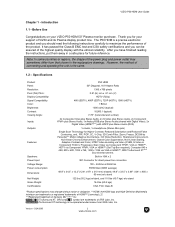
... method of connecting and operating the unit is a precise electronic product and you can be assured of VIZIO and its Plasma display product line. TruSurround XT technology is incorporated under license from that shown in the explanatory drawings. Introduction 1.1 - Specifications Product Panel: Resolution: Pixel (Dot) Pitch: Display Compatibility: Signal Compatibility: Color: Brightness: Contrast: Viewing Angle: Inputs: Outputs: Features: Speakers: Power Input: Voltage Range: Power consumption: Dimensions: Net Weight: Gross Weight: Certifications: P50 HDM 50" Diagonal...
... method of connecting and operating the unit is a precise electronic product and you can be assured of VIZIO and its Plasma display product line. TruSurround XT technology is incorporated under license from that shown in the explanatory drawings. Introduction 1.1 - Specifications Product Panel: Resolution: Pixel (Dot) Pitch: Display Compatibility: Signal Compatibility: Color: Brightness: Contrast: Viewing Angle: Inputs: Outputs: Features: Speakers: Power Input: Voltage Range: Power consumption: Dimensions: Net Weight: Gross Weight: Certifications: P50 HDM 50" Diagonal...
User Manual
Page 5
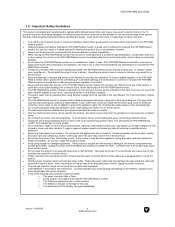
... installation, use an adapter to repair or service the product yourself. Do not use the product if any way. This plug will not be observed for cleaning the P50 HDM Plasma monitor. If your dealer. • The P50 HDM Plasma monitor is damaged, the internal components may expose you are unplugged before moving the product. • Hold the power connector when removing the power cable...
... installation, use an adapter to repair or service the product yourself. Do not use the product if any way. This plug will not be observed for cleaning the P50 HDM Plasma monitor. If your dealer. • The P50 HDM Plasma monitor is damaged, the internal components may expose you are unplugged before moving the product. • Hold the power connector when removing the power cable...
User Manual
Page 7
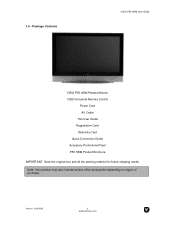
Version - 5/24/2005 6 www.vizioce.com Package Contents VIZIO P50 HDM User Guide VIZIO P50 HDM Plasma Monitor VIZIO Universal Remote Control Power Cord AV Cable This User Guide Registration Card Warranty Card Quick Connection Guide Accessory Promotional Flyer P50 HDM Product Brochure IMPORTANT: Save the original box and all the packing material for future shipping needs. 1.6 - Note: Your product may also include various other accessories depending on region of purchase.
Version - 5/24/2005 6 www.vizioce.com Package Contents VIZIO P50 HDM User Guide VIZIO P50 HDM Plasma Monitor VIZIO Universal Remote Control Power Cord AV Cable This User Guide Registration Card Warranty Card Quick Connection Guide Accessory Promotional Flyer P50 HDM Product Brochure IMPORTANT: Save the original box and all the packing material for future shipping needs. 1.6 - Note: Your product may also include various other accessories depending on region of purchase.
User Manual
Page 9
... a DVD player or set -top box. Connect the video from a computer or set-top box and the audio from a computer or set -top box and the audio through the standard speakers. *S-Video has priority. Use the connectors indicated by the green, blue, and red for the video input and the white and red connectors for a DVD multimedia player, computer or set -top box to connect the external audio from the same source. 10. Note: YPbPr is indicated by the purple color...
... a DVD player or set -top box. Connect the video from a computer or set-top box and the audio from a computer or set -top box and the audio through the standard speakers. *S-Video has priority. Use the connectors indicated by the green, blue, and red for the video input and the white and red connectors for a DVD multimedia player, computer or set -top box to connect the external audio from the same source. 10. Note: YPbPr is indicated by the purple color...
User Manual
Page 11
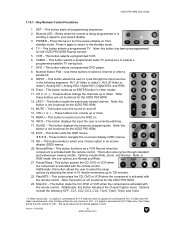
... set-top box. 7. This button selects a programmed DVD player. 8. This button turns the sound on -screen display (OSD) menus. 19. This button is activated with the remote control. This button displays the electronic program guide. dcfe - This button works to select your plasma display. 3. Pause/Sleep - This button plays the CD, DVD or VCR when the component is used to turn volume up or down . 15. Stop/CC - The same input priority scheme applies to the standby mode. 4. VIZIO P50 HDM User Guide 1.10.1 - Remote LED...
... set-top box. 7. This button selects a programmed DVD player. 8. This button turns the sound on -screen display (OSD) menus. 19. This button is activated with the remote control. This button displays the electronic program guide. dcfe - This button works to select your plasma display. 3. Pause/Sleep - This button plays the CD, DVD or VCR when the component is used to turn volume up or down . 15. Stop/CC - The same input priority scheme applies to the standby mode. 4. VIZIO P50 HDM User Guide 1.10.1 - Remote LED...
User Manual
Page 14
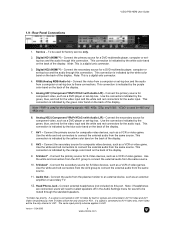
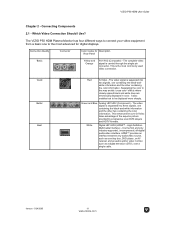
... User Guide Chapter 2 - The VIZIO P50 HDM Plasma Monitor has four different ways to connect your video equipment from a basic one to be displayed more sharply. Green and Blue Analog HD1/HD2 (Component) - The video signal is the most advanced for Description Rear Panel Basic Yellow and Orange AV1/AV2 (Composite) - This enhancement over a single cable. HDMI™ provides an interface between any audio/video source, such as a set-top box, DVD player...
... User Guide Chapter 2 - The VIZIO P50 HDM Plasma Monitor has four different ways to connect your video equipment from a basic one to be displayed more sharply. Green and Blue Analog HD1/HD2 (Component) - The video signal is the most advanced for Description Rear Panel Basic Yellow and Orange AV1/AV2 (Composite) - This enhancement over a single cable. HDMI™ provides an interface between any audio/video source, such as a set-top box, DVD player...
User Manual
Page 15
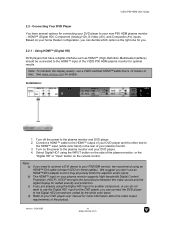
...) should be connected to the Digital HD2 connections coded by the white color band. Note: To maintain the display quality, use an HDMI™/DVI adapter since it may physically block the adjacent audio inputs. Refer to your DVD player user manual for connecting your DVD player to the plasma monitor and DVD player. 2. Select Digital HD1 using an HDMI™-DVI cable (contact VIZIO for optimal results. Turn off the power to your DVD player. 4. Note: a) b) c) d) If you don't use a VIZIO certified HDMI™ cable that have...
...) should be connected to the Digital HD2 connections coded by the white color band. Note: To maintain the display quality, use an HDMI™/DVI adapter since it may physically block the adjacent audio inputs. Refer to your DVD player user manual for connecting your DVD player to the plasma monitor and DVD player. 2. Select Digital HD1 using an HDMI™-DVI cable (contact VIZIO for optimal results. Turn off the power to your DVD player. 4. Note: a) b) c) d) If you don't use a VIZIO certified HDMI™ cable that have...
User Manual
Page 16
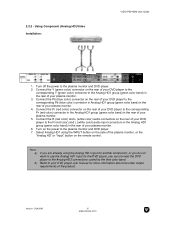
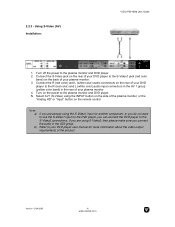
.... Connect the R (red color) and L (white color) audio connectors on the remote control. Version - 5/24/2005 15 www.vizioce.com Connect the Pr (red color) connector on the power to the R (red color) and L (white color) audio input connectors in the Analog HD1 group (green color band) in the rear of your plasma monitor. 5. Turn on the rear of your DVD player to the plasma monitor and DVD player. 2. Using Component (Analog HD) Video Installation: VIZIO P50 HDM User Guide 1. Turn off the power to the corresponding Pr (red color) connector...
.... Connect the R (red color) and L (white color) audio connectors on the remote control. Version - 5/24/2005 15 www.vizioce.com Connect the Pr (red color) connector on the power to the R (red color) and L (white color) audio input connectors in the Analog HD1 group (green color band) in the rear of your plasma monitor. 5. Turn on the rear of your DVD player to the plasma monitor and DVD player. 2. Using Component (Analog HD) Video Installation: VIZIO P50 HDM User Guide 1. Turn off the power to the corresponding Pr (red color) connector...
User Manual
Page 17
Using S-Video (AV) Installation: VIZIO P50 HDM User Guide 1. Select AV1 (S-Video) using the INPUT button on the side of your DVD player to the R (red color) and L (white color) audio input connectors in the AV 1 group (yellow color band) in the AV2 group. Version - 5/24/2005 16 www.vizioce.com Connect the S-Video jack on the power to the plasma monitor and DVD player. 2. Turn on the rear of the plasma monitor, or the "Analog HD" or "Input" button on the remote control Note...
Using S-Video (AV) Installation: VIZIO P50 HDM User Guide 1. Select AV1 (S-Video) using the INPUT button on the side of your DVD player to the R (red color) and L (white color) audio input connectors in the AV 1 group (yellow color band) in the AV2 group. Version - 5/24/2005 16 www.vizioce.com Connect the S-Video jack on the power to the plasma monitor and DVD player. 2. Turn on the rear of the plasma monitor, or the "Analog HD" or "Input" button on the remote control Note...
User Manual
Page 18
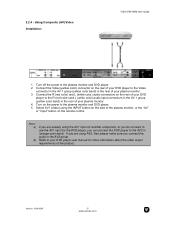
Using Composite (AV) Video Installation: VIZIO P50 HDM User Guide 1. Turn on the remote control. If you are already using the AV1 input for another component, or you can connect the DVD player to the AV2 in the rear of your DVD player to the plasma monitor and DVD player. 5. Connect the R (red color) and L (white color) audio connectors on the rear of your DVD player user manual for the DVD player, you do not want to the plasma monitor and DVD player. 2. 2.2.4 - Turn off the power to use the AV1 input for...
Using Composite (AV) Video Installation: VIZIO P50 HDM User Guide 1. Turn on the remote control. If you are already using the AV1 input for another component, or you can connect the DVD player to the AV2 in the rear of your DVD player to the plasma monitor and DVD player. 5. Connect the R (red color) and L (white color) audio connectors on the rear of your DVD player user manual for the DVD player, you do not want to the plasma monitor and DVD player. 2. 2.2.4 - Turn off the power to use the AV1 input for...
User Manual
Page 19
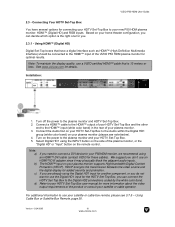
... . 2.3.1 - Using Cable Box or Satellite Box Remote, page 36. Connect the Audio Out on your satellite or cable operator. Based on your HDTV Set-Top Box to use an HDMI™/DVI adapter since it may physically block the adjacent audio inputs. Installation: 1. HDCP encrypts the transmission between the video source and the digital display for you do not want to the Audio within the Digital HD1 group (white color band) on the power to your HDTV Set-Top Box user manual for...
... . 2.3.1 - Using Cable Box or Satellite Box Remote, page 36. Connect the Audio Out on your satellite or cable operator. Based on your HDTV Set-Top Box to use an HDMI™/DVI adapter since it may physically block the adjacent audio inputs. Installation: 1. HDCP encrypts the transmission between the video source and the digital display for you do not want to the Audio within the Digital HD1 group (white color band) on the power to your HDTV Set-Top Box user manual for...

User Manual
Page 20
.... Connect the R (red color) and L (white color) audio connectors on the power to the plasma monitor and VCR or video camera. 2. Turn on the rear of your VCR or Video Camera to your HDTV Set-Top Box user manual for more information about the video output requirements of your satellite or cable operator. 2.4 - Select RGB using the INPUT button on the side of the plasma monitor, or the "RGB" or "Input" button on the remote control. Select AV1 (S-Video) using the INPUT button on...
.... Connect the R (red color) and L (white color) audio connectors on the power to the plasma monitor and VCR or video camera. 2. Turn on the rear of your VCR or Video Camera to your HDTV Set-Top Box user manual for more information about the video output requirements of your satellite or cable operator. 2.4 - Select RGB using the INPUT button on the side of the plasma monitor, or the "RGB" or "Input" button on the remote control. Select AV1 (S-Video) using the INPUT button on...

User Manual
Page 21
... graphic card's user guide for more information about the video output requirements of your plasma monitor. 3. Please refer to set your plasma monitor. 4. Connect the R (red color) and L (white color) audio input connectors on your computer to the RGB Audio (purple band) at the rear of your plasma monitor. 3. Turn on the remote control to VESA 1024 x 768 @60Hz. Turn off the power to the plasma monitor and amplifier. 4. Then press the menu button on the power to the plasma monitor and Computer. 2. Connecting a Computer Installation: 1. Connect...
... graphic card's user guide for more information about the video output requirements of your plasma monitor. 3. Please refer to set your plasma monitor. 4. Connect the R (red color) and L (white color) audio input connectors on your computer to the RGB Audio (purple band) at the rear of your plasma monitor. 3. Turn on the remote control to VESA 1024 x 768 @60Hz. Turn off the power to the plasma monitor and amplifier. 4. Then press the menu button on the power to the plasma monitor and Computer. 2. Connecting a Computer Installation: 1. Connect...
User Manual
Page 22
... plasma monitor. See below for selecting your plasma monitor, please see a picture. Connect Audio and Video Cables to the monitor For AV, S-Video, Analog HD (YPbPr/YCbCr) and HDMI™ compatible devices, connect the video and audio cables to AV2. 3.2 - Select Digital HD using the Input button on the remote control. Select Analog HD using the Input button on the side of your Plasma Monitor On and Off 1. Turning your plasma monitor. Press the power button on the remote control. 4. VIZIO P50 HDM User Guide Chapter 3 - Watching a TV Program...
... plasma monitor. See below for selecting your plasma monitor, please see a picture. Connect Audio and Video Cables to the monitor For AV, S-Video, Analog HD (YPbPr/YCbCr) and HDMI™ compatible devices, connect the video and audio cables to AV2. 3.2 - Select Digital HD using the Input button on the remote control. Select Analog HD using the Input button on the side of your Plasma Monitor On and Off 1. Turning your plasma monitor. Press the power button on the remote control. 4. VIZIO P50 HDM User Guide Chapter 3 - Watching a TV Program...
User Manual
Page 39
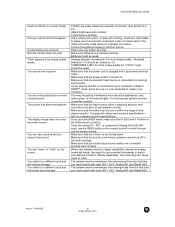
... a distorted picture or hear unusual sound. Make sure batteries are set correctly. Try moving your plasma monitor's display capabilities. Make sure that the power button is turned on the screen. Control buttons do not work . Make sure that your computer. If your plasma monitor is connected to your computer in RGB or HDMI™ mode, press any colors (red, green, or blue) are missing, check the video cable to "wake" your audio input source cables are using AV1, AV2...
... a distorted picture or hear unusual sound. Make sure batteries are set correctly. Try moving your plasma monitor's display capabilities. Make sure that the power button is turned on the screen. Control buttons do not work . Make sure that your computer. If your plasma monitor is connected to your computer in RGB or HDMI™ mode, press any colors (red, green, or blue) are missing, check the video cable to "wake" your audio input source cables are using AV1, AV2...
User Manual
Page 42
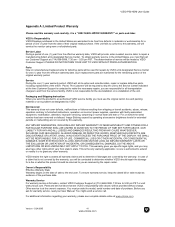
... which the serial number has been removed or defaced. Packaging and Shipping Instruction When you are covered by VIZIO Customer Support. Image Sticking caused by operating at its designated Service Center. no one (1) year from state to the end user. Parts and service labor that is contacted to make the necessary repairs, you send the product to furnished instructions, operation on incorrect power supplies, operation...
... which the serial number has been removed or defaced. Packaging and Shipping Instruction When you are covered by VIZIO Customer Support. Image Sticking caused by operating at its designated Service Center. no one (1) year from state to the end user. Parts and service labor that is contacted to make the necessary repairs, you send the product to furnished instructions, operation on incorrect power supplies, operation...


