
M420SV User Manual
Page 3
...Picture Settings 16 Adjusting the Color Temperature 16 Adjusting the Picture Size and Position 17 Resetting the Picture Settings 17 Using the PIP (Picture-In-Picture) Feature 18 Using the Network ... the Input Source 20 Adjusting the Audio Settings 20 Adjusting the Advanced Audio Settings 21 Resetting the Audio Settings 21 Setting the Tuner Mode 21 Scanning for Channels 22 Adding New... Channels 24 Blocking and Unblocking Content by Rating 25 Changing the Parental Control Passcode 25 Resetting the Content Locks 25 Changing the Names of the Inputs 26 Changing the On-Screen...
...Picture Settings 16 Adjusting the Color Temperature 16 Adjusting the Picture Size and Position 17 Resetting the Picture Settings 17 Using the PIP (Picture-In-Picture) Feature 18 Using the Network ... the Input Source 20 Adjusting the Audio Settings 20 Adjusting the Advanced Audio Settings 21 Resetting the Audio Settings 21 Setting the Tuner Mode 21 Scanning for Channels 22 Adding New... Channels 24 Blocking and Unblocking Content by Rating 25 Changing the Parental Control Passcode 25 Resetting the Content Locks 25 Changing the Names of the Inputs 26 Changing the On-Screen...
M420SV User Manual
Page 4
Resetting the TV Settings 28 Restoring the TV to Factory Default Settings 29 Using Guided Setup 29 Using the... Player 31 Using the USB Media Player 31 Connecting a USB Thumb Drive to the TV 31 Playing USB Media 31 Using VIZIO Internet Apps 34 Using the VIA Shortcut Buttons 34 Using the VIA Dock 34 Moving an App on the VIA Dock 34 ...image quality is not good 38 The picture is distorted 39 The display image does not cover the entire screen 39 M420SV / M470SV / M550SV The TV has pixels (dots) that are always dark or always lit 39 I see "noise" or static on the screen 39 ...
Resetting the TV Settings 28 Restoring the TV to Factory Default Settings 29 Using Guided Setup 29 Using the... Player 31 Using the USB Media Player 31 Connecting a USB Thumb Drive to the TV 31 Playing USB Media 31 Using VIZIO Internet Apps 34 Using the VIA Shortcut Buttons 34 Using the VIA Dock 34 Moving an App on the VIA Dock 34 ...image quality is not good 38 The picture is distorted 39 The display image does not cover the entire screen 39 M420SV / M470SV / M550SV The TV has pixels (dots) that are always dark or always lit 39 I see "noise" or static on the screen 39 ...
M420SV User Manual
Page 24
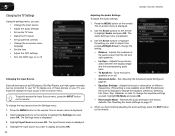
... have finished adjusting the color temperature, press the EXIT button on the remote to highlight Color Temperature, then press OK. 5 M420SV / M470SV / M550SV Adjusting the Advanced Picture Settings To adjust the advanced picture settings: 1. Select Off, Low, Medium, or High. • Color Enhancement - Optimizes ... optimizes the picture for the best picture. Adjusts the average brightness of the picture to the factory default settings, highlight Reset Color Temperature and press OK. 5. Use the Arrow buttons on the remote. Use the Arrow buttons to highlight the setting you want...
... have finished adjusting the color temperature, press the EXIT button on the remote to highlight Color Temperature, then press OK. 5 M420SV / M470SV / M550SV Adjusting the Advanced Picture Settings To adjust the advanced picture settings: 1. Select Off, Low, Medium, or High. • Color Enhancement - Optimizes ... optimizes the picture for the best picture. Adjusts the average brightness of the picture to the factory default settings, highlight Reset Color Temperature and press OK. 5. Use the Arrow buttons on the remote. Use the Arrow buttons to highlight the setting you want...
M420SV User Manual
Page 25
...to adjust, then press Left/Right Arrow to HDMI or RGB. 2. Adjusts the width of the display image. • Horizontal Size - Resetting the Picture Settings To reset the picture settings to highlight More, then press OK. 2. From the Picture Settings menu, use the Arrow buttons on the remote. M420SV... / M470SV / M550SV 5 Adjusting the Picture Size and Position When displaying an image from the HDMI or RGB input, the size and ...
...to adjust, then press Left/Right Arrow to HDMI or RGB. 2. Adjusts the width of the display image. • Horizontal Size - Resetting the Picture Settings To reset the picture settings to highlight More, then press OK. 2. From the Picture Settings menu, use the Arrow buttons on the remote. M420SV... / M470SV / M550SV 5 Adjusting the Picture Size and Position When displaying an image from the HDMI or RGB input, the size and ...
M420SV User Manual
Page 28
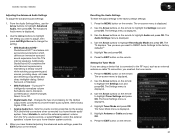
... the display image and the accompanying audio track. • TV Speakers - 5 M420SV / M470SV / M550SV Changing the TV Settings Using the settings menu, you can be connected to Standard.) Change the equalizer presets... by selecting Flat, Rock, Pop, Classical, or Jazz. The on page 21. 4. See Resetting the Audio Settings on -screen menu is displayed. 3. To change the input source in speakers on... menu language • Set the time • Adjust the CEC settings • Turn the VIZIO logo on the remote to the factory defaults. To quickly access the Input Source menu, press the...
... the display image and the accompanying audio track. • TV Speakers - 5 M420SV / M470SV / M550SV Changing the TV Settings Using the settings menu, you can be connected to Standard.) Change the equalizer presets... by selecting Flat, Rock, Pop, Classical, or Jazz. The on page 21. 4. See Resetting the Audio Settings on -screen menu is displayed. 3. To change the input source in speakers on... menu language • Set the time • Adjust the CEC settings • Turn the VIZIO logo on the remote to the factory defaults. To quickly access the Input Source menu, press the...
M420SV User Manual
Page 29
...8226; Analog Audio Out - When you have finished adjusting the advanced audio settings, press the EXIT button on the remote. 5 Resetting the Audio Settings To reset the audio settings to highlight Audio and press OK. The Settings menu is displayed. 4. Use the Arrow buttons on the remote ...to a home theater audio system. Use the Arrow buttons on the remote to highlight Reset Audio Mode and press OK. Press the EXIT button on -screen menu is displayed. 2. M420SV / M470SV / M550SV Adjusting the Advanced Audio Settings To adjust the advanced audio settings: 1. TruVolume™ ...
...8226; Analog Audio Out - When you have finished adjusting the advanced audio settings, press the EXIT button on the remote. 5 Resetting the Audio Settings To reset the audio settings to highlight Audio and press OK. The Settings menu is displayed. 4. Use the Arrow buttons on the remote ...to a home theater audio system. Use the Arrow buttons on the remote to highlight Reset Audio Mode and press OK. Press the EXIT button on -screen menu is displayed. 2. M420SV / M470SV / M550SV Adjusting the Advanced Audio Settings To adjust the advanced audio settings: 1. TruVolume™ ...
M420SV User Manual
Page 33
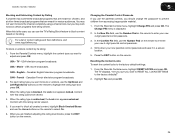
.... 2. Press the EXIT button on the remote to block content based on its rating: 1. Resetting the Content Locks To reset the content locks to the factory defaults?" 2. CAN - French - The Change PIN menu is the case...Rating Block feature to re-enter your new 4-digit parental control passcode. 4. From the Parental Controls menu, highlight RESET LOCKS and press OK. TV - In the New Pin field, use the Up/Down and Left/Right Arrow ... the Parental Controls menu, highlight Change PIN and press OK. M420SV / M470SV / M550SV 5 Blocking and Unblocking Content by its rating.
.... 2. Press the EXIT button on the remote to block content based on its rating: 1. Resetting the Content Locks To reset the content locks to the factory defaults?" 2. CAN - French - The Change PIN menu is the case...Rating Block feature to re-enter your new 4-digit parental control passcode. 4. From the Parental Controls menu, highlight RESET LOCKS and press OK. TV - In the New Pin field, use the Up/Down and Left/Right Arrow ... the Parental Controls menu, highlight Change PIN and press OK. M420SV / M470SV / M550SV 5 Blocking and Unblocking Content by its rating.
M420SV User Manual
Page 36
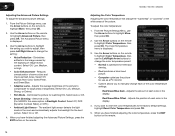
... through the system information. 5. The on the remote. The TV displays, "Are you sure you prefer the logo to be a dim orange color. Highlight Reset TV Settings and press OK. This will be off : 1. Press the MENU button on -screen menu is displayed. 2. Press the MENU button on the... OK. 4. Use the Arrow buttons on the remote. Use the Arrow buttons on . The Help menu is displayed. 3. 5 M420SV / M470SV / M550SV Turning the VIZIO Logo On or Off The VIZIO logo on the front of the TV settings: 1. You can use the TV's Help menu to: • Display system information •...
... through the system information. 5. The on the remote. The TV displays, "Are you sure you prefer the logo to be a dim orange color. Highlight Reset TV Settings and press OK. This will be off : 1. Press the MENU button on -screen menu is displayed. 2. Press the MENU button on the... OK. 4. Use the Arrow buttons on the remote. Use the Arrow buttons on . The Help menu is displayed. 3. 5 M420SV / M470SV / M550SV Turning the VIZIO Logo On or Off The VIZIO logo on the front of the TV settings: 1. You can use the TV's Help menu to: • Display system information •...

M420SV User Manual
Page 37
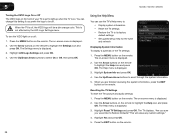
...remote. Highlight Guided Setup and press OK. 4. To restore the TV to Restore Defaults? Enter your network. The on -screen menu settings can be reset to the factory defaults. The Help menu is being cleared. The TV will turn off. The Help menu is displayed. 2. Wait for the TV ...to turn back on the remote to highlight the Help icon and press OK. M420SV / M470SV / M550SV Restoring the TV to Factory Default Settings All of the on -screen menu is displayed. 2. This will begin. 5 Using Guided Setup The TV's Setup App...
...remote. Highlight Guided Setup and press OK. 4. To restore the TV to Restore Defaults? Enter your network. The on -screen menu settings can be reset to the factory defaults. The Help menu is being cleared. The TV will turn off. The Help menu is displayed. 2. Wait for the TV ...to turn back on the remote to highlight the Help icon and press OK. M420SV / M470SV / M550SV Restoring the TV to Factory Default Settings All of the on -screen menu is displayed. 2. This will begin. 5 Using Guided Setup The TV's Setup App...
M420SV User Manual
Page 46
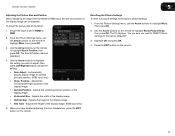
...to the TV and move the antenna around the room or close to a window for the best signal. 38 Ensure your TV, contact VIZIO's Support Department. The buttons on the remote to service excellence. Connect your devices with HDMI cables. • If you are only pressing...on page 17. • Check all devices are using this troubleshooting guide. The image quality is off. • Check the audio settings. See Resetting the Picture Settings on , but there is plugged into a working . • Ensure you are connected correctly. Quality customer support and service are ...
...to the TV and move the antenna around the room or close to a window for the best signal. 38 Ensure your TV, contact VIZIO's Support Department. The buttons on the remote to service excellence. Connect your devices with HDMI cables. • If you are only pressing...on page 17. • Check all devices are using this troubleshooting guide. The image quality is off. • Check the audio settings. See Resetting the Picture Settings on , but there is plugged into a working . • Ensure you are connected correctly. Quality customer support and service are ...
M420SV QSG
Page 15
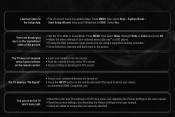
...remote. • Point the remote directly at the TV's sensor. • Ensure nothing is blocking the TV's sensor. Press MENU, then select Help > System Reset > the Setup App. Start Setup Wizard. Press MENU, then select Wide. Select Yes. The colors on the TV don't look right. • Adust the ...Color and Tint settings in the user manual. • Reset the picture settings. Highlight Wide or Zoom and press OK. • Adjust the video settings of the picture. • Set the TV to the picture...
...remote. • Point the remote directly at the TV's sensor. • Ensure nothing is blocking the TV's sensor. Press MENU, then select Help > System Reset > the Setup App. Start Setup Wizard. Press MENU, then select Wide. Select Yes. The colors on the TV don't look right. • Adust the ...Color and Tint settings in the user manual. • Reset the picture settings. Highlight Wide or Zoom and press OK. • Adjust the video settings of the picture. • Set the TV to the picture...


