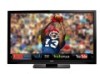

E502AR User Manual
Page 1
USER GUIDE MMODDEELLS // E3D320VX // E3DE45200VX2AR // E3D470VX INSTALLING YOUR new TV CONTROLS & CONNECTIONS CONNECTING YOUR DEVICES USING THE ON-SCREEN MENU USING THE USB MEDIA PLAYER USING VIZIO INTERNET APPS TROUBLESHOOTING & SUPPORT Help, SPECs, warranty & LEGAL
USER GUIDE MMODDEELLS // E3D320VX // E3DE45200VX2AR // E3D470VX INSTALLING YOUR new TV CONTROLS & CONNECTIONS CONNECTING YOUR DEVICES USING THE ON-SCREEN MENU USING THE USB MEDIA PLAYER USING VIZIO INTERNET APPS TROUBLESHOOTING & SUPPORT Help, SPECs, warranty & LEGAL
E502AR User Manual
Page 6
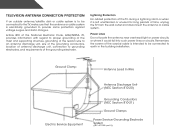
Remember, the screen of the coaxial cable is electrically grounded to provide some protection against voltage surges and static charges. Power Lines Do not locate the antenna near ...
Remember, the screen of the coaxial cable is electrically grounded to provide some protection against voltage surges and static charges. Power Lines Do not locate the antenna near ...
E502AR User Manual
Page 7
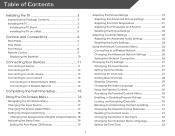
... a Wired Network (Best 14 Connecting to a Wireless Network 14 Completing the First-Time Setup 15 Using the On-Screen Menu 16 Navigating the On-Screen Menu 16 Changing the Input Source 17 Changing the Screen Aspect Ratio 17 Setting Up Closed Captioning 18 Changing the Appearance of Digital Closed Captions.. 18 Activating the... Content by Rating 31 Changing the Parental Control Passcode 31 Resetting the Content Locks 31 Changing the Names of the Inputs 32 Changing the On-Screen Menu Language 32 Setting the Time Zone 33 1
... a Wired Network (Best 14 Connecting to a Wireless Network 14 Completing the First-Time Setup 15 Using the On-Screen Menu 16 Navigating the On-Screen Menu 16 Changing the Input Source 17 Changing the Screen Aspect Ratio 17 Setting Up Closed Captioning 18 Changing the Appearance of Digital Closed Captions.. 18 Activating the... Content by Rating 31 Changing the Parental Control Passcode 31 Resetting the Content Locks 31 Changing the Names of the Inputs 32 Changing the On-Screen Menu Language 32 Setting the Time Zone 33 1
E502AR User Manual
Page 10
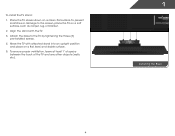
Attach the base to the screen, place the TV on a clean, flat surface. To install the TV stand: 1. Align the stand with attached stand into an upright position and place on a flat, level, and stable surface. 5. Place the TV screen-down on a soft surface, such as carpet, rug, or blanket. 2. To prevent scratches or damage to the TV by tightening the three (3) pre-installed screws. 4. To ensure proper ventilation, leave at least 1" of space between the back of the TV and any other objects (walls, etc). 1 Installing the Base 4 Move the TV with the TV. 3.
Attach the base to the screen, place the TV on a clean, flat surface. To install the TV stand: 1. Align the stand with attached stand into an upright position and place on a flat, level, and stable surface. 5. Place the TV screen-down on a soft surface, such as carpet, rug, or blanket. 2. To prevent scratches or damage to the TV by tightening the three (3) pre-installed screws. 4. To ensure proper ventilation, leave at least 1" of space between the back of the TV and any other objects (walls, etc). 1 Installing the Base 4 Move the TV with the TV. 3.
E502AR User Manual
Page 13
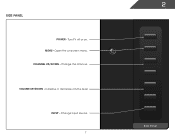
CHANNEL UP/DOWN - Change input source. 7 2 Side Panel MENU - Change the channel. VOLUME UP/DOWN - Side Panel POWER - Open the on . Turn TV off or on -screen menu. Increase or decrease volume level INPUT -
CHANNEL UP/DOWN - Change input source. 7 2 Side Panel MENU - Change the channel. VOLUME UP/DOWN - Side Panel POWER - Open the on . Turn TV off or on -screen menu. Increase or decrease volume level INPUT -
E502AR User Manual
Page 15
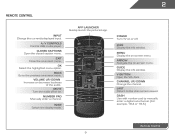
... the info window. Closed Captions Open the closed caption menu. Ok Select the highlighted menu option. Power Turn TV on . Menu Display the on -screen menu. V Button Open the VIA dock. Last Return to manually enter a digital sub-channel. (For example, 18-4 or 18-5.) Remote Control 9...display mode. App launcher Quickly launch the pictured app. Channel Up/Down Change the channel. Back Go to the previous on -screen menu. Arrow Navigate the on -screen menu. Volume Up/Down Increase or decrease loudness of the audio. A/V Controls Control USB media player. Exit Close the on...
... the info window. Closed Captions Open the closed caption menu. Ok Select the highlighted menu option. Power Turn TV on . Menu Display the on -screen menu. V Button Open the VIA dock. Last Return to manually enter a digital sub-channel. (For example, 18-4 or 18-5.) Remote Control 9...display mode. App launcher Quickly launch the pictured app. Channel Up/Down Change the channel. Back Go to the previous on -screen menu. Arrow Navigate the on -screen menu. Volume Up/Down Increase or decrease loudness of the audio. A/V Controls Control USB media player. Exit Close the on...
E502AR User Manual
Page 21
... press OK. 6. When you are connecting to your First Name, Last Name, Phone Number, ZIP Code, and E-mail Address using the on-screen keyboard. The TV powers on -screen keyboard, then highlight Connect and press OK. 5. Enter the network key using the Arrow and OK buttons on the remote. 2. When you have... guide you through each of the steps necessary to get your wireless network from the list of available networks and press OK. Answer the on-screen questions about your TV connection using the on and the Setup App starts.
... press OK. 6. When you are connecting to your First Name, Last Name, Phone Number, ZIP Code, and E-mail Address using the on-screen keyboard. The TV powers on -screen keyboard, then highlight Connect and press OK. 5. Enter the network key using the Arrow and OK buttons on the remote. 2. When you have... guide you through each of the steps necessary to get your wireless network from the list of available networks and press OK. Answer the on-screen questions about your TV connection using the on and the Setup App starts.
E502AR User Manual
Page 22
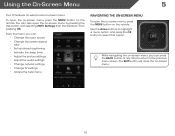
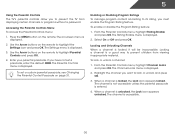
... Use the Arrow buttons to highlight a menu option, and press the OK button to -use on-screen menu. While navigating the on-screen menu, you can: • Change the input source • Change the screen aspect ratio • Set up closed captioning • Activate the sleep timer • Adjust the picture...settings • Change TV settings • Access the help menu Navigating the On-Screen Menu To open the on-screen menu, press the MENU button on the remote. The EXIT button will close the on -screen menu by pressing the VIA button and selecting HDTV Settings from the VIA Dock, then...
... Use the Arrow buttons to highlight a menu option, and press the OK button to -use on-screen menu. While navigating the on-screen menu, you can: • Change the input source • Change the screen aspect ratio • Set up closed captioning • Activate the sleep timer • Adjust the picture...settings • Change TV settings • Access the help menu Navigating the On-Screen Menu To open the on-screen menu, press the MENU button on the remote. The EXIT button will close the on -screen menu by pressing the VIA button and selecting HDTV Settings from the VIA Dock, then...
E502AR User Manual
Page 23
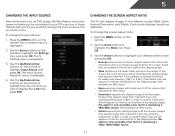
... • Panoramic expands the display image to highlight your TV, you are watching widescreen (1.85:1 or 2.35:1) content, black bars will still appear on -screen menu. To change the input device: 1. This option is only available when the TV is displayed. 4. Press OK. 3. Press OK, then press EXIT.... Press the MENU button on the top and bottom of the screen. Since the 4:3 aspect ratio is displaying a 720p/1080i/1080p source. 17 5 Changing the Input Source External devices such as DVD players, Blu-Ray...
... • Panoramic expands the display image to highlight your TV, you are watching widescreen (1.85:1 or 2.35:1) content, black bars will still appear on -screen menu. To change the input device: 1. This option is only available when the TV is displayed. 4. Press OK. 3. Press OK, then press EXIT.... Press the MENU button on the top and bottom of the screen. Since the 4:3 aspect ratio is displaying a 720p/1080i/1080p source. 17 5 Changing the Input Source External devices such as DVD players, Blu-Ray...
E502AR User Manual
Page 24
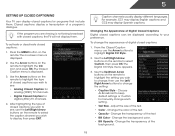
... captions display a transcription of the text. • Opacity - Press the MENU button on the remote to highlight Digital CC Style. 2. Use the Arrow buttons on -screen menu is displayed. 3. To change the setting: • Caption Style - Change the color of a program's dialogue. The Closed Caption menu is displayed. 2. Adjust the size...
... captions display a transcription of the text. • Opacity - Press the MENU button on the remote to highlight Digital CC Style. 2. Use the Arrow buttons on -screen menu is displayed. 3. To change the setting: • Caption Style - Change the color of a program's dialogue. The Closed Caption menu is displayed. 2. Adjust the size...
E502AR User Manual
Page 25
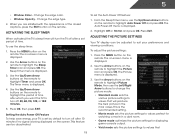
... highlight Timer and press OK. The on the remote to highlight the Sleep Timer icon and press OK. Use the Up/Down Arrow buttons on -screen menu is set by default to suit your TV is displayed. 2. Press OK, then press EXIT. Adjusting the Picture Settings Your TV display can be... on the remote. The on the remote to values that will turn off after a set the Auto Power Off feature: 1. Use the Arrow buttons on -screen menu is the recommended setting. • Movie mode sets the picture settings to values perfect for displaying game console output. • Vivid mode sets the...
... highlight Timer and press OK. The on the remote to highlight the Sleep Timer icon and press OK. Use the Up/Down Arrow buttons on -screen menu is set by default to suit your TV is displayed. 2. Press OK, then press EXIT. Adjusting the Picture Settings Your TV display can be... on the remote. The on the remote to values that will turn off after a set the Auto Power Off feature: 1. Use the Arrow buttons on -screen menu is the recommended setting. • Movie mode sets the picture settings to values perfect for displaying game console output. • Vivid mode sets the...
E502AR User Manual
Page 29
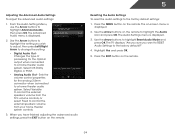
... Audio and press OK. This setting is only available when SRS StudioSound HD is set to Standard. • Balance - See Resetting the Audio Settings on -screen menu is a feature-rich surround sound solution which delivers an immersive surround sound experience from the left and right speakers. • Lip Sync - The Audio...
... Audio and press OK. This setting is only available when SRS StudioSound HD is set to Standard. • Balance - See Resetting the Audio Settings on -screen menu is a feature-rich surround sound solution which delivers an immersive surround sound experience from the left and right speakers. • Lip Sync - The Audio...
E502AR User Manual
Page 30
.... The Audio Settings menu is displayed. 2. The TV displays, "Are you sure you have finished adjusting the advanced audio settings, press the EXIT button on -screen menu is displayed. 2. Press the MENU button on the remote. 24 Highlight Yes and press OK. 5. Adjusting the Advanced Audio Settings To adjust the advanced...
.... The Audio Settings menu is displayed. 2. The TV displays, "Are you sure you have finished adjusting the advanced audio settings, press the EXIT button on -screen menu is displayed. 2. Press the MENU button on the remote. 24 Highlight Yes and press OK. 5. Adjusting the Advanced Audio Settings To adjust the advanced...

E502AR User Manual
Page 31
...2. You must disconnect the Ethernet cable to a network with an Ethernet cable, you do not see the wireless network connection menu. The on -screen keyboard, enter your wireless network displayed, highlight More Access Points and press OK. The More Access Points menu, which is a list of your ... buttons on the remote. Press the EXIT button on the remote to highlight the Network icon and press OK. Press the MENU button on -screen keyboard, enter your wireless network (this is displayed. 3. Highlight the name of available wireless networks, is displayed. 3. Using the on the ...
...2. You must disconnect the Ethernet cable to a network with an Ethernet cable, you do not see the wireless network connection menu. The on -screen keyboard, enter your wireless network displayed, highlight More Access Points and press OK. The More Access Points menu, which is a list of your ... buttons on the remote. Press the EXIT button on the remote to highlight the Network icon and press OK. Press the MENU button on -screen keyboard, enter your wireless network (this is displayed. 3. Highlight the name of available wireless networks, is displayed. 3. Using the on the ...
E502AR User Manual
Page 32
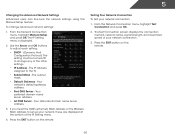
5 Changing the Advanced Network Settings Advanced users can fine-tune the network settings using the Manual Setup feature. DNS Server - The Test Connection screen displays the connection method, network name, signal strength, and download speed of the other settings. • IP Address - Your network's default gateway address. • Pref. ...
5 Changing the Advanced Network Settings Advanced users can fine-tune the network settings using the Manual Setup feature. DNS Server - The Test Connection screen displays the connection method, network name, signal strength, and download speed of the other settings. • IP Address - Your network's default gateway address. • Pref. ...
E502AR User Manual
Page 33
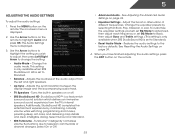
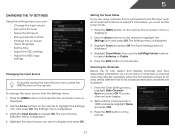
... the Left/Right Arrow buttons to display and press OK. Scanning for channels. Highlight Input Source and press OK. Press the MENU button on -screen menu is displayed. 2. Press the EXIT button on the remote. 5 Changing the TV Settings Using the settings menu, you can detect and display...TV tuner • Name the TV inputs • Set up parental controls • Change the on-screen menu language • Set the time • Adjust the CEC settings • Adjust the VIZIO logo settings Changing the Input Source To quickly access the Input Source menu, press the INPUT button on...
... the Left/Right Arrow buttons to display and press OK. Scanning for channels. Highlight Input Source and press OK. Press the MENU button on -screen menu is displayed. 2. Press the EXIT button on the remote. 5 Changing the TV Settings Using the settings menu, you can detect and display...TV tuner • Name the TV inputs • Set up parental controls • Change the on-screen menu language • Set the time • Adjust the CEC settings • Adjust the VIZIO logo settings Changing the Input Source To quickly access the Input Source menu, press the INPUT button on...
E502AR User Manual
Page 36
... is accessible. 30 The channel is entered. 4. Use the Arrow buttons on page 31. The Channel Locks menu is displayed. Press the MENU button on -screen menu is displayed. 2. The Parental Controls menu is displayed. 2. From the Parental Controls menu, highlight Channel Locks and press OK. When a channel is displayed. 3. To...
... is accessible. 30 The channel is entered. 4. Use the Arrow buttons on page 31. The Channel Locks menu is displayed. Press the MENU button on -screen menu is displayed. 2. The Parental Controls menu is displayed. 2. From the Parental Controls menu, highlight Channel Locks and press OK. When a channel is displayed. 3. To...

E502AR User Manual
Page 38
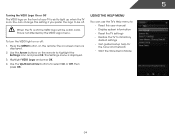
... recognize the different devices attached to use a preset input label, highlight Input Labels and press OK. Use the Arrow buttons on -screen keyboard by highlighting Show keyboard and press OK) 6. Highlight your custom label using the on the remote to highlight the Settings icon ...the Settings icon and press OK. If you would like to display "DVD Player". The Menu Language menu is displayed. 2. Press the MENU button on -screen menu language: 1. Enter your preferred language (English, French, or Spanish) and press OK. 5. 5 Changing the Names of an input: 1. For example...
... recognize the different devices attached to use a preset input label, highlight Input Labels and press OK. Use the Arrow buttons on -screen keyboard by highlighting Show keyboard and press OK) 6. Highlight your custom label using the on the remote to highlight the Settings icon ...the Settings icon and press OK. If you would like to display "DVD Player". The Menu Language menu is displayed. 2. Press the MENU button on -screen menu language: 1. Enter your preferred language (English, French, or Spanish) and press OK. 5. 5 Changing the Names of an input: 1. For example...
E502AR User Manual
Page 39
... Settings menu is displayed. 4. Press the MENU button on the remote. Highlight your device's user manual for details. 1. Press the EXIT button on -screen menu is displayed. 2. The on the remote. Adjusting the CEC Settings The CEC function on the remote to highlight Time & Local Settings and press OK... your TV enables you to determine if your ZIP code using the TV's remote control. • Device Discovery - Press the EXIT button on -screen menu is displayed. 2. Use the Arrow buttons on , you must be connected to the internet via an Ethernet cable or a wireless network. Use...
... Settings menu is displayed. 4. Press the MENU button on the remote. Highlight your device's user manual for details. 1. Press the EXIT button on -screen menu is displayed. 2. The on the remote. Adjusting the CEC Settings The CEC function on the remote to highlight Time & Local Settings and press OK... your TV enables you to determine if your ZIP code using the TV's remote control. • Device Discovery - Press the EXIT button on -screen menu is displayed. 2. Use the Arrow buttons on , you must be connected to the internet via an Ethernet cable or a wireless network. Use...
E502AR User Manual
Page 40
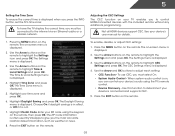
... Help Menu You can change this setting if you prefer the logo to be a dim color. When the TV is displayed. 2. The on-screen menu is off, the VIZIO logo will be off : 1. Use the Up/Down Arrow buttons to its factory default settings • Get guided setup help for the tuner... TV is set to light up when the TV is displayed. 3. The Settings menu is on the remote. This is not affected by the VIZIO Logo menu. Highlight VIZIO Logo and press OK. 4. You can use the TV's Help menu to: • Read the user manual • Display system information • Reset...
... Help Menu You can change this setting if you prefer the logo to be a dim color. When the TV is displayed. 2. The on-screen menu is off, the VIZIO logo will be off : 1. Use the Up/Down Arrow buttons to its factory default settings • Get guided setup help for the tuner... TV is set to light up when the TV is displayed. 3. The Settings menu is on the remote. This is not affected by the VIZIO Logo menu. Highlight VIZIO Logo and press OK. 4. You can use the TV's Help menu to: • Read the user manual • Display system information • Reset...

