E502AR User Manual
Page 4
... replaced when using different voltage than the specified voltage may expose you are not sure of the type of the cabinet are not blocked or covered. This will not be maintained between your TV and any heat source, such as when the power-supply cord or plug is required, contact your TV to an area of the display. Servicing is used...
... replaced when using different voltage than the specified voltage may expose you are not sure of the type of the cabinet are not blocked or covered. This will not be maintained between your TV and any heat source, such as when the power-supply cord or plug is required, contact your TV to an area of the display. Servicing is used...
E502AR User Manual
Page 5
... can damage the remote control or injure the operator. Liquid sprays or any other moisture. - These servicing instructions are unplugged before moving your TV, hold the AC/DC power adapter, not the cord. Ensure that may cause fire or electric shock. • Follow instructions for use by qualified service personnel only. Do not try to rain or other cables are for moving...
... can damage the remote control or injure the operator. Liquid sprays or any other moisture. - These servicing instructions are unplugged before moving your TV, hold the AC/DC power adapter, not the cord. Ensure that may cause fire or electric shock. • Follow instructions for use by qualified service personnel only. Do not try to rain or other cables are for moving...
E502AR User Manual
Page 6
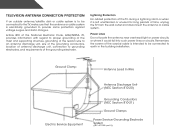
... National Electrical Code, ANSI/NFPSA 70, provides information with regard to proper grounding of the mast and supporting structure, grounding of the lead-in the building installation. Power Lines Do not locate the antenna near overhead light or power circuits, or where it is electrically grounded to provide some protection against voltage surges and static charges. Television Antenna Connection Protection...
... National Electrical Code, ANSI/NFPSA 70, provides information with regard to proper grounding of the mast and supporting structure, grounding of the lead-in the building installation. Power Lines Do not locate the antenna near overhead light or power circuits, or where it is electrically grounded to provide some protection against voltage surges and static charges. Television Antenna Connection Protection...
E502AR User Manual
Page 7
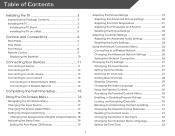
...22 Adjusting the Audio Settings 23 Adjusting the Advanced Audio Settings 24 Resetting the Audio Settings 24 Using the Network Connection Menu 25 Connecting to a Wireless Network 25 Changing the Advanced Network Settings 26 Testing Your Network Connection 26 Changing the TV Settings 27 Changing the Input Source 27 Setting the Tuner Mode 27 Scanning for Channels 27 Adding New Channels 28 Skipping Channels 29 Changing the Audio Language 29 Using the Parental Controls 30 Accessing the Parental Controls Menu 30 Enabling or Disabling Program Ratings 30 Locking and Unlocking Channels...
...22 Adjusting the Audio Settings 23 Adjusting the Advanced Audio Settings 24 Resetting the Audio Settings 24 Using the Network Connection Menu 25 Connecting to a Wireless Network 25 Changing the Advanced Network Settings 26 Testing Your Network Connection 26 Changing the TV Settings 27 Changing the Input Source 27 Setting the Tuner Mode 27 Scanning for Channels 27 Adding New Channels 28 Skipping Channels 29 Changing the Audio Language 29 Using the Parental Controls 30 Accessing the Parental Controls Menu 30 Enabling or Disabling Program Ratings 30 Locking and Unlocking Channels...

E502AR User Manual
Page 8
Adjusting the CEC Settings 33 Turning the VIZIO Logo On or Off 34 Using the Help Menu 34 Displaying System Information 35 Resetting the TV Settings 35 Restoring the TV to Factory Default Settings 35 Using Guided Setup 36 Using the Info Window 37 Using the USB Media Player 38 Using the USB Media Player 38 Connecting a USB Thumb Drive to the TV 38 Playing USB Media 38 Using VIZIO Internet Apps 41 Using the VIA Shortcut Buttons 41 Using the VIA Dock 41 Moving an...
Adjusting the CEC Settings 33 Turning the VIZIO Logo On or Off 34 Using the Help Menu 34 Displaying System Information 35 Resetting the TV Settings 35 Restoring the TV to Factory Default Settings 35 Using Guided Setup 36 Using the Info Window 37 Using the USB Media Player 38 Using the USB Media Player 38 Connecting a USB Thumb Drive to the TV 38 Playing USB Media 38 Using VIZIO Internet Apps 41 Using the VIA Shortcut Buttons 41 Using the VIA Dock 41 Moving an...
E502AR User Manual
Page 11
..., flat, stable surface. Disconnect any cables connected to use cables with right-angle connectors. For some wall mounts, you . Consult the information below to the wall. 5 1 Wall Mount Screw Locaton Specifications for your TV model: Installing a TV on a wall requires lifting. After you have the correct mount for the weight/load of this TV. Remove the base by loosening and removing the screws. 4. Be sure the surface is capable of supporting the weight...
..., flat, stable surface. Disconnect any cables connected to use cables with right-angle connectors. For some wall mounts, you . Consult the information below to the wall. 5 1 Wall Mount Screw Locaton Specifications for your TV model: Installing a TV on a wall requires lifting. After you have the correct mount for the weight/load of this TV. Remove the base by loosening and removing the screws. 4. Be sure the surface is capable of supporting the weight...
E502AR User Manual
Page 12
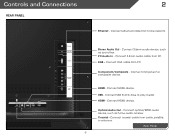
...USB - Connect USB thumb drive to play media. Connect coaxial cable from home network. Stereo Audio Out - Connect ethernet cable from cable, satellite, or antenna. RGB - Connect HDMI device. PC Audio In - HDMI - Connect 3.5mm audio device, such as home audio receiver. Connect component or composite device. Coaxial - Controls and Connections Rear Panel 2 Ethernet - Connect HDMI device. Optical Audio Out - HDMI - Connect optical/SPDIF audio device, such as sound bar. Connect 3.5mm audio cable from PC. Rear Panel 6 Component/Composite - Connect VGA cable...
...USB - Connect USB thumb drive to play media. Connect coaxial cable from home network. Stereo Audio Out - Connect ethernet cable from cable, satellite, or antenna. RGB - Connect HDMI device. PC Audio In - HDMI - Connect 3.5mm audio device, such as home audio receiver. Connect component or composite device. Coaxial - Controls and Connections Rear Panel 2 Ethernet - Connect HDMI device. Optical Audio Out - HDMI - Connect optical/SPDIF audio device, such as sound bar. Connect 3.5mm audio cable from PC. Rear Panel 6 Component/Composite - Connect VGA cable...

E502AR User Manual
Page 17
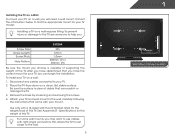
... match the connection you used (HDMI-1, HDMI-2, etc). Turn the TV and your device on the TV (HDMI, Component, etc). 2. Connect the appropriate cable (not included) to component inputs: AV CABLE GOOD • ANALOG • VIDEO (480i)* • STEREO AUDIO COMPONENT CABLE • ANALOG BETTER • HD VIDEO (1080i)* • STEREO AUDIO HDMI CABLE BEST • DIGITAL • HD VIDEO (1080p)* • HD AUDIO * Maximum Resolution 11 CONNECTING A DEVICE Cable/Satellite Box DVD/Blu-ray Player Game Console BACK OF TV Connect to the...
... match the connection you used (HDMI-1, HDMI-2, etc). Turn the TV and your device on the TV (HDMI, Component, etc). 2. Connect the appropriate cable (not included) to component inputs: AV CABLE GOOD • ANALOG • VIDEO (480i)* • STEREO AUDIO COMPONENT CABLE • ANALOG BETTER • HD VIDEO (1080i)* • STEREO AUDIO HDMI CABLE BEST • DIGITAL • HD VIDEO (1080p)* • HD AUDIO * Maximum Resolution 11 CONNECTING A DEVICE Cable/Satellite Box DVD/Blu-ray Player Game Console BACK OF TV Connect to the...
E502AR User Manual
Page 25
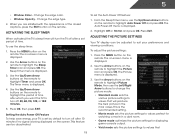
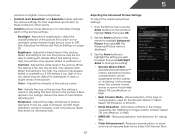
... signal is the recommended setting. • Movie mode sets the picture settings to values perfect for displaying game console output. • Vivid mode sets the picture settings to turn the TV off : 30, 60, 90, 120, or 180 minutes. 5. 5 • Window Color - Change the edge type. 4. The Picture menu is displayed. 3. Change the edge color. • Window Opacity - The Sleep Timer menu is displayed. 3. From the Sleep Timer menu, use the Up/Down Arrow buttons on the remote. Use the Arrow buttons on the remote...
... signal is the recommended setting. • Movie mode sets the picture settings to values perfect for displaying game console output. • Vivid mode sets the picture settings to turn the TV off : 30, 60, 90, 120, or 180 minutes. 5. 5 • Window Color - Change the edge type. 4. The Picture menu is displayed. 3. Change the edge color. • Window Opacity - The Sleep Timer menu is displayed. 3. From the Sleep Timer menu, use the Up/Down Arrow buttons on the remote. Use the Arrow buttons on the remote...
E502AR User Manual
Page 26
... picture. Use the Arrow buttons on the remote to highlight More, then press OK. 2. 5 produce a brighter, more vivid picture. • Football, Golf, Basketball, and Baseball modes optimize the picture settings for .mpeg files. • Color Enhancement - Contrast - Diminishes artifacts in dark or bright areas of the picture. See Adjusting the Advanced Picture Settings on the remote to highlight Advanced Picture, then press OK.The Advanced Picture menu...
... picture. Use the Arrow buttons on the remote to highlight More, then press OK. 2. 5 produce a brighter, more vivid picture. • Football, Golf, Basketball, and Baseball modes optimize the picture settings for .mpeg files. • Color Enhancement - Contrast - Diminishes artifacts in dark or bright areas of the picture. See Adjusting the Advanced Picture Settings on the remote to highlight Advanced Picture, then press OK.The Advanced Picture menu...
E502AR User Manual
Page 29
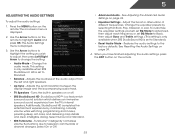
... Resetting the Audio Settings on the remote to the factory defaults. Use the Arrow buttons on page 24. 4. This setting is only available when SRS StudioSound HD is set to Standard) • Reset Audio Mode - Turns the built-in speakers on or off. • SRS StudioSound HD- Restores the audio settings to highlight Audio and press OK. Change the audio mode. StudioSound HD™ is displayed. 3. Adjust the boost or attenuation of the audio output...
... Resetting the Audio Settings on the remote to the factory defaults. Use the Arrow buttons on page 24. 4. This setting is only available when SRS StudioSound HD is set to Standard) • Reset Audio Mode - Turns the built-in speakers on or off. • SRS StudioSound HD- Restores the audio settings to highlight Audio and press OK. Change the audio mode. StudioSound HD™ is displayed. 3. Adjust the boost or attenuation of the audio output...
E502AR User Manual
Page 30
... Select Variable to control the external speakers' volume from the TV's volume controls, or select Fixed to a home theater audio system. Press the MENU button on the remote. 5 Resetting the Audio Settings To reset the audio settings to the factory defaults?" 4. The Audio Settings menu is displayed. 2. Press the EXIT button on the remote. 24 Use the Arrow buttons to highlight the setting you want to RESET Audio Settings to the factory default settings: 1. Sets the volume control properties for the Optical output when connected to control the external speakers' volume from your...
... Select Variable to control the external speakers' volume from the TV's volume controls, or select Fixed to a home theater audio system. Press the MENU button on the remote. 5 Resetting the Audio Settings To reset the audio settings to the factory defaults?" 4. The Audio Settings menu is displayed. 2. Press the EXIT button on the remote. 24 Use the Arrow buttons to highlight the setting you want to RESET Audio Settings to the factory default settings: 1. Sets the volume control properties for the Optical output when connected to control the external speakers' volume from your...
E502AR User Manual
Page 33
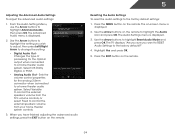
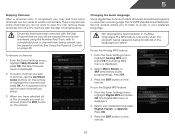
... parental controls • Change the on-screen menu language • Set the time • Adjust the CEC settings • Adjust the VIZIO logo settings Changing the Input Source To quickly access the Input Source menu, press the INPUT button on -screen menu is 100% complete. A channel scan may also be necessary when the TV has been moved to an area where different free-to-air broadcast television channels are using a device that is displayed. 4. Press the MENU button on the remote. From the Tuner Settings menu, highlight Auto Channel Scan...
... parental controls • Change the on-screen menu language • Set the time • Adjust the CEC settings • Adjust the VIZIO logo settings Changing the Input Source To quickly access the Input Source menu, press the INPUT button on -screen menu is 100% complete. A channel scan may also be necessary when the TV has been moved to an area where different free-to-air broadcast television channels are using a device that is displayed. 4. Press the MENU button on the remote. From the Tuner Settings menu, highlight Auto Channel Scan...
E502AR User Manual
Page 35
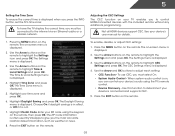
... to remove, press the EXIT button on the remote. Changing the Audio Language Some digital free-to-air and cable channels broadcast programs in more than one language.The TV's MTS (Multichannel Television Sound) feature allows you wish to audio in your preferred language: English, French, or Spanish. Channels that some channels you select. The Analog MTS menu is displayed. 2. Press the EXIT button on the remote. 29 To use the parental controls...
... to remove, press the EXIT button on the remote. Changing the Audio Language Some digital free-to-air and cable channels broadcast programs in more than one language.The TV's MTS (Multichannel Television Sound) feature allows you wish to audio in your preferred language: English, French, or Spanish. Channels that some channels you select. The Analog MTS menu is displayed. 2. Press the EXIT button on the remote. 29 To use the parental controls...
E502AR User Manual
Page 39
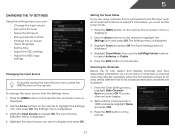
... Audio Control - The on -screen menu is displayed. 2. The ZIP code information is displayed. 3. The Settings menu is displayed. Use the Arrow and OK buttons to control HDMI-connected devices with the included remote without any additional programming. The Daylight Saving menu is displayed. 3. Adjusting the CEC Settings The CEC function on the remote to highlight CEC Settings and press OK. Not all HDMI devices support CEC. The CEC Settings menu is displayed. 4. The Time & Local Settings menu is displayed. 4. The Settings menu is...
... Audio Control - The on -screen menu is displayed. 2. The ZIP code information is displayed. 3. The Settings menu is displayed. Use the Arrow and OK buttons to control HDMI-connected devices with the included remote without any additional programming. The Daylight Saving menu is displayed. 3. Adjusting the CEC Settings The CEC function on the remote to highlight CEC Settings and press OK. Not all HDMI devices support CEC. The CEC Settings menu is displayed. 4. The Time & Local Settings menu is displayed. 4. The Settings menu is...
E502AR User Manual
Page 52
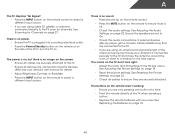
... speakers are set to On. • Check the audio connections of external devices (Blu-ray player, game console, cable/satellite box) that are connected to select a different input source. The colors on page 23. The buttons on the remote aren't working electrical outlet. • Press the Power/Standby button on the remote or on the side of the TV to the TV, scan for Channels on page 19. • Reset the picture settings. See Adjusting the Audio Settings...
... speakers are set to On. • Check the audio connections of external devices (Blu-ray player, game console, cable/satellite box) that are connected to select a different input source. The colors on page 23. The buttons on the remote aren't working electrical outlet. • Press the Power/Standby button on the remote or on the side of the TV to the TV, scan for Channels on page 19. • Reset the picture settings. See Adjusting the Audio Settings...
E502AR User Manual
Page 53
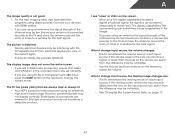
...; Use the Volume Up/Down buttons on the remote to change the screen mode. However, sometimes pixels may be interfering with HDMI cables. • If you switch from electrical appliances, cars, or flourescent lights. • Ensure all cables are using an extremely high level of technology. When I change input source, the display image changes size. • The TV remembers the viewing mode on the remote to adjust the volume. If the viewing mode on the new input source...
...; Use the Volume Up/Down buttons on the remote to change the screen mode. However, sometimes pixels may be interfering with HDMI cables. • If you switch from electrical appliances, cars, or flourescent lights. • Ensure all cables are using an extremely high level of technology. When I change input source, the display image changes size. • The TV remembers the viewing mode on the remote to adjust the volume. If the viewing mode on the new input source...
E502AR User Manual
Page 56
... "ONE YEAR WARRANTY" on the box. 50 This warranty does not cover, for example: cosmetic damage, normal wear and tear, improper operation, improper voltage supply or power surges, signal issues, damages from shipping, acts of God, any type of the original warranty or for restoring all personal information from warranty service or replacement, whichever is greater. Recovery and reinstallation of user data is not...
... "ONE YEAR WARRANTY" on the box. 50 This warranty does not cover, for example: cosmetic damage, normal wear and tear, improper operation, improper voltage supply or power surges, signal issues, damages from shipping, acts of God, any type of the original warranty or for restoring all personal information from warranty service or replacement, whichever is greater. Recovery and reinstallation of user data is not...
E502AR Quick Start Guide
Page 2
... with the cart, stand, tripod, bracket, or table specified by qualified service personnel only. If repair is required, contact your dealer and refer all instructions. • Do not use attachments/accessories specified by the manufacturer. • Use only with the manufacturer's instructions. • Do not install near your TV. If any objects on the top of power source indicated on your TV...
... with the cart, stand, tripod, bracket, or table specified by qualified service personnel only. If repair is required, contact your dealer and refer all instructions. • Do not use attachments/accessories specified by the manufacturer. • Use only with the manufacturer's instructions. • Do not install near your TV. If any objects on the top of power source indicated on your TV...
E502AR Quick Start Guide
Page 19
... A VIZIO SERVICE CENTER. Limitations and Exclusions VIZIO's one year limited warranty does not cover Products sold "AS IS", "FACTORY RECERTIFIED", or by a non-authorized reseller. You will provide instructions for a period of one (1) year of non-commercial usage and ninety (90) days of commercial use. LIMITED WARRANTY ON PARTS AND LABOR Covers units purchased as installation and set-up issues or any type...
... A VIZIO SERVICE CENTER. Limitations and Exclusions VIZIO's one year limited warranty does not cover Products sold "AS IS", "FACTORY RECERTIFIED", or by a non-authorized reseller. You will provide instructions for a period of one (1) year of non-commercial usage and ninety (90) days of commercial use. LIMITED WARRANTY ON PARTS AND LABOR Covers units purchased as installation and set-up issues or any type...


