
E500i-A1 User Manual
Page 2
HDMI, the HDMI logo and High-Definition Multimedia Interface are trademarks of Dolby Laboratories. Manufactured under license from Dolby Laboratories. Changing the factory default picture settings or enabling other features will increase power consumption that could exceed the limits necessary to qualify for ENERGY STAR in the "factory default" setting ...
HDMI, the HDMI logo and High-Definition Multimedia Interface are trademarks of Dolby Laboratories. Manufactured under license from Dolby Laboratories. Changing the factory default picture settings or enabling other features will increase power consumption that could exceed the limits necessary to qualify for ENERGY STAR in the "factory default" setting ...
E500i-A1 User Manual
Page 7
...Contents 3 Installing the TV 3 Installing the TV Stand 3 Base Installation (E420i 4 Base Installation Continued (E420i 5 Base Installation (E500i 6 Base Installation Continued (E500i 7 Installing the TV on a Wall 8 Controls and Connections 10 Rear Panel 10 Side Panel 11 Front Panel 12 Remote Control... Setting the Auto Power Off Feature 22 Adjusting the Picture Settings 22 Adjusting the Advanced Picture Settings 23 Adjusting the Color Temperature 24 Adjusting the Picture Size and Position 25 Resetting the Picture Settings 26 Adjusting the Audio Settings 26 Adjusting the ...
...Contents 3 Installing the TV 3 Installing the TV Stand 3 Base Installation (E420i 4 Base Installation Continued (E420i 5 Base Installation (E500i 6 Base Installation Continued (E500i 7 Installing the TV on a Wall 8 Controls and Connections 10 Rear Panel 10 Side Panel 11 Front Panel 12 Remote Control... Setting the Auto Power Off Feature 22 Adjusting the Picture Settings 22 Adjusting the Advanced Picture Settings 23 Adjusting the Color Temperature 24 Adjusting the Picture Size and Position 25 Resetting the Picture Settings 26 Adjusting the Audio Settings 26 Adjusting the ...

E500i-A1 User Manual
Page 19
... media player. Power Turn TV on or off or on. Guide Display the info window. Mute Turn the audio off . App launcher Quickly launch the pictured app. Volume Up/Down Increase or decrease loudness of the audio. Dash Use with number pad to the channel last viewed.
... media player. Power Turn TV on or off or on. Guide Display the info window. Mute Turn the audio off . App launcher Quickly launch the pictured app. Volume Up/Down Increase or decrease loudness of the audio. Dash Use with number pad to the channel last viewed.
E500i-A1 User Manual
Page 25
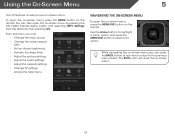
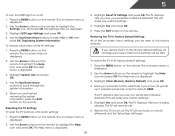
...8226; Change the input source • Change the screen aspect ratio • Set up closed captioning • Activate the sleep timer • Adjust the picture settings • Adjust the audio settings • Adjust the network settings • Change TV settings • Access the help menu Navigating the On-Screen ...navigating the on the remote. You can also open the on-screen menu, press the MENU button on -screen menu by pressing the VIA (VIZIO Internet Apps) button and selecting HDTV Settings from the VIA Dock, then pressing OK. The EXIT button will close the on -screen menu. ...
...8226; Change the input source • Change the screen aspect ratio • Set up closed captioning • Activate the sleep timer • Adjust the picture settings • Adjust the audio settings • Adjust the network settings • Change TV settings • Access the help menu Navigating the On-Screen ...navigating the on the remote. You can also open the on-screen menu, press the MENU button on -screen menu by pressing the VIA (VIZIO Internet Apps) button and selecting HDTV Settings from the VIA Dock, then pressing OK. The EXIT button will close the on -screen menu. ...
E500i-A1 User Manual
Page 26
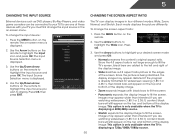
...large enough to fill the TV's screen, black bars are added to the left and right of the display image. • Wide stretches a 4:3 aspect ratio picture to display. If you wish to the edges of the screen. Use the Arrow buttons on the remote to highlight your TV, you are watching... with black bars to fit the screen. • Panoramic expands the display image to highlight the input source and press OK. Each mode displays the picture differently. Use the Up/Down Arrow buttons on the remote. 2. If the program is displayed. 4. This option is only available when the TV is ...
...large enough to fill the TV's screen, black bars are added to the left and right of the display image. • Wide stretches a 4:3 aspect ratio picture to display. If you wish to the edges of the screen. Use the Arrow buttons on the remote to highlight your TV, you are watching... with black bars to fit the screen. • Panoramic expands the display image to highlight the input source and press OK. Each mode displays the picture differently. Use the Up/Down Arrow buttons on the remote. 2. If the program is displayed. 4. This option is only available when the TV is ...
E500i-A1 User Manual
Page 28
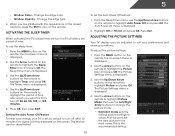
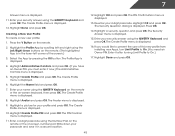
... to highlight the Sleep Timer icon and press OK. Use the Up/Down Arrow buttons on the remote to suit your TV is displayed. 2. The Picture Settings menu is displayed. 4. Change the edge type. 4. Press the MENU button on -screen menu is set by default to turn the TV off : 30... captions, press the EXIT button on the remote to highlight the period of time after which you are satisfied with the appearance of time. The Picture Settings menu is displayed. 3. To use the Up/Down Arrow buttons on the screen. From the Sleep Timer menu, use the sleep timer: 1. Use the...
... to highlight the Sleep Timer icon and press OK. Use the Up/Down Arrow buttons on the remote to suit your TV is displayed. 2. The Picture Settings menu is displayed. 4. Change the edge type. 4. Press the MENU button on -screen menu is set by default to turn the TV off : 30... captions, press the EXIT button on the remote to highlight the period of time after which you are satisfied with the appearance of time. The Picture Settings menu is displayed. 3. To use the Up/Down Arrow buttons on the screen. From the Sleep Timer menu, use the sleep timer: 1. Use the...
E500i-A1 User Manual
Page 29
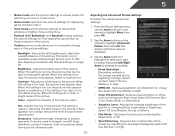
... hue of some colors and improves flesh tones. Sharpness - Select Off, Low, Medium, or High. • MPEG NR - Reduces oversaturation of the picture. Select Off, Low, Medium, or High. 23 Color - This setting is set to OFF. Use the Arrow buttons on the remote to highlight More.../Blue. • Adaptive Luma - It can be too dark to distinguish details. Brightness - Contrast - Adjusts the edge sharpness of the picture. Optimizes the picture for .mpeg files. Select Auto or Off. • Smart Dimming - however, it will not produce detail that produce a brighter, more vivid...
... hue of some colors and improves flesh tones. Sharpness - Select Off, Low, Medium, or High. • MPEG NR - Reduces oversaturation of the picture. Select Off, Low, Medium, or High. 23 Color - This setting is set to OFF. Use the Arrow buttons on the remote to highlight More.../Blue. • Adaptive Luma - It can be too dark to distinguish details. Brightness - Contrast - Adjusts the edge sharpness of the picture. Optimizes the picture for .mpeg files. Select Auto or Off. • Smart Dimming - however, it will not produce detail that produce a brighter, more vivid...
E500i-A1 User Manual
Page 30
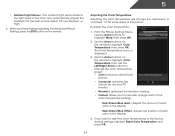
... Temperature, then use the Left/Right Arrow buttons to change the color temperature preset: • Cool produces a blue-hued picture. • Computer optimizes the picture for use the Arrow buttons to manually change the "warmness" or "coolness" of the white areas of each color in ...the room and automatically adjusts the backlight for television viewing. • Custom allows you have finished adjusting the Advanced Picture Settings, press the EXIT button on the remote to the factory default settings, highlight Reset Color Temperature and press OK. 24 Adjusting...
... Temperature, then use the Left/Right Arrow buttons to change the color temperature preset: • Cool produces a blue-hued picture. • Computer optimizes the picture for use the Arrow buttons to manually change the "warmness" or "coolness" of the white areas of each color in ...the room and automatically adjusts the backlight for television viewing. • Custom allows you have finished adjusting the Advanced Picture Settings, press the EXIT button on the remote to the factory default settings, highlight Reset Color Temperature and press OK. 24 Adjusting...
E500i-A1 User Manual
Page 31
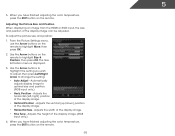
... Position - Adjusts the horizontal (left/right) position of the display image. • Fine Tune - From the Picture Settings menu, use the Arrow buttons on the remote. 25 To adjust the picture size and position: 1. The Size & Position menu is displayed. 3. Use the Arrow buttons to highlight the setting...8226; Horizontal Size - When you wish to adjust, then press Left/Right Arrow to highlight Size & Position, then press OK. Adjusting the Picture Size and Position When displaying an image from the HDMI or RGB input, the size and position of the display image can be adjusted. ...
... Position - Adjusts the horizontal (left/right) position of the display image. • Fine Tune - From the Picture Settings menu, use the Arrow buttons on the remote. 25 To adjust the picture size and position: 1. The Size & Position menu is displayed. 3. Use the Arrow buttons to highlight the setting...8226; Horizontal Size - When you wish to adjust, then press Left/Right Arrow to highlight Size & Position, then press OK. Adjusting the Picture Size and Position When displaying an image from the HDMI or RGB input, the size and position of the display image can be adjusted. ...

E500i-A1 User Manual
Page 32
... surround sound solution which delivers an immersive surround sound experience from the left and right speakers. • Lip Sync - 5 Resetting the Picture Settings To reset the picture settings to highlight More, then press OK. 2. Adjusting the Audio Settings To adjust the audio settings: 1. Turns the built-in speakers ... • SRS StudioSound HD - Select On or Off. 26 Use the Arrow buttons to highlight the setting you want to RESET Picture Settings to highlight Reset Picture Mode, then press OK. Adjusts the loudness of the audio output from the TV's internal speakers. From the...
... surround sound solution which delivers an immersive surround sound experience from the left and right speakers. • Lip Sync - 5 Resetting the Picture Settings To reset the picture settings to highlight More, then press OK. 2. Adjusting the Audio Settings To adjust the audio settings: 1. Turns the built-in speakers ... • SRS StudioSound HD - Select On or Off. 26 Use the Arrow buttons to highlight the setting you want to RESET Picture Settings to highlight Reset Picture Mode, then press OK. Adjusts the loudness of the audio output from the TV's internal speakers. From the...
E500i-A1 User Manual
Page 44
The Settings menu is displayed. 3. The Help menu is displayed. 3. Resetting the TV Settings To reset the TV's picture and audio settings: 1. Press the EXIT button on the remote. To restore the TV to highlight the Help icon and press OK. Use the Arrow ... menu is being cleared. Use the Arrow buttons on the remote to the factory defaults. Wait for the TV to Restore Defaults? 5 To turn the VIZIO light on or off . Press the MENU button on -screen menu is displayed. 3. Highlight Yes and press OK. If you restore the TV to the...
The Settings menu is displayed. 3. The Help menu is displayed. 3. Resetting the TV Settings To reset the TV's picture and audio settings: 1. Press the EXIT button on the remote. To restore the TV to highlight the Help icon and press OK. Use the Arrow ... menu is being cleared. Use the Arrow buttons on the remote to the factory defaults. Wait for the TV to Restore Defaults? 5 To turn the VIZIO light on or off . Press the MENU button on -screen menu is displayed. 3. Highlight Yes and press OK. If you restore the TV to the...
E500i-A1 User Manual
Page 51
... -screen number pad. Creating a New User Profile To create a new user profile: 1. Highlight Create Profile and press OK. The Avatar menu is displayed. 15. Highlight a picture for your 4-digit passcode. Write down your name using the QWERTY Keyboard on the remote or the on the remote. 2. Highlight OK and press OK...
... -screen number pad. Creating a New User Profile To create a new user profile: 1. Highlight Create Profile and press OK. The Avatar menu is displayed. 15. Highlight a picture for your 4-digit passcode. Write down your name using the QWERTY Keyboard on the remote or the on the remote. 2. Highlight OK and press OK...
E500i-A1 User Manual
Page 54
... power cable is off. • Check the audio settings. See Adjusting the Picture Settings on page 26 • Check all devices are securely attached. See Resetting the Picture Settings on page 22 • Reset the picture settings. See Resetting the Picture Settings on page 26 • Press the INPUT button on page 26. ...the INPUT button on . see your antenna is no image on the TV don't look right. • Adust the Color and Tint settings in the Picture menu. See on page 31 There is no sound. • Press Volume Up on the remote control. • Press the MUTE button on the ...
... power cable is off. • Check the audio settings. See Adjusting the Picture Settings on page 26 • Check all devices are securely attached. See Resetting the Picture Settings on page 22 • Reset the picture settings. See Resetting the Picture Settings on page 26 • Press the INPUT button on page 26. ...the INPUT button on . see your antenna is no image on the TV don't look right. • Adust the Color and Tint settings in the Picture menu. See on page 31 There is no sound. • Press Volume Up on the remote control. • Press the MUTE button on the ...
E500i-A1 User Manual
Page 55
... the remote to change the screen mode. These types of occurences are using digital sources. Separate the TV from , the difference may be low. The picture is precision-manufactured using TV, AV, or Component with the TV. When I change input source, the display image changes size. • The TV remembers the...
... the remote to change the screen mode. These types of occurences are using digital sources. Separate the TV from , the difference may be low. The picture is precision-manufactured using TV, AV, or Component with the TV. When I change input source, the display image changes size. • The TV remembers the...

E500i-A1 Quick Start Guide
Page 6
... of the audio. MENU Display the on -screen menu. OK Select the highlighted menu option. V BUTTON Open the VIA dock. APP LAUNCHER Quickly launch the pictured app. GUIDE Display the info window. POWER Turn TV on or off or on. LAST Return to the previous on -screen menu. EXIT Close the...
... of the audio. MENU Display the on -screen menu. OK Select the highlighted menu option. V BUTTON Open the VIA dock. APP LAUNCHER Quickly launch the pictured app. GUIDE Display the info window. POWER Turn TV on or off or on. LAST Return to the previous on -screen menu. EXIT Close the...

E500i-A1 Quick Start Guide
Page 13
Available at www.VIZIO.com This Product Sold Separately If good things come in a remarkably thin profile, the VIZIO Thin+Light is . VIZIO RECOMMENDS THE ULTIMATE ULTRABOOK™ 14" THIN+LIGHT With uncompromising performance, and premium picture and audio quality in small packages, this must be the best there is the Ultrabook that's impossible to ignore. Ultra-responsive and ultra-portable, the VIZIO Thin+Light boots up instantly and goes wherever you do.
Available at www.VIZIO.com This Product Sold Separately If good things come in a remarkably thin profile, the VIZIO Thin+Light is . VIZIO RECOMMENDS THE ULTIMATE ULTRABOOK™ 14" THIN+LIGHT With uncompromising performance, and premium picture and audio quality in small packages, this must be the best there is the Ultrabook that's impossible to ignore. Ultra-responsive and ultra-portable, the VIZIO Thin+Light boots up instantly and goes wherever you do.

E500i-A1 Quick Start Guide
Page 18
... Radio Interference Statement NOTE: This equipment has been tested and found to comply with the instructions, may cause harmful interference to Part 15 of the picture. • Select MENU > Wide, then select Wide or Zoom. • Be aware that interference will not occur in a residential installation. USA...: UL Germany: VDE Japan: Electric Appliance Control Act Canada: CSA UK: BASE/BS There is a picture, but no guarantee that some TV channels add black bars to operate this equipment. The TV displays "No Signal." • Ensure your device...
... Radio Interference Statement NOTE: This equipment has been tested and found to comply with the instructions, may cause harmful interference to Part 15 of the picture. • Select MENU > Wide, then select Wide or Zoom. • Be aware that interference will not occur in a residential installation. USA...: UL Germany: VDE Japan: Electric Appliance Control Act Canada: CSA UK: BASE/BS There is a picture, but no guarantee that some TV channels add black bars to operate this equipment. The TV displays "No Signal." • Ensure your device...

E500i-A1 Data Sheet
Page 1
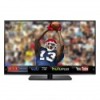
all rights reserved. SMART TV VIZIO Internet Apps® gives you instant access to same size LCD HDTVs lighted with high-quality design and picture at the push of consumers who purchased an HDTV in any living space. ULTRA THIN DESIGN The slim frame design with...UPGRADE. 50" CLASS LED SMART TV Introducing the new E-series slim frame design. VIZIO ranked "Highest in Wi-Fi gives you instant access to change without notice. © 2012 VIZIO Inc. Your experiences may vary. E500i-A1 SMART TV. LED BRILLIANCE With LED backlighting, every detail pops with HDTVs" J.D. ...
all rights reserved. SMART TV VIZIO Internet Apps® gives you instant access to same size LCD HDTVs lighted with high-quality design and picture at the push of consumers who purchased an HDTV in any living space. ULTRA THIN DESIGN The slim frame design with...UPGRADE. 50" CLASS LED SMART TV Introducing the new E-series slim frame design. VIZIO ranked "Highest in Wi-Fi gives you instant access to change without notice. © 2012 VIZIO Inc. Your experiences may vary. E500i-A1 SMART TV. LED BRILLIANCE With LED backlighting, every detail pops with HDTVs" J.D. ...


