
E500i-A1 User Manual
Page 4
... on the label. The manufacturer's warranty does not cover user abuse or improper installations. • The power cord must be used for long periods of time. • Refer all servicing to qualified service personnel. Doing so could short circuit parts causing a fire or electric shock. Do not install your dealer. • Your TV is a safety feature. Operating your TV. Do not defeat...
... on the label. The manufacturer's warranty does not cover user abuse or improper installations. • The power cord must be used for long periods of time. • Refer all servicing to qualified service personnel. Doing so could short circuit parts causing a fire or electric shock. Do not install your dealer. • Your TV is a safety feature. Operating your TV. Do not defeat...
E500i-A1 User Manual
Page 5
Do not try to repair your TV, hold the AC/DC power adapter, not the cord. Ensure that the power cord and any other than that may function abnormally. Liquid sprays or any abnormality occurs. The performance of your TV changes substantially. • This apparatus shall not be exposed..., such as vases, shall be placed on the power cord may cause the batteries to rain or moisture. These servicing instructions are for repair. Opening or removing the back cover may expose you are qualified to do so. Operating your TV. - Incorrect polarities may damage the wires...
Do not try to repair your TV, hold the AC/DC power adapter, not the cord. Ensure that the power cord and any other than that may function abnormally. Liquid sprays or any abnormality occurs. The performance of your TV changes substantially. • This apparatus shall not be exposed..., such as vases, shall be placed on the power cord may cause the batteries to rain or moisture. These servicing instructions are for repair. Opening or removing the back cover may expose you are qualified to do so. Operating your TV. - Incorrect polarities may damage the wires...
E500i-A1 User Manual
Page 6
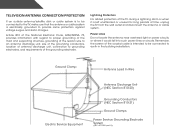
... grounded to proper grounding of the mast and supporting structure, grounding of the lead-in the building installation. Television Antenna Connection Protection If an outside antenna/satellite dish or cable system is to be connected to earth in wire to an antenna discharge unit, size of the grounding conductors, location of antenna discharge unit, connection to grounding electrodes, and requirements of the...
... grounded to proper grounding of the mast and supporting structure, grounding of the lead-in the building installation. Television Antenna Connection Protection If an outside antenna/satellite dish or cable system is to be connected to earth in wire to an antenna discharge unit, size of the grounding conductors, location of antenna discharge unit, connection to grounding electrodes, and requirements of the...
E500i-A1 User Manual
Page 7
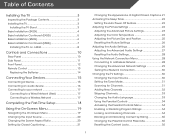
... Installation (E500i 6 Base Installation Continued (E500i 7 Installing the TV on a Wall 8 Controls and Connections 10 Rear Panel 10 Side Panel 11 Front Panel 12 Remote Control 13 Replacing the Batteries 14 Connecting Your Devices 15 Connecting A Device 15 Connecting an audio device 16 Connecting to your network 17 Connecting to a Wired Network (Best 17 Connecting to a Wireless Network 17 Completing the First-Time Setup 18 Using the On-Screen Menu 19 Navigating the On-Screen Menu 19 Changing the Input Source 20 Changing the Screen Aspect Ratio 20 Setting Up Closed Captioning...
... Installation (E500i 6 Base Installation Continued (E500i 7 Installing the TV on a Wall 8 Controls and Connections 10 Rear Panel 10 Side Panel 11 Front Panel 12 Remote Control 13 Replacing the Batteries 14 Connecting Your Devices 15 Connecting A Device 15 Connecting an audio device 16 Connecting to your network 17 Connecting to a Wired Network (Best 17 Connecting to a Wireless Network 17 Completing the First-Time Setup 18 Using the On-Screen Menu 19 Navigating the On-Screen Menu 19 Changing the Input Source 20 Changing the Screen Aspect Ratio 20 Setting Up Closed Captioning...
E500i-A1 User Manual
Page 8
... of the Inputs 36 Changing the On-Screen Menu Language 36 Setting the Time Zone 37 Adjusting the CEC Settings 37 Turning the VIZIO Logo On or Off 37 Resetting the TV Settings 38 Restoring the TV to Factory Default Settings 38 Using Guided Setup 39 Using the Info Window 40 Using the USB Media Player 41 Using the USB Media Player 41 Connecting a USB Thumb Drive to the TV 41 Playing USB Media 41 Using VIZIO Internet Apps 43 Using the VIA Shortcut Buttons 43 Using the...
... of the Inputs 36 Changing the On-Screen Menu Language 36 Setting the Time Zone 37 Adjusting the CEC Settings 37 Turning the VIZIO Logo On or Off 37 Resetting the TV Settings 38 Restoring the TV to Factory Default Settings 38 Using Guided Setup 39 Using the Info Window 40 Using the USB Media Player 41 Using the USB Media Player 41 Connecting a USB Thumb Drive to the TV 41 Playing USB Media 41 Using VIZIO Internet Apps 43 Using the VIA Shortcut Buttons 43 Using the...
E500i-A1 User Manual
Page 14
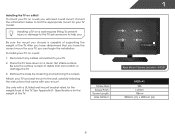
... supporting the weight of this TV. Attach your TV and wall mount to find the appropriate mount for your TV. 2. Screw Size: Screw Pitch: Screw Length: Hole Pattern: 1 Wall Mount Screw Locaton - Consult the information below to the wall, carefully following the instructions that came with a UL-listed wall mount bracket rated for the weight of debris that you will need a wall mount. To install yovur TV on a clean, flat, stable surface. Disconnect any cables connected to help...
... supporting the weight of this TV. Attach your TV and wall mount to find the appropriate mount for your TV. 2. Screw Size: Screw Pitch: Screw Length: Hole Pattern: 1 Wall Mount Screw Locaton - Consult the information below to the wall, carefully following the instructions that came with a UL-listed wall mount bracket rated for the weight of debris that you will need a wall mount. To install yovur TV on a clean, flat, stable surface. Disconnect any cables connected to help...

E500i-A1 User Manual
Page 21
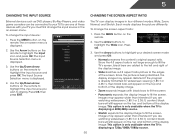
... matches an available port on the TV (HDMI, Component, etc). 2. Turn the TV and your device off. 3. COMPONENT CABLE • ANALOG BETTER • HD VIDEO (1080i)* • STEREO AUDIO AV CABLE GOOD * Maximum Resolution 15 • ANALOG • VIDEO (480i)* • STEREO AUDIO CONNECTING A DEVICE Connecting Your Devices Connecting A Device Your TV can be used (HDMI-1, HDMI-2, etc). 3 Cable/Satellite Box DVD/Blu-ray Player Game Console HDMI CABLE BEST • DIGITAL • HD VIDEO (1080p)* • HD AUDIO (HDMI 4 is available...
... matches an available port on the TV (HDMI, Component, etc). 2. Turn the TV and your device off. 3. COMPONENT CABLE • ANALOG BETTER • HD VIDEO (1080i)* • STEREO AUDIO AV CABLE GOOD * Maximum Resolution 15 • ANALOG • VIDEO (480i)* • STEREO AUDIO CONNECTING A DEVICE Connecting Your Devices Connecting A Device Your TV can be used (HDMI-1, HDMI-2, etc). 3 Cable/Satellite Box DVD/Blu-ray Player Game Console HDMI CABLE BEST • DIGITAL • HD VIDEO (1080p)* • HD AUDIO (HDMI 4 is available...

E500i-A1 User Manual
Page 24
Press the Power/Standby button on -screen keyboard, then highlight Connect and press OK. 5. Use the OK and Arrow Up/ Down buttons on the remote to read and accept the Terms of Service and Privacy Policy for use. Enter the network key using the on the remote. Choose signal Select cable device Select Input Cable Through a cable box HDMI-1 Please check your connections if you are connecting to your wireless network from the device. Completing...
Press the Power/Standby button on -screen keyboard, then highlight Connect and press OK. 5. Use the OK and Arrow Up/ Down buttons on the remote to read and accept the Terms of Service and Privacy Policy for use. Enter the network key using the on the remote. Choose signal Select cable device Select Input Cable Through a cable box HDMI-1 Please check your connections if you are connecting to your wireless network from the device. Completing...
E500i-A1 User Manual
Page 26
... highlight the input source and press OK. 5 Changing the Input Source Changing the Screen Aspect Ratio External devices such as DVD players, Blu-Ray Players, and video game consoles can display images in the on the top and bottom of the display image. • Wide stretches a 4:3 aspect ratio picture to highlight the Input icon and press OK. Press the MENU button on the remote. 2. Press the MENU button on the remote. Since the...
... highlight the input source and press OK. 5 Changing the Input Source Changing the Screen Aspect Ratio External devices such as DVD players, Blu-Ray Players, and video game consoles can display images in the on the top and bottom of the display image. • Wide stretches a 4:3 aspect ratio picture to highlight the Input icon and press OK. Press the MENU button on the remote. 2. Press the MENU button on the remote. Since the...
E500i-A1 User Manual
Page 29
... the Picture Settings menu, use the Arrow buttons on the remote to affect the overall brilliance of the picture settings: Backlight - Also try these modes for other sports. • Custom picture mode allows you wish to adjust, then press Left/Right Arrow to change each of the picture. Adjusts the LED brightness to highlight More, then press OK. 2. Adjusts the black level of the picture. Adjusts the white level of the picture. Use...
... the Picture Settings menu, use the Arrow buttons on the remote to affect the overall brilliance of the picture settings: Backlight - Also try these modes for other sports. • Custom picture mode allows you wish to adjust, then press Left/Right Arrow to change each of the picture. Adjusts the LED brightness to highlight More, then press OK. 2. Adjusts the black level of the picture. Adjusts the white level of the picture. Use...

E500i-A1 User Manual
Page 32
Use the Arrow buttons on the remote. Press the EXIT button on the remote to highlight Reset Picture Mode, then press OK. Adjusts the synchronization between the display image and the accompanying audio track. • TV Speakers - Turns the built-in speakers on -screen menu is displayed. 2. TruVolume® intelligently normalizes volume fluctuations due to highlight More, then press OK. 2. Adjusting the Audio Settings To adjust the audio settings: 1. The Audio Settings menu is a feature-rich surround sound solution...
Use the Arrow buttons on the remote. Press the EXIT button on the remote to highlight Reset Picture Mode, then press OK. Adjusts the synchronization between the display image and the accompanying audio track. • TV Speakers - Turns the built-in speakers on -screen menu is displayed. 2. TruVolume® intelligently normalizes volume fluctuations due to highlight More, then press OK. 2. Adjusting the Audio Settings To adjust the audio settings: 1. The Audio Settings menu is a feature-rich surround sound solution...
E500i-A1 User Manual
Page 33
... external speakers' volume from the TV's volume controls, or select Fixed to a home theater audio system. See Resetting the Audio Settings on the remote. 5 • Advanced Audio - From the Audio Settings Menu, use the Arrow buttons to the factory defaults. Restores the audio settings to highlight Advanced Audio, then press OK. Adjusts the boost or attenuation of processing for the analog RCA (red/ white) connectors when connected to control the external speakers' volume from your home theater system controls. 3. Select Off, Dolby Digital...
... external speakers' volume from the TV's volume controls, or select Fixed to a home theater audio system. See Resetting the Audio Settings on the remote. 5 • Advanced Audio - From the Audio Settings Menu, use the Arrow buttons to the factory defaults. Restores the audio settings to highlight Advanced Audio, then press OK. Adjusts the boost or attenuation of processing for the analog RCA (red/ white) connectors when connected to control the external speakers' volume from your home theater system controls. 3. Select Off, Dolby Digital...

E500i-A1 User Manual
Page 36
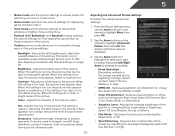
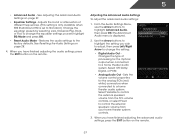
...Connection screen displays the connection method, network name, signal strength, and download speed of your network connection: 1. Press the EXIT button on the remote. Highlight the input source you can: • Change the input source • Adjust the Tuner settings • Name the TV inputs • Set up parental controls • Change the on-screen menu language • Set the time • Adjust the CEC settings • Adjust the VIZIO logo settings Settings Input Source Tuner Name Input Parental Controls Menu Language Time & Local Settings CEC Settings Power LED Set power LED...
...Connection screen displays the connection method, network name, signal strength, and download speed of your network connection: 1. Press the EXIT button on the remote. Highlight the input source you can: • Change the input source • Adjust the Tuner settings • Name the TV inputs • Set up parental controls • Change the on-screen menu language • Set the time • Adjust the CEC settings • Adjust the VIZIO logo settings Settings Input Source Tuner Name Input Parental Controls Menu Language Time & Local Settings CEC Settings Power LED Set power LED...

E500i-A1 User Manual
Page 43
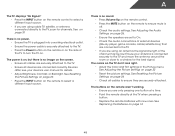
... time, you to the internet via an Ethernet cable or a wireless network. This is on -screen menu is displayed when you press the INFO button, set to light up when the TV is not affected by VIA Apps to give you must be connected to control HDMI-connected devices with the included remote without any additional programming. 5 Setting the Time Zone To ensure the correct time is displayed. 2. Not all HDMI devices support...
... time, you to the internet via an Ethernet cable or a wireless network. This is on -screen menu is displayed when you press the INFO button, set to light up when the TV is not affected by VIA Apps to give you must be connected to control HDMI-connected devices with the included remote without any additional programming. 5 Setting the Time Zone To ensure the correct time is displayed. 2. Not all HDMI devices support...
E500i-A1 User Manual
Page 54
... Color and Tint settings in the Picture menu. see your antenna is connected securely to the TV and move the antenna around the room or close to ensure mute is securely attached to the TV. • Press the Power button on the remote or on the side of external devices (Blu-ray player, game console, cable/satellite box) that are connected to select a different input source. There is no power...
... Color and Tint settings in the Picture menu. see your antenna is connected securely to the TV and move the antenna around the room or close to ensure mute is securely attached to the TV. • Press the Power button on the remote or on the side of external devices (Blu-ray player, game console, cable/satellite box) that are connected to select a different input source. There is no power...
E500i-A1 User Manual
Page 55
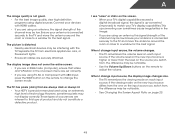
... best image quality, view high-definition programs using digital sources. Connect your antenna is distorted. • Nearby electrical devices may be interfering with 480i input, press the WIDE button on each input source. The display image does not cover the entire screen. • If you are in RGB mode (computer), ensure that are using an antenna, the signal strength of the channel may be low. Ensure your devices with HDMI cables...
... best image quality, view high-definition programs using digital sources. Connect your antenna is distorted. • Nearby electrical devices may be interfering with 480i input, press the WIDE button on each input source. The display image does not cover the entire screen. • If you are in RGB mode (computer), ensure that are using an antenna, the signal strength of the channel may be low. Ensure your devices with HDMI cables...
E500i-A1 User Manual
Page 58
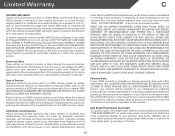
... materials and workmanship. Limited Warranty C ON PARTS AND LABOR Covers units purchased as installation and set-up issues or any type of the servicer. VIZIO is serviced, regardless of customer misuse, modifications or adjustments, as well as new in the form of the model's product information page (www.VIZIO.com) or look for parts or labor during the warranty period. VIZIO'S TOTAL LIABILITY FOR ANY...
... materials and workmanship. Limited Warranty C ON PARTS AND LABOR Covers units purchased as installation and set-up issues or any type of the servicer. VIZIO is serviced, regardless of customer misuse, modifications or adjustments, as well as new in the form of the model's product information page (www.VIZIO.com) or look for parts or labor during the warranty period. VIZIO'S TOTAL LIABILITY FOR ANY...
E500i-A1 Quick Start Guide
Page 2
... the type of the display. Read the following instructions should be observed for future reference. Operating your TV close to rain or moisture. Never spill liquids on your TV from the apparatus. • Only use attachments/accessories specified by the manufacturer. • Use only with the cart, stand, tripod, bracket, or table specified by qualified service personnel only. Any other components to...
... the type of the display. Read the following instructions should be observed for future reference. Operating your TV close to rain or moisture. Never spill liquids on your TV from the apparatus. • Only use attachments/accessories specified by the manufacturer. • Use only with the cart, stand, tripod, bracket, or table specified by qualified service personnel only. Any other components to...

E500i-A1 Quick Start Guide
Page 18
... the receiving antenna. • Increase the separation between the equipment and receiver. • Connect the equipment into an outlet on a circuit different from that some TV channels add black bars to operate this equipment. Caution Always use an AC/DC power adapter that may cause harmful interference to this equipment. TROUBLESHOOTING There is no sound. • Press the Volume Up button on the remote or...
... the receiving antenna. • Increase the separation between the equipment and receiver. • Connect the equipment into an outlet on a circuit different from that some TV channels add black bars to operate this equipment. Caution Always use an AC/DC power adapter that may cause harmful interference to this equipment. TROUBLESHOOTING There is no sound. • Press the Volume Up button on the remote or...

E500i-A1 Quick Start Guide
Page 19
... TO A VIZIO SERVICE CENTER FOR WARRANTY SERVICE. THERE ARE NO EXPRESS WARRANTIES OTHER THAN THOSE LISTED OR DESCRIBED ABOVE. LIMITED WARRANTY ON PARTS AND LABOR Covers units purchased as new in the form of a purchase receipt or copy thereof is required to show that you configured as installation and set-up issues or any type of customer misuse, modifications or adjustments, as well...
... TO A VIZIO SERVICE CENTER FOR WARRANTY SERVICE. THERE ARE NO EXPRESS WARRANTIES OTHER THAN THOSE LISTED OR DESCRIBED ABOVE. LIMITED WARRANTY ON PARTS AND LABOR Covers units purchased as new in the form of a purchase receipt or copy thereof is required to show that you configured as installation and set-up issues or any type of customer misuse, modifications or adjustments, as well...


