Download
Page 7
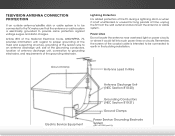
Lightning Protection For added protection of the TV during a lightning storm or when it could fall into such power lines or circuits. Remember, the screen of the coaxial cable is left unattended or unused for long periods of time, unplug the TV from the wall outlet and disconnect the antenna ...
Lightning Protection For added protection of the TV during a lightning storm or when it could fall into such power lines or circuits. Remember, the screen of the coaxial cable is left unattended or unused for long periods of time, unplug the TV from the wall outlet and disconnect the antenna ...
Download
Page 8
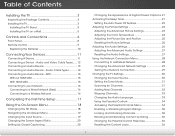
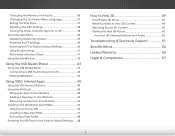
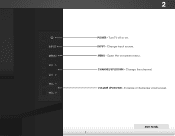
... 16 Connecting to a Wireless Network 16 Completing the First-Time Setup 17 Using the On-Screen Menu 18 Changing the 3D Mode 18 Navigating the On-Screen Menu 19 Changing the Input Source 19 Changing the Screen Aspect Ratio 20 Setting Up Closed Captioning 20 Changing the Appearance of Contents Installing the TV...
... 16 Connecting to a Wireless Network 16 Completing the First-Time Setup 17 Using the On-Screen Menu 18 Changing the 3D Mode 18 Navigating the On-Screen Menu 19 Changing the Input Source 19 Changing the Screen Aspect Ratio 20 Setting Up Closed Captioning 20 Changing the Appearance of Contents Installing the TV...
Download
Page 9
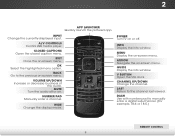
Changing the Names of the Inputs 36 Changing the On-Screen Menu Language 37 Setting the Time Zone 37 Adjusting the CEC Settings 38 Turning the Power Indicator Light On or Off 38 Using the Help ... Using the USB Media Player 43 Using the USB Media Player 43 Connecting a USB Thumb Drive to the TV 43 Playing USB Media 43 Using VIZIO Internet Apps 45 Using the VIA Shortcut Buttons 45 Using the VIA Dock 45 Moving an App on the VIA Dock 45 Adding a New App...
Changing the Names of the Inputs 36 Changing the On-Screen Menu Language 37 Setting the Time Zone 37 Adjusting the CEC Settings 38 Turning the Power Indicator Light On or Off 38 Using the Help ... Using the USB Media Player 43 Using the USB Media Player 43 Connecting a USB Thumb Drive to the TV 43 Playing USB Media 43 Using VIZIO Internet Apps 45 Using the VIA Shortcut Buttons 45 Using the VIA Dock 45 Moving an App on the VIA Dock 45 Adding a New App...

Download
Page 11
First, align and insert the neck into the base with the included hex screwdriver. 4 Then, insert and tighten the three(3) included 16mm M4 hex screws into the base as carpet, rug, or blanket. 2. To prevent scratches or damage to the screen, place the TV on a clean, flat surface. 1 To install the base: 1. Remove any plastic wrapping from the TV and stand. It is recommended that two people take part in the base installation. Place the TV screen-down on a soft surface, such as shown.
First, align and insert the neck into the base with the included hex screwdriver. 4 Then, insert and tighten the three(3) included 16mm M4 hex screws into the base as carpet, rug, or blanket. 2. To prevent scratches or damage to the screen, place the TV on a clean, flat surface. 1 To install the base: 1. Remove any plastic wrapping from the TV and stand. It is recommended that two people take part in the base installation. Place the TV screen-down on a soft surface, such as shown.
Download
Page 14
Turn TV off or on -screen menu. Side Panel 7 Open the on . INPUT MENU CH ^ CH VOL ^ VOL ^ ^ 2 POWER - Increase or decrease volume level. MENU - INPUT - VOLUME UP/DOWN - Change input source. Change the channel. CHANNEL UP/DOWN -
Turn TV off or on -screen menu. Side Panel 7 Open the on . INPUT MENU CH ^ CH VOL ^ VOL ^ ^ 2 POWER - Increase or decrease volume level. MENU - INPUT - VOLUME UP/DOWN - Change input source. Change the channel. CHANNEL UP/DOWN -
Download
Page 16
... enter a digital sub-channel. (For example, 18-4 or 18-5.) Remote Control 9 Ok Select the highlighted menu option. Back Go to the previous on -screen menu. Mute Turn the audio off or on or off. Power Turn TV on . Dash Use with number pad to the channel last viewed. 2 Remote...Closed Captions Open the closed caption menu. Guide Display the info window. Channel Up/Down Change the channel. Exit Close the on -screen menu. Arrow Navigate the on -screen menu. Info Display the info window. Volume Up/Down Increase or decrease loudness of the audio. V Button Open the VIA dock. ...
... enter a digital sub-channel. (For example, 18-4 or 18-5.) Remote Control 9 Ok Select the highlighted menu option. Back Go to the previous on -screen menu. Mute Turn the audio off or on or off. Power Turn TV on . Dash Use with number pad to the channel last viewed. 2 Remote...Closed Captions Open the closed caption menu. Guide Display the info window. Channel Up/Down Change the channel. Exit Close the on -screen menu. Arrow Navigate the on -screen menu. Info Display the info window. Volume Up/Down Increase or decrease loudness of the audio. V Button Open the VIA dock. ...

Download
Page 24
...you have the network key ready. • If you have a wireless network, have finished the channel scan, highlight Exit to the Ethernet port on -screen keyboard. Before you begin the first-time setup: • Your TV should be installed and the power cord should be connected to an electrical outlet.... • Your devices should be connected. • If you are finished, highlight Next and press OK. 4. Use the Up/Down Arrow buttons on -screen keyboard, then highlight Connect and press OK. 5. Enter your network with an Ethernet cable, connect it to Live TV and press OK. To complete the...
...you have the network key ready. • If you have a wireless network, have finished the channel scan, highlight Exit to the Ethernet port on -screen keyboard. Before you begin the first-time setup: • Your TV should be installed and the power cord should be connected to an electrical outlet.... • Your devices should be connected. • If you are finished, highlight Next and press OK. 4. Use the Up/Down Arrow buttons on -screen keyboard, then highlight Connect and press OK. 5. Enter your network with an Ethernet cable, connect it to Live TV and press OK. To complete the...

Download
Page 25
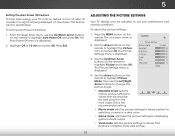
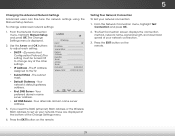
...Adjust the picture settings • Adjust the audio settings • Adjust the network settings • Change TV settings • Access the help menu VIZIO ABC 3D Wide CC Sleep Timer Picture Audio Network Settings Help Changing the 3D Mode To correctly view 3D content, you are watching: • ...SBS - Press the MENU button on -screen menu is displayed. Use the Arrow buttons on your 3D glasses. 18 Go to step 4. 4. Put on the remote to highlight the 3D icon...
...Adjust the picture settings • Adjust the audio settings • Adjust the network settings • Change TV settings • Access the help menu VIZIO ABC 3D Wide CC Sleep Timer Picture Audio Network Settings Help Changing the 3D Mode To correctly view 3D content, you are watching: • ...SBS - Press the MENU button on -screen menu is displayed. Use the Arrow buttons on your 3D glasses. 18 Go to step 4. 4. Put on the remote to highlight the 3D icon...
Download
Page 26
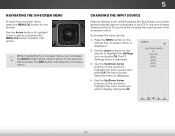
...the Arrow buttons on the remote to the previous menu screen. The Input Source Selection menu is displayed. 3. VIZIO Input Source Selection TV Comp/AV HDMI-1 HDMI-2 HDMI-3 HDMI-4 4. Navigating the On-Screen Menu To open the on-screen menu, press the MENU/OK button on the remote. ...The on -screen menu. To change the input source in the on -screen menu is displayed. ...
...the Arrow buttons on the remote to the previous menu screen. The Input Source Selection menu is displayed. 3. VIZIO Input Source Selection TV Comp/AV HDMI-1 HDMI-2 HDMI-3 HDMI-4 4. Navigating the On-Screen Menu To open the on-screen menu, press the MENU/OK button on the remote. ...The on -screen menu. To change the input source in the on -screen menu is displayed. ...
Download
Page 27
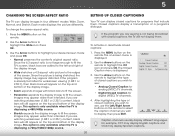
... to display, then press EXIT. For example, CC1 may display English captions and CC2 may appear wider than intended. 5 Changing the Screen Aspect Ratio Setting Up Closed Captioning The TV can display closed captions for programs that include them . Press the MENU button on the ... 1. The Closed Caption menu is displayed. 2. Use the Arrow buttons on the remote. After highlighting the type of a program's dialogue. VIZIO Closed Caption Analog Closed Caption Off Digital Closed Caption Off Digital CC Style As Broadcaster Caption channels usually display different languages.
... to display, then press EXIT. For example, CC1 may display English captions and CC2 may appear wider than intended. 5 Changing the Screen Aspect Ratio Setting Up Closed Captioning The TV can display closed captions for programs that include them . Press the MENU button on the ... 1. The Closed Caption menu is displayed. 2. Use the Arrow buttons on the remote. After highlighting the type of a program's dialogue. VIZIO Closed Caption Analog Closed Caption Off Digital Closed Caption Off Digital CC Style As Broadcaster Caption channels usually display different languages.

Download
Page 28
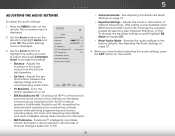
... remote. 21 Activating the Sleep Timer When activated, the TV's sleep timer will turn off after a set period of time. Normal Panoramic VIZIO Sleep Timer 2. The Timers menu is WiddeisplaZoyoemd. Adjust the size of the text. • BG Color - Change the background color. &#...8226; BG Opacity - Press the MENU button on the remote. The on-screen menu is displayed. 4. VIZIO Digital CC Style Caption Style Custom Text Size As Broadcast Color As Broadcast Opacity As Broadcast 3. Change the color of the background....
... remote. 21 Activating the Sleep Timer When activated, the TV's sleep timer will turn off after a set period of time. Normal Panoramic VIZIO Sleep Timer 2. The Timers menu is WiddeisplaZoyoemd. Adjust the size of the text. • BG Color - Change the background color. &#...8226; BG Opacity - Press the MENU button on the remote. The on-screen menu is displayed. 4. VIZIO Digital CC Style Caption Style Custom Text Size As Broadcast Color As Broadcast Opacity As Broadcast 3. Change the color of the background....
Download
Page 29
...Auto Power-Off menu is being displayed on the remote to highlight Picture Mode, then use the Up/Down Arrow buttons on the screen. Press Exit. Adjusting the Picture Settings Your TV display can be adjusted to suit your TV is set the Auto Power Off ... the remote to turn off after 10 minutes if no signal is displayed. 2. The Picture Settings menu is displayed. 2. Use the Arrow buttons on -screen menu is displayed. VIZIO Picture Settings Picture Mode Backlight Brightness Contrast Color Tint Sharpness Custom - + 50 - + 50 - + 50 - + 50 - +0 - +0 More 4. From...
...Auto Power-Off menu is being displayed on the remote to highlight Picture Mode, then use the Up/Down Arrow buttons on the screen. Press Exit. Adjusting the Picture Settings Your TV display can be adjusted to suit your TV is set the Auto Power Off ... the remote to turn off after 10 minutes if no signal is displayed. 2. The Picture Settings menu is displayed. 2. Use the Arrow buttons on -screen menu is displayed. VIZIO Picture Settings Picture Mode Backlight Brightness Contrast Color Tint Sharpness Custom - + 50 - + 50 - + 50 - + 50 - +0 - +0 More 4. From...
Download
Page 33
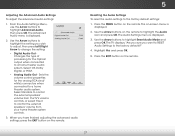
Press the MENU button on page 27. • Equalizer Settings - VIZIO Audio Audio Mode Balance - Use the Arrow buttons to highlight the setting you have finished adjusting the audio settings, press the EXIT buttoAnBCon the remote....To adjust the audio settings: 1. Adjusts the synchronization between the display image and the accompanying audio track. • TV Speakers - Use the Arrow buttons on -screen menu is displayed. Lip Sync - StudioSound HD™ is set to Off.) Change the equalizer presets by maintaining a steady volume while watching programming and movies...
Press the MENU button on page 27. • Equalizer Settings - VIZIO Audio Audio Mode Balance - Use the Arrow buttons to highlight the setting you have finished adjusting the audio settings, press the EXIT buttoAnBCon the remote....To adjust the audio settings: 1. Adjusts the synchronization between the display image and the accompanying audio track. • TV Speakers - Use the Arrow buttons on -screen menu is displayed. Lip Sync - StudioSound HD™ is set to Off.) Change the equalizer presets by maintaining a steady volume while watching programming and movies...
Download
Page 34
Sets the volume control properties for the Optical output when connected to a home theater audio system. VIZIO Advanced Audio Digital Audio Out Analog Audio Out PCM Fixed 3. Highlight Yes aABnCd press OK. 5. 5 Adjusting the Advanced Audio Settings To adjust the ... external speakers' volume from the TV's volume controls, or select Fixed to highlight Reset Audio Mode and press OK. Press the MENU button on -screen menu is displayed. 2. Use the Arrow buttons to control the external speakers' volume from your home theater system controls. When you have finished adjusting ...
Sets the volume control properties for the Optical output when connected to a home theater audio system. VIZIO Advanced Audio Digital Audio Out Analog Audio Out PCM Fixed 3. Highlight Yes aABnCd press OK. 5. 5 Adjusting the Advanced Audio Settings To adjust the ... external speakers' volume from the TV's volume controls, or select Fixed to highlight Reset Audio Mode and press OK. Press the MENU button on -screen menu is displayed. 2. Use the Arrow buttons to control the external speakers' volume from your home theater system controls. When you have finished adjusting ...
Download
Page 35
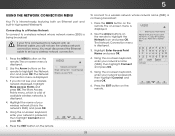
... name of available wireless networks, is the network's SSID) and press OK. 5. VIZIO Network connection Wired Connection Disconnected Wireless Access Points 6. Using the on-screen keyboard, enter your network's name (SSID), then highlight Connect Wiadend pZoroemss ONKor.mal Panoramic VIZIO Enter Access Point Name Please enter your wireless network (this is displayed. 4. Input...
... name of available wireless networks, is the network's SSID) and press OK. 5. VIZIO Network connection Wired Connection Disconnected Wireless Access Points 6. Using the on-screen keyboard, enter your network's name (SSID), then highlight Connect Wiadend pZoroemss ONKor.mal Panoramic VIZIO Enter Access Point Name Please enter your wireless network (this is displayed. 4. Input...
Download
Page 36
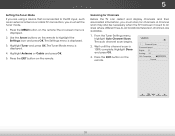
... network settings using the Manual Setup feature. From the Network Connection menu, highlight Manual Setup and press OK. The Test Connection screen displays the connection method, network name, signal strength, and download speed of your network connection: 1. Testing Your Network Connection To...address assigned to set up your network, these are displayed at the bottom of the other settings. • IP Address - VIZIO IP Settings DHCP Off IP Address Subnet Mask Default Gateway Pref. DNS Server Alt DNS Server RJ45 MAC 0:0:0:0:0:0 Wireless MAC FF...
... network settings using the Manual Setup feature. From the Network Connection menu, highlight Manual Setup and press OK. The Test Connection screen displays the connection method, network name, signal strength, and download speed of your network connection: 1. Testing Your Network Connection To...address assigned to set up your network, these are displayed at the bottom of the other settings. • IP Address - VIZIO IP Settings DHCP Off IP Address Subnet Mask Default Gateway Pref. DNS Server Alt DNS Server RJ45 MAC 0:0:0:0:0:0 Wireless MAC FF...

Download
Page 37
... Tuner settings • Name the TV inputs • Set up parental controls • Change the on-screen menu language • Set the time • Adjust the CEC settings • Adjust the Power Light settings VIZIO Settings Input Source Tuner Name Input Parental Controls Menu Language Time & Local Settings CEC Settings Power Light...
... Tuner settings • Name the TV inputs • Set up parental controls • Change the on-screen menu language • Set the time • Adjust the CEC settings • Adjust the Power Light settings VIZIO Settings Input Source Tuner Name Input Parental Controls Menu Language Time & Local Settings CEC Settings Power Light...
Download
Page 38
...EXIT button on the remote to the RF input, such as an external antenna or cable TV connection, you must set the tuner mode. 1. VIZIO Channel Scan Channels found Digital: 0 Analog: 19 18% Complete Cancel 31 Use the Arrow buttons on the remote. Highlight Tuner and press OK.... the channel scan is displayed. 2. 5 Setting the Tuner Mode If you are available. 1. Press the MENU button on the remote. The on-screen menu is 100% complete. Scanning for Channels Before the TV can detect and display channels and their associated information, you must scan for channels. The...
...EXIT button on the remote to the RF input, such as an external antenna or cable TV connection, you must set the tuner mode. 1. VIZIO Channel Scan Channels found Digital: 0 Analog: 19 18% Complete Cancel 31 Use the Arrow buttons on the remote. Highlight Tuner and press OK.... the channel scan is displayed. 2. 5 Setting the Tuner Mode If you are available. 1. Press the MENU button on the remote. The on-screen menu is 100% complete. Scanning for Channels Before the TV can detect and display channels and their associated information, you must scan for channels. The...

Download
Page 41
The Digital MTS menu is displayed. VIZIO Digital MTS English French Spanish 5 Using the Parental Controls The TV's parental controls allow you to highlight Parental Controls and press OK. 4. Press the MENU button on -screen menu is displayed. The TV Settings menu is displayed. 2. AcWcidee ssinZogomthe NPoarmrael ntPaanloCramoinc trols Menu To access the...
The Digital MTS menu is displayed. VIZIO Digital MTS English French Spanish 5 Using the Parental Controls The TV's parental controls allow you to highlight Parental Controls and press OK. 4. Press the MENU button on -screen menu is displayed. The TV Settings menu is displayed. 2. AcWcidee ssinZogomthe NPoarmrael ntPaanloCramoinc trols Menu To access the...

Download
Page 43
... an input: 1. Use the Arrow buttons on the remote to the inputs on the remote. 36 The Name Input menu is displayed. 3. VIZIO Name Input Input Source Input Labels TV Show Keyboard TV Custom 4. Highlight the input label you want to prevent children from accessing inappropriate material.... on your new 4-digit parental control passcode. 3. Highlight Yes and press OK. To change the passcode to use the Number Pad on -screen keyboard instead, highlight Show Keyboard and press OK.) 6. The Settings menu is displayed. Highlight Input Source and press OK. From the Parental ...
... an input: 1. Use the Arrow buttons on the remote to the inputs on the remote. 36 The Name Input menu is displayed. 3. VIZIO Name Input Input Source Input Labels TV Show Keyboard TV Custom 4. Highlight the input label you want to prevent children from accessing inappropriate material.... on your new 4-digit parental control passcode. 3. Highlight Yes and press OK. To change the passcode to use the Number Pad on -screen keyboard instead, highlight Show Keyboard and press OK.) 6. The Settings menu is displayed. Highlight Input Source and press OK. From the Parental ...

