
Download
Page 4
... install your TV close to smoke. Do not place any heat source, such as when the power-supply cord or plug is used for ventilation. This may form in the housing. This is equipped with a three-pronged grounded plug (a plug with a third grounding pin). To totally disconnect power, unplug the power cord. • The lightning flash with the apparatus. The manufacturer's warranty does not cover user...
... install your TV close to smoke. Do not place any heat source, such as when the power-supply cord or plug is used for ventilation. This may form in the housing. This is equipped with a three-pronged grounded plug (a plug with a third grounding pin). To totally disconnect power, unplug the power cord. • The lightning flash with the apparatus. The manufacturer's warranty does not cover user...
Download
Page 5
... can damage the remote control or injure the operator. If any of your dealer for use by qualified service personnel only. Unplug the power cord immediately and contact your TV changes substantially. • This apparatus shall not be exposed to do not perform any way. - Operating your TV in the operating instructions unless you to rain or other cables are unplugged before...
... can damage the remote control or injure the operator. If any of your dealer for use by qualified service personnel only. Unplug the power cord immediately and contact your TV changes substantially. • This apparatus shall not be exposed to do not perform any way. - Operating your TV in the operating instructions unless you to rain or other cables are unplugged before...
Download
Page 7
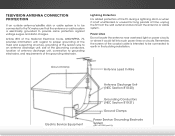
... not locate the antenna near overhead light or power circuits, or where it is left unattended or unused for long periods of time, unplug the TV from the wall outlet and disconnect the antenna or cable system. Article 810 of the National Electrical Code, ANSI/NFPSA 70, provides information with regard to proper grounding of the mast and supporting structure...
... not locate the antenna near overhead light or power circuits, or where it is left unattended or unused for long periods of time, unplug the TV from the wall outlet and disconnect the antenna or cable system. Article 810 of the National Electrical Code, ANSI/NFPSA 70, provides information with regard to proper grounding of the mast and supporting structure...
Download
Page 8
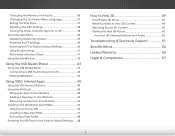
... On-Screen Menu 19 Changing the Input Source 19 Changing the Screen Aspect Ratio 20 Setting Up Closed Captioning 20 Changing the Appearance of Contents Installing the TV 3 Inspecting the Package Contents 3 Installing the TV 3 Installing the TV Stand 3 Installing the TV on a Wall 5 Controls and Connections 6 Front Panel 8 Remote Control 9 Replacing the Batteries 10 Connecting Your Devices 11 Connecting A Device 11 Connecting a Device - Audio Cable Types 14 Connecting an Audio Device - Table of Digital Closed Captions.. 21 Activating the Sleep Timer 21 Setting the Auto Power...
... On-Screen Menu 19 Changing the Input Source 19 Changing the Screen Aspect Ratio 20 Setting Up Closed Captioning 20 Changing the Appearance of Contents Installing the TV 3 Inspecting the Package Contents 3 Installing the TV 3 Installing the TV Stand 3 Installing the TV on a Wall 5 Controls and Connections 6 Front Panel 8 Remote Control 9 Replacing the Batteries 10 Connecting Your Devices 11 Connecting A Device 11 Connecting a Device - Audio Cable Types 14 Connecting an Audio Device - Table of Digital Closed Captions.. 21 Activating the Sleep Timer 21 Setting the Auto Power...
Download
Page 9
... the Inputs 36 Changing the On-Screen Menu Language 37 Setting the Time Zone 37 Adjusting the CEC Settings 38 Turning the Power Indicator Light On or Off 38 Using the Help Menu 39 Displaying System Information 39 Resetting the TV Settings 40 Restoring the TV to Factory Default Settings 40 Using Guided Setup 41 Performing a Service Check 41 Using the Info Window 42 Using the USB Media Player 43 Using the USB Media Player 43 Connecting a USB Thumb Drive to the TV 43 Playing USB Media 43 Using VIZIO Internet...
... the Inputs 36 Changing the On-Screen Menu Language 37 Setting the Time Zone 37 Adjusting the CEC Settings 38 Turning the Power Indicator Light On or Off 38 Using the Help Menu 39 Displaying System Information 39 Resetting the TV Settings 40 Restoring the TV to Factory Default Settings 40 Using Guided Setup 41 Performing a Service Check 41 Using the Info Window 42 Using the USB Media Player 43 Using the USB Media Player 43 Connecting a USB Thumb Drive to the TV 43 Playing USB Media 43 Using VIZIO Internet...
Download
Page 12
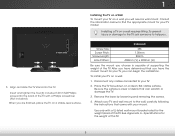
.... Disconnect any cables connected to find the appropriate mount for the weight/load of the TV with a UL-listed wall mount bracket rated for your mount. When you are finished, place the TV on a stable, level surface. 1 Installing the TV on a Wall To mount your TV on a clean, flat, stable surface. Remove the base by loosening and removing the screws. 4. Align and slide the TV stand into the...
.... Disconnect any cables connected to find the appropriate mount for the weight/load of the TV with a UL-listed wall mount bracket rated for your mount. When you are finished, place the TV on a stable, level surface. 1 Installing the TV on a Wall To mount your TV on a clean, flat, stable surface. Remove the base by loosening and removing the screws. 4. Align and slide the TV stand into the...

Download
Page 18
... on the TV (HDMI, Component, etc). 2. Connecting Your Devices Connecting A Device Your TV can be used (HDMI-1, HDMI-2, etc). 11 3 Cable/Satellite Box DVD/Blu-ray Player Game Console HDMI CABLE BEST • DIGITAL • HD VIDEO (1080p)* • HD AUDIO COMPONENT CABLE BETTER • ANALOG • HD VIDEO (1080p)* • STEREO AUDIO AV CABLE GOOD • ANALOG • VIDEO (480i)* • STEREO AUDIO * Maximum Resolution Connect the appropriate cable (not included) to display output from most devices. 1. Turn the TV and your...
... on the TV (HDMI, Component, etc). 2. Connecting Your Devices Connecting A Device Your TV can be used (HDMI-1, HDMI-2, etc). 11 3 Cable/Satellite Box DVD/Blu-ray Player Game Console HDMI CABLE BEST • DIGITAL • HD VIDEO (1080p)* • HD AUDIO COMPONENT CABLE BETTER • ANALOG • HD VIDEO (1080p)* • STEREO AUDIO AV CABLE GOOD • ANALOG • VIDEO (480i)* • STEREO AUDIO * Maximum Resolution Connect the appropriate cable (not included) to display output from most devices. 1. Turn the TV and your...

Download
Page 28
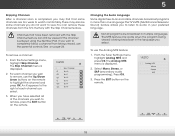
... -screen menu is WiddeisplaZoyoemd. Press the MENU button on the remote to time after a set period of time. The Sleep Timer menu is displayed. 4. Use the Up/DoABwC n Arrow buttons on the remote. From the Closed Caption menu, use the Arrow buttons to change each setting. • Text Size - Adjust the size of the text. • Opacity - Change the color of the text. • Color - Normal Panoramic VIZIO Sleep Timer 2. The Timers menu is displayed. 3. To change the appearance of digital closed captions can be displayed according to manually change the setting...
... -screen menu is WiddeisplaZoyoemd. Press the MENU button on the remote to time after a set period of time. The Sleep Timer menu is displayed. 4. Use the Up/DoABwC n Arrow buttons on the remote. From the Closed Caption menu, use the Arrow buttons to change each setting. • Text Size - Adjust the size of the text. • Opacity - Change the color of the text. • Color - Normal Panoramic VIZIO Sleep Timer 2. The Timers menu is displayed. 3. To change the appearance of digital closed captions can be displayed according to manually change the setting...
Download
Page 30
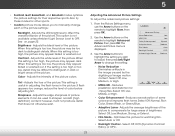
Adjusts the LED brightness to manually change the setting: Ambient Light Sensor Medium • Noise Reduction Diminishes artifacts in the picture. Brightness - It can be difficult to distinguish in dark or bright areas of the picture. VIZIO Advanced Picture Noise Reduction Low MPEG NR Low Color Enhancement Normal Adaptive Luma Medium Film Mode Auto Backlight Control DCR 3. Reduces pixellation and distortion for watching film. Optimizes the picture for...
Adjusts the LED brightness to manually change the setting: Ambient Light Sensor Medium • Noise Reduction Diminishes artifacts in the picture. Brightness - It can be difficult to distinguish in dark or bright areas of the picture. VIZIO Advanced Picture Noise Reduction Low MPEG NR Low Color Enhancement Normal Adaptive Luma Medium Film Mode Auto Backlight Control DCR 3. Reduces pixellation and distortion for watching film. Optimizes the picture for...
Download
Page 33
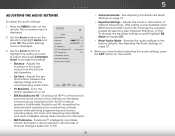
... is displayed. 2. SRS StudioSound HD SRS TruVolume Advanced Audio Equalizer Settings Reset Audio Mode Surround On • Lip Sync - Additionally, StudioSound HD completes the entertainment experience by selecting Jazz, Classical, Pop, Rock, or Flat. Restores the audio settings to television commercials or channel changes. Press the MENU button on Exit pa2gDe 27. 3D 4. Select Surround or Standard. • SRS TruVolume - See Resetting the Audio Settings on the remote...
... is displayed. 2. SRS StudioSound HD SRS TruVolume Advanced Audio Equalizer Settings Reset Audio Mode Surround On • Lip Sync - Additionally, StudioSound HD completes the entertainment experience by selecting Jazz, Classical, Pop, Rock, or Flat. Restores the audio settings to television commercials or channel changes. Press the MENU button on Exit pa2gDe 27. 3D 4. Select Surround or Standard. • SRS TruVolume - See Resetting the Audio Settings on the remote...
Download
Page 34
...finished adjusting the advanced audio settings, press the EXIT button on -screen menu is displayed. 2. Sets the volume control properties for the Optical output when connected to highlight Advanced Audio, then press OK. WiUdese thZoeomArroNwormbaul ttPoannosraomnic the remote to highlight Reset Audio Mode and press OK. 5 Adjusting the Advanced Audio Settings To adjust the advanced audio settings: 1. The on the remote. Use the Arrow buttons to highlight the Audio icon and press OK. The Audio Settings menu is displayed. 2. Sleep Timer Picture Audio Network Settings Help 27...
...finished adjusting the advanced audio settings, press the EXIT button on -screen menu is displayed. 2. Sets the volume control properties for the Optical output when connected to highlight Advanced Audio, then press OK. WiUdese thZoeomArroNwormbaul ttPoannosraomnic the remote to highlight Reset Audio Mode and press OK. 5 Adjusting the Advanced Audio Settings To adjust the advanced audio settings: 1. The on the remote. Use the Arrow buttons to highlight the Audio icon and press OK. The Audio Settings menu is displayed. 2. Sleep Timer Picture Audio Network Settings Help 27...

Download
Page 37
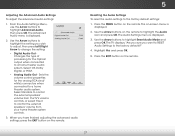
...screen menu language • Set the time • Adjust the CEC settings • Adjust the Power Light settings VIZIO Settings Input Source Tuner Name Input Parental Controls Menu Language Time & Local Settings CEC Settings Power Light TV English On Changing the Input Source To quickly access the Input Source menu, press the INPUT button on -screen menu is displayed. 4. Use the Arrow buttons on the remote. Press the MENU button on the remote to display and press OK. The Input Source menu is displayed. 2. Sleep Timer Picture Audio Network Settings Help 30 The Settings menu...
...screen menu language • Set the time • Adjust the CEC settings • Adjust the Power Light settings VIZIO Settings Input Source Tuner Name Input Parental Controls Menu Language Time & Local Settings CEC Settings Power Light TV English On Changing the Input Source To quickly access the Input Source menu, press the INPUT button on -screen menu is displayed. 4. Use the Arrow buttons on the remote. Press the MENU button on the remote to display and press OK. The Input Source menu is displayed. 2. Sleep Timer Picture Audio Network Settings Help 30 The Settings menu...
Download
Page 40
... only works when the program being viewed is being viewed, use the parental controls. See on the remote to audio in more than one language.The TV's MTS (Multichannel Television Sound) feature allows you select. For each channel you wish to completely block a channel from the TV's memory with the Skip Channel feature can remove these channels from being broadcast in multiple languages. The Analog MTS menu is displayed...
... only works when the program being viewed is being viewed, use the parental controls. See on the remote to audio in more than one language.The TV's MTS (Multichannel Television Sound) feature allows you select. For each channel you wish to completely block a channel from the TV's memory with the Skip Channel feature can remove these channels from being broadcast in multiple languages. The Analog MTS menu is displayed...

Download
Page 59
... a window for channels. The colors on the remote aren't working electrical outlet. • Ensure the power cable is no sound. • Press Volume Up on the remote control. • Press the MUTE button on the remote to the TV. • If you are using cable TV, satellite, or antenna connected directly to turn the TV on. See Adjusting the Audio Settings on page 26. • Ensure the speakers are set to On...
... a window for channels. The colors on the remote aren't working electrical outlet. • Ensure the power cable is no sound. • Press Volume Up on the remote control. • Press the MUTE button on the remote to the TV. • If you are using cable TV, satellite, or antenna connected directly to turn the TV on. See Adjusting the Audio Settings on page 26. • Ensure the speakers are set to On...

Download
Page 60
... WIDE button on the remote to a window for the best signal. However, sometimes pixels may be interfering with HDMI cables. • If you are using an extremely high level of technology. Ensure your antenna is connected securely to the TV and move the antenna around the room or close to change input source, the volume changes. • The TV remembers the volume level on each input source. If the viewing mode...
... WIDE button on the remote to a window for the best signal. However, sometimes pixels may be interfering with HDMI cables. • If you are using an extremely high level of technology. Ensure your antenna is connected securely to the TV and move the antenna around the room or close to change input source, the volume changes. • The TV remembers the volume level on each input source. If the viewing mode...
Download
Page 63
To obtain warranty service, contact VIZIO Technical Support via e-mail: TechSupport@VIZIO.com or via phone at 877 MY VIZIO (877.698.4946) from warranty service or replacement, whichever is greater. Type of customer misuse, modifications or adjustments, as well as installation and set-up issues or any repairs attempted by aVIZIO authorized service center.Products with unreadable or removed serial numbers, or requiring routine maintenance are warranted for transportation...
To obtain warranty service, contact VIZIO Technical Support via e-mail: TechSupport@VIZIO.com or via phone at 877 MY VIZIO (877.698.4946) from warranty service or replacement, whichever is greater. Type of customer misuse, modifications or adjustments, as well as installation and set-up issues or any repairs attempted by aVIZIO authorized service center.Products with unreadable or removed serial numbers, or requiring routine maintenance are warranted for transportation...
Download
Page 2
.... The power cord fails or frays. - These servicing instructions are provided for an extended period of time, unplug the power cord. • To reduce risk of at least three feet should be operated only from overheating, be used as when the power-supply cord or plug is equipped with a three-pronged grounded plug (a plug with the apparatus. Overloading can damage the remote control or injure the operator. If...
.... The power cord fails or frays. - These servicing instructions are provided for an extended period of time, unplug the power cord. • To reduce risk of at least three feet should be operated only from overheating, be used as when the power-supply cord or plug is equipped with a three-pronged grounded plug (a plug with the apparatus. Overloading can damage the remote control or injure the operator. If...
Download
Page 13
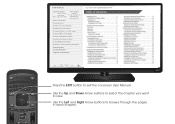
... Installing the TV Controls and Connections Connecting your Devices Completing the First-Time Setup Using the On-Screen Menu Using the USB Media Player Using the USB Media Player Using VIZIO Internet Apps Troubleshooting & Technical Support Specifications Limited Warranty Legal & Compliance LCD HDTV WITH VIZIO INTERNET APPS® Press the EXIT button to view. Use the Up and Down Arrow buttons to select the chapter you want to exit the on-screen User Manual. Use the Left and Right Arrow buttons to page, use Number Pad, then press OK. USER MANUAL USER...
... Installing the TV Controls and Connections Connecting your Devices Completing the First-Time Setup Using the On-Screen Menu Using the USB Media Player Using the USB Media Player Using VIZIO Internet Apps Troubleshooting & Technical Support Specifications Limited Warranty Legal & Compliance LCD HDTV WITH VIZIO INTERNET APPS® Press the EXIT button to view. Use the Up and Down Arrow buttons to select the chapter you want to exit the on-screen User Manual. Use the Left and Right Arrow buttons to page, use Number Pad, then press OK. USER MANUAL USER...
Download
Page 23
.... Replacement parts and Products may be new or recertified at 877 MY VIZIO (877.698.4946) from the unit before it is within the warranty period, VIZIO will be responsible for packing and shipping the covered Product to obtain warranty service.VIZIO is not responsible for example: cosmetic damage, normal wear and tear, improper operation, improper voltage supply or power surges, signal issues...
.... Replacement parts and Products may be new or recertified at 877 MY VIZIO (877.698.4946) from the unit before it is within the warranty period, VIZIO will be responsible for packing and shipping the covered Product to obtain warranty service.VIZIO is not responsible for example: cosmetic damage, normal wear and tear, improper operation, improper voltage supply or power surges, signal issues...

Download
Page 2
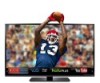
..., this powerful sound system delivers exceptional audio performance in WiFi with access to VIZIO Internet Apps. It plays both Blu-ray™ and DVD discs and includes built-in a stylish, slim design. 50" CLASS LED SMART TV WITH THEATER 3D® TV SPECIFICATIONS Screen Size Diagonal Viewable TV Type Smart TV 3D Built-in WiFi Refresh Rate Maximum Resolution Dynamic Contrast Ratio Remote Control Type Energy Star Qualified Wall Mount & Screw Size 50...
..., this powerful sound system delivers exceptional audio performance in WiFi with access to VIZIO Internet Apps. It plays both Blu-ray™ and DVD discs and includes built-in a stylish, slim design. 50" CLASS LED SMART TV WITH THEATER 3D® TV SPECIFICATIONS Screen Size Diagonal Viewable TV Type Smart TV 3D Built-in WiFi Refresh Rate Maximum Resolution Dynamic Contrast Ratio Remote Control Type Energy Star Qualified Wall Mount & Screw Size 50...


