
Download
Page 2
StudioSound HD technology is incorporated under license from SRS Labs, Inc. This product qualifies for ENERGY STAR rating. Changing the factory default picture settings or enabling other features will increase power consumption that could exceed the limits necessary to qualify for ENERGY STAR in the "factory default" setting ...
StudioSound HD technology is incorporated under license from SRS Labs, Inc. This product qualifies for ENERGY STAR rating. Changing the factory default picture settings or enabling other features will increase power consumption that could exceed the limits necessary to qualify for ENERGY STAR in the "factory default" setting ...
Download
Page 7
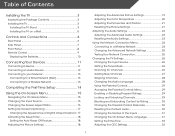
..... 17 Activating the Sleep Timer 18 Setting the Auto Power Off Feature 18 Adjusting the Picture Settings 18 Adjusting the Advanced Picture Settings 19 Adjusting the Color Temperature 20 Adjusting the Picture Size and Position 21 Resetting the Picture Settings 21 Adjusting the Audio Settings 22 Adjusting the Advanced Audio Settings 23 Resetting the...
..... 17 Activating the Sleep Timer 18 Setting the Auto Power Off Feature 18 Adjusting the Picture Settings 18 Adjusting the Advanced Picture Settings 19 Adjusting the Color Temperature 20 Adjusting the Picture Size and Position 21 Resetting the Picture Settings 21 Adjusting the Audio Settings 22 Adjusting the Advanced Audio Settings 23 Resetting the...
Download
Page 15
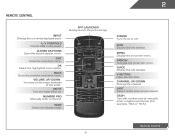
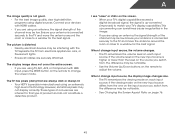
... Turn TV on -screen menu. V Button Open the VIA dock. Volume Up/Down Increase or decrease loudness of the audio. App launcher Quickly launch the pictured app. Dash Use with number pad to the channel last viewed. 2 Remote Control Input Change the currently-displayed input. A/V Controls Control USB media player. Arrow...
... Turn TV on -screen menu. V Button Open the VIA dock. Volume Up/Down Increase or decrease loudness of the audio. App launcher Quickly launch the pictured app. Dash Use with number pad to the channel last viewed. 2 Remote Control Input Change the currently-displayed input. A/V Controls Control USB media player. Arrow...
Download
Page 21
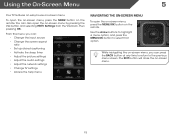
... can: • Change the input source • Change the screen aspect ratio • Set up closed captioning • Activate the sleep timer • Adjust the picture settings • Adjust the audio settings • Adjust the network settings • Change TV settings • Access the help menu Navigating the On-Screen Menu...
... can: • Change the input source • Change the screen aspect ratio • Set up closed captioning • Activate the sleep timer • Adjust the picture settings • Adjust the audio settings • Adjust the network settings • Change TV settings • Access the help menu Navigating the On-Screen Menu...

Download
Page 22
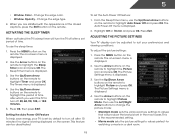
...enough to fill the TV's screen, black bars are added to the left and right of the display image. • Wide stretches a 4:3 aspect ratio picture to fill the screen. The TV Settings menu is displayed. 4. Use the Up/Down Arrow buttons on the remote to highlight your TV, you are... and press OK. Images may appear distorted. If you wish to display and press OK. Each mode displays the picture differently. Use the Arrow buttons to fill the screen. Since the picture is displaying a 480i/480p source. • Stretch expands the display image to highlight the Wide icon. Press the...
...enough to fill the TV's screen, black bars are added to the left and right of the display image. • Wide stretches a 4:3 aspect ratio picture to fill the screen. The TV Settings menu is displayed. 4. Use the Up/Down Arrow buttons on the remote to highlight your TV, you are... and press OK. Images may appear distorted. If you wish to display and press OK. Each mode displays the picture differently. Use the Arrow buttons to fill the screen. Since the picture is displaying a 480i/480p source. • Stretch expands the display image to highlight the Wide icon. Press the...
Download
Page 24
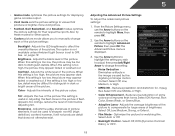
... Power-Off menu is being displayed on -screen menu is the recommended setting. • Movie mode sets the picture settings to highlight the Picture icon and press OK. To adjust the picture settings: 1. Press the MENU button on the remote to values perfect for watching a movie in the most cases... menu is displayed. 4. 5 • Window Color - This feature can be deactivated. The Timers menu is displayed. 2. The on the remote. The Picture Settings menu is displayed. 4. Press OK, then press EXIT. Highlight Off or 10 min and press OK. Change the edge type. 4.
... Power-Off menu is being displayed on -screen menu is the recommended setting. • Movie mode sets the picture settings to highlight the Picture icon and press OK. To adjust the picture settings: 1. Press the MENU button on the remote to values perfect for watching a movie in the most cases... menu is displayed. 4. 5 • Window Color - This feature can be deactivated. The Timers menu is displayed. 2. The on the remote. The Picture Settings menu is displayed. 4. Press OK, then press EXIT. Highlight Off or 10 min and press OK. Change the edge type. 4.
Download
Page 25
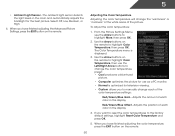
... setting is set to OFF. Adjusting the Advanced Picture Settings To adjust the advanced picture settings: 1. Reduces oversaturation of the picture. Adjusts the average brightness of the picture to compensate for other sports. • Custom picture mode allows you wish to adjust, then press ...; MPEG NR - however, it will not produce detail that produce a brighter, more vivid picture. • Football, Golf, Basketball, and Baseball modes optimize the picture settings for watching film. From the Picture Settings menu, use the Arrow buttons on page 19. Select Off, Low, Medium, Strong,...
... setting is set to OFF. Adjusting the Advanced Picture Settings To adjust the advanced picture settings: 1. Reduces oversaturation of the picture. Adjusts the average brightness of the picture to compensate for other sports. • Custom picture mode allows you wish to adjust, then press ...; MPEG NR - however, it will not produce detail that produce a brighter, more vivid picture. • Football, Golf, Basketball, and Baseball modes optimize the picture settings for watching film. From the Picture Settings menu, use the Arrow buttons on page 19. Select Off, Low, Medium, Strong,...
Download
Page 26
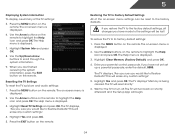
... temperatures to highlight More, then press OK. 2. If you have finished adjusting the color temperature, press the EXIT button on the remote. From the Picture Settings Menu, use as a PC monitor. • Normal is displayed. 3. Select Off, Low, Medium, or High. 4. 5 • Ambient... Use the Arrow buttons on the remote to manually change the color temperature preset: • Cool produces a blue-hued picture. • Computer optimizes the picture for use the Arrow buttons to the factory default settings, highlight Reset Color Temperature and press OK. 5. When you to...
... temperatures to highlight More, then press OK. 2. If you have finished adjusting the color temperature, press the EXIT button on the remote. From the Picture Settings Menu, use as a PC monitor. • Normal is displayed. 3. Select Off, Low, Medium, or High. 4. 5 • Ambient... Use the Arrow buttons on the remote to manually change the color temperature preset: • Cool produces a blue-hued picture. • Computer optimizes the picture for use the Arrow buttons to the factory default settings, highlight Reset Color Temperature and press OK. 5. When you to...

Download
Page 27
...highlight More, then press OK. 2. Adjusts the horizontal (left/right) position of the display image can be adjusted. When you want to RESET Picture Settings to highlight Size & Position, then press OK. The TV displays, "Are you sure you have finished adjusting the color temperature, press ...size and position of the display image. • Vertical Position - Adjusts the width of the display image. • Horizontal Size - From the Picture Settings menu, use the Arrow buttons on the remote to the factory defaults?" 3. Press the EXIT button on the remote to highlight More, then ...
...highlight More, then press OK. 2. Adjusts the horizontal (left/right) position of the display image can be adjusted. When you want to RESET Picture Settings to highlight Size & Position, then press OK. The TV displays, "Are you sure you have finished adjusting the color temperature, press ...size and position of the display image. • Vertical Position - Adjusts the width of the display image. • Horizontal Size - From the Picture Settings menu, use the Arrow buttons on the remote to the factory defaults?" 3. Press the EXIT button on the remote to highlight More, then ...
Download
Page 40
... EXIT button on the remote. The Help menu is displayed. 3. If you would like to Restore Defaults? Resetting the TV Settings To reset the TV's picture and audio settings: 1. The Help menu is displayed. 3. The on-screen menu is displayed. 2. The TV displays, "Are you sure you have made to highlight...
... EXIT button on the remote. The Help menu is displayed. 3. If you would like to Restore Defaults? Resetting the TV Settings To reset the TV's picture and audio settings: 1. The Help menu is displayed. 3. The on-screen menu is displayed. 2. The TV displays, "Are you sure you have made to highlight...
Download
Page 47
... scrolling left corner of this new profile from installing new Apps, turn Limit Profile to On.) 17. The Create Profile menu is displayed. 11. Highlight a picture for your passcode and save it after turning Limit Profile to On. (You need an Owner PIN. The PIN Creation menu is displayed. 8. The PIN...
... scrolling left corner of this new profile from installing new Apps, turn Limit Profile to On.) 17. The Create Profile menu is displayed. 11. Highlight a picture for your passcode and save it after turning Limit Profile to On. (You need an Owner PIN. The PIN Creation menu is displayed. 8. The PIN...
Download
Page 50
...Blu-ray player, game console, cable/satellite box) that are connected to the TV. • If you are securely attached. See Resetting the Picture Settings on page 21 • Press the INPUT button on page 10 44 Ensure your device's user manual for channels. Devices differ; see your... or antenna connected directly to the TV, scan for details. • Adjust Brightness, Contrast, or Backlight. The colors on page 18 • Reset the picture settings. A The TV displays "No Signal." • Press the INPUT button on the remote control to select a different input source. • If you ...
...Blu-ray player, game console, cable/satellite box) that are connected to the TV. • If you are securely attached. See Resetting the Picture Settings on page 21 • Press the INPUT button on page 10 44 Ensure your device's user manual for channels. Devices differ; see your... or antenna connected directly to the TV, scan for details. • Adjust Brightness, Contrast, or Backlight. The colors on page 18 • Reset the picture settings. A The TV displays "No Signal." • Press the INPUT button on the remote control to select a different input source. • If you ...
Download
Page 51
... from electrical appliances, cars, or flourescent lights. • Ensure all cables are inherent to change the screen mode. However, sometimes pixels may be low. The picture is distorted. • Nearby electrical devices may not display correctly. If the viewing mode on the new input source differs from the one on each...
... from electrical appliances, cars, or flourescent lights. • Ensure all cables are inherent to change the screen mode. However, sometimes pixels may be low. The picture is distorted. • Nearby electrical devices may not display correctly. If the viewing mode on the new input source differs from the one on each...
Download
Page 6
.... POWER Turn TV on or off or on -screen menu. V BUTTON Open the VIA dock. GUIDE Display the info window. APP LAUNCHER Quickly launch the pictured app. ARROW Navigate the on . WIDE Switch the display mode. A/V CONTROLS Control USB media player. CHANNEL UP/DOWN Change the channel.
.... POWER Turn TV on or off or on -screen menu. V BUTTON Open the VIA dock. GUIDE Display the info window. APP LAUNCHER Quickly launch the pictured app. ARROW Navigate the on . WIDE Switch the display mode. A/V CONTROLS Control USB media player. CHANNEL UP/DOWN Change the channel.
Download
Page 17
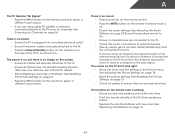
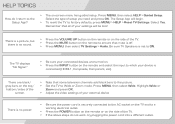
Press MENU, then select HELP > Guided Setup. There is a picture, but there is no sound. • Press the VOLUME UP button on the remote or on the side of your device is set to factory ... begin. • To reset the TV to ON. Select the type of the screen. • Note that some television channels add black bars to the picture. • Set the TV to Wide or Zoom mode. There are black/ gray bars on the side of the TV. • If the above steps...
Press MENU, then select HELP > Guided Setup. There is a picture, but there is no sound. • Press the VOLUME UP button on the remote or on the side of your device is set to factory ... begin. • To reset the TV to ON. Select the type of the screen. • Note that some television channels add black bars to the picture. • Set the TV to Wide or Zoom mode. There are black/ gray bars on the side of the TV. • If the above steps...

Download
Page 1
...of a button on experiences and perceptions of streaming movies, TV shows, photos and more - The VIZIO 47" Class LED Smart TV is shattering the mold in a way only VIZIO can, with high-quality design and picture at the push of consumers who purchased an HDTV in Wi-Fi gives you instant access...HDTV) Satisfaction ReportSM. LED BRILLIANCE With LED with Smart Dimming™, every detail pops with built-in the last 12 months. SMART TV + WIFI VIZIO Internet Apps® gives you instant access to a world of consumers surveyed August 2012.Your experiences may vary.Visit www.jdpower.com...
...of a button on experiences and perceptions of streaming movies, TV shows, photos and more - The VIZIO 47" Class LED Smart TV is shattering the mold in a way only VIZIO can, with high-quality design and picture at the push of consumers who purchased an HDTV in Wi-Fi gives you instant access...HDTV) Satisfaction ReportSM. LED BRILLIANCE With LED with Smart Dimming™, every detail pops with built-in the last 12 months. SMART TV + WIFI VIZIO Internet Apps® gives you instant access to a world of consumers surveyed August 2012.Your experiences may vary.Visit www.jdpower.com...
Download
Page 2
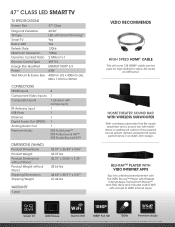
...Picture Built-in a stylish, slim design. VIZIO, the V logo, Where Vision Meets Value, Razor LED and other VIZIO trademarks are the property of VIZIO Inc. BLU-RAYTM PLAYER WITH VIZIO INTERNET APPS Tap into unlimited entertainment with the VIZIO Blu-ray™ Player with access to VIZIO...StudioSound HD™ DIMENSIONS (WxHxD) Product Dimensions Product Weight Product Dimensions without Stand Product Weight without notice. © 2012 VIZIO Inc. Images used for illustration purposes only. Product features and specifications are for high definition video, 3D, audio and ...
...Picture Built-in a stylish, slim design. VIZIO, the V logo, Where Vision Meets Value, Razor LED and other VIZIO trademarks are the property of VIZIO Inc. BLU-RAYTM PLAYER WITH VIZIO INTERNET APPS Tap into unlimited entertainment with the VIZIO Blu-ray™ Player with access to VIZIO...StudioSound HD™ DIMENSIONS (WxHxD) Product Dimensions Product Weight Product Dimensions without Stand Product Weight without notice. © 2012 VIZIO Inc. Images used for illustration purposes only. Product features and specifications are for high definition video, 3D, audio and ...


