
User Manual
Page 4
... electric shock or component damage, switch off the power before turning on your TV to avoid causing fire, electric shock, or component damage. • A distance of at plugs, convenience receptacles, and the point where they exit from the apparatus. • Only use attachments/accessories specified by the manufacturer. • Use only with the cart, stand, tripod, bracket, or table specified by...
... electric shock or component damage, switch off the power before turning on your TV to avoid causing fire, electric shock, or component damage. • A distance of at plugs, convenience receptacles, and the point where they exit from the apparatus. • Only use attachments/accessories specified by the manufacturer. • Use only with the cart, stand, tripod, bracket, or table specified by...
User Manual
Page 5
... or electric shock. • The wall socket should be installed near your TV and easily accessible. • Only power of time. E470VLE • Do not overload power strips and extension cords. Ensure that may damage the wires inside the cord and cause fire or electric shock. Unplug the power cord immediately and contact your TV, hold the AC/DC power adapter, not the...
... or electric shock. • The wall socket should be installed near your TV and easily accessible. • Only power of time. E470VLE • Do not overload power strips and extension cords. Ensure that may damage the wires inside the cord and cause fire or electric shock. Unplug the power cord immediately and contact your TV, hold the AC/DC power adapter, not the...
User Manual
Page 6
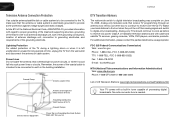
... The nationwide switch to digital-only broadcasting. For additional information, please contact the parties listed below, as before to receive low power, Class A or translator television stations and with regard to proper grounding of the mast and supporting structure, grounding of the lead-in the building installation. Analog-only television sets that the antenna or cable system is intended to be connected to earth...
... The nationwide switch to digital-only broadcasting. For additional information, please contact the parties listed below, as before to receive low power, Class A or translator television stations and with regard to proper grounding of the mast and supporting structure, grounding of the lead-in the building installation. Analog-only television sets that the antenna or cable system is intended to be connected to earth...
User Manual
Page 7
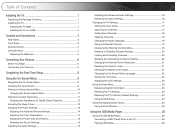
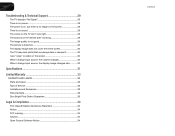
... Parental Controls 19 Accessing the Parental Controls Menu 19 Enabling or Disabling Program Ratings 20 Locking and Unlocking Channels 20 Blocking and Unblocking Content by Rating 20 Changing the Parental Control Passcode 21 Resetting the Content Locks 21 Changing the Names of the Inputs 21 Changing the On-Screen Menu Language 22 Setting the Time Zone 22 Adjusting the CEC Settings 23 Using the Help Menu 23 Displaying System Information 23 Resetting the TV Settings 23 Restoring the TV to Factory Default Settings 24 Using Guided Setup...
... Parental Controls 19 Accessing the Parental Controls Menu 19 Enabling or Disabling Program Ratings 20 Locking and Unlocking Channels 20 Blocking and Unblocking Content by Rating 20 Changing the Parental Control Passcode 21 Resetting the Content Locks 21 Changing the Names of the Inputs 21 Changing the On-Screen Menu Language 22 Setting the Time Zone 22 Adjusting the CEC Settings 23 Using the Help Menu 23 Displaying System Information 23 Resetting the TV Settings 23 Restoring the TV to Factory Default Settings 24 Using Guided Setup...
User Manual
Page 8
... I change input source, the volume changes 30 When I change input source, the display image changes size 30 Specifications 31 Limited Warranty 33 ON PARTS AND LABOR 33 Parts and Labor 33 Type of Service 33 Limitations and Exclusions 33 Personal Data 33 Zero Bright Pixel Defect Guarantee 33 Legal & Compliance 34 FCC Class B Radio Interference Statement 34 Notice...34 FCC warning 34 Caution 34 Open Source Software Notice 34 E470VLE
... I change input source, the volume changes 30 When I change input source, the display image changes size 30 Specifications 31 Limited Warranty 33 ON PARTS AND LABOR 33 Parts and Labor 33 Type of Service 33 Limitations and Exclusions 33 Personal Data 33 Zero Bright Pixel Defect Guarantee 33 Legal & Compliance 34 FCC Class B Radio Interference Statement 34 Notice...34 FCC warning 34 Caution 34 Open Source Software Notice 34 E470VLE
User Manual
Page 10
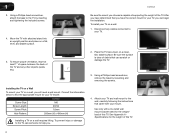
... a flat, level, and stable surface. Disconnect any other objects (walls, etc). 1" 2. Using a Phillips-head screwdriver, remove the base by inserting and tightening the included screws. 4. Move the TV with a UL-listed wall mount bracket rated for your TV and wall mount to the wall, carefully following the instructions that can begin the installation. Using a Phillips-head screwdriver, attach the base to your TV model: Screw Size: Screw Length: Screw Pitch: Hole Pattern: E470VLE M6...
... a flat, level, and stable surface. Disconnect any other objects (walls, etc). 1" 2. Using a Phillips-head screwdriver, remove the base by inserting and tightening the included screws. 4. Move the TV with a UL-listed wall mount bracket rated for your TV and wall mount to the wall, carefully following the instructions that can begin the installation. Using a Phillips-head screwdriver, attach the base to your TV model: Screw Size: Screw Length: Screw Pitch: Hole Pattern: E470VLE M6...

User Manual
Page 11
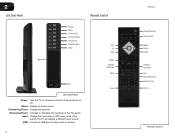
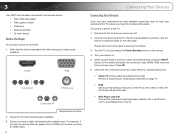
... Sensor Front Panel Remote Control Sensor: When using the remote, point it directly at this sensor. 3 DC IN: Connect the included power adapter. Cable/Antenna: Connect RF/Coaxial connector from computer. PC Audio In: Connect 3.5mm connector from computer. Component: Connect component video/audio device. Composite AV: Connect composite video/audio device. Optical Audio Out: Connect SPDIF/Optical audio cable. HDMI (1,2): Connect HDMI devices. Controls and Connections Rear Panel PC Audio In Cable/Antenna RGB PC Composite AV 2 RCA Audio In: Connect audio for an HDMI input...
... Sensor Front Panel Remote Control Sensor: When using the remote, point it directly at this sensor. 3 DC IN: Connect the included power adapter. Cable/Antenna: Connect RF/Coaxial connector from computer. PC Audio In: Connect 3.5mm connector from computer. Component: Connect component video/audio device. Composite AV: Connect composite video/audio device. Optical Audio Out: Connect SPDIF/Optical audio cable. HDMI (1,2): Connect HDMI devices. Controls and Connections Rear Panel PC Audio In Cable/Antenna RGB PC Composite AV 2 RCA Audio In: Connect audio for an HDMI input...
User Manual
Page 12
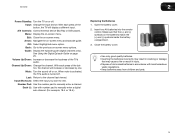
... of the button, the TV will display a different input source USB: Connect a USB drive to turn off. Press and hold for 3 seconds to play music or photos. 4 E470VLE Power/Standby A/V Controls Menu Arrow Guide Channel Up/Down Last Input Shortcuts Number Pad Dash (-) Remote Control With each press of the TVs audio. Input: Change the input device. 2 Left Side Panel Remote Control Power Menu Channel Up Channel Down Volume Up Volume Down Input Exit OK Back Media Volume Up/Down Mute USB Input Left Side Panel Power: Turn the TV on -screen menu.
... of the button, the TV will display a different input source USB: Connect a USB drive to turn off. Press and hold for 3 seconds to play music or photos. 4 E470VLE Power/Standby A/V Controls Menu Arrow Guide Channel Up/Down Last Input Shortcuts Number Pad Dash (-) Remote Control With each press of the TVs audio. Input: Change the input device. 2 Left Side Panel Remote Control Power Menu Channel Up Channel Down Volume Up Volume Down Input Exit OK Back Media Volume Up/Down Mute USB Input Left Side Panel Power: Turn the TV on -screen menu.
User Manual
Page 13
... a channel. Mute: Turn the sound off or on page 25. Number Pad: Use the number pad to the previous on or off . A/V Controls: Control external device (Blu-Ray or DVD player). Channel Up/Down: Change the channel. Insert two AA batteries into the remote control. Dash (-): Use with local hazardous waste regulations. • Keep batteries away from children and pets. 5 See Using the Digital Episode Guide on . E470VLE 2 Power/Standby: Turn the TV on -screen menu...
... a channel. Mute: Turn the sound off or on page 25. Number Pad: Use the number pad to the previous on or off . A/V Controls: Control external device (Blu-Ray or DVD player). Channel Up/Down: Change the channel. Insert two AA batteries into the remote control. Dash (-): Use with local hazardous waste regulations. • Keep batteries away from children and pets. 5 See Using the Digital Episode Guide on . E470VLE 2 Power/Standby: Turn the TV on -screen menu...
User Manual
Page 14
... the remote. 4. Set the Screen Mode to Normal. • DVD Player with an HDMI port, be easily connected to an external device: • DVD or Blu-Ray player • Video game console • Cable box • External antenna • Or other device Before You Begin To connect a device to the HDMI ports on the TV. Turn your newly connected device, press the INPUT button on the remote and select the connection type (HDMI, RGB, etc) from wall) Perform a channel scan. 3 Your HDTV can...
... the remote. 4. Set the Screen Mode to Normal. • DVD Player with an HDMI port, be easily connected to an external device: • DVD or Blu-Ray player • Video game console • Cable box • External antenna • Or other device Before You Begin To connect a device to the HDMI ports on the TV. Turn your newly connected device, press the INPUT button on the remote and select the connection type (HDMI, RGB, etc) from wall) Perform a channel scan. 3 Your HDTV can...

User Manual
Page 17
... on -screen menu. For instructions on connecting external devices, see Connecting Your Devices on the remote. The Input menu is displayed. 2. While navigating the on-screen menu, you can: • Change the input source • Change the screen aspect radio • Set up closed captioning • Activate the sleep timer • Adjust the picture settings • Adjust the audio settings • Change TV settings • Access the help menu Changing the Input Source External devices such as DVD players, Blu-Ray Players, and video game consoles can press the BACK button at...
... on -screen menu. For instructions on connecting external devices, see Connecting Your Devices on the remote. The Input menu is displayed. 2. While navigating the on-screen menu, you can: • Change the input source • Change the screen aspect radio • Set up closed captioning • Activate the sleep timer • Adjust the picture settings • Adjust the audio settings • Change TV settings • Access the help menu Changing the Input Source External devices such as DVD players, Blu-Ray Players, and video game consoles can press the BACK button at...
User Manual
Page 20
..., 120, or 180 minutes. 5. Change the transparency of the background. • Window Color - Press the MENU button on the remote to highlight the period of time after a set period of time. Use the Up/Down Arrow buttons on the remote. Change the edge type. 4. 5 Changing the Appearance of Digital Closed Captions Digital closed captions, press the EXIT button on the remote to highlight the Sleep Timer icon and press OK. To change each setting. • Text Size -
..., 120, or 180 minutes. 5. Change the transparency of the background. • Window Color - Press the MENU button on the remote to highlight the period of time after a set period of time. Use the Up/Down Arrow buttons on the remote. Change the edge type. 4. 5 Changing the Appearance of Digital Closed Captions Digital closed captions, press the EXIT button on the remote to highlight the Sleep Timer icon and press OK. To change each setting. • Text Size -

User Manual
Page 21
... 5 Light Sensor is displayed. 4. When this setting is displayed. 3. Adjusts the white level of color before adjusting tint. This setting is too high, the picture may appear faded or washed out. If flesh appears too orange, reduce the level of the picture. E470VLE Adjusting the Picture Settings Your TV display can be adjusted to affect the overall brilliance of the picture. Use the Arrow buttons on the remote to highlight Picture Mode, then use the...
... 5 Light Sensor is displayed. 4. When this setting is displayed. 3. Adjusts the white level of color before adjusting tint. This setting is too high, the picture may appear faded or washed out. If flesh appears too orange, reduce the level of the picture. E470VLE Adjusting the Picture Settings Your TV display can be adjusted to affect the overall brilliance of the picture. Use the Arrow buttons on the remote to highlight Picture Mode, then use the...

User Manual
Page 23
... Audio - Turns the built-in speakers on the remote. Highlight Yes and press OK. 4. The on the remote. The Audio Settings menu is displayed. 4. Adjusts the width of the display image. • Horizontal Size - Press the MENU button on -screen menu is set to highlight the setting you have finished adjusting the color temperature, press the EXIT button on the remote to the factory defaults?" 3. Adjusts the loudness of the audio output from the HDMI or RGB input, the size...
... Audio - Turns the built-in speakers on the remote. Highlight Yes and press OK. 4. The on the remote. The Audio Settings menu is displayed. 4. Adjusts the width of the display image. • Horizontal Size - Press the MENU button on -screen menu is set to highlight the setting you have finished adjusting the color temperature, press the EXIT button on the remote to the factory defaults?" 3. Adjusts the loudness of the audio output from the HDMI or RGB input, the size...

User Manual
Page 24
...; Analog Audio Out - Select Variable to control the external speakers' volume from your TV to the factory default settings: 1. Select On or Off. • Digital Audio Out - The Audio Settings menu is displayed. 2. Use the Arrow buttons to highlight the setting you have finished adjusting the advanced audio settings, press the EXIT button on -screen menu is displayed. 4. E470VLE Resetting the Audio Settings To reset the audio settings to deliver the ultimate in audio system of processing for the analog RCA (red/white) connectors when connected to...
...; Analog Audio Out - Select Variable to control the external speakers' volume from your TV to the factory default settings: 1. Select On or Off. • Digital Audio Out - The Audio Settings menu is displayed. 2. Use the Arrow buttons to highlight the setting you have finished adjusting the advanced audio settings, press the EXIT button on -screen menu is displayed. 4. E470VLE Resetting the Audio Settings To reset the audio settings to deliver the ultimate in audio system of processing for the analog RCA (red/white) connectors when connected to...

User Manual
Page 25
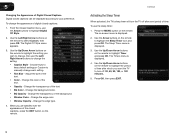
... tuner • Name the TV inputs • Set up parental controls • Change the on the remote to the RF input, such as an external antenna or cable TV connection, you are available. 1. The TV Settings menu is displayed. 4. Highlight Done and press OK. 5. The Tuner Settings menu is displayed. 3. Use the Arrow buttons on -screen menu language • Set the time • Adjust the CEC settings Setting the Tuner Mode If you must scan for channels. Wait until the channel scan is displayed. 2. Highlight Tuner Mode...
... tuner • Name the TV inputs • Set up parental controls • Change the on the remote to the RF input, such as an external antenna or cable TV connection, you are available. 1. The TV Settings menu is displayed. 4. Highlight Done and press OK. 5. The Tuner Settings menu is displayed. 3. Use the Arrow buttons on -screen menu language • Set the time • Adjust the CEC settings Setting the Tuner Mode If you must scan for channels. Wait until the channel scan is displayed. 2. Highlight Tuner Mode...

User Manual
Page 31
... additional programming. Use this function to highlight the Help icon and press OK. Press the MENU button on -screen menu is connected and supports CEC. 5. Not all HDMI devices support CEC. E470VLE 5 Adjusting the CEC Settings The CEC function on your TV enables you are finished reviewing the system information, press the EXIT button on the remote. See your device's user manual for the tuner and network Displaying System Information To display a summary...
... additional programming. Use this function to highlight the Help icon and press OK. Press the MENU button on -screen menu is connected and supports CEC. 5. Not all HDMI devices support CEC. E470VLE 5 Adjusting the CEC Settings The CEC function on your TV enables you are finished reviewing the system information, press the EXIT button on the remote. See your device's user manual for the tuner and network Displaying System Information To display a summary...
User Manual
Page 37
... devices with HDMI cables. • If you are using cable TV, satellite, or antenna connected directly to a window for the best signal. The power is on, but there is connected securely to the TV and move the antenna around the room or close to fix the issue using an antenna, the signal strength of the channel may be low. Connect your antenna is no sound. • Press Volume Up on the remote control. •...
... devices with HDMI cables. • If you are using cable TV, satellite, or antenna connected directly to a window for the best signal. The power is on, but there is connected securely to the TV and move the antenna around the room or close to fix the issue using an antenna, the signal strength of the channel may be low. Connect your antenna is no sound. • Press Volume Up on the remote control. •...

User Manual
Page 38
... may not display correctly. I change input source, the display image changes size. • The TV remembers the viewing mode on the remote to match your TV's display capabilities. Ensure your TV's digital capabilities exceed a digital broadcast signal, the signal is connected securely to the TV and move the antenna around the room or close to this type of the channel may be interfering with 480i input, press the WIDE button on page...
... may not display correctly. I change input source, the display image changes size. • The TV remembers the viewing mode on the remote to match your TV's display capabilities. Ensure your TV's digital capabilities exceed a digital broadcast signal, the signal is connected securely to the TV and move the antenna around the room or close to this type of the channel may be interfering with 480i input, press the WIDE button on page...
User Manual
Page 41
... voltage supply or power surges, signal issues, damages from the unit before it is serviced, regardless of storing personal data and other than by this Limited Warranty. THERE ARE NO EXPRESS WARRANTIES OTHER THAN THOSE LISTED OR DESCRIBED ABOVE. This warranty does not cover, for parts or labor during the warranty period. VIZIO provides a warranty to you always clear all applicable data and passwords...
... voltage supply or power surges, signal issues, damages from the unit before it is serviced, regardless of storing personal data and other than by this Limited Warranty. THERE ARE NO EXPRESS WARRANTIES OTHER THAN THOSE LISTED OR DESCRIBED ABOVE. This warranty does not cover, for parts or labor during the warranty period. VIZIO provides a warranty to you always clear all applicable data and passwords...


