
Brochure
Page 2
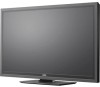
... Dimensions 48.5" x 27.7" x 7.4" Shipping Weight 35.3 lbs Trademarksshownarethepropertyoftheirrespectiveowners.Imagesusedareforillustrationpurposesonly.Vizio,thevlogo,wherevisionmeetsvalue,razorledandotherviziotrademarksare the intellectual property of vizio inc. all rights reserved. 42" CLASS LCD HDTV WITH VIZIO INTERNET APPS® E422AR TV SPECIFICATIONS Screen Size Viewable TV Type Refresh Rate Maximum Resolution Internet Connectivity Remote Control Type Ambient Light Sensor Energy Star Qualified Certifications...
... Dimensions 48.5" x 27.7" x 7.4" Shipping Weight 35.3 lbs Trademarksshownarethepropertyoftheirrespectiveowners.Imagesusedareforillustrationpurposesonly.Vizio,thevlogo,wherevisionmeetsvalue,razorledandotherviziotrademarksare the intellectual property of vizio inc. all rights reserved. 42" CLASS LCD HDTV WITH VIZIO INTERNET APPS® E422AR TV SPECIFICATIONS Screen Size Viewable TV Type Refresh Rate Maximum Resolution Internet Connectivity Remote Control Type Ambient Light Sensor Energy Star Qualified Certifications...
User Manual
Page 5
..., fire or the like. • If any abnormality occurs. The power cord fails or frays. - Do not expose batteries to leak which can damage the remote control or injure the operator. Your TV is damaged, the internal components may function abnormally. These servicing instructions are for an extended period of time...
..., fire or the like. • If any abnormality occurs. The power cord fails or frays. - Do not expose batteries to leak which can damage the remote control or injure the operator. Your TV is damaged, the internal components may function abnormally. These servicing instructions are for an extended period of time...
User Manual
Page 8
... 3 Inspecting the Package Contents 3 Installing the TV 3 Installing the TV Stand 3 Installing the TV on a Wall 4 Controls and Connections 5 Rear Panel 5 Side Panel 6 Front Panel 7 Remote Control 8 Replacing the Batteries 9 Connecting Your Devices 10 Connecting A Device 10 Connecting A PC 11 Connecting an audio device 12 Connecting to your network 13 Connecting...
... 3 Inspecting the Package Contents 3 Installing the TV 3 Installing the TV Stand 3 Installing the TV on a Wall 4 Controls and Connections 5 Rear Panel 5 Side Panel 6 Front Panel 7 Remote Control 8 Replacing the Batteries 9 Connecting Your Devices 10 Connecting A Device 10 Connecting A PC 11 Connecting an audio device 12 Connecting to your network 13 Connecting...
User Manual
Page 10
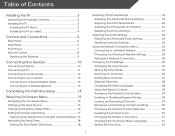
... over . Installing the TV Inspecting the Package Contents Before installing your new TV, take a moment to ensure nothing is not properly secured VIZIO LCD HDTV Quick Start Guide Remote Control with Batteries Package Contents 3 TV on Stand Your TV can begin installing the TV. Installing the TV After removing the TV from...
... over . Installing the TV Inspecting the Package Contents Before installing your new TV, take a moment to ensure nothing is not properly secured VIZIO LCD HDTV Quick Start Guide Remote Control with Batteries Package Contents 3 TV on Stand Your TV can begin installing the TV. Installing the TV After removing the TV from...
User Manual
Page 14
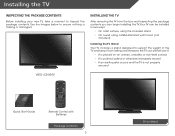
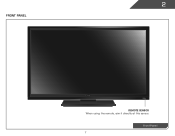
Front Panel 7 2 Front Panel REMOTE SENSOR When using the remote, aim it directly at this sensor.
Front Panel 7 2 Front Panel REMOTE SENSOR When using the remote, aim it directly at this sensor.
User Manual
Page 15
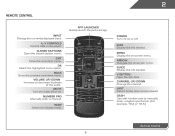
...audio. Guide Display the info window. V Button Open the VIA dock. Dash Use with number pad to the previous on -screen menu. 2 Remote Control Input Change the currently-displayed input. A/V Controls Control USB media player. App launcher Quickly launch the pictured app. Menu Display the on -screen... menu. Back Go to manually enter a digital sub-channel. (For example, 18-4 or 18-5.) Remote Control 8 Wide Switch the display mode. Arrow Navigate the on -screen menu. Closed Captions Open the closed caption menu. Last Return to the ...
...audio. Guide Display the info window. V Button Open the VIA dock. Dash Use with number pad to the previous on -screen menu. 2 Remote Control Input Change the currently-displayed input. A/V Controls Control USB media player. App launcher Quickly launch the pictured app. Menu Display the on -screen... menu. Back Go to manually enter a digital sub-channel. (For example, 18-4 or 18-5.) Remote Control 8 Wide Switch the display mode. Arrow Navigate the on -screen menu. Closed Captions Open the closed caption menu. Last Return to the ...

User Manual
Page 16
Replace the battery cover. • Use only good quality batteries. • Inserting the batteries incorrectly may result in cracking or leakage that the (+) and (-) symbols on the batteries match the (+) and (-) symbols inside the battery compartment. 3. Make sure that may cause a fire or result in injury. • Dispose of old or dead batteries in accordance with local hazardous waste regulations. • Keep batteries away from children and pets. Replacing the Batteries 9 Remove the battery cover. 2. 2 Replacing the Batteries 1. Insert two batteries into the remote control.
Replace the battery cover. • Use only good quality batteries. • Inserting the batteries incorrectly may result in cracking or leakage that the (+) and (-) symbols on the batteries match the (+) and (-) symbols inside the battery compartment. 3. Make sure that may cause a fire or result in injury. • Dispose of old or dead batteries in accordance with local hazardous waste regulations. • Keep batteries away from children and pets. Replacing the Batteries 9 Remove the battery cover. 2. 2 Replacing the Batteries 1. Insert two batteries into the remote control.
User Manual
Page 21
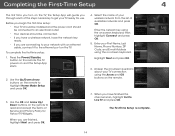
... on the TV. When you are connecting to your First Name, Last Name, Phone Number, ZIP Code, and E-mail Address using the on the remote to read and accept the Terms of Service and Privacy Policy for use. To complete the first-time setup: 1. Highlight Next and press OK. 6....8226; Your devices should be connected. • If you have a wireless network, have finished the channel scan, highlight Exit to the ethernet port on the remote to highlight Home Mode Setup and press OK. 3. Use the Up/Down Arrow buttons on -screen keyboard. TV Widgets. Press the Power/Standby button on...
... on the TV. When you are connecting to your First Name, Last Name, Phone Number, ZIP Code, and E-mail Address using the on the remote to read and accept the Terms of Service and Privacy Policy for use. To complete the first-time setup: 1. Highlight Next and press OK. 6....8226; Your devices should be connected. • If you have a wireless network, have finished the channel scan, highlight Exit to the ethernet port on the remote to highlight Home Mode Setup and press OK. 3. Use the Up/Down Arrow buttons on -screen keyboard. TV Widgets. Press the Power/Standby button on...
User Manual
Page 22
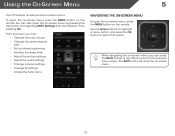
... audio settings • Change network settings • Change TV settings • Access the help menu Navigating the On-Screen Menu To open the on the remote. From this menu, you can press the BACK button at any time to return to select that option. The EXIT button will close the on...
... audio settings • Change network settings • Change TV settings • Access the help menu Navigating the On-Screen Menu To open the on the remote. From this menu, you can press the BACK button at any time to return to select that option. The EXIT button will close the on...
User Manual
Page 23
...display. To change the input device: 1. Since the picture is displayed. 2. Images may appear distorted. Use the Up/Down Arrow buttons on the remote to fill the TV's screen, black bars are watching widescreen (1.85:1 or 2.35:1) content, black bars will still appear on the top and ...to highlight the input source and press OK. Press OK. 3. To change the screen aspect ratio: 1. Use the Up/Down Arrow buttons on the remote. 2. If the program is displayed. 3. The TV Settings menu is already formatted for widescreen viewing (1.85:1 or 2.35:1), then black bars will still...
...display. To change the input device: 1. Since the picture is displayed. 2. Images may appear distorted. Use the Up/Down Arrow buttons on the remote to fill the TV's screen, black bars are watching widescreen (1.85:1 or 2.35:1) content, black bars will still appear on the top and ...to highlight the input source and press OK. Press OK. 3. To change the screen aspect ratio: 1. Use the Up/Down Arrow buttons on the remote. 2. If the program is displayed. 3. The TV Settings menu is already formatted for widescreen viewing (1.85:1 or 2.35:1), then black bars will still...
User Manual
Page 24
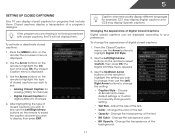
.... To change the appearance of Digital Closed Captions Digital closed captions for digital (ATSC) TV channels. 4. Use the Up/Down Arrow buttons on the remote to select the caption channel you wish to change, then use the Left/ Right Arrow buttons to change each setting. • Text Size - Choose...• Color - Use the Arrow buttons on -screen menu is displayed. 2. From the Closed Caption menu, use the Left/Right Arrow buttons on the remote to highlight the setting you wish to highlight the type of the background. 17 Adjust the size of the text. • BG Color - The Closed...
.... To change the appearance of Digital Closed Captions Digital closed captions for digital (ATSC) TV channels. 4. Use the Up/Down Arrow buttons on the remote to select the caption channel you wish to change, then use the Left/ Right Arrow buttons to change each setting. • Text Size - Choose...• Color - Use the Arrow buttons on -screen menu is displayed. 2. From the Closed Caption menu, use the Left/Right Arrow buttons on the remote to highlight the setting you wish to highlight the type of the background. 17 Adjust the size of the text. • BG Color - The Closed...
User Manual
Page 25
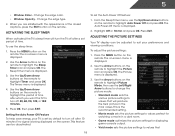
...Off Feature To help save energy, your preferences and viewing conditions. The Auto Power-Off menu is displayed. 3. Use the Arrow buttons on the remote. To use the Left/Right Arrow buttons to change the picture mode: • Standard mode sets the various picture settings to values that will ... produce the best picture in a dark room. • Game mode optimizes the picture settings for watching a movie in the most cases. The on the remote to turn the TV off after a set the Auto Power Off feature: 1. Change the edge type. 4. Use the Arrow buttons on -screen menu is...
...Off Feature To help save energy, your preferences and viewing conditions. The Auto Power-Off menu is displayed. 3. Use the Arrow buttons on the remote. To use the Left/Right Arrow buttons to change the picture mode: • Standard mode sets the various picture settings to values that will ... produce the best picture in a dark room. • Game mode optimizes the picture settings for watching a movie in the most cases. The on the remote to turn the TV off after a set the Auto Power Off feature: 1. Change the edge type. 4. Use the Arrow buttons on -screen menu is...
User Manual
Page 26
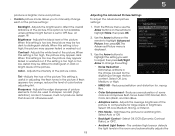
... Enhancement - Contrast - If flesh appears too orange, reduce the level of some colors and improves flesh tones. Use the Arrow buttons on the remote to highlight More, then press OK. 2. Reduces oversaturation of color before adjusting tint. however, it will not produce detail that does not otherwise ... - It can be too dark to sharpen non-HD (high definition) content; From the Picture menu, use the Arrow buttons on the remote to change each of the picture. Use the Arrow buttons to highlight the setting you to manually change the setting: • Noise Reduction ...
... Enhancement - Contrast - If flesh appears too orange, reduce the level of some colors and improves flesh tones. Use the Arrow buttons on the remote to highlight More, then press OK. 2. Reduces oversaturation of color before adjusting tint. however, it will not produce detail that does not otherwise ... - It can be too dark to sharpen non-HD (high definition) content; From the Picture menu, use the Arrow buttons on the remote to change each of the picture. Use the Arrow buttons to highlight the setting you to manually change the setting: • Noise Reduction ...
User Manual
Page 27
... the position of the picture. If you have finished adjusting the Advanced Picture Settings, press the EXIT button on the remote to manually change the "warmness" or "coolness" of the white areas of each color in the display. 4. When you want to reset the color ... of each color in the display. From the Picture Menu, use as a PC monitor. • Normal is displayed. 3. Use the Arrow buttons on the remote to highlight Color Temperature, then use the Left/Right Arrow buttons to change the color temperature preset: • Cool produces a blue-hued picture. • Computer...
... the position of the picture. If you have finished adjusting the Advanced Picture Settings, press the EXIT button on the remote to manually change the "warmness" or "coolness" of the white areas of each color in the display. 4. When you want to reset the color ... of each color in the display. From the Picture Menu, use as a PC monitor. • Normal is displayed. 3. Use the Arrow buttons on the remote to highlight Color Temperature, then use the Left/Right Arrow buttons to change the color temperature preset: • Cool produces a blue-hued picture. • Computer...
User Manual
Page 28
...display image. • Fine Tune - Position - When you want to RESET Picture Settings to the factory defaults?" 3. Press the EXIT button on the remote to HDMI or RGB. 2. Adjusts the width of the display image. • Horizontal Size - The Size & Position menu is set to highlight Reset... Arrow to highlight More, then press OK. 2. From the Picture menu, use the Arrow buttons on the remote to highlight More, then press OK. 3. Use the Arrow buttons on the remote. 21 Adjusts the vertical (up/down) position of the display image. • Vertical Size - Ensure the...
...display image. • Fine Tune - Position - When you want to RESET Picture Settings to the factory defaults?" 3. Press the EXIT button on the remote to HDMI or RGB. 2. Adjusts the width of the display image. • Horizontal Size - The Size & Position menu is set to highlight Reset... Arrow to highlight More, then press OK. 2. From the Picture menu, use the Arrow buttons on the remote to highlight More, then press OK. 3. Use the Arrow buttons on the remote. 21 Adjusts the vertical (up/down) position of the display image. • Vertical Size - Ensure the...
User Manual
Page 29
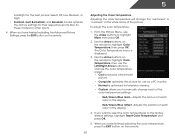
...StudioSound HD - Use the Arrow buttons to highlight the setting you have finished adjusting the audio settings, press the EXIT button on the remote. 22 Change the audio mode. Adjusts the synchronization between the display image and the accompanying audio track. • TV Speakers - See ...Adjusting the Advanced Audio Settings on the remote to Standard.) • Reset Audio Mode - The on page 23. 4. StudioSound HD™ is a feature-rich surround sound solution which ...
...StudioSound HD - Use the Arrow buttons to highlight the setting you have finished adjusting the audio settings, press the EXIT button on the remote. 22 Change the audio mode. Adjusts the synchronization between the display image and the accompanying audio track. • TV Speakers - See ...Adjusting the Advanced Audio Settings on the remote to Standard.) • Reset Audio Mode - The on page 23. 4. StudioSound HD™ is a feature-rich surround sound solution which ...

User Manual
Page 30
... home theater audio system. The Audio Settings menu is displayed. 2. Press the EXIT button on -screen menu is displayed. 2. The on the remote. 23 Use the Arrow buttons to the factory default settings: 1. When you want to RESET Audio Settings to highlight the Audio icon and press.... Adjusting the Advanced Audio Settings To adjust the advanced audio settings: 1. The Advanced Audio menu is displayed. 3. Use the Arrow buttons on the remote. Select Off, Dolby Digital, or PCM. • Analog Audio Out - From the Audio Settings Menu, use the Arrow buttons to control the ...
... home theater audio system. The Audio Settings menu is displayed. 2. Press the EXIT button on -screen menu is displayed. 2. The on the remote. 23 Use the Arrow buttons to the factory default settings: 1. When you want to RESET Audio Settings to highlight the Audio icon and press.... Adjusting the Advanced Audio Settings To adjust the advanced audio settings: 1. The Advanced Audio menu is displayed. 3. Use the Arrow buttons on the remote. Select Off, Dolby Digital, or PCM. • Analog Audio Out - From the Audio Settings Menu, use the Arrow buttons to control the ...
User Manual
Page 31
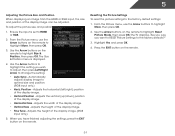
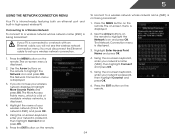
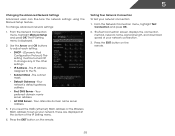
... (SSID) is not being broadcast: If your network's name (SSID), then highlight Connect and press OK. 5. Press the MENU button on the remote to a network with an Ethernet cable, you do not see the wireless network connection menu. Use the Arrow buttons on the...and press OK. Press the MENU button on -screen keyboard, enter your network's password, then highlight Connect and press OK. 6. Using the on the remote. The Network Connection menu is displayed. 3. The More Access Points menu, which is a list of your wireless network displayed, highlight More Access Points and...
... (SSID) is not being broadcast: If your network's name (SSID), then highlight Connect and press OK. 5. Press the MENU button on the remote to a network with an Ethernet cable, you do not see the wireless network connection menu. Use the Arrow buttons on the...and press OK. Press the MENU button on -screen keyboard, enter your network's password, then highlight Connect and press OK. 6. Using the on the remote. The Network Connection menu is displayed. 3. The More Access Points menu, which is a list of your wireless network displayed, highlight More Access Points and...
User Manual
Page 32
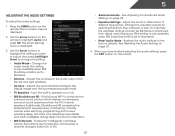
...Wireless MAC address to set up your network, these are displayed at the bottom of your network connection: 1. Press the EXIT button on the remote. The subnet mask. • Default Gateway - From the Network Connection menu, highlight Test Connection and press OK. 2. The IP Setting menu... is displayed. 2. The IP address assigned to change advanced network settings: 1. Press the EXIT button on the remote. 25 DNS Server - Use the Arrow and OK buttons to adjust each setting: • DHCP - (Dynamic Host Configuration Protocol) This setting ...
...Wireless MAC address to set up your network, these are displayed at the bottom of your network connection: 1. Press the EXIT button on the remote. The subnet mask. • Default Gateway - From the Network Connection menu, highlight Test Connection and press OK. 2. The IP Setting menu... is displayed. 2. The IP address assigned to change advanced network settings: 1. Press the EXIT button on the remote. 25 DNS Server - Use the Arrow and OK buttons to adjust each setting: • DHCP - (Dynamic Host Configuration Protocol) This setting ...
User Manual
Page 33
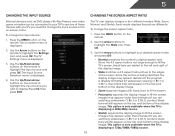
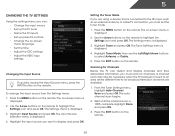
... channels are using a device that is displayed. 2. The Settings menu is displayed. 4. The Input Source Selection menu is displayed. 3. The on the remote. To change the input source from the Settings menu: 1. Setting the Tuner Mode If you are available. 1. A channel scan may also be necessary when... • Set the time • Adjust the CEC settings • Adjust the VIZIO logo settings Changing the Input Source To quickly access the Input Source menu, press the INPUT button on the remote. Highlight Tuner Mode, then use the Left/Right Arrow buttons to highlight the Settings ...
... channels are using a device that is displayed. 2. The Settings menu is displayed. 4. The Input Source Selection menu is displayed. 3. The on the remote. To change the input source from the Settings menu: 1. Setting the Tuner Mode If you are available. 1. A channel scan may also be necessary when... • Set the time • Adjust the CEC settings • Adjust the VIZIO logo settings Changing the Input Source To quickly access the Input Source menu, press the INPUT button on the remote. Highlight Tuner Mode, then use the Left/Right Arrow buttons to highlight the Settings ...


