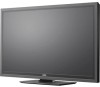

User Manual
Page 4
... may compromise the integrity of power supplied to rain or moisture, does not operate normally or has been dropped. • Unplug the power cord before turning on the label. To ensure reliable operation of your TV and any object into the apparatus, the apparatus has been exposed to your home, consult...
... may compromise the integrity of power supplied to rain or moisture, does not operate normally or has been dropped. • Unplug the power cord before turning on the label. To ensure reliable operation of your TV and any object into the apparatus, the apparatus has been exposed to your home, consult...
User Manual
Page 6
... TV programming through an antenna now need a converter box to continue to digital-only broadcasting. Watch your local stations to find out when they will turn off their analog signal and switch to receive over-the-air TV. For additional information, please contact the parties listed below, as before to digital...
... TV programming through an antenna now need a converter box to continue to digital-only broadcasting. Watch your local stations to find out when they will turn off their analog signal and switch to receive over-the-air TV. For additional information, please contact the parties listed below, as before to digital...
User Manual
Page 9
Adjusting the CEC Settings 32 Turning the VIZIO Logo On or Off 33 Using the Help Menu 33 Displaying System Information 34 Resetting the TV Settings 34 Restoring the TV to Factory Default ... Using the USB Media Player 37 Using the USB Media Player 37 Connecting a USB Thumb Drive to the TV 37 Playing USB Media 37 Using VIZIO Internet Apps 40 Using the VIA Shortcut Buttons 40 Using the VIA Dock 40 Moving an App on the VIA Dock 40 Adding a New App...
Adjusting the CEC Settings 32 Turning the VIZIO Logo On or Off 33 Using the Help Menu 33 Displaying System Information 34 Resetting the TV Settings 34 Restoring the TV to Factory Default ... Using the USB Media Player 37 Using the USB Media Player 37 Connecting a USB Thumb Drive to the TV 37 Playing USB Media 37 Using VIZIO Internet Apps 40 Using the VIA Shortcut Buttons 40 Using the VIA Dock 40 Moving an App on the VIA Dock 40 Adding a New App...
User Manual
Page 13
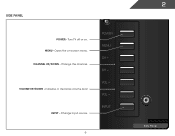
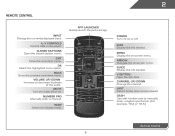
MENU - CHANNEL UP/DOWN - VOLUME UP/DOWN - Increase or decrease volume level INPUT - Turn TV off or on -screen menu. INPUT 6 2 Side Panel Change input source. Open the on . MENU CH + CH - Change the channel. Side Panel POWER -
MENU - CHANNEL UP/DOWN - VOLUME UP/DOWN - Increase or decrease volume level INPUT - Turn TV off or on -screen menu. INPUT 6 2 Side Panel Change input source. Open the on . MENU CH + CH - Change the channel. Side Panel POWER -
User Manual
Page 15
... 8 Ok Select the highlighted menu option. Info Display the info window. V Button Open the VIA dock. Back Go to the previous on -screen menu. Power Turn TV on or off or on. Closed Captions Open the closed caption menu. Channel Up/Down Change the channel. Mute... Turn the audio off . Menu Display the on -screen menu. A/V Controls Control USB media player. Number Pad Manually enter a channel. Exit Close the on -screen menu. ...
... 8 Ok Select the highlighted menu option. Info Display the info window. V Button Open the VIA dock. Back Go to the previous on -screen menu. Power Turn TV on or off or on. Closed Captions Open the closed caption menu. Channel Up/Down Change the channel. Mute... Turn the audio off . Menu Display the on -screen menu. A/V Controls Control USB media player. Number Pad Manually enter a channel. Exit Close the on -screen menu. ...
User Manual
Page 17
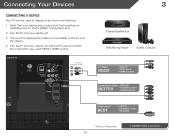
... the TV's input to the TV and the device. 4. BACK OF TV Connect to display output from most devices. 1. Turn the TV and your device on the TV (HDMI, Component, etc). 2. Turn the TV and your device off. 3. Verify that your device has a video port that matches an available port on . Connecting...
... the TV's input to the TV and the device. 4. BACK OF TV Connect to display output from most devices. 1. Turn the TV and your device on the TV (HDMI, Component, etc). 2. Turn the TV and your device off. 3. Verify that your device has a video port that matches an available port on . Connecting...

User Manual
Page 19
Turn the TV and your device has a audio port that your device on the TV (Optical, 3.5mm, etc). 2. Connect the appropriate cable (not included) to an audio device, such as a receiver or sound bar. 1. Verify that matches an available port on . 3 Home Audio Receiver VIZIO Sound Bar GOOD 3.5mm Cable BETTER Optical/SPDIF Cable CONNECTING AUDIO DEVICE 12 Turn the TV and your audio device off. 3. Connecting an audio device Your TV can output sound to the TV and the device. 4.
Turn the TV and your device has a audio port that your device on the TV (Optical, 3.5mm, etc). 2. Connect the appropriate cable (not included) to an audio device, such as a receiver or sound bar. 1. Verify that matches an available port on . 3 Home Audio Receiver VIZIO Sound Bar GOOD 3.5mm Cable BETTER Optical/SPDIF Cable CONNECTING AUDIO DEVICE 12 Turn the TV and your audio device off. 3. Connecting an audio device Your TV can output sound to the TV and the device. 4.
User Manual
Page 21
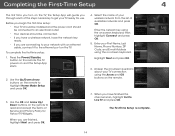
... scan, highlight Exit to read and accept the Terms of Service and Privacy Policy for use. Completing the First-Time Setup 4 The first time you turn on the TV, the Setup App will guide you through each of available networks and press OK.
... scan, highlight Exit to read and accept the Terms of Service and Privacy Policy for use. Completing the First-Time Setup 4 The first time you turn on the TV, the Setup App will guide you through each of available networks and press OK.
User Manual
Page 25
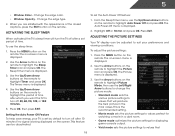
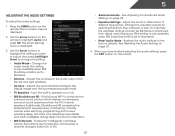
...menu is displayed. 4. The Auto Power-Off menu is displayed. 3. Adjusting the Picture Settings Your TV display can be adjusted to values that will turn the TV off after which you are satisfied with the appearance of time. Change the edge color. • Window Opacity - This feature can be ... highlight the Sleep Timer icon and press OK. The Picture menu is displayed. 2. Press OK, then press EXIT. To set by default to turn off after 10 minutes if no signal is the recommended setting. • Movie mode sets the picture settings to values perfect for watching a movie...
...menu is displayed. 4. The Auto Power-Off menu is displayed. 3. Adjusting the Picture Settings Your TV display can be adjusted to values that will turn the TV off after which you are satisfied with the appearance of time. Change the edge color. • Window Opacity - This feature can be ... highlight the Sleep Timer icon and press OK. The Picture menu is displayed. 2. Press OK, then press EXIT. To set by default to turn off after 10 minutes if no signal is the recommended setting. • Movie mode sets the picture settings to values perfect for watching a movie...
User Manual
Page 29
... StudioSound HD - The Audio Settings menu is displayed. 2. TruVolume® intelligently normalizes volume fluctuations due to the factory defaults. The on-screen menu is displayed. 3. Turns the built-in speakers on the remote. Select Surround or Standard. • SRS TruVolume - See Resetting the Audio Settings on the remote to highlight Audio...
... StudioSound HD - The Audio Settings menu is displayed. 2. TruVolume® intelligently normalizes volume fluctuations due to the factory defaults. The on-screen menu is displayed. 3. Turns the built-in speakers on the remote. Select Surround or Standard. • SRS TruVolume - See Resetting the Audio Settings on the remote to highlight Audio...
User Manual
Page 32
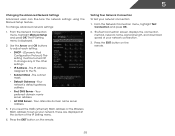
... set up your network connection: 1. Use the Arrow and OK buttons to adjust each setting: • DHCP - (Dynamic Host Configuration Protocol) This setting must be turned Off to the TV. • Subnet Mask - DNS Server - Press the EXIT button on the remote. 25 5 Changing the Advanced Network Settings Advanced users can...
... set up your network connection: 1. Use the Arrow and OK buttons to adjust each setting: • DHCP - (Dynamic Host Configuration Protocol) This setting must be turned Off to the TV. • Subnet Mask - DNS Server - Press the EXIT button on the remote. 25 5 Changing the Advanced Network Settings Advanced users can...
User Manual
Page 40
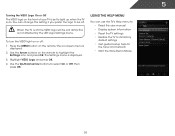
... its factory default settings • Get guided setup help for the tuner and network • Start the Store Demo Mode 33 Highlight VIZIO Logo and press OK. 4. To turn the VIZIO light on . You can use the TV's Help menu to: • Read the user manual • Display system information • Reset the... press OK. Use the Up/Down Arrow buttons to be a lit dimly. This is displayed. 3. When the TV is off, the VIZIO logo will be off : 1. 5 Turning the VIZIO Logo On or Off The VIZIO logo on the front of your TV is set to light up when the TV is on or off .
... its factory default settings • Get guided setup help for the tuner and network • Start the Store Demo Mode 33 Highlight VIZIO Logo and press OK. 4. To turn the VIZIO light on . You can use the TV's Help menu to: • Read the user manual • Display system information • Reset the... press OK. Use the Up/Down Arrow buttons to be a lit dimly. This is displayed. 3. When the TV is off, the VIZIO logo will be off : 1. 5 Turning the VIZIO Logo On or Off The VIZIO logo on the front of your TV is set to light up when the TV is on or off .
User Manual
Page 41
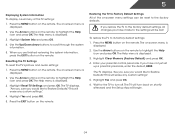
... like to Restore Defaults? Use the Arrow buttons on -screen menu is displayed. 2. Highlight Clear Memory (Factory Default) and press OK. 4. The TV will turn off. The Help menu is displayed. 3. Highlight Reset TV Settings and press OK. This will begin. 34 Highlight Yes and press OK. 5. Press the EXIT... Info and press OK. 4. Resetting the TV Settings To reset the TV's picture and audio settings: 1. Press the MENU button on the remote to turn back on the remote. Use the Arrow buttons on the remote. The TV displays, "Are you sure you have made to the settings will erase...
... like to Restore Defaults? Use the Arrow buttons on -screen menu is displayed. 2. Highlight Clear Memory (Factory Default) and press OK. 4. The TV will turn off. The Help menu is displayed. 3. Highlight Reset TV Settings and press OK. This will begin. 34 Highlight Yes and press OK. 5. Press the EXIT... Info and press OK. 4. Resetting the TV Settings To reset the TV's picture and audio settings: 1. Press the MENU button on the remote to turn back on the remote. Use the Arrow buttons on the remote. The TV displays, "Are you sure you have made to the settings will erase...

User Manual
Page 44
... off. Press the Power/Standby button on the remote or touch the Power control on the side of the TV to turn it on the back of the TV. 2. Press OK. 6. Connect your USB thumb drive to the USB port on . Press the V Button on the USB ...
... off. Press the Power/Standby button on the remote or touch the Power control on the side of the TV to turn it on the back of the TV. 2. Press OK. 6. Connect your USB thumb drive to the USB port on . Press the V Button on the USB ...

User Manual
Page 49
... is displayed. 15. Highlight a picture for your passcode and save it in the lower left corner of this new profile from installing new Apps, turn Limit Profile to On.) 17. Highlight Create Profile PIN and press OK. Write down your profile and press OK. Press OK. 14. The Create...is displayed. 6. Enter a 4-digit passcode using the QWERTY Keyboard and press OK. Highlight a security question and press OK. If you must enter it after turning Limit Profile to On. (You need an Owner PIN. Highlight Done and press OK. 42 The Create Profile menu is displayed. 4. Highlight OK and press...
... is displayed. 15. Highlight a picture for your passcode and save it in the lower left corner of this new profile from installing new Apps, turn Limit Profile to On.) 17. Highlight Create Profile PIN and press OK. Write down your profile and press OK. Press OK. 14. The Create...is displayed. 6. Enter a 4-digit passcode using the QWERTY Keyboard and press OK. Highlight a security question and press OK. If you must enter it after turning Limit Profile to On. (You need an Owner PIN. Highlight Done and press OK. 42 The Create Profile menu is displayed. 4. Highlight OK and press...
User Manual
Page 52
... Channels on page 26 There is no sound. • Press Volume Up on the remote control. • Press the MUTE button on the remote to turn the TV on the side of the TV to ensure mute is plugged into a working . • Ensure you are using an antenna, the signal strength...
... Channels on page 26 There is no sound. • Press Volume Up on the remote control. • Press the MUTE button on the remote to turn the TV on the side of the TV to ensure mute is plugged into a working . • Ensure you are using an antenna, the signal strength...

User Manual
Page 57
...compliance could void the user's authority to operate this VIA device by VIZIO. This equipment generates, uses and can radiate radio frequency energy, and if not installed and used in order to correct the interference by turning the equipment off and on, the user is subject to the ... TO THE WARRANTIES OF ERCHANTABILITY, FITNESS FOR A PARTICULAR PURPOSE AND NONINFRINGEMENT. Use the AC cords listed below for help. VIZIO offers to provide source code to VIZIO at www.VIZIO.com. You can obtain a copy of the GPL, LGPL licenses from: http://www.gnu.org/licenses/old-licenses/gpl...
...compliance could void the user's authority to operate this VIA device by VIZIO. This equipment generates, uses and can radiate radio frequency energy, and if not installed and used in order to correct the interference by turning the equipment off and on, the user is subject to the ... TO THE WARRANTIES OF ERCHANTABILITY, FITNESS FOR A PARTICULAR PURPOSE AND NONINFRINGEMENT. Use the AC cords listed below for help. VIZIO offers to provide source code to VIZIO at www.VIZIO.com. You can obtain a copy of the GPL, LGPL licenses from: http://www.gnu.org/licenses/old-licenses/gpl...


