
Brochure
Page 2
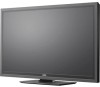
... x 7.4" Shipping Weight 35.3 lbs Trademarksshownarethepropertyoftheirrespectiveowners.Imagesusedareforillustrationpurposesonly.Vizio,thevlogo,wherevisionmeetsvalue,razorledandotherviziotrademarksare the intellectual property of vizio inc. rev 10262010 CEC/ARC, App certificates, Vizio AQ, Vizio PQ, Dolby Digital 300mm [V] x 300mm [H] CONNECTIONS...without notice. © 2012 vizio inc. 42" CLASS LCD HDTV WITH VIZIO INTERNET APPS® E422AR TV SPECIFICATIONS Screen Size Viewable TV Type Refresh Rate Maximum Resolution Internet Connectivity Remote Control Type Ambient Light Sensor Energy ...
... x 7.4" Shipping Weight 35.3 lbs Trademarksshownarethepropertyoftheirrespectiveowners.Imagesusedareforillustrationpurposesonly.Vizio,thevlogo,wherevisionmeetsvalue,razorledandotherviziotrademarksare the intellectual property of vizio inc. rev 10262010 CEC/ARC, App certificates, Vizio AQ, Vizio PQ, Dolby Digital 300mm [V] x 300mm [H] CONNECTIONS...without notice. © 2012 vizio inc. 42" CLASS LCD HDTV WITH VIZIO INTERNET APPS® E422AR TV SPECIFICATIONS Screen Size Viewable TV Type Refresh Rate Maximum Resolution Internet Connectivity Remote Control Type Ambient Light Sensor Energy ...
User Manual
Page 5
Do not expose your TV yourself. • Avoid using dropped or damaged appliances. Incorrect polarities may cause the batteries to leak which can damage the remote control or injure the operator. Do not expose batteries to excessive heat such as vases, shall be used as the disconnect device, the disconnect device shall ...
Do not expose your TV yourself. • Avoid using dropped or damaged appliances. Incorrect polarities may cause the batteries to leak which can damage the remote control or injure the operator. Do not expose batteries to excessive heat such as vases, shall be used as the disconnect device, the disconnect device shall ...
User Manual
Page 8
... the Package Contents 3 Installing the TV 3 Installing the TV Stand 3 Installing the TV on a Wall 4 Controls and Connections 5 Rear Panel 5 Side Panel 6 Front Panel 7 Remote Control 8 Replacing the Batteries 9 Connecting Your Devices 10 Connecting A Device 10 Connecting A PC 11 Connecting an audio device... Channels 26 Adding New Channels 27 Skipping Channels 28 Changing the Audio Language 28 Using the Parental Controls 29 Accessing the Parental Controls Menu 29 Enabling or Disabling Program Ratings 29 Locking and Unlocking Channels 29 Blocking and Unblocking Content ...
... the Package Contents 3 Installing the TV 3 Installing the TV Stand 3 Installing the TV on a Wall 4 Controls and Connections 5 Rear Panel 5 Side Panel 6 Front Panel 7 Remote Control 8 Replacing the Batteries 9 Connecting Your Devices 10 Connecting A Device 10 Connecting A PC 11 Connecting an audio device... Channels 26 Adding New Channels 27 Skipping Channels 28 Changing the Audio Language 28 Using the Parental Controls 29 Accessing the Parental Controls Menu 29 Enabling or Disabling Program Ratings 29 Locking and Unlocking Channels 29 Blocking and Unblocking Content ...
User Manual
Page 10
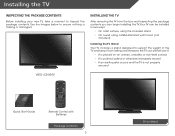
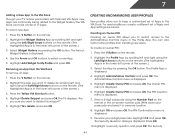
... is missing or damaged. However, the TV can begin installing the TV. Use the images below to ensure nothing is not properly secured VIZIO LCD HDTV Quick Start Guide Remote Control with Batteries Package Contents 3 TV on Stand Your TV can be installed in two ways: • On a flat surface, using the included...
... is missing or damaged. However, the TV can begin installing the TV. Use the images below to ensure nothing is not properly secured VIZIO LCD HDTV Quick Start Guide Remote Control with Batteries Package Contents 3 TV on Stand Your TV can be installed in two ways: • On a flat surface, using the included...
User Manual
Page 15
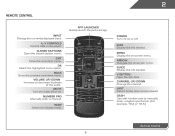
...screen menu. Guide Display the info window. Last Return to manually enter a digital sub-channel. (For example, 18-4 or 18-5.) Remote Control 8 Dash Use with number pad to the channel last viewed. Ok Select the highlighted menu option. Volume Up/Down Increase or decrease ...launcher Quickly launch the pictured app. Arrow Navigate the on -screen menu. Channel Up/Down Change the channel. 2 Remote Control Input Change the currently-displayed input. A/V Controls Control USB media player. V Button Open the VIA dock. Info Display the info window. Exit Close the on -screen...
...screen menu. Guide Display the info window. Last Return to manually enter a digital sub-channel. (For example, 18-4 or 18-5.) Remote Control 8 Dash Use with number pad to the channel last viewed. Ok Select the highlighted menu option. Volume Up/Down Increase or decrease ...launcher Quickly launch the pictured app. Arrow Navigate the on -screen menu. Channel Up/Down Change the channel. 2 Remote Control Input Change the currently-displayed input. A/V Controls Control USB media player. V Button Open the VIA dock. Info Display the info window. Exit Close the on -screen...

User Manual
Page 16
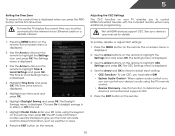
2 Replacing the Batteries 1. Insert two batteries into the remote control. Replacing the Batteries 9 Remove the battery cover. 2. Make sure that may result in cracking or leakage that the (+) and (-) symbols on the batteries match the (+) ...
2 Replacing the Batteries 1. Insert two batteries into the remote control. Replacing the Batteries 9 Remove the battery cover. 2. Make sure that may result in cracking or leakage that the (+) and (-) symbols on the batteries match the (+) ...
User Manual
Page 26
...the picture. Brightness - Adjusts the intensity of some colors and improves flesh tones. Reduces oversaturation of the picture colors. See on the remote to affect the overall brilliance of the picture. Adjusts the black level of the picture. It can be too dark to compensate for ....mpeg files. • Color Enhancement - Select Auto or Off. • Backlight Control - The ambient light sensor detects the light levels in the image caused by the digitizing of brightness. When this setting is too high, the...
...the picture. Brightness - Adjusts the intensity of some colors and improves flesh tones. Reduces oversaturation of the picture colors. See on the remote to affect the overall brilliance of the picture. Adjusts the black level of the picture. It can be too dark to compensate for ....mpeg files. • Color Enhancement - Select Auto or Off. • Backlight Control - The ambient light sensor detects the light levels in the image caused by the digitizing of brightness. When this setting is too high, the...

User Manual
Page 30
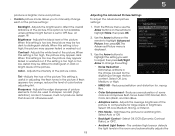
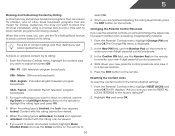
...Settings to a home theater audio system. Use the Arrow buttons on the remote to highlight Reset Audio Mode and press OK. Select Variable to control the external speakers' volume from the TV's volume controls, or select Fixed to highlight Advanced Audio, then press OK. The on... Adjusting the Advanced Audio Settings To adjust the advanced audio settings: 1. Sets the volume control properties for the Optical output when connected to the factory default settings: 1. Press the MENU button on the remote. 5 Resetting the Audio Settings To reset the audio settings to a home theater audio...
...Settings to a home theater audio system. Use the Arrow buttons on the remote to highlight Reset Audio Mode and press OK. Select Variable to control the external speakers' volume from the TV's volume controls, or select Fixed to highlight Advanced Audio, then press OK. The on... Adjusting the Advanced Audio Settings To adjust the advanced audio settings: 1. Sets the volume control properties for the Optical output when connected to the factory default settings: 1. Press the MENU button on the remote. 5 Resetting the Audio Settings To reset the audio settings to a home theater audio...
User Manual
Page 33
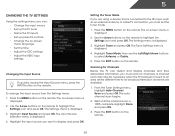
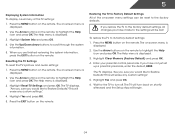
...8226; Set up the TV tuner • Name the TV inputs • Set up parental controls • Change the on-screen menu language • Set the time • Adjust the CEC settings • Adjust the VIZIO logo settings Changing the Input Source To quickly access the Input Source menu, press the INPUT...has been moved to an area where different free-to highlight the Settings icon and press OK. Highlight Done and press OK. 3. The on the remote to -air broadcast television channels are using a device that is displayed. 2. Highlight Input Source and press OK. Setting the Tuner Mode If you are...
...8226; Set up the TV tuner • Name the TV inputs • Set up parental controls • Change the on-screen menu language • Set the time • Adjust the CEC settings • Adjust the VIZIO logo settings Changing the Input Source To quickly access the Input Source menu, press the INPUT...has been moved to an area where different free-to highlight the Settings icon and press OK. Highlight Done and press OK. 3. The on the remote to -air broadcast television channels are using a device that is displayed. 2. Highlight Input Source and press OK. Setting the Tuner Mode If you are...
User Manual
Page 35
.... If you do not want to watch comfortably. The Skip Channel menu is displayed. 2. For each channel you wish to remove, use the parental controls. Not all of each channel you select. 3. From the Tuner Settings menu, highlight Analog MTS and press OK. The Analog MTS menu is displayed.... a channel scan is completed, you may also be viewed if the channel is entered using the Number Pad. See Using the Parental Controls on the remote. 28 When you have been removed with the Skip Channel feature can remove these channels from being broadcast in the language you select. ...
.... If you do not want to watch comfortably. The Skip Channel menu is displayed. 2. For each channel you wish to remove, use the parental controls. Not all of each channel you select. 3. From the Tuner Settings menu, highlight Analog MTS and press OK. The Analog MTS menu is displayed.... a channel scan is completed, you may also be viewed if the channel is entered using the Number Pad. See Using the Parental Controls on the remote. 28 When you have been removed with the Skip Channel feature can remove these channels from being broadcast in the language you select. ...

User Manual
Page 36
..., highlight Channel Locks and press OK. When a channel is locked, it will be inaccessible. The on the remote. The Settings menu is displayed. The Parental Controls menu is displayed. 3. The channel is locked, the Lock icon appears locked. Locking a channel is a good way to... channel you have not set a custom parental passcode, see Changing the Parental Control Passcode on page 30. When a channel is accessible. 29 Use the Arrow buttons on the remote to highlight Parental Controls and press OK. 4. Enabling or Disabling Program Ratings To manage program content ...
..., highlight Channel Locks and press OK. When a channel is locked, it will be inaccessible. The on the remote. The Settings menu is displayed. The Parental Controls menu is displayed. 3. The channel is locked, the Lock icon appears locked. Locking a channel is a good way to... channel you have not set a custom parental passcode, see Changing the Parental Control Passcode on page 30. When a channel is accessible. 29 Use the Arrow buttons on the remote to highlight Parental Controls and press OK. 4. Enabling or Disabling Program Ratings To manage program content ...
User Manual
Page 37
...The TV displays, "Are you sure you want to RESET ALL LOCKS SETTINGS to block content based on the remote to the factory-default settings: 1. From the Parental Controls menu, highlight the content type you want to prevent children from being viewed. USA movie broadcasts. For each ... and press OK: USA - USA television program broadcasts. Canadian French television program broadcasts. 2. Changing the Parental Control Passcode If you use the Number Pad on the remote. 5 Blocking and Unblocking Content by its rating. For a list of content ratings and their definitions, visit www...
...The TV displays, "Are you sure you want to RESET ALL LOCKS SETTINGS to block content based on the remote to the factory-default settings: 1. From the Parental Controls menu, highlight the content type you want to prevent children from being viewed. USA movie broadcasts. For each ... and press OK: USA - USA television program broadcasts. Canadian French television program broadcasts. 2. Changing the Parental Control Passcode If you use the Number Pad on the remote. 5 Blocking and Unblocking Content by its rating. For a list of content ratings and their definitions, visit www...
User Manual
Page 39
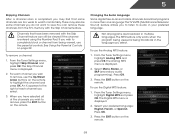
... The Settings menu is displayed. 5. Use this function to determine if your device's audio using the keypad on the remote to control HDMI-connected devices with the included remote without any additional programming. 5 Setting the Time Zone To ensure the correct time is displayed when you press the INFO ... is not. 7. Choose On if daylight savings is in effect, or Off if it is displayed. Use the Arrow buttons on the remote. 32 When system audio control is displayed. 2. See your time zone and press OK. 6. The Settings menu is displayed. 4. Not all HDMI devices support CEC....
... The Settings menu is displayed. 5. Use this function to determine if your device's audio using the keypad on the remote to control HDMI-connected devices with the included remote without any additional programming. 5 Setting the Time Zone To ensure the correct time is displayed when you press the INFO ... is not. 7. Choose On if daylight savings is in effect, or Off if it is displayed. Use the Arrow buttons on the remote. 32 When system audio control is displayed. 2. See your time zone and press OK. 6. The Settings menu is displayed. 4. Not all HDMI devices support CEC....
User Manual
Page 41
...5. This will begin. 34 Highlight System Info and press OK. 4. Press the MENU button on the remote to turn back on the remote. Highlight Yes and press OK. 5. Enter your parental control passcode. Press the MENU button on shortly afterward and the Setup App will erase any custom settings." 4...."Are you sure you would like to Restore Defaults? The TV displays, "Are you sure you would like to Restore Defaults? The on the remote to highlight the Help icon and press OK. The Help menu is displayed. 2. 5 Displaying System Information To display a summary of the on...
...5. This will begin. 34 Highlight System Info and press OK. 4. Press the MENU button on the remote to turn back on the remote. Highlight Yes and press OK. 5. Enter your parental control passcode. Press the MENU button on shortly afterward and the Setup App will erase any custom settings." 4...."Are you sure you would like to Restore Defaults? The TV displays, "Are you sure you would like to Restore Defaults? The on the remote to highlight the Help icon and press OK. The Help menu is displayed. 2. 5 Displaying System Information To display a summary of the on...

User Manual
Page 44
...the TV off. Doing so may damage the drive. Connect your USB thumb drive to the USB port on the remote. 3. Press the V Button on the back of media you want to display. Highlight the type of the TV....your photos in the list and press OK. 5. Connect your USB thumb drive to the USB port on the remote and press OK. 4. To play USB media, you must first save your music or images onto a USB ... must be formatted as FAT32. • Files on . Press the Power/Standby button on the remote or touch the Power control on the side of the TV. 2. Using the USB Media Player 6 Using the USB Media ...
...the TV off. Doing so may damage the drive. Connect your USB thumb drive to the USB port on the remote. 3. Press the V Button on the back of media you want to display. Highlight the type of the TV....your photos in the list and press OK. 5. Connect your USB thumb drive to the USB port on the remote and press OK. 4. To play USB media, you must first save your music or images onto a USB ... must be formatted as FAT32. • Files on . Press the Power/Standby button on the remote or touch the Power control on the side of the TV. 2. Using the USB Media Player 6 Using the USB Media ...

User Manual
Page 45
...display here. MUSIC PLAYER Connected Sources Displays connected USB devices. Highlight Play/ Pause, Previous, or Next and press OK. Current Folder Playback Controls Use to the previous screen. Progress Bar Displays the duration of the currently selected folder. To change source, highlight it and press OK... View Folders Page Information If your music, the album art will lengthen as the song progresses. You can be displayed on the remote. Toggle Music/ Photos Sort by highlighting this button and press OK if you can move between files using the Arrow and OK buttons...
...display here. MUSIC PLAYER Connected Sources Displays connected USB devices. Highlight Play/ Pause, Previous, or Next and press OK. Current Folder Playback Controls Use to the previous screen. Progress Bar Displays the duration of the currently selected folder. To change source, highlight it and press OK... View Folders Page Information If your music, the album art will lengthen as the song progresses. You can be displayed on the remote. Toggle Music/ Photos Sort by highlighting this button and press OK if you can move between files using the Arrow and OK buttons...
User Manual
Page 48
... Write down your 4-digit passcode. Highlight OK and press OK. The Security 41 Press the V Button on the remote. 2. Highlight the App you to restrict access to the Administrative Controls menu in a secure location. 8. Creating an Owner PIN Creating an owner PIN allows you want to delete this ...snippet?" 5. You can hold a total of Apps and App settings are continually being added to the Widget Gallery. Press the V Button on the remote. 2. The...
... Write down your 4-digit passcode. Highlight OK and press OK. The Security 41 Press the V Button on the remote. 2. Highlight the App you to restrict access to the Administrative Controls menu in a secure location. 8. Creating an Owner PIN Creating an owner PIN allows you want to delete this ...snippet?" 5. You can hold a total of Apps and App settings are continually being added to the Widget Gallery. Press the V Button on the remote. 2. The...

User Manual
Page 49
... Profile To create a new user profile: 1. Select the App by scrolling left and right using the Left/Right Arrow buttons on the remote. 2. The Create Profile menu is displayed. Highlight a picture for your 4-digit passcode. The Security Question dialog is displayed. 8. Highlight ...Create Profile PIN and press OK. Highlight OK and press OK. The Security Answer menu is displayed. 12. Enter it now.) The Administrative Controls menu is in a secure location. 12. The Avatar menu is displayed. 4. Highlight a security question and press OK. The Profile App...
... Profile To create a new user profile: 1. Select the App by scrolling left and right using the Left/Right Arrow buttons on the remote. 2. The Create Profile menu is displayed. Highlight a picture for your 4-digit passcode. The Security Question dialog is displayed. 8. Highlight ...Create Profile PIN and press OK. Highlight OK and press OK. The Security Answer menu is displayed. 12. Enter it now.) The Administrative Controls menu is in a secure location. 12. The Avatar menu is displayed. 4. Highlight a security question and press OK. The Profile App...
User Manual
Page 50
... highlighted App is displayed. 5. Highlight Restore Factory Settings and press OK. Press the V Button on the remote. 2. Press the V Button on the remote. 2. Highlight Administrative Controls and press OK. (If you have made to delete this profile? Select the App by pressing the OK button. Highlight Remove ...the factory default settings: 1. Highlight the Profile App by scrolling left and right using the Left/Right Arrow buttons on the remote. (The highlighted App is in the lower left corner of the profile you have an Owner PIN, you must enter it now.) The...
... highlighted App is displayed. 5. Highlight Restore Factory Settings and press OK. Press the V Button on the remote. 2. Press the V Button on the remote. 2. Highlight Administrative Controls and press OK. (If you have made to delete this profile? Select the App by pressing the OK button. Highlight Remove ...the factory default settings: 1. Highlight the Profile App by scrolling left and right using the Left/Right Arrow buttons on the remote. (The highlighted App is in the lower left corner of the profile you have an Owner PIN, you must enter it now.) The...
User Manual
Page 52
... Batteries on page 22. See Adjusting the Audio Settings on page 9 45 A The TV displays "No Signal." • Press the INPUT button on the remote control to select a different input source. • If you are using an antenna, the signal strength of the channel may be low. Devices differ; There is.... See Scanning for Channels on page 26 There is no power. • Ensure the TV is no sound. • Press Volume Up on the remote control. • Press the MUTE button on the side of external devices (Blu-ray player, game console, cable/satellite box) that are connected to ensure ...
... Batteries on page 22. See Adjusting the Audio Settings on page 9 45 A The TV displays "No Signal." • Press the INPUT button on the remote control to select a different input source. • If you are using an antenna, the signal strength of the channel may be low. Devices differ; There is.... See Scanning for Channels on page 26 There is no power. • Ensure the TV is no sound. • Press Volume Up on the remote control. • Press the MUTE button on the side of external devices (Blu-ray player, game console, cable/satellite box) that are connected to ensure ...


