Download
Page 4
... the apparatus, the apparatus has been exposed to rain or moisture, does not operate normally or has been dropped. • Unplug the power cord before turning on your TV. The manufacturer's warranty does not cover user abuse or improper installations. • The power cord must be replaced when using different voltage...
... the apparatus, the apparatus has been exposed to rain or moisture, does not operate normally or has been dropped. • Unplug the power cord before turning on your TV. The manufacturer's warranty does not cover user abuse or improper installations. • The power cord must be replaced when using different voltage...

Download
Page 8
... Channels 45 Blocking and Unblocking Content by Rating 46 Changing the Parental Control Passcode 46 Resetting the Content Locks 46 Adjusting the CEC Settings 47 Turning the Power Indicator On or Off 47 Using the Reset & Admin Menu 48 Restoring the TV to Factory Default Settings 48 Using the Guided ... 50 Using the USB Media Player 50 Preparing Your USB Drive to the My Apps Tab 57 Deleting an App from the TV 50 Using VIZIO Internet Apps Plus® (V.I.A. Plus App Dock 54 Using the Hot Keys 54 Using the Fullscreen V.I .A. Plus)....... 54 Using the V.I .A. Plus Apps Window 55 ...
... Channels 45 Blocking and Unblocking Content by Rating 46 Changing the Parental Control Passcode 46 Resetting the Content Locks 46 Adjusting the CEC Settings 47 Turning the Power Indicator On or Off 47 Using the Reset & Admin Menu 48 Restoring the TV to Factory Default Settings 48 Using the Guided ... 50 Using the USB Media Player 50 Preparing Your USB Drive to the My Apps Tab 57 Deleting an App from the TV 50 Using VIZIO Internet Apps Plus® (V.I.A. Plus App Dock 54 Using the Hot Keys 54 Using the Fullscreen V.I .A. Plus)....... 54 Using the V.I .A. Plus Apps Window 55 ...
Download
Page 13
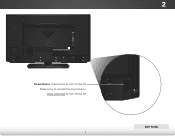
Press and hold to access the Input menu. 2 Power/Input - Press once to turn on the TV. Press once to turn off the TV. 7 Side Panel
Press and hold to access the Input menu. 2 Power/Input - Press once to turn on the TV. Press once to turn off the TV. 7 Side Panel
Download
Page 14
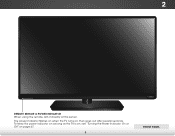
2 Front Panel REMOTE SENSOR & POWER INDICATOR When using the remote, aim it directly at this sensor. To keep the power indicator on as long as the TV is on, see "Turning the Power Indicator On or Off" on , then goes out after several seconds. The power indicator flashes on when the TV turns on page 47. 8 Front Panel
2 Front Panel REMOTE SENSOR & POWER INDICATOR When using the remote, aim it directly at this sensor. To keep the power indicator on as long as the TV is on, see "Turning the Power Indicator On or Off" on , then goes out after several seconds. The power indicator flashes on when the TV turns on page 47. 8 Front Panel

Download
Page 15
... manually enter a digital sub-channel. (For example, 18-4 or 18-5.) Remote Control 9 Dash Use with number pad to the channel last viewed. Mute Turn the audio off . Wide Switch the display mode. Menu Display the on or off or on -screen menu. Channel Up/Down Change the channel. Number... Pad Manually enter a channel. Power Turn TV on -screen menu. Guide Display the info window. Ok Select the highlighted menu option. V Button Open the VIZIO Internet Apps Plus® dock.
... manually enter a digital sub-channel. (For example, 18-4 or 18-5.) Remote Control 9 Dash Use with number pad to the channel last viewed. Mute Turn the audio off . Wide Switch the display mode. Menu Display the on or off or on -screen menu. Channel Up/Down Change the channel. Number... Pad Manually enter a channel. Power Turn TV on -screen menu. Guide Display the info window. Ok Select the highlighted menu option. V Button Open the VIZIO Internet Apps Plus® dock.

Download
Page 17
...)* • STEREO AUDIO * Maximum Resolution Connecting Your Devices Connecting A Device Your TV can be used (HDMI-1, HDMI-2, etc.). Turn the TV and your device has a video port that matches an available port on . Turn the TV and your device on the TV (HDMI, Component, etc.). 2. Connect the appropriate cable (not included) to...
...)* • STEREO AUDIO * Maximum Resolution Connecting Your Devices Connecting A Device Your TV can be used (HDMI-1, HDMI-2, etc.). Turn the TV and your device has a video port that matches an available port on . Turn the TV and your device on the TV (HDMI, Component, etc.). 2. Connect the appropriate cable (not included) to...

Download
Page 20
... TV and your audio device off. 3. Connect the appropriate cable (not included) to an audio device, such as a receiver or sound bar. 1. Turn the TV and your device on the TV (HDMI or RCA). 2. Verify that your device has an audio port that matches an available port on . ...3 Home Audio Receiver VIZIO Sound Bar HDMI CABLE BEST • CEC 2-WAY COMMUNICATION • 2.0-5.1 DIGITAL AUDIO • PCM, DTS, DOLBY DIGITAL OPTICAL/SPDIF CABLE BETTER • PCM STREAM &#...
... TV and your audio device off. 3. Connect the appropriate cable (not included) to an audio device, such as a receiver or sound bar. 1. Turn the TV and your device on the TV (HDMI or RCA). 2. Verify that your device has an audio port that matches an available port on . ...3 Home Audio Receiver VIZIO Sound Bar HDMI CABLE BEST • CEC 2-WAY COMMUNICATION • 2.0-5.1 DIGITAL AUDIO • PCM, DTS, DOLBY DIGITAL OPTICAL/SPDIF CABLE BETTER • PCM STREAM &#...
Download
Page 24
..., have the wireless password ready. • If you are connecting to your TV ready for use. Completing the First-Time Setup The first time you turn on the TV, the Setup App will guide you through each of available networks and press OK. ChoisCishsoeiszis"sHeozm"HeoUmseeU" speo"uproMuroMdeodDeoDmoimciilceileouou"S"StotorereDDeemmoo"" ppoouurr DD...
..., have the wireless password ready. • If you are connecting to your TV ready for use. Completing the First-Time Setup The first time you turn on the TV, the Setup App will guide you through each of available networks and press OK. ChoisCishsoeiszis"sHeozm"HeoUmseeU" speo"uproMuroMdeodDeoDmoimciilceileouou"S"StotorereDDeemmoo"" ppoouurr DD...
Download
Page 31
...11 Point White Balance, and test patterns allow you wish to adjust, then press OK to adjust the HSB color and 11 point white balance, turn color channels off for testing, and display color bar, flat, and ramp test patterns. Adjusting the Color Tuner Settings The Color Tuner settings allow ... to save the setting. To adjust the professional picture settings: 1. Use the Arrow buttons to highlight the setting you to change the setting: VIZIO Professional picture Color Tuner Rename Picture Mode Create Picture Mode Lock Picture Mode Delete Picture Mode • Color Tuner -
...11 Point White Balance, and test patterns allow you wish to adjust, then press OK to adjust the HSB color and 11 point white balance, turn color channels off for testing, and display color bar, flat, and ramp test patterns. Adjusting the Color Tuner Settings The Color Tuner settings allow ... to save the setting. To adjust the professional picture settings: 1. Use the Arrow buttons to highlight the setting you to change the setting: VIZIO Professional picture Color Tuner Rename Picture Mode Create Picture Mode Lock Picture Mode Delete Picture Mode • Color Tuner -
Download
Page 32
Use the Arrow buttons on . Use the Arrow buttons to highlight another color channel to turn off or on the remote to adjust. An X appears over a color channel that has been turned off at the same time. 5. When you wish to highlight Red, Green, or Blue. 3. From the Color Tuner menu, use the... are finished press the OK button to adjust the value. The Color Tuner menu is displayed. To adjust the 11 Point White Balance settings: 1. 5 To turn color channels off and on . Press the OK button to highlight Color Tuner, and then press OK. Only two color channels can be...
Use the Arrow buttons on . Use the Arrow buttons to highlight another color channel to turn off or on the remote to adjust. An X appears over a color channel that has been turned off at the same time. 5. When you wish to highlight Red, Green, or Blue. 3. From the Color Tuner menu, use the... are finished press the OK button to adjust the value. The Color Tuner menu is displayed. To adjust the 11 Point White Balance settings: 1. 5 To turn color channels off and on . Press the OK button to highlight Color Tuner, and then press OK. Only two color channels can be...
Download
Page 37
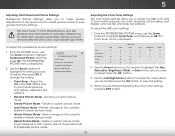
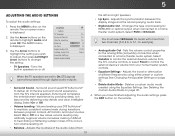
...system controls. 5 Adjusting the Audio Settings To adjust the audio settings: 1. Use the Arrow buttons on or off . • Balance - VIZIO Audio TV Speakers Surround Sound Volume Leveling Balance - Surround sound uses DTS TruSurround™ to control the external device's volume from the TV's...Mode - Sets the volume control properties for the anaAlBoCg RCA (red/white) connectors when connected to hear dialog or flattening sudden noises. Turns the built-in speakers on the remote to On, DTS signals cannot be passed through digital audio outputs. • Surround Sound - ...
...system controls. 5 Adjusting the Audio Settings To adjust the audio settings: 1. Use the Arrow buttons on or off . • Balance - VIZIO Audio TV Speakers Surround Sound Volume Leveling Balance - Surround sound uses DTS TruSurround™ to control the external device's volume from the TV's...Mode - Sets the volume control properties for the anaAlBoCg RCA (red/white) connectors when connected to hear dialog or flattening sudden noises. Turns the built-in speakers on the remote to On, DTS signals cannot be passed through digital audio outputs. • Surround Sound - ...
Download
Page 39
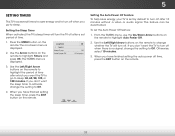
...VIZIO Timers Sleep Timer Auto Power Off Off 10 minutes 3. When you have finished setting the auto power off after which you want the TV to go to Off. Otherwise, Wisdee lecZtoo1m0 mNinorumtael s.Panoramic 3. 5 Setting Timers This TV has several timers to save energy, your TV is set by default to turn... to sleep. Use the Left/Right Arrow buttons on the remote to Off. 4. The Timers menu is no signal, change whether the TV will turn off after 10 minutes without a video or audio signal. If you have finished setting the sleep timer, press the EXIT button on -screen menu ...
...VIZIO Timers Sleep Timer Auto Power Off Off 10 minutes 3. When you have finished setting the auto power off after which you want the TV to go to Off. Otherwise, Wisdee lecZtoo1m0 mNinorumtael s.Panoramic 3. 5 Setting Timers This TV has several timers to save energy, your TV is set by default to turn... to sleep. Use the Left/Right Arrow buttons on the remote to Off. 4. The Timers menu is no signal, change whether the TV will turn off after 10 minutes without a video or audio signal. If you have finished setting the sleep timer, press the EXIT button on -screen menu ...

Download
Page 53
...must select On. • System Audio Control - Use this setting if you to control HDMI-connected devices with the included remote without any additional programming. Turning the Power Indicator On or Off The Power Indicator on the front of your TV normally does not glow when the TV is connected and...on . See your device's user manual for details. Use the Arrow buttons on the remote to determine if your device is on the remote. To turn the Power Indicator Light on the remote. Use the Arrow buttons on the remote to adjust each setting: • CEC - The Power Indicator menu is...
...must select On. • System Audio Control - Use this setting if you to control HDMI-connected devices with the included remote without any additional programming. Turning the Power Indicator On or Off The Power Indicator on the front of your TV normally does not glow when the TV is connected and...on . See your device's user manual for details. Use the Arrow buttons on the remote to determine if your device is on the remote. To turn the Power Indicator Light on the remote. Use the Arrow buttons on the remote to adjust each setting: • CEC - The Power Indicator menu is...
Download
Page 54
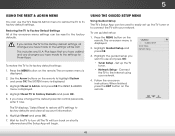
To use and press OK: • Tuner Setup - VIZIO Guided Setup Tuner Setup Network Setup 3. When finished, press the EXIT button on the remote. To restore the TV to factory defaults and clear all ... for those Apps. Press the MENU button on the remote. 48 Follow the on shortly afterward and the Setup App will turn off. Use the Arrow buttons on the remote to turn back on -screen instructions. Highlight the guided setup you restore the TV to the factory default settings, all TV settings...
To use and press OK: • Tuner Setup - VIZIO Guided Setup Tuner Setup Network Setup 3. When finished, press the EXIT button on the remote. To restore the TV to factory defaults and clear all ... for those Apps. Press the MENU button on the remote. 48 Follow the on shortly afterward and the Setup App will turn off. Use the Arrow buttons on the remote to turn back on -screen instructions. Highlight the guided setup you restore the TV to the factory default settings, all TV settings...
Download
Page 56
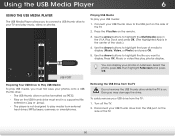
... USB drive from the TV Do not remove the USB thumb drive while the TV is not designed to the USB port on the remote. 3. Turn off the TV. 2. Using the USB Media Player 6 Using the USB Media Player The USB Media Player allows you to connect a USB thumb drive to...
... USB drive from the TV Do not remove the USB thumb drive while the TV is not designed to the USB port on the remote. 3. Turn off the TV. 2. Using the USB Media Player 6 Using the USB Media Player The USB Media Player allows you to connect a USB thumb drive to...

Download
Page 66
..., but there is securely attached to the TV. • Press the Power/Standby button on the remote or on the side of the TV to turn the TV on the screen. • Ensure all cables are securely attached to the TV. • Ensure all cables to ensure they are securely attached... move the antenna around the room or close to a window for details. • Adjust Brightness, Contrast, or Backlight. see your antenna is not audible. • Turn off . • Check the audio settings. See Adjusting the Audio Settings on the remote to ensure mute is no sound. • Press Volume Up on...
..., but there is securely attached to the TV. • Press the Power/Standby button on the remote or on the side of the TV to turn the TV on the screen. • Ensure all cables are securely attached to the TV. • Ensure all cables to ensure they are securely attached... move the antenna around the room or close to a window for details. • Adjust Brightness, Contrast, or Backlight. see your antenna is not audible. • Turn off . • Check the audio settings. See Adjusting the Audio Settings on the remote to ensure mute is no sound. • Press Volume Up on...

Download
Page 71
... Act Open Source Software Notice Your VIA device may contain GPL executables and LGPL libraries that are designed to correct the interference by turning the equipment off and on, the user is the responsibilities of copyrights to which can radiate radio frequency energy, and if not... an experienced radio/TV technician for each area. Use the AC cords listed below for help. FCC warning Changes or modifications not expressly approved by VIZIO. Legal & Compliance D FCC Class B Radio Interference Statement NOTE: This equipment has been tested and found to comply with the limits for a ...
... Act Open Source Software Notice Your VIA device may contain GPL executables and LGPL libraries that are designed to correct the interference by turning the equipment off and on, the user is the responsibilities of copyrights to which can radiate radio frequency energy, and if not... an experienced radio/TV technician for each area. Use the AC cords listed below for help. FCC warning Changes or modifications not expressly approved by VIZIO. Legal & Compliance D FCC Class B Radio Interference Statement NOTE: This equipment has been tested and found to comply with the limits for a ...
Download
Page 2
... not cover user abuse or improper installations. • The power cord must be maintained between your TV and any of the following safety instructions before turning on your TV close to avoid causing fire, electric shock, or component damage. • A distance of at plugs, convenience receptacles, and the point where they...
... not cover user abuse or improper installations. • The power cord must be maintained between your TV and any of the following safety instructions before turning on your TV close to avoid causing fire, electric shock, or component damage. • A distance of at plugs, convenience receptacles, and the point where they...

Download
Page 5
...decrease loudness of the audio. WIDE Switch the display mode. LAST Return to manually enter a digital sub-channel. (For example, 18-4 or 18-5.) CLOSED CAPTIONS Turn closed captions on -screen menu or app. EXIT Close the on -screen menu. MENU Display the on -screen menu. NUMBER PAD Manually enter a channel. ... menu option. GUIDE Display the info window. CHANNEL UP/DOWN Change the channel. DASH Use with number pad to the channel last viewed. MUTE Turn the audio off . A/V CONTROLS Control USB media player. POWER Turn TV on -screen menu. BACK Go to the previous on-screen menu.
...decrease loudness of the audio. WIDE Switch the display mode. LAST Return to manually enter a digital sub-channel. (For example, 18-4 or 18-5.) CLOSED CAPTIONS Turn closed captions on -screen menu or app. EXIT Close the on -screen menu. MENU Display the on -screen menu. NUMBER PAD Manually enter a channel. ... menu option. GUIDE Display the info window. CHANNEL UP/DOWN Change the channel. DASH Use with number pad to the channel last viewed. MUTE Turn the audio off . A/V CONTROLS Control USB media player. POWER Turn TV on -screen menu. BACK Go to the previous on-screen menu.
Download
Page 11
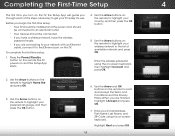
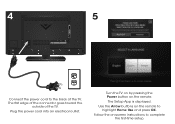
The flat edge of the connector goes toward the outside of the TV. The Setup App is displayed. Follow the on the remote to highlight Home Use and press OK. Use the Arrow buttons on -screen instructions to complete the first-time setup. Turn the TV on by pressing the Power button on the remote. 4 5 Connect the power cord to the back of the TV. Plug the power cord into an electrical outlet.
The flat edge of the connector goes toward the outside of the TV. The Setup App is displayed. Follow the on the remote to highlight Home Use and press OK. Use the Arrow buttons on -screen instructions to complete the first-time setup. Turn the TV on by pressing the Power button on the remote. 4 5 Connect the power cord to the back of the TV. Plug the power cord into an electrical outlet.


