Download
Page 4
...your TV. • Use only with the cart, stand, tripod, bracket, or table specified by the manufacturer, or sold with arrowhead symbol within an equilateral triangle is required, contact your dealer and refer all servicing to qualified service personnel. If you to rain or...parts causing a fire or electric shock. Do not install your TV close to repair or service your TV yourself. Wait before cleaning your TV. • When moving the cart/apparatus combination to protect it will protect your TV from the type of the display. To ensure reliable operation...
...your TV. • Use only with the cart, stand, tripod, bracket, or table specified by the manufacturer, or sold with arrowhead symbol within an equilateral triangle is required, contact your dealer and refer all servicing to qualified service personnel. If you to rain or...parts causing a fire or electric shock. Do not install your TV close to repair or service your TV yourself. Wait before cleaning your TV. • When moving the cart/apparatus combination to protect it will protect your TV from the type of the display. To ensure reliable operation...
Download
Page 5
...the remote control or injure the operator. your TV, unplug the power cord and contact your dealer immediately. Continuous use your TV, hold the AC/DC power adapter, not the cord. Continued use by qualified service personnel only. The power cord ...cables are for an extended period of time, unplug the power cord. • To reduce risk of uninsulated DANGEROUS VOLTAGE within an equilateral triangle is damaged, the internal components may result in fire or electric shock. • Do not use in an area with instructions. Pulling on the apparatus. • The mains plug...
...the remote control or injure the operator. your TV, unplug the power cord and contact your dealer immediately. Continuous use your TV, hold the AC/DC power adapter, not the cord. Continued use by qualified service personnel only. The power cord ...cables are for an extended period of time, unplug the power cord. • To reduce risk of uninsulated DANGEROUS VOLTAGE within an equilateral triangle is damaged, the internal components may result in fire or electric shock. • Do not use in an area with instructions. Pulling on the apparatus. • The mains plug...
Download
Page 6
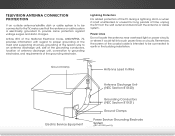
.... Remember, the screen of time, unplug the TV from the wall outlet and disconnect the antenna or cable system. Ground Clamp Antenna Lead In Wire Electric Service Equipment Antenna Discharge Unit (NEC Section 810-20) Grounding Conductors (NEC Section 810-21) Ground Clamps Power Service Grounding Electrode System (NEC ART 250, part H) Article 810 of the National Electrical Code, ANSI/NFPSA 70...
.... Remember, the screen of time, unplug the TV from the wall outlet and disconnect the antenna or cable system. Ground Clamp Antenna Lead In Wire Electric Service Equipment Antenna Discharge Unit (NEC Section 810-20) Grounding Conductors (NEC Section 810-21) Ground Clamps Power Service Grounding Electrode System (NEC ART 250, part H) Article 810 of the National Electrical Code, ANSI/NFPSA 70...
Download
Page 7
... Custom Audio Mode 32 Setting Timers 33 Setting the Sleep Timer 33 Setting the Auto Power Off Feature 33 Using the Network Connection Menu 34 Connecting to a Wireless Network 34 Changing the Manual Setup Settings 34 Finding MAC Addresses for Network Setup 35 Connecting to a Hidden Network 35 Setting Up the Tuner 36 Selecting a Tuner Input 36 Scanning for Channels 36 Adding New Channels 37 Skipping Channels 38 Listening to Alternate Audio 39 Changing the Analog Audio Language 39 Changing the Digital Audio Language 39 Setting Up Closed Captioning 40 1 Audio Cable Types 15...
... Custom Audio Mode 32 Setting Timers 33 Setting the Sleep Timer 33 Setting the Auto Power Off Feature 33 Using the Network Connection Menu 34 Connecting to a Wireless Network 34 Changing the Manual Setup Settings 34 Finding MAC Addresses for Network Setup 35 Connecting to a Hidden Network 35 Setting Up the Tuner 36 Selecting a Tuner Input 36 Scanning for Channels 36 Adding New Channels 37 Skipping Channels 38 Listening to Alternate Audio 39 Changing the Analog Audio Language 39 Changing the Digital Audio Language 39 Setting Up Closed Captioning 40 1 Audio Cable Types 15...

Download
Page 8
... Using the Parental Controls 45 Accessing the Parental Controls Menu 45 Enabling or Disabling Program Ratings 45 Locking and Unlocking Channels 45 Blocking and Unblocking Content by Rating 46 Changing the Parental Control Passcode 46 Resetting the Content Locks 46 Adjusting the CEC Settings 47 Turning the Power Indicator On or Off 47 Using the Reset & Admin Menu 48 Restoring the TV to Factory Default Settings 48 Using the Guided Setup Menu 48 Using Guided Setup 48 Using the Info Window 49 Using the USB Media Player 50 Using the USB Media Player...
... Using the Parental Controls 45 Accessing the Parental Controls Menu 45 Enabling or Disabling Program Ratings 45 Locking and Unlocking Channels 45 Blocking and Unblocking Content by Rating 46 Changing the Parental Control Passcode 46 Resetting the Content Locks 46 Adjusting the CEC Settings 47 Turning the Power Indicator On or Off 47 Using the Reset & Admin Menu 48 Restoring the TV to Factory Default Settings 48 Using the Guided Setup Menu 48 Using Guided Setup 48 Using the Info Window 49 Using the USB Media Player 50 Using the USB Media Player...
Download
Page 11
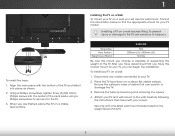
E420i-B0 Screw Size: Hole Pattern: Weight w/o Stand: M4 200mm (V) x 200mm (H) 16.0 lbs Be sure the mount you . Disconnect any cables connected to your mount. Use only with a UL-listed wall mount bracket rated for your TV model: Installing a TV on a wall, you can scratch or damage the TV. 3. Consult the information below to find the appropriate mount for the weight/load of the neck piece using a Phillips screwdriver to the TV. 3. After...
E420i-B0 Screw Size: Hole Pattern: Weight w/o Stand: M4 200mm (V) x 200mm (H) 16.0 lbs Be sure the mount you . Disconnect any cables connected to your mount. Use only with a UL-listed wall mount bracket rated for your TV model: Installing a TV on a wall, you can scratch or damage the TV. 3. Consult the information below to find the appropriate mount for the weight/load of the neck piece using a Phillips screwdriver to the TV. 3. After...

Download
Page 15
.... Guide Display the info window. Arrow Navigate the on -screen menu. Last Return to the previous on . 2 Remote Control Input Change the currently-displayed input. Number Pad Manually enter a channel. A/V Controls Control USB media player. Hot Keys Perform functions within an on or off. Power Turn TV on -screen menu or app. Menu Display the on or off or on -screen menu. Channel Up/Down Change the channel. Closed Captions Turn closed captions on -screen menu. App launcher Quickly launch the pictured app. Dash Use with number pad to manually enter a digital...
.... Guide Display the info window. Arrow Navigate the on -screen menu. Last Return to the previous on . 2 Remote Control Input Change the currently-displayed input. Number Pad Manually enter a channel. A/V Controls Control USB media player. Hot Keys Perform functions within an on or off. Power Turn TV on -screen menu or app. Menu Display the on or off or on -screen menu. Channel Up/Down Change the channel. Closed Captions Turn closed captions on -screen menu. App launcher Quickly launch the pictured app. Dash Use with number pad to manually enter a digital...

Download
Page 27
... program is already formatted for more information. 21 The TV can be connected to highlight the aspect ratio you are watching widescreen (1.85:1 or 2.35:1) content, black bars will still appear on the remote. You change the input source in five different modes: Normal, Stretch, Panoramic, Wide, and Zoom. 5 Changing the Input Source Changing the Screen Aspect Ratio External devices such as DVD players, Blu-ray Players, and video game...
... program is already formatted for more information. 21 The TV can be connected to highlight the aspect ratio you are watching widescreen (1.85:1 or 2.35:1) content, black bars will still appear on the remote. You change the input source in five different modes: Normal, Stretch, Panoramic, Wide, and Zoom. 5 Changing the Input Source Changing the Screen Aspect Ratio External devices such as DVD players, Blu-ray Players, and video game...
Download
Page 29
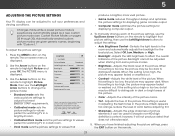
... picture modes. To manually change the picture mode: VIZIO Picture Picture Mode Auto Brightness Control Backlight - Adjusts the LED brightness to affect the overall brilliance of the picture. Adjusts the black level of the picture. When this setting is too low, the picture may appear faded Input or wWaideshedCoCut. When this setting is too high, the picture may be too dark to distinguish details. Adjusts the intensity Picture Audio Tint - Press the MENU button on the remote to highlight Picture...
... picture modes. To manually change the picture mode: VIZIO Picture Picture Mode Auto Brightness Control Backlight - Adjusts the LED brightness to affect the overall brilliance of the picture. Adjusts the black level of the picture. When this setting is too low, the picture may appear faded Input or wWaideshedCoCut. When this setting is too high, the picture may be too dark to distinguish details. Adjusts the intensity Picture Audio Tint - Press the MENU button on the remote to highlight Picture...
Download
Page 31
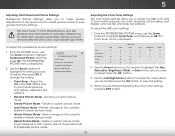
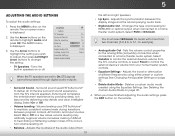
... buttons to adjust the HSB color and 11 point white balance, turn color channels off for testing, and display color bar, flat, and ramp test patterns. Input Wide CC 4. From the Picture menu, use the Arrow buttons to that custom picture mode will be set colors, and a specialized light meter. Create a custom picture mode. • Lock Picture Mode - To adjust the HSB color settings: 1. Delete a custom picture mode. Use the Arrow buttons on the remote to save groups of the color you are finished adjusting the color tuner settings...
... buttons to adjust the HSB color and 11 point white balance, turn color channels off for testing, and display color bar, flat, and ramp test patterns. Input Wide CC 4. From the Picture menu, use the Arrow buttons to that custom picture mode will be set colors, and a specialized light meter. Create a custom picture mode. • Lock Picture Mode - To adjust the HSB color settings: 1. Delete a custom picture mode. Use the Arrow buttons on the remote to save groups of the color you are finished adjusting the color tuner settings...
Download
Page 37
... anaAlBoCg RCA (red/white) connectors when connected to hear dialog or flattening sudden noises. Ne•tworkDeSelettitnegsAudHeilop Mode - The Audio menu is displayed. 2. VIZIO Audio TV Speakers Surround Sound Volume Leveling Balance - Lip Sync - Select On or Off. • Volume Leveling - Changes the type of the audio output from your home theater system controls. 5 Adjusting the Audio Settings To adjust the audio settings: 1. Press the MENU button on page 32. The on page 32. 4. Turns the built...
... anaAlBoCg RCA (red/white) connectors when connected to hear dialog or flattening sudden noises. Ne•tworkDeSelettitnegsAudHeilop Mode - The Audio menu is displayed. 2. VIZIO Audio TV Speakers Surround Sound Volume Leveling Balance - Lip Sync - Select On or Off. • Volume Leveling - Changes the type of the audio output from your home theater system controls. 5 Adjusting the Audio Settings To adjust the audio settings: 1. Press the MENU button on page 32. The on page 32. 4. Turns the built...
Download
Page 44
... 3D ABC Input Wide CC Sleep Timer Picture Audio Network Settings Help 38 Channels that some channels you wish to watch comfortably. A P appears to the right of each channel you wish to highlight the channel and press OK. 5 Skipping Channels After a channel scan is completed, you select. 3. For each channel you may also be viewed if the channel is displayed. 2. See Locking and Unlocking Channels on the remote to completely block a channel from the...
... 3D ABC Input Wide CC Sleep Timer Picture Audio Network Settings Help 38 Channels that some channels you wish to watch comfortably. A P appears to the right of each channel you wish to highlight the channel and press OK. 5 Skipping Channels After a channel scan is completed, you select. 3. For each channel you may also be viewed if the channel is displayed. 2. See Locking and Unlocking Channels on the remote to completely block a channel from the...
Download
Page 54
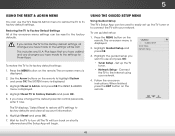
... the MENU button on -screen instructions. The System menu is displayed. 2. If you have changed the default parental control passcode, enter it now. Highlight Reset and press OK. 7. VIZIO Guided Setup Tuner Setup Network Setup 3. Follow the on the remote. Set up the TV tuner or to connect the TV with your network. 4. The TV displays, "Select Reset to restore all TV settings to factory defaults and clear all changes you have made to the settings for the TV to turn...
... the MENU button on -screen instructions. The System menu is displayed. 2. If you have changed the default parental control passcode, enter it now. Highlight Reset and press OK. 7. VIZIO Guided Setup Tuner Setup Network Setup 3. Follow the on the remote. Set up the TV tuner or to connect the TV with your network. 4. The TV displays, "Select Reset to restore all TV settings to factory defaults and clear all changes you have made to the settings for the TV to turn...

Download
Page 66
..., scan for details. • Adjust Brightness, Contrast, or Backlight. See Adjusting the Picture Settings on page 23. • Select one of external devices (Blu-ray player, game console, cable/satellite box) that are connected to the TV. • If you are connected correctly. A The TV displays "No Signal." • Press the INPUT button on the remote control to select a different input source. • If you are securely attached. 60 The power...
..., scan for details. • Adjust Brightness, Contrast, or Backlight. See Adjusting the Picture Settings on page 23. • Select one of external devices (Blu-ray player, game console, cable/satellite box) that are connected to the TV. • If you are connected correctly. A The TV displays "No Signal." • Press the INPUT button on the remote control to select a different input source. • If you are securely attached. 60 The power...

Download
Page 67
.... • Use the Volume Up/Down buttons on the remote to this model. • Ensure you are always dark or always lit. • Your HDTV is filled, and then press OK. When I change input source, the display image changes size. • The TV remembers the viewing mode on each input source. When I see "noise" or static on the input source you are using an antenna, the signal strength of the channel may...
.... • Use the Volume Up/Down buttons on the remote to this model. • Ensure you are always dark or always lit. • Your HDTV is filled, and then press OK. When I change input source, the display image changes size. • The TV remembers the viewing mode on each input source. When I see "noise" or static on the input source you are using an antenna, the signal strength of the channel may...
Download
Page 70
... protection.VIZIO Technical Support will provide instructions for packing and shipping the covered Product to obtain warranty service. Type of commercial use. THERE ARE NO EXPRESS WARRANTIES OTHER THAN THOSE LISTED OR DESCRIBED ABOVE. THIS WARRANTY GIVES YOU SPECIFIC LEGAL RIGHTS, AND YOU MAY ALSO HAVE OTHER RIGHTS, WHICH VARY FROM STATE TO STATE.THIS WARRANTY IS SUBJECT TO CHANGE WITHOUT NOTICE. Replacement parts and...
... protection.VIZIO Technical Support will provide instructions for packing and shipping the covered Product to obtain warranty service. Type of commercial use. THERE ARE NO EXPRESS WARRANTIES OTHER THAN THOSE LISTED OR DESCRIBED ABOVE. THIS WARRANTY GIVES YOU SPECIFIC LEGAL RIGHTS, AND YOU MAY ALSO HAVE OTHER RIGHTS, WHICH VARY FROM STATE TO STATE.THIS WARRANTY IS SUBJECT TO CHANGE WITHOUT NOTICE. Replacement parts and...
Download
Page 2
... accommodate the polarized plug, have fallen into the apparatus, the apparatus has been exposed to rain or moisture, does not operate normally or has been dropped. • Unplug the power cord before moving your TV from being damaged, the following safety instructions before turning on your TV to repair or service your TV yourself. Opening or removing the back...
... accommodate the polarized plug, have fallen into the apparatus, the apparatus has been exposed to rain or moisture, does not operate normally or has been dropped. • Unplug the power cord before moving your TV from being damaged, the following safety instructions before turning on your TV to repair or service your TV yourself. Opening or removing the back...
Download
Page 13
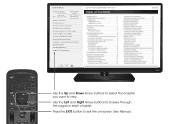
Table of Contents Installing the TV Controls and Connections Connecting your Devices Completing the First-Time Setup Using the On-Screen Menu Using the USB Media Player Using VIZIO Internet Apps Troubleshooting & Technical Support Specifications Limited Warranty Legal & Compliance LED HDTV WITH VIZIO INTERNET APPS PLUS® E420i-B0 Use the Up and Down Arrow buttons to select the chapter you want to browse through the pages in each chapter. Use the Left and Right Arrow buttons to view. Press the EXIT button to...
Table of Contents Installing the TV Controls and Connections Connecting your Devices Completing the First-Time Setup Using the On-Screen Menu Using the USB Media Player Using VIZIO Internet Apps Troubleshooting & Technical Support Specifications Limited Warranty Legal & Compliance LED HDTV WITH VIZIO INTERNET APPS PLUS® E420i-B0 Use the Up and Down Arrow buttons to select the chapter you want to browse through the pages in each chapter. Use the Left and Right Arrow buttons to view. Press the EXIT button to...
Download
Page 14
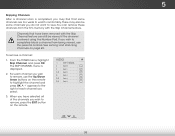
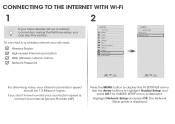
... need: Wireless Router High-speed Internet connection SSID (Wireless network name) Network Password VIZIO TV SETTINGS Picture Audio Timers Network Tuner CC Closed Captions Devices System Guided Setup User Manual Wide VIZIO GUIDED SETUP ZoToumner SeNtuoprmal Panoramic Network Setup Exit 2D 3D ABC Input Wide CC Sleep Timer Picture Audio Network Settings Help Wide Exit Input Sleep Timer Networ For streaming video, your Internet Service Provider (ISP). Press the MENU button to highlight Guided Setup and press OK. The Network Setup guide is displayed. To connect to a wireless...
... need: Wireless Router High-speed Internet connection SSID (Wireless network name) Network Password VIZIO TV SETTINGS Picture Audio Timers Network Tuner CC Closed Captions Devices System Guided Setup User Manual Wide VIZIO GUIDED SETUP ZoToumner SeNtuoprmal Panoramic Network Setup Exit 2D 3D ABC Input Wide CC Sleep Timer Picture Audio Network Settings Help Wide Exit Input Sleep Timer Networ For streaming video, your Internet Service Provider (ISP). Press the MENU button to highlight Guided Setup and press OK. The Network Setup guide is displayed. To connect to a wireless...
Download
Page 19
... 877 MY VIZIO (877.698.4946) from warranty service or replacement, whichever is required to show that to which can radiate radio frequency energy, and if not installed and used in a particular installation. Proof of purchase in the form of commercial use an AC/DC power adapter that may be responsible for compliance could void the user's authority to operate this equipment...
... 877 MY VIZIO (877.698.4946) from warranty service or replacement, whichever is required to show that to which can radiate radio frequency energy, and if not installed and used in a particular installation. Proof of purchase in the form of commercial use an AC/DC power adapter that may be responsible for compliance could void the user's authority to operate this equipment...


