
Download
Page 3
...recommend that produce heat. • Do not defeat the safety purpose of the polarized or grounding-type plug. When Reading this Manual When you either: • Register your VIZIO product at (877) 878-4946. Keep these instructions before operating your TV. A polarized plug has two blades and a ...mind, and to operate within defined design limits. To get the most out of your TV. Welcome Thank You for Choosing VIZIO And congratulations on or pinched, particularly at plugs, convenience receptacles, and the point where they exit from being damaged, the following safety ...
...recommend that produce heat. • Do not defeat the safety purpose of the polarized or grounding-type plug. When Reading this Manual When you either: • Register your VIZIO product at (877) 878-4946. Keep these instructions before operating your TV. A polarized plug has two blades and a ...mind, and to operate within defined design limits. To get the most out of your TV. Welcome Thank You for Choosing VIZIO And congratulations on or pinched, particularly at plugs, convenience receptacles, and the point where they exit from being damaged, the following safety ...

Download
Page 15
... to the previous on or off or on -screen menu. Closed Captions Open the closed caption menu. Mute Turn the audio off . Number Pad Manually enter a channel. Info Display the info window. Arrow Navigate the on -screen menu. Back Go to the channel last viewed. Wide Switch the ...display mode. Menu Display the on -screen menu. Ok Select the highlighted menu option. Guide Display the info window. Dash Use with number pad to manually enter a digital sub-channel. (For example, 18-4 or 18-5.) Remote Control 9 App launcher Quickly launch the pictured app. Power Turn TV on -screen ...
... to the previous on or off or on -screen menu. Closed Captions Open the closed caption menu. Mute Turn the audio off . Number Pad Manually enter a channel. Info Display the info window. Arrow Navigate the on -screen menu. Back Go to the channel last viewed. Wide Switch the ...display mode. Menu Display the on -screen menu. Ok Select the highlighted menu option. Guide Display the info window. Dash Use with number pad to manually enter a digital sub-channel. (For example, 18-4 or 18-5.) Remote Control 9 App launcher Quickly launch the pictured app. Power Turn TV on -screen ...

Download
Page 23
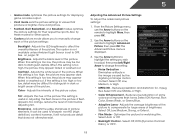
... Closed Caption menu is not being broadcast with closed captions: 1. From the Closed Caption menu, use the Left/Right Arrow buttons on the remote to manually change the appearance of the background. 17 The Digital CC Style menu appears. 3. Choose Auto to keep default settings or Custom to highlight the type...
... Closed Caption menu is not being broadcast with closed captions: 1. From the Closed Caption menu, use the Left/Right Arrow buttons on the remote to manually change the appearance of the background. 17 The Digital CC Style menu appears. 3. Choose Auto to keep default settings or Custom to highlight the type...
Download
Page 25
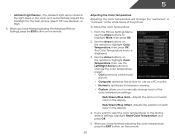
... low, the picture may appear faded or washed out. Adjusts the hue of picture elements. Use the Arrow buttons to highlight the setting you to manually change the setting: • Noise Reduction Diminishes artifacts in the picture. Select Off, Low, Middle, or High. • Color Enhancement - 5 • Game mode optimizes the...
... low, the picture may appear faded or washed out. Adjusts the hue of picture elements. Use the Arrow buttons to highlight the setting you to manually change the setting: • Noise Reduction Diminishes artifacts in the picture. Select Off, Low, Middle, or High. • Color Enhancement - 5 • Game mode optimizes the...
Download
Page 26
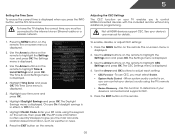
... color temperature will change the color temperature preset: • Cool produces a blue-hued picture. • Computer optimizes the picture for use the Arrow buttons to manually change each color in the display. 4. Red/Green/Blue Offset - Select Off, Low, Medium, or High. 4. When you have finished adjusting the color temperature, press...
... color temperature will change the color temperature preset: • Cool produces a blue-hued picture. • Computer optimizes the picture for use the Arrow buttons to manually change each color in the display. 4. Red/Green/Blue Offset - Select Off, Low, Medium, or High. 4. When you have finished adjusting the color temperature, press...

Download
Page 31
...the TV. • Subnet Mask - Testing Your Network Connection To test your network connection. 3. From the Network Connection menu, highlight Manual Setup and press OK. The IP address assigned to set up your network, these are displayed at the bottom of the Change Settings ... Your network's default gateway address. • Pref. 5 Changing the Advanced Network Settings Advanced users can fine-tune the network settings using the Manual Setup feature. The subnet mask. • Default Gateway - Press the EXIT button on the remote. 25 The Test Connection screen displays the connection...
...the TV. • Subnet Mask - Testing Your Network Connection To test your network connection. 3. From the Network Connection menu, highlight Manual Setup and press OK. The IP address assigned to set up your network, these are displayed at the bottom of the Change Settings ... Your network's default gateway address. • Pref. 5 Changing the Advanced Network Settings Advanced users can fine-tune the network settings using the Manual Setup feature. The subnet mask. • Default Gateway - Press the EXIT button on the remote. 25 The Test Connection screen displays the connection...
Download
Page 38
.... Use the Arrow buttons on -screen menu is displayed. The Settings menu is displayed. 4. The Time & Local Settings menu is displayed. 3. Highlight your device's user manual for details. 1. Highlight Daylight Savings and press OK. Enter your device is connected and supports CEC. 5. The ZIP code information is displayed. 3. Use the Arrow...
.... Use the Arrow buttons on -screen menu is displayed. The Settings menu is displayed. 4. The Time & Local Settings menu is displayed. 3. Highlight your device's user manual for details. 1. Highlight Daylight Savings and press OK. Enter your device is connected and supports CEC. 5. The ZIP code information is displayed. 3. Use the Arrow...
Download
Page 39
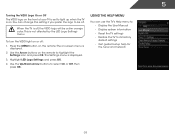
When the TV is off, the VIZIO logo will be off : 1. The Settings menu is not affected by the LED Logo Settings menu. You can use the TV's Help menu to: • Display the User Manual • Display system information • Reset the TV settings • Restore the TV to its ...factory default settings • Get guided setup help for the tuner and network 33 5 Turning the VIZIO Logo On or Off The VIZIO logo on the front of your TV...
When the TV is off, the VIZIO logo will be off : 1. The Settings menu is not affected by the LED Logo Settings menu. You can use the TV's Help menu to: • Display the User Manual • Display system information • Reset the TV settings • Restore the TV to its ...factory default settings • Get guided setup help for the tuner and network 33 5 Turning the VIZIO Logo On or Off The VIZIO logo on the front of your TV...
Download
Page 50
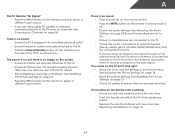
... are securely attached. The power is on, but there is no image on the remote to ensure they are connected correctly. Ensure your device's user manual for the best signal. Devices differ; See Replacing the Batteries on page 18 • Reset the picture settings.
... are securely attached. The power is on, but there is no image on the remote to ensure they are connected correctly. Ensure your device's user manual for the best signal. Devices differ; See Replacing the Batteries on page 18 • Reset the picture settings.
Download
Page 4
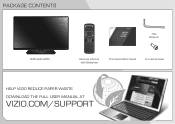
DOWNLOAD THE FULL USER MANUAL AT VIZIO.COM/SUPPORT PACKAGE CONTENTS VIZIO LED HDTV Hex Wrench Remote Control with Batteries This Quick Start Guide 3 x Hex Screws HELP VIZIO REDUCE PAPER WASTE.
DOWNLOAD THE FULL USER MANUAL AT VIZIO.COM/SUPPORT PACKAGE CONTENTS VIZIO LED HDTV Hex Wrench Remote Control with Batteries This Quick Start Guide 3 x Hex Screws HELP VIZIO REDUCE PAPER WASTE.

Download
Page 6
... to the channel last viewed. VOLUME UP/DOWN Increase or decrease loudness of the audio. NUMBER PAD Manually enter a channel. MENU Display the on -screen menu. GUIDE Display the info window. LAST Return to manually enter a digital sub-channel. (For example, 18-4 or 18-5.) BATTERY COMPARTMENT Insert 2 AAA batteries here. CLOSED CAPTIONS...
... to the channel last viewed. VOLUME UP/DOWN Increase or decrease loudness of the audio. NUMBER PAD Manually enter a channel. MENU Display the on -screen menu. GUIDE Display the info window. LAST Return to manually enter a digital sub-channel. (For example, 18-4 or 18-5.) BATTERY COMPARTMENT Insert 2 AAA batteries here. CLOSED CAPTIONS...

