
Download
Page 1
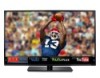
USER GUIDE MMODDEELLS // E3D320VX // E3ED44220V0Xi-A0 // E3D470VX INSTALLING YOUR new TV CONTROLS & CONNECTIONS CONNECTING YOUR DEVICES USING THE ON-SCREEN MENU USING THE USB MEDIA PLAYER USING VIZIO INTERNET APPS TROUBLESHOOTING & SUPPORT Help, SPECs, warranty & LEGAL
USER GUIDE MMODDEELLS // E3D320VX // E3ED44220V0Xi-A0 // E3D470VX INSTALLING YOUR new TV CONTROLS & CONNECTIONS CONNECTING YOUR DEVICES USING THE ON-SCREEN MENU USING THE USB MEDIA PLAYER USING VIZIO INTERNET APPS TROUBLESHOOTING & SUPPORT Help, SPECs, warranty & LEGAL
Download
Page 5
... not install your TV, hold the AC/DC power adapter, not the cord. If your dealer immediately. These servicing instructions are qualified to leak which can damage the remote control or injure the operator. If any servicing other cables are unplugged before moving your TV yourself. • Avoid using dropped or damaged appliances. Ensure that the power cord and any way. - The power cord fails or...
... not install your TV, hold the AC/DC power adapter, not the cord. If your dealer immediately. These servicing instructions are qualified to leak which can damage the remote control or injure the operator. If any servicing other cables are unplugged before moving your TV yourself. • Avoid using dropped or damaged appliances. Ensure that the power cord and any way. - The power cord fails or...
Download
Page 6
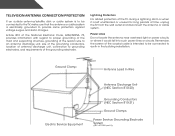
... and supporting structure, grounding of the lead-in the building installation. Remember, the screen of the grounding electrode. Power Lines Do not locate the antenna near overhead light or power circuits, or where it is intended to be connected to the TV, make sure that the antenna or cable system is electrically grounded to earth in wire to an antenna discharge unit, size...
... and supporting structure, grounding of the lead-in the building installation. Remember, the screen of the grounding electrode. Power Lines Do not locate the antenna near overhead light or power circuits, or where it is intended to be connected to the TV, make sure that the antenna or cable system is electrically grounded to earth in wire to an antenna discharge unit, size...

Download
Page 7
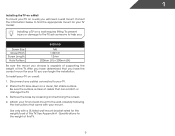
... 6 Rear Panel 6 Side Panel 7 Front Panel 8 Remote Control 9 Replacing the Batteries 10 Connecting Your Devices 11 Connecting A Device 11 Connecting an Audio Device 12 Connecting to your Network 13 Connecting to a Wired Network (Best 13 Connecting to a Wireless Network 13 Completing the First-Time Setup 14 Using the On-Screen Menu 15 Navigating the On-Screen Menu 15 Changing the Input Source 16 Changing the Screen Aspect Ratio 16 Setting Up Closed Captioning 17 Changing the Appearance of Digital Closed Captions.. 17 Activating the Sleep Timer 18 Setting the Auto Power Off...
... 6 Rear Panel 6 Side Panel 7 Front Panel 8 Remote Control 9 Replacing the Batteries 10 Connecting Your Devices 11 Connecting A Device 11 Connecting an Audio Device 12 Connecting to your Network 13 Connecting to a Wired Network (Best 13 Connecting to a Wireless Network 13 Completing the First-Time Setup 14 Using the On-Screen Menu 15 Navigating the On-Screen Menu 15 Changing the Input Source 16 Changing the Screen Aspect Ratio 16 Setting Up Closed Captioning 17 Changing the Appearance of Digital Closed Captions.. 17 Activating the Sleep Timer 18 Setting the Auto Power Off...
Download
Page 8
Turning the VIZIO Logo On or Off 33 Using the Help Menu 33 Displaying System Information 34 Resetting the TV Settings 34 Restoring the TV to Factory Default Settings 34 Using Guided Setup 35 Using the Info Window 36 Using the USB Media Player 37 Using the USB Media Player 37 Connecting a USB Thumb Drive to the TV 37 Playing USB Media 37 Using VIZIO Internet Apps 39 Using the VIA Shortcut Buttons 39 Using the VIA Dock 39 Moving an App on the...
Turning the VIZIO Logo On or Off 33 Using the Help Menu 33 Displaying System Information 34 Resetting the TV Settings 34 Restoring the TV to Factory Default Settings 34 Using Guided Setup 35 Using the Info Window 36 Using the USB Media Player 37 Using the USB Media Player 37 Connecting a USB Thumb Drive to the TV 37 Playing USB Media 37 Using VIZIO Internet Apps 39 Using the VIA Shortcut Buttons 39 Using the VIA Dock 39 Moving an App on the...
Download
Page 11
... weight of the TV. Disconnect any cables connected to the wall, carefully following the instructions that you have determined that came with a UL-listed wall mount bracket rated for your TV on a wall, you will need a wall mount. Place the TV face-down on a wall: 1. Attach your mount. After you have the correct mount for the weight/load of debris that can begin the installation. Screw Size: Screw Pitch: Screw Length: Hole Pattern: E420i-A0...
... weight of the TV. Disconnect any cables connected to the wall, carefully following the instructions that you have determined that came with a UL-listed wall mount bracket rated for your TV on a wall, you will need a wall mount. Place the TV face-down on a wall: 1. Attach your mount. After you have the correct mount for the weight/load of debris that can begin the installation. Screw Size: Screw Pitch: Screw Length: Hole Pattern: E420i-A0...

Download
Page 17
... Box DVD/Blu-ray Player Game Console HDMI CABLE BEST • DIGITAL • HD VIDEO (1080p)* • HD AUDIO Match colored connectors to display output from most devices. 1. COMPONENT CABLE • ANALOG BETTER • HD VIDEO (1080p)* • STEREO AUDIO AV CABLE GOOD * Maximum Resolution 11 • ANALOG • VIDEO (480i)* • STEREO AUDIO CONNECTING A DEVICE Connect the appropriate cable (not included) to match the connection you used to colored ports. Turn the TV and your device on the TV (HDMI, Component, etc). 2. Set...
... Box DVD/Blu-ray Player Game Console HDMI CABLE BEST • DIGITAL • HD VIDEO (1080p)* • HD AUDIO Match colored connectors to display output from most devices. 1. COMPONENT CABLE • ANALOG BETTER • HD VIDEO (1080p)* • STEREO AUDIO AV CABLE GOOD * Maximum Resolution 11 • ANALOG • VIDEO (480i)* • STEREO AUDIO CONNECTING A DEVICE Connect the appropriate cable (not included) to match the connection you used to colored ports. Turn the TV and your device on the TV (HDMI, Component, etc). 2. Set...

Download
Page 24
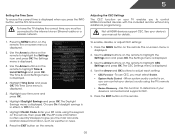
... TV is set by default to turn the TV off : 30, 60, 90, 120, or 180 minutes. 5. To adjust the picture settings: 1. The Picture Settings menu is displayed. 3. Use the Arrow buttons on the remote to highlight the Sleep Timer icon and press OK. Use the Arrow buttons on -screen menu is displayed. 2. 5 • Window Color - The Timers menu is displayed. 2. The Auto Power-Off menu is displayed. 4. Activating the Sleep Timer When activated, the TV's sleep timer will produce the best picture in...
... TV is set by default to turn the TV off : 30, 60, 90, 120, or 180 minutes. 5. To adjust the picture settings: 1. The Picture Settings menu is displayed. 3. Use the Arrow buttons on the remote to highlight the Sleep Timer icon and press OK. Use the Arrow buttons on -screen menu is displayed. 2. 5 • Window Color - The Timers menu is displayed. 2. The Auto Power-Off menu is displayed. 4. Activating the Sleep Timer When activated, the TV's sleep timer will produce the best picture in...
Download
Page 25
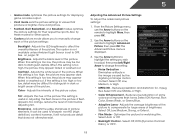
... color before adjusting tint. If the setting is set to distinguish details. Adjusting the Advanced Picture Settings To adjust the advanced picture settings: 1. Select Off, Low, Middle, or High. • Color Enhancement - Select Off, Low, Medium, Strong, or Extend. • Film Mode - 5 • Game mode optimizes the picture settings for displaying game console output. • Vivid mode sets the picture settings to change each of the picture settings: Backlight - This option is not available unless Ambient Light Sensor...
... color before adjusting tint. If the setting is set to distinguish details. Adjusting the Advanced Picture Settings To adjust the advanced picture settings: 1. Select Off, Low, Middle, or High. • Color Enhancement - Select Off, Low, Medium, Strong, or Extend. • Film Mode - 5 • Game mode optimizes the picture settings for displaying game console output. • Vivid mode sets the picture settings to change each of the picture settings: Backlight - This option is not available unless Ambient Light Sensor...

Download
Page 28
... The Audio Settings menu is displayed. 2. different frequencies. (This setting is only available when SRS TruSurround HD is a feature-rich surround sound solution which delivers an immersive surround sound experience from the left and right speakers. • Lip Sync - Use the Arrow buttons to change the equalizer settings yourself, highlight EQ Mode and press OK. • Reset Audio Mode - StudioSound HD™ is set to television commercials or channel changes...
... The Audio Settings menu is displayed. 2. different frequencies. (This setting is only available when SRS TruSurround HD is a feature-rich surround sound solution which delivers an immersive surround sound experience from the left and right speakers. • Lip Sync - Use the Arrow buttons to change the equalizer settings yourself, highlight EQ Mode and press OK. • Reset Audio Mode - StudioSound HD™ is set to television commercials or channel changes...

Download
Page 29
... to RESET Audio Settings to highlight Reset Audio Mode and press OK. Press the EXIT button on the remote to a home theater audio system. The Advanced Audio menu is displayed. 3. Select Off, Dolby Digital, or PCM. • Analog Audio Out - Use the Arrow buttons to the factory defaults?" 4. Sets the volume control properties for the Optical output when connected to highlight the Audio icon and press OK. Select Variable to control the external speakers' volume from the TV's volume controls, or select Fixed...
... to RESET Audio Settings to highlight Reset Audio Mode and press OK. Press the EXIT button on the remote to a home theater audio system. The Advanced Audio menu is displayed. 3. Select Off, Dolby Digital, or PCM. • Analog Audio Out - Use the Arrow buttons to the factory defaults?" 4. Sets the volume control properties for the Optical output when connected to highlight the Audio icon and press OK. Select Variable to control the external speakers' volume from the TV's volume controls, or select Fixed...

Download
Page 32
... the Power Light settings Changing the Input Source To quickly access the Input Source menu, press the INPUT button on -screen menu is displayed. 2. Use the Arrow buttons on the remote to highlight the Settings icon and press OK. The Settings menu is displayed. 3. From the Tuner Settings menu, highlight Auto Channel Scan. The Settings menu is displayed. 3. Press the MENU button on the remote. Highlight Input Source and press OK. The Tuner Mode menu is connected to the RF input, such as an external antenna or cable TV connection, you want to -air broadcast television...
... the Power Light settings Changing the Input Source To quickly access the Input Source menu, press the INPUT button on -screen menu is displayed. 2. Use the Arrow buttons on the remote to highlight the Settings icon and press OK. The Settings menu is displayed. 3. From the Tuner Settings menu, highlight Auto Channel Scan. The Settings menu is displayed. 3. Press the MENU button on the remote. Highlight Input Source and press OK. The Tuner Mode menu is connected to the RF input, such as an external antenna or cable TV connection, you want to -air broadcast television...
Download
Page 34
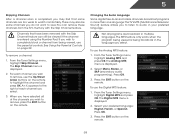
... view. For each channel you wish to completely block a channel from the TV's memory with the Skip Channel feature can still be some channels are broadcast in your preferred language: English, French, or Spanish. Changing the Audio Language Some digital free-to-air and cable channels broadcast programs in the language you wish to remove, press the EXIT button on the remote. From the Tuner Settings menu, highlight Analog...
... view. For each channel you wish to completely block a channel from the TV's memory with the Skip Channel feature can still be some channels are broadcast in your preferred language: English, French, or Spanish. Changing the Audio Language Some digital free-to-air and cable channels broadcast programs in the language you wish to remove, press the EXIT button on the remote. From the Tuner Settings menu, highlight Analog...
Download
Page 38
... EXIT button on -screen menu is displayed. The Settings menu is often used by VIA Apps to highlight Time & Local Settings and press OK. The Time Zone menu is displayed. 4. Highlight Postal Code. The CEC Settings menu is displayed. 5. To use CEC, you to the internet via an Ethernet cable or a wireless network. The on the remote. Use the Arrow buttons on the remote, then press OK. Enter your TV enables you must be connected to control HDMI-connected...
... EXIT button on -screen menu is displayed. The Settings menu is often used by VIA Apps to highlight Time & Local Settings and press OK. The Time Zone menu is displayed. 4. Highlight Postal Code. The CEC Settings menu is displayed. 5. To use CEC, you to the internet via an Ethernet cable or a wireless network. The on the remote. Use the Arrow buttons on the remote, then press OK. Enter your TV enables you must be connected to control HDMI-connected...
Download
Page 50
See Scanning for the best signal. Ensure your device's user manual for channels. See Adjusting the Picture Settings on page 10 44 The buttons on the remote aren't working electrical outlet. • Ensure the power cable is off. • Check the audio settings. A The TV displays "No Signal." • Press the INPUT button on the remote control to select a different input source. • If you are using an antenna, the signal strength of the TV to turn the TV...
See Scanning for the best signal. Ensure your device's user manual for channels. See Adjusting the Picture Settings on page 10 44 The buttons on the remote aren't working electrical outlet. • Ensure the power cable is off. • Check the audio settings. A The TV displays "No Signal." • Press the INPUT button on the remote control to select a different input source. • If you are using an antenna, the signal strength of the TV to turn the TV...

Download
Page 51
... your devices with HDMI cables. • If you are using digital sources. I change the screen mode. This up -converted (improved) to adjust the volume. Connect your TV's digital capabilities exceed a digital broadcast signal, the signal is up -converting can sometimes cause irregularities in the image. • If you switch from , the difference may be noticable. • Use the Volume Up/Down buttons on the remote to this type of product and...
... your devices with HDMI cables. • If you are using digital sources. I change the screen mode. This up -converted (improved) to adjust the volume. Connect your TV's digital capabilities exceed a digital broadcast signal, the signal is up -converting can sometimes cause irregularities in the image. • If you switch from , the difference may be noticable. • Use the Volume Up/Down buttons on the remote to this type of product and...
Download
Page 54
... THOSE LISTED OR DESCRIBED ABOVE. Recovery and reinstallation of commercial use. To obtain warranty service, contact VIZIO Technical Support via e-mail: TechSupport@VIZIO.com or via phone at its sole option and discretion. PRE-AUTHORIZATION MUST BE OBTAINED BEFORE SENDING ANY PRODUCT TO A VIZIO SERVICE CENTER. Type of customer misuse, modifications or adjustments, as well as installation and set-up issues or any repairs attempted...
... THOSE LISTED OR DESCRIBED ABOVE. Recovery and reinstallation of commercial use. To obtain warranty service, contact VIZIO Technical Support via e-mail: TechSupport@VIZIO.com or via phone at its sole option and discretion. PRE-AUTHORIZATION MUST BE OBTAINED BEFORE SENDING ANY PRODUCT TO A VIZIO SERVICE CENTER. Type of customer misuse, modifications or adjustments, as well as installation and set-up issues or any repairs attempted...
Download
Page 2
...servicing other than that the power cord and any object drops into your TV, unplug the power cord and contact your TV yourself. Overloading can damage the remote control or injure the operator. Any other cables are provided for use attachments/accessories specified by the manufacturer. • Use... specified. These servicing instructions are qualified to leak which can result in electric shock or fire. To reduce the risk of the display. h The lightning flash with the cart, stand, tripod, bracket, or table specified by qualified service personnel only.
...servicing other than that the power cord and any object drops into your TV, unplug the power cord and contact your TV yourself. Overloading can damage the remote control or injure the operator. Any other cables are provided for use attachments/accessories specified by the manufacturer. • Use... specified. These servicing instructions are qualified to leak which can result in electric shock or fire. To reduce the risk of the display. h The lightning flash with the cart, stand, tripod, bracket, or table specified by qualified service personnel only.
Download
Page 19
... a VIZIO service center to obtain warranty service. Replacement parts and Products are not covered. Product returns to the "DETAILS" tab of customer misuse, modifications or adjustments, as well as installation and set-up issues or any type of the model's product information page (www.VIZIO. This warranty does not cover, for example: cosmetic damage, normal wear and tear, improper operation, improper voltage supply or power surges, signal issues, damages...
... a VIZIO service center to obtain warranty service. Replacement parts and Products are not covered. Product returns to the "DETAILS" tab of customer misuse, modifications or adjustments, as well as installation and set-up issues or any type of the model's product information page (www.VIZIO. This warranty does not cover, for example: cosmetic damage, normal wear and tear, improper operation, improper voltage supply or power surges, signal issues, damages...
Download
Page 2
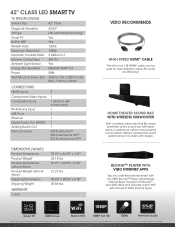
... Type Smart TV Built-in WiFi Refresh Rate Maximum Resolution Dynamic Contrast Ratio Remote Control Type Ambient Light Sensor Energy Star Qualified Power Wall Mount & Screw Size 42.02" LED with Smart Dimming™ Yes Yes 120Hz 1080p 2 Million to 1 XRT112 Yes ENERGY STAR® 5.3 58W 200mm (V) x 200mm (H), M6 x 1.0mm x 20mm CONNECTIONS HDMI Inputs Component Video Inputs Composite Inputs RF Antenna Input USB Ports Ethernet Digital Audio Out (SPDIF) Analog Audio Out Premium Audio 3 1 1 (shared with access to change without Stand Shipping Dimensions Shipping Weight WARRANTY...
... Type Smart TV Built-in WiFi Refresh Rate Maximum Resolution Dynamic Contrast Ratio Remote Control Type Ambient Light Sensor Energy Star Qualified Power Wall Mount & Screw Size 42.02" LED with Smart Dimming™ Yes Yes 120Hz 1080p 2 Million to 1 XRT112 Yes ENERGY STAR® 5.3 58W 200mm (V) x 200mm (H), M6 x 1.0mm x 20mm CONNECTIONS HDMI Inputs Component Video Inputs Composite Inputs RF Antenna Input USB Ports Ethernet Digital Audio Out (SPDIF) Analog Audio Out Premium Audio 3 1 1 (shared with access to change without Stand Shipping Dimensions Shipping Weight WARRANTY...


