E420AR User Manual
Page 7
...the Package Contents 3 Installing the TV 3 Installing the TV Stand 3 Installing the TV on a Wall 4 Wall Mount Screw Location 5 Controls and Connections 6 Rear Panel (E240AR 6 Rear Panel (E320AR & E420AR 7 Rear Panel (E500AR 8 Side Panel 9 Front Panel 10 Remote Control 11 Replacing the Batteries... 12 Connecting Your Devices 13 Connecting A Device (E240AR 13 Connecting A Device (E320AR & E420AR 14 Connecting A Device (E500AR 15 Connecting A PC (E240AR 16 Connecting A PC (E320AR & E420AR 17 Connecting A PC (E500AR 18 Connecting an Audio Device (E240AR 19 Connecting an Audio ...
...the Package Contents 3 Installing the TV 3 Installing the TV Stand 3 Installing the TV on a Wall 4 Wall Mount Screw Location 5 Controls and Connections 6 Rear Panel (E240AR 6 Rear Panel (E320AR & E420AR 7 Rear Panel (E500AR 8 Side Panel 9 Front Panel 10 Remote Control 11 Replacing the Batteries... 12 Connecting Your Devices 13 Connecting A Device (E240AR 13 Connecting A Device (E320AR & E420AR 14 Connecting A Device (E500AR 15 Connecting A PC (E240AR 16 Connecting A PC (E320AR & E420AR 17 Connecting A PC (E500AR 18 Connecting an Audio Device (E240AR 19 Connecting an Audio ...
E420AR User Manual
Page 9
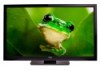
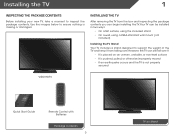
...over . Your TV can be installed in two ways: • On a flat surface, using the included stand • On a wall, using a VESA-standard wall mount (not included) Installing the TV Stand Your TV includes a stand designed to inspect the package contents. Use the images below to ensure... nothing is not properly secured VIZIO HDTV Quick Start Guide Remote Control with Batteries Package Contents 3 TV on an uneven, unstable, ...
...over . Your TV can be installed in two ways: • On a flat surface, using the included stand • On a wall, using a VESA-standard wall mount (not included) Installing the TV Stand Your TV includes a stand designed to inspect the package contents. Use the images below to ensure... nothing is not properly secured VIZIO HDTV Quick Start Guide Remote Control with Batteries Package Contents 3 TV on an uneven, unstable, ...
E420AR User Manual
Page 10
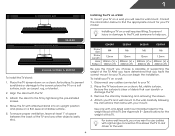
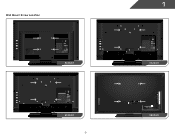
...on a flat, level, and stable surface. 5. Remove the stand by tightening the pre-installed screws. 4. 1 Installing the TV on a Wall To mount your TV. 2. E240AR E320AR E420AR E500AR Screw Size: Screw Length: Hole Pattern: M4 12mm 100mm (V) x 100mm (H) M6 12mm 200mm (V) x 200mm (H) M6 M6 12mm... TV model: E240AR E320AR, E420AR, & E500AR To install the TV stand: 1. Move the TV with the TV. 3. Disconnect any other objects (walls, etc). Place the TV face-down on a clean, flat, stable surface. For some wall mounts, you will need a wall mount. Place the TV screen-down...
...on a flat, level, and stable surface. 5. Remove the stand by tightening the pre-installed screws. 4. 1 Installing the TV on a Wall To mount your TV. 2. E240AR E320AR E420AR E500AR Screw Size: Screw Length: Hole Pattern: M4 12mm 100mm (V) x 100mm (H) M6 12mm 200mm (V) x 200mm (H) M6 M6 12mm... TV model: E240AR E320AR, E420AR, & E500AR To install the TV stand: 1. Move the TV with the TV. 3. Disconnect any other objects (walls, etc). Place the TV face-down on a clean, flat, stable surface. For some wall mounts, you will need a wall mount. Place the TV screen-down...
E420AR User Manual
Page 11
Wall Mount Screw Location E240AR E320AR 5 1 E420AR E500AR
Wall Mount Screw Location E240AR E320AR 5 1 E420AR E500AR


