Download
Page 5
... qualified to dripping or splashing and no objects fill with heavy dust or high humidity may cause the batteries to leak which can damage the remote control or injure the operator. Do not try to rain or moisture. Unplug the power cord immediately and contact your dealer for moving your TV. •...
... qualified to dripping or splashing and no objects fill with heavy dust or high humidity may cause the batteries to leak which can damage the remote control or injure the operator. Do not try to rain or moisture. Unplug the power cord immediately and contact your dealer for moving your TV. •...
Download
Page 7
... for Channels 31 Adding New Channels 32 Skipping Channels 33 Changing the Audio Language 33 Using the Parental Controls 34 Accessing the Parental Controls Menu 34 Enabling or Disabling Program Ratings 35 Locking and Unlocking Channels 35 Blocking and Unblocking Content by ... Changing the Parental Control Passcode 36 Resetting the Content Locks 36 Changing the Names of Contents Installing the TV 3 Inspecting the Package Contents 3 Installing the TV 3 Installing the TV Stand 3 Installing the TV on a Wall 5 Controls and Connections 6 Front Panel 8 Remote Control 9 Replacing the ...
... for Channels 31 Adding New Channels 32 Skipping Channels 33 Changing the Audio Language 33 Using the Parental Controls 34 Accessing the Parental Controls Menu 34 Enabling or Disabling Program Ratings 35 Locking and Unlocking Channels 35 Blocking and Unblocking Content by ... Changing the Parental Control Passcode 36 Resetting the Content Locks 36 Changing the Names of Contents Installing the TV 3 Inspecting the Package Contents 3 Installing the TV 3 Installing the TV Stand 3 Installing the TV on a Wall 5 Controls and Connections 6 Front Panel 8 Remote Control 9 Replacing the ...
Download
Page 9
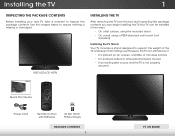
Installing the TV 1 Inspecting the Package Contents Before installing your new TV, take a moment to ensure nothing is not properly secured VIZIO QUICK START GUIDE Quick Start Guide Model: E390i-A1 Power Cord Remote Control with Batteries 6x M4 14mm Philips Screws Package Contents 3 TV on an uneven, unstable, or non-level surface • It is...
Installing the TV 1 Inspecting the Package Contents Before installing your new TV, take a moment to ensure nothing is not properly secured VIZIO QUICK START GUIDE Quick Start Guide Model: E390i-A1 Power Cord Remote Control with Batteries 6x M4 14mm Philips Screws Package Contents 3 TV on an uneven, unstable, or non-level surface • It is...
Download
Page 15
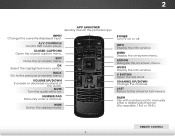
... the highlighted menu option. Last Return to manually enter a digital sub-channel. (For example, 18-4 or 18-5.) Remote Control 9 Dash Use with number pad to the channel last viewed. Number Pad Manually enter a channel. A/V Controls Control USB media player. Closed Captions Open the closed caption menu. Volume Up/Down Increase or decrease loudness of.... Arrow Navigate the on -screen menu. Guide Display the info window. Back Go to the previous on -screen menu. Channel Up/Down Change the channel. 2 Remote Control App launcher Quickly launch the pictured app.
... the highlighted menu option. Last Return to manually enter a digital sub-channel. (For example, 18-4 or 18-5.) Remote Control 9 Dash Use with number pad to the channel last viewed. Number Pad Manually enter a channel. A/V Controls Control USB media player. Closed Captions Open the closed caption menu. Volume Up/Down Increase or decrease loudness of.... Arrow Navigate the on -screen menu. Guide Display the info window. Back Go to the previous on -screen menu. Channel Up/Down Change the channel. 2 Remote Control App launcher Quickly launch the pictured app.
Download
Page 16
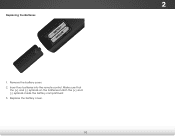
Remove the battery cover. 2. Replace the battery cover. 10 2 Replacing the Batteries 1. Make sure that the (+) and (-) symbols on the batteries match the (+) and (-) symbols inside the battery compartment. 3. Insert two batteries into the remote control.
Remove the battery cover. 2. Replace the battery cover. 10 2 Replacing the Batteries 1. Make sure that the (+) and (-) symbols on the batteries match the (+) and (-) symbols inside the battery compartment. 3. Insert two batteries into the remote control.

Download
Page 33
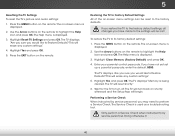
... OK. Use the Arrow buttons to highlight the setting you want to RESET Exit 2D 3D Audio Settings to the factory default settings: 1. VIZIO Advanced Audio Digital Audio Out Analog Audio Out PCM Fixed 3. Press the MENU button on -screen menu is displayed. 2. Sleep Timer Picture ...Audio Network Settings Help 27 Select Variable to control the external speakers' volume from your home theater system controls. The on the remote. The TV displays, "Are you sure you wish to adjust, then press Left/Right Arrow to change...
... OK. Use the Arrow buttons to highlight the setting you want to RESET Exit 2D 3D Audio Settings to the factory default settings: 1. VIZIO Advanced Audio Digital Audio Out Analog Audio Out PCM Fixed 3. Press the MENU button on -screen menu is displayed. 2. Sleep Timer Picture ...Audio Network Settings Help 27 Select Variable to control the external speakers' volume from your home theater system controls. The on the remote. The TV displays, "Are you sure you wish to adjust, then press Left/Right Arrow to change...

Download
Page 36
...screen menu language • Set the time • Adjust the CEC settings • Adjust the Power Indicator settings VIZIO Settings Input Source Tuner Name Input Parental Controls Menu Language Time & Local Settings CEC Settings Power Indicator TV English On Changing the Input Source To quickly access the...Settings Using the settings menu, you want to highlight the Settings Exit 2D 3D icon and press OK. Use the Arrow buttons on the remote. The Settings menu is displayed. 4. Sleep Timer Picture Audio Network Settings Help 30 Press the MENU button on -screen menu is displayed...
...screen menu language • Set the time • Adjust the CEC settings • Adjust the Power Indicator settings VIZIO Settings Input Source Tuner Name Input Parental Controls Menu Language Time & Local Settings CEC Settings Power Indicator TV English On Changing the Input Source To quickly access the...Settings Using the settings menu, you want to highlight the Settings Exit 2D 3D icon and press OK. Use the Arrow buttons on the remote. The Settings menu is displayed. 4. Sleep Timer Picture Audio Network Settings Help 30 Press the MENU button on -screen menu is displayed...
Download
Page 39
... and press OK. To use the Up/Down Arrow buttons on the remote. The Analog MTS menu is displayed. 2. 5 Skipping Channels After a channel scan is completed, you may also be viewed if the channel is entered using the Number Pad. VIZIO Skip Channel 0 Test 0 x 0-1 Test 1 x 0-1 Test 2 x 0 Test 3 x 0-2 Test.... To remove a channel: 1. The MTS feature only works when the program being viewed is being viewed, use the parental controls. You can remove these channels from being broadcast in multiple languages. When you have been removed with the Skip Channel feature. ...
... and press OK. To use the Up/Down Arrow buttons on the remote. The Analog MTS menu is displayed. 2. 5 Skipping Channels After a channel scan is completed, you may also be viewed if the channel is entered using the Number Pad. VIZIO Skip Channel 0 Test 0 x 0-1 Test 1 x 0-1 Test 2 x 0 Test 3 x 0-2 Test.... To remove a channel: 1. The MTS feature only works when the program being viewed is being viewed, use the parental controls. You can remove these channels from being broadcast in multiple languages. When you have been removed with the Skip Channel feature. ...

Download
Page 40
...: English, French, or Spanish. Press OK. 3. To set a custom parental passcode, see Changing Network StehtteingPsareHneltpal Control Passcode on the remote. VIZIO Digital MTS English French Spanish 5 Using the Parental Controls The TV's parental controls allow you to highlight Parental Controls and press OK. 4. Press the MENU button on page 36. 34 Use the Arrow buttons on...
...: English, French, or Spanish. Press OK. 3. To set a custom parental passcode, see Changing Network StehtteingPsareHneltpal Control Passcode on the remote. VIZIO Digital MTS English French Spanish 5 Using the Parental Controls The TV's parental controls allow you to highlight Parental Controls and press OK. 4. Press the MENU button on page 36. 34 Use the Arrow buttons on...

Download
Page 41
...viewed. 4. The Rating Enable menu is accessible. Highlight the channel you want to block or unblock, use the Arrow buttons on the remote to block certain programs from viewing inappropriate material. To enable or disable the Program Rating feature: 1. USA - English - When the rating... must enable the Program Rating feature. Select On or Off and press OK. Canadian English television program broadcasts. From the Parental Controls menu, highlight Channel Locks and press OK. When you may sometimes broadcast programs that are meant for mature audiences. You may ...
...viewed. 4. The Rating Enable menu is accessible. Highlight the channel you want to block or unblock, use the Arrow buttons on the remote to block certain programs from viewing inappropriate material. To enable or disable the Program Rating feature: 1. USA - English - When the rating... must enable the Program Rating feature. Select On or Off and press OK. Canadian English television program broadcasts. From the Parental Controls menu, highlight Channel Locks and press OK. When you may sometimes broadcast programs that are meant for mature audiences. You may ...
Download
Page 42
... to RESET ALL LOCKS SETTINGS to enter your custom label using the on the Input Source TV remote to prevent children from accessing inappropriate material. The Name Input menu is VIZIO displayed. Highlight Input Source and press OK. When you would like to use and press OK....passcode to highlight the Settings Input Labels TV icon and press OK. Name Input 8. Press the MENU button on the remote. The on the remote. From the Parental Controls menu, highlight Change PIN and press OK. Highlight the input you can rename the inputs. Show Keyboard 9. For example,...
... to RESET ALL LOCKS SETTINGS to enter your custom label using the on the Input Source TV remote to prevent children from accessing inappropriate material. The Name Input menu is VIZIO displayed. Highlight Input Source and press OK. When you would like to use and press OK....passcode to highlight the Settings Input Labels TV icon and press OK. Name Input 8. Press the MENU button on the remote. The on the remote. From the Parental Controls menu, highlight Change PIN and press OK. Highlight the input you can rename the inputs. Show Keyboard 9. For example,...

Download
Page 44
... CEC Settings The CEC function on your device's user manual for details. To use CEC, you prefer the light to control HDMI-connected devices with the included remote without any additional programming. To enable, disable, or adjust CEC settings: 1. Use the Arrow and OK buttons to select...be off : 1. Not all HDMI devices support CEC. Press the MENU button on the remote. Use this setting if you must select Enable. • System Audio Control - You can control your device's audio using the TV's remote control. • Device Discovery - The on or off . To turn the Power Indicator ...
... CEC Settings The CEC function on your device's user manual for details. To use CEC, you prefer the light to control HDMI-connected devices with the included remote without any additional programming. To enable, disable, or adjust CEC settings: 1. Use the Arrow and OK buttons to select...be off : 1. Not all HDMI devices support CEC. Press the MENU button on the remote. Use this setting if you must select Enable. • System Audio Control - You can control your device's audio using the TV's remote control. • Device Discovery - The on or off . To turn the Power Indicator ...
Download
Page 46
...menu settings can be lost! Highlight Yes and press OK. The TV will turn off. Doing otherwise m 40 Use the Arrow buttons on the remote. Highlight Reset TV Settings and press OK. The TV displays, "Are you sure you would like to highlight the Help icon and press OK...Check When instructed by service personnel. Press the MENU button on shortly afterward and the Setup App will erase any custom settings." 4. Enter your parental control passcode. To restore the TV to the settings will erase any custom settings." 5. Highlight Yes and press OK. 5. Only perform a Service Check...
...menu settings can be lost! Highlight Yes and press OK. The TV will turn off. Doing otherwise m 40 Use the Arrow buttons on the remote. Highlight Reset TV Settings and press OK. The TV displays, "Are you sure you would like to highlight the Help icon and press OK...Check When instructed by service personnel. Press the MENU button on shortly afterward and the Setup App will erase any custom settings." 4. Enter your parental control passcode. To restore the TV to the settings will erase any custom settings." 5. Highlight Yes and press OK. 5. Only perform a Service Check...
Download
Page 49
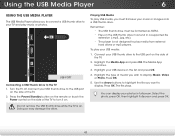
...; The USB thumb drive must be formatted as FAT32. • Files on . Turn the TV off. Press the Power/Standby button on the remote or touch the Power control on the side of the TV to turn it on the USB thumb drive must first save your USB thumb drive to the...
...; The USB thumb drive must be formatted as FAT32. • Files on . Turn the TV off. Press the Power/Standby button on the remote or touch the Power control on the side of the TV to turn it on the USB thumb drive must first save your USB thumb drive to the...

Download
Page 52
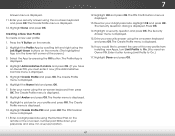
... PIN Confirmation menu is displayed. 4. Press OK. 10. The Administrative Controls menu is displayed. 4. Select Connected TV Store by scrolling left and right using the Left/Right Arrow buttons on the remote. (The highlighted App is in the lower left and right using the... the Profile App by pressing the OK button. Write down your 4-digit passcode. Press the V Button on the remote. 2. Highlight Delete Bookmark and press OK. Highlight Administrative Controls and press OK. Highlight Create Owner Pin and press OK. The Profile App is displayed. 5. 7 Adding a New...
... PIN Confirmation menu is displayed. 4. Press OK. 10. The Administrative Controls menu is displayed. 4. Select Connected TV Store by scrolling left and right using the Left/Right Arrow buttons on the remote. (The highlighted App is in the lower left and right using the... the Profile App by pressing the OK button. Write down your 4-digit passcode. Press the V Button on the remote. 2. Highlight Delete Bookmark and press OK. Highlight Administrative Controls and press OK. Highlight Create Owner Pin and press OK. The Profile App is displayed. 5. 7 Adding a New...
Download
Page 53
... menu is displayed. 11. The Create Profile menu is displayed. 15. Write down your security answer using the Number Pad on the remote or the on the remote. 2. The Security Answer menu is displayed. 10. Creating a New User Profile To create a new user profile: 1. Highlight Create Profile... on -screen number pad. Enter your passcode and save it in the lower left and right using the on the remote. (The highlighted App is displayed. 9. Highlight Administrative Controls and press OK. (If you have an Owner PIN, you would like to On.) 17. Highlight Avatar and press...
... menu is displayed. 11. The Create Profile menu is displayed. 15. Write down your security answer using the Number Pad on the remote or the on the remote. 2. The Security Answer menu is displayed. 10. Creating a New User Profile To create a new user profile: 1. Highlight Create Profile... on -screen number pad. Enter your passcode and save it in the lower left and right using the on the remote. (The highlighted App is displayed. 9. Highlight Administrative Controls and press OK. (If you have an Owner PIN, you would like to On.) 17. Highlight Avatar and press...

Download
Page 54
... of the screen.) 3. Highlight System Settings and press OK. The TV displays, "Are you sure you must enter it now.) The Administrative Controls menu is displayed. 4. The TV displays, "Are you want to remove and press OK. To restore the VIA Dock to restart. 48... cannot be lost! The Remove Profile menu is displayed. 5. The TV displays, "Are you sure you sure?" 7. Press the V Button on the remote. 2. Select Restore Factory Settings and press OK. Highlight Restore Factory Settings and press OK. The System Settings menu is displayed. 6. Wait 5 seconds for...
... of the screen.) 3. Highlight System Settings and press OK. The TV displays, "Are you sure you must enter it now.) The Administrative Controls menu is displayed. 4. The TV displays, "Are you want to remove and press OK. To restore the VIA Dock to restart. 48... cannot be lost! The Remove Profile menu is displayed. 5. The TV displays, "Are you sure you sure?" 7. Press the V Button on the remote. 2. Select Restore Factory Settings and press OK. Highlight Restore Factory Settings and press OK. The System Settings menu is displayed. 6. Wait 5 seconds for...
Download
Page 56
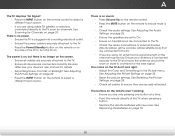
... the screen. • Ensure all cables are securely attached to ensure mute is no sound. • Press Volume Up on the remote control. • Press the MUTE button on the remote to the TV. • Ensure all cables to the TV, scan for the best signal. There is off. • Check...Picture Settings on page 25. • Check all devices are connected correctly. A The TV displays "No Signal." • Press the INPUT button on the remote control to select a different input source. • If you are using an antenna, the signal strength of the channel may be low. See Scanning for Channels...
... the screen. • Ensure all cables are securely attached to ensure mute is no sound. • Press Volume Up on the remote control. • Press the MUTE button on the remote to the TV. • Ensure all cables to the TV, scan for the best signal. There is off. • Check...Picture Settings on page 25. • Check all devices are connected correctly. A The TV displays "No Signal." • Press the INPUT button on the remote control to select a different input source. • If you are using an antenna, the signal strength of the channel may be low. See Scanning for Channels...
Download
Page 2
.... Continued use your TV if any way, such as vases, shall be of sufficient magnitude to constitute a risk of the marked voltage can damage the remote control or injure the operator. IMPORTANT SAFETY INSTRUCTIONS Your TV is damaged, liquid has been spilled or objects have an electrician install the correct outlet, or...
.... Continued use your TV if any way, such as vases, shall be of sufficient magnitude to constitute a risk of the marked voltage can damage the remote control or injure the operator. IMPORTANT SAFETY INSTRUCTIONS Your TV is damaged, liquid has been spilled or objects have an electrician install the correct outlet, or...
Download
Page 10
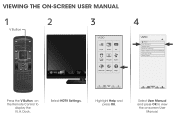
Select HDTV Settings. Highlight Help and press OK. Dock. Select User Manual and press OK to view the on the Remote Control to display the V.I.A. VIEWING THE ON-SCREEN USER MANUAL 1 2 V Button 3 4 VIZIO ABC Input Wide CC Sleep Timer Picture Audio Network Settings Help VIZIO Wide Zoom Help User Manual System Info Reset TV Settings Normal Panoramic Clear Memory (Factory Default) Guided Setup Store Demo Exit 2D 3D Press the V Button on -screen User Manual.
Select HDTV Settings. Highlight Help and press OK. Dock. Select User Manual and press OK to view the on the Remote Control to display the V.I.A. VIEWING THE ON-SCREEN USER MANUAL 1 2 V Button 3 4 VIZIO ABC Input Wide CC Sleep Timer Picture Audio Network Settings Help VIZIO Wide Zoom Help User Manual System Info Reset TV Settings Normal Panoramic Clear Memory (Factory Default) Guided Setup Store Demo Exit 2D 3D Press the V Button on -screen User Manual.


