Download
Page 3
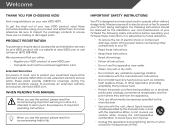
... amplifiers) that you see this apparatus near water. • Clean only with the apparatus. When Reading this Manual When you either: • Register your VIZIO product at www.VIZIO.com • Complete and mail the enclosed registration card Extended Warranties For peace of your TV. • Read...by the manufacturer, or sold with a dry cloth. • Do not block any ventilation openings. When you to protect your new VIZIO HDTV. Important Safety Instructions Your TV is intended to alert you see this apparatus during the standard warranty period. To get the most...
... amplifiers) that you see this apparatus near water. • Clean only with the apparatus. When Reading this Manual When you either: • Register your VIZIO product at www.VIZIO.com • Complete and mail the enclosed registration card Extended Warranties For peace of your TV. • Read...by the manufacturer, or sold with a dry cloth. • Do not block any ventilation openings. When you to protect your new VIZIO HDTV. Important Safety Instructions Your TV is intended to alert you see this apparatus during the standard warranty period. To get the most...

Download
Page 14
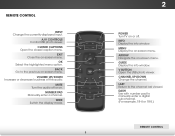
... a channel. Info Display the info window. Channel Up/Down Change the channel. Closed Captions Open the closed caption menu. Back Go to manually enter a digital sub-channel. (For example, 18-4 or 18-5.) Remote Control Guide Display the info window. V Button Open the USB photo viewer. Exit Close the ...
... a channel. Info Display the info window. Channel Up/Down Change the channel. Closed Captions Open the closed caption menu. Back Go to manually enter a digital sub-channel. (For example, 18-4 or 18-5.) Remote Control Guide Display the info window. V Button Open the USB photo viewer. Exit Close the ...

Download
Page 21
... the Up/Down Arrow buttons on the remote to highlight the CC icon and press OK. Choose Auto to keep default settings or Custom to manually change , then use the Arrow buttons to change each setting. • Text Size - Changing the Appearance of the text. • BG Color - Use the Arrow...
... the Up/Down Arrow buttons on the remote to highlight the CC icon and press OK. Choose Auto to keep default settings or Custom to manually change , then use the Arrow buttons to change each setting. • Text Size - Changing the Appearance of the text. • BG Color - Use the Arrow...

Download
Page 23
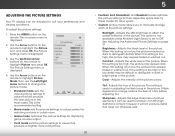
... edge sharpness of the picture. 5 • Football, Golf, Basketball, and Baseball modes optimize the picture settings for large areas of brightness. Adjusts the brightness to manually change the setting: • Noise Reduction Diminishes artifacts in the picture. Brightness - When this setting is too high or too low, detail may appear faded...
... edge sharpness of the picture. 5 • Football, Golf, Basketball, and Baseball modes optimize the picture settings for large areas of brightness. Adjusts the brightness to manually change the setting: • Noise Reduction Diminishes artifacts in the picture. Brightness - When this setting is too high or too low, detail may appear faded...

Download
Page 24
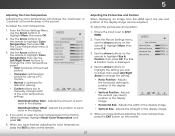
... Arrow buttons to change the color temperature preset: • Cool produces a blue-hued picture. • Computer optimizes the picture for use the Arrow buttons to manually change the "warmness" or "coolness" of the white areas of the picture. If you have finished adjusting the color temperature, press the EXIT button on...
... Arrow buttons to change the color temperature preset: • Cool produces a blue-hued picture. • Computer optimizes the picture for use the Arrow buttons to manually change the "warmness" or "coolness" of the white areas of the picture. If you have finished adjusting the color temperature, press the EXIT button on...

Download
Page 34
... is displayed. 3. Press the MENU button on . Highlight Power Indicator Settings and press OK. 4. Use the Arrow buttons on the remote. See your device's user manual for details. Use the Up/Down Arrow buttons to adjust each setting: • CEC Function - To enable, disable, or adjust CEC settings: 1. Use this setting...
... is displayed. 3. Press the MENU button on . Highlight Power Indicator Settings and press OK. 4. Use the Arrow buttons on the remote. See your device's user manual for details. Use the Up/Down Arrow buttons to adjust each setting: • CEC Function - To enable, disable, or adjust CEC settings: 1. Use this setting...
Download
Page 41
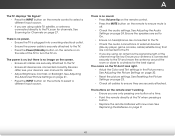
... the TV. • Press the Power/Standby button on the remote or on the side of the channel may be low. Ensure your device's user manual for the best signal. See Replacing the Batteries on the remote aren't working electrical outlet. • Ensure the power cable is no headphones are connected...
... the TV. • Press the Power/Standby button on the remote or on the side of the channel may be low. Ensure your device's user manual for the best signal. See Replacing the Batteries on the remote aren't working electrical outlet. • Ensure the power cable is no headphones are connected...
Download
Page 4
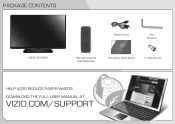
PACKAGE CONTENTS VIZIO LED HDTV Power Cord Hex Wrench Remote Control with Batteries This Quick Start Guide 1 x Hex Screw HELP VIZIO REDUCE PAPER WASTE. DOWNLOAD THE FULL USER MANUAL AT VIZIO.COM/SUPPORT
PACKAGE CONTENTS VIZIO LED HDTV Power Cord Hex Wrench Remote Control with Batteries This Quick Start Guide 1 x Hex Screw HELP VIZIO REDUCE PAPER WASTE. DOWNLOAD THE FULL USER MANUAL AT VIZIO.COM/SUPPORT

Download
Page 5
NUMBER PAD Manually enter a channel. INFO Display the info window. ARROW Navigate the on -screen menu. V BUTTON Open the USB media player. VOLUME UP/DOWN Increase or decrease .... DASH Use with number pad to the channel last viewed. MENU Display the on -screen menu. OK Select the highlighted menu option. LAST Return to manually enter a digital sub-channel. (For example, 18-4 or 18-5.) MUTE Turn the audio off . USING THE REMOTE INPUT Change the currently-displayed input...
NUMBER PAD Manually enter a channel. INFO Display the info window. ARROW Navigate the on -screen menu. V BUTTON Open the USB media player. VOLUME UP/DOWN Increase or decrease .... DASH Use with number pad to the channel last viewed. MENU Display the on -screen menu. OK Select the highlighted menu option. LAST Return to manually enter a digital sub-channel. (For example, 18-4 or 18-5.) MUTE Turn the audio off . USING THE REMOTE INPUT Change the currently-displayed input...

User Manual
Page 3
...To get the most out of important operating instructions. Product Registration To purchase or inquire about accessories and installation services for Choosing VIZIO And congratulations on your TV from the apparatus. • Only use attachments/accessories specified by the manufacturer. It is designed and.... These plans provide additional coverage during the standard warranty period. We recommend that you see this Manual When you either: • Register your VIZIO product at plugs, convenience receptacles, and the point where they exit from being damaged, the following safety ...
...To get the most out of important operating instructions. Product Registration To purchase or inquire about accessories and installation services for Choosing VIZIO And congratulations on your TV from the apparatus. • Only use attachments/accessories specified by the manufacturer. It is designed and.... These plans provide additional coverage during the standard warranty period. We recommend that you see this Manual When you either: • Register your VIZIO product at plugs, convenience receptacles, and the point where they exit from being damaged, the following safety ...
User Manual
Page 14
Closed Captions Open the closed caption menu. Volume Up/Down Increase or decrease loudness of the audio. Number Pad Manually enter a channel. Back Go to the previous on -screen menu. Exit Close the on -screen menu. Arrow Navigate the on or off or on -screen ...-displayed input. A/V Controls Control USB photo viewer. Info Display the info window. Menu Display the on . V Button Open the USB photo viewer. Last Return to manually enter a digital sub-channel. (For example, 18-4 or 18-5.) Remote Control
Closed Captions Open the closed caption menu. Volume Up/Down Increase or decrease loudness of the audio. Number Pad Manually enter a channel. Back Go to the previous on -screen menu. Exit Close the on -screen menu. Arrow Navigate the on or off or on -screen ...-displayed input. A/V Controls Control USB photo viewer. Info Display the info window. Menu Display the on . V Button Open the USB photo viewer. Last Return to manually enter a digital sub-channel. (For example, 18-4 or 18-5.) Remote Control

User Manual
Page 24
... WibdeuttoZnoosmon tNhoremarel mPaontoeramtoic highlight the setting you are satisfied with closed captions, press the EXIT button on the remote. Ne•tworkBGSetOtinpgsaciHtyelp- VIZIO Digital CC Style Caption Style Custom Text Size As Broadcast Color As Broadcast Opacity As Broadcast 3. Change the edge type. 4. The...to highlight Digital CC Style. 2. If the program you wish to change, then use the Arrow buttons to manually change the appearance of a program's dialogue. Closed captions display a transcription of digital closed captions: 1.
... WibdeuttoZnoosmon tNhoremarel mPaontoeramtoic highlight the setting you are satisfied with closed captions, press the EXIT button on the remote. Ne•tworkBGSetOtinpgsaciHtyelp- VIZIO Digital CC Style Caption Style Custom Text Size As Broadcast Color As Broadcast Opacity As Broadcast 3. Change the edge type. 4. The...to highlight Digital CC Style. 2. If the program you wish to change, then use the Arrow buttons to manually change the appearance of a program's dialogue. Closed captions display a transcription of digital closed captions: 1.
User Manual
Page 26
... may appear dark. PiCctuorelor -AuAddiojusts the intensity of the picture. Use the Up/Down Arrow buttons on the remote to manually change each of the picture settings: Wide Exit Input Sleep Timer Backlight - ContraAsBtC- The on the remote to highlight Picture... is displayed. 2. This setting is too high or too low, detail may appear faded or washed out. ZooSmee ANdorjmuasl tinPagnotrhameicAdvanced Picture Settings on the remote. VIZIO Picture Settings Picture Mode Backlight Brightness Contrast Color Tint Sharpness Custom - + 50 - + 50 - + 50 - + 50 - +0 - +0 More...
... may appear dark. PiCctuorelor -AuAddiojusts the intensity of the picture. Use the Up/Down Arrow buttons on the remote to manually change each of the picture settings: Wide Exit Input Sleep Timer Backlight - ContraAsBtC- The on the remote to highlight Picture... is displayed. 2. This setting is too high or too low, detail may appear faded or washed out. ZooSmee ANdorjmuasl tinPagnotrhameicAdvanced Picture Settings on the remote. VIZIO Picture Settings Picture Mode Backlight Brightness Contrast Color Tint Sharpness Custom - + 50 - + 50 - + 50 - + 50 - +0 - +0 More...
User Manual
Page 28
... Arrow buttons to change the "warmness" or "coolness" of the white areas of the picture. Use the Arrow buttons on the remote to manually change each of each color in the display. Blue Gain - Red Offset - Blue Offset - Vertical Position + 16 Exit 2D 3D Horizontal ... Horizontal Size - To adjust the color temperature: 1. The Color Temperature menu is displayed. Adjusts the amount of the color temperature settings: VIZIO Color Temperature Color Temperature Red Gain - Green Offset - Ensure the input is optimized for use as a PC monitor. • Normal ...
... Arrow buttons to change the "warmness" or "coolness" of the white areas of the picture. Use the Arrow buttons on the remote to manually change each of each color in the display. Blue Gain - Red Offset - Blue Offset - Vertical Position + 16 Exit 2D 3D Horizontal ... Horizontal Size - To adjust the color temperature: 1. The Color Temperature menu is displayed. Adjusts the amount of the color temperature settings: VIZIO Color Temperature Color Temperature Red Gain - Green Offset - Ensure the input is optimized for use as a PC monitor. • Normal ...

User Manual
Page 40
... to adjust each setting: • CEC Function - Press the MENU button on the remote. 5 Adjusting the CEC Settings The CEC function on your device's user manual for details. Not all HDMI devices support CEC. Turning the Power Indicator Light On or Off The Power Indicator Light on or off . To turn...
... to adjust each setting: • CEC Function - Press the MENU button on the remote. 5 Adjusting the CEC Settings The CEC function on your device's user manual for details. Not all HDMI devices support CEC. Turning the Power Indicator Light On or Off The Power Indicator Light on or off . To turn...
User Manual
Page 47
... Scanning for the best signal. There is no image on page 23. • Check all devices are securely attached. Devices differ; Ensure your device's user manual for channels.
... Scanning for the best signal. There is no image on page 23. • Check all devices are securely attached. Devices differ; Ensure your device's user manual for channels.

