Download
Page 5
... damage the remote control or injure the operator. Ensure that the power cord and any servicing other cables are qualified to do not perform any other than that may cause fire or electric shock. • Do not install your TV will not be of sufficient magnitude to constitute a risk of your TV, hold the AC/DC power adapter, not the...
... damage the remote control or injure the operator. Ensure that the power cord and any servicing other cables are qualified to do not perform any other than that may cause fire or electric shock. • Do not install your TV will not be of sufficient magnitude to constitute a risk of your TV, hold the AC/DC power adapter, not the...

Download
Page 7
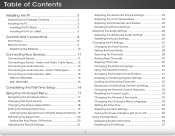
...3 Installing the TV Stand 3 Installing the TV on a Wall 5 Controls and Connections 6 Rear Panel 6 Front Panel 7 Remote Control 8 Replacing the Batteries 9 Connecting Your Devices 10 Connecting A Device 10 Connecting an audio device 11 Completing the First-Time Setup 12 Using the On-Screen Menu 13 Navigating the On-Screen Menu 13 Changing the Input Source 14 Changing the Screen Aspect Ratio 14 Setting Up Closed Captioning 15 Changing the Appearance of Digital Closed Captions.. 15 Activating the Sleep Timer 16 Setting the Auto Power Off Feature 16 Adjusting the Picture Settings...
...3 Installing the TV Stand 3 Installing the TV on a Wall 5 Controls and Connections 6 Rear Panel 6 Front Panel 7 Remote Control 8 Replacing the Batteries 9 Connecting Your Devices 10 Connecting A Device 10 Connecting an audio device 11 Completing the First-Time Setup 12 Using the On-Screen Menu 13 Navigating the On-Screen Menu 13 Changing the Input Source 14 Changing the Screen Aspect Ratio 14 Setting Up Closed Captioning 15 Changing the Appearance of Digital Closed Captions.. 15 Activating the Sleep Timer 16 Setting the Auto Power Off Feature 16 Adjusting the Picture Settings...
Download
Page 11
... any cables connected to find the appropriate mount for the weight/load of the TV. Specifications for your TV on a wall: 1. Be sure the surface is capable of supporting the weight of this TV. 5 Use only with your mount. 1 Installing the TV on a Wall To mount your TV on a wall, you . Consult the information below to your TV model: Installing a TV on a clean, flat, stable surface. Remove the base...
... any cables connected to find the appropriate mount for the weight/load of the TV. Specifications for your TV on a wall: 1. Be sure the surface is capable of supporting the weight of this TV. 5 Use only with your mount. 1 Installing the TV on a Wall To mount your TV on a wall, you . Consult the information below to your TV model: Installing a TV on a clean, flat, stable surface. Remove the base...
Download
Page 25
... the Picture Settings menu, use the Arrow buttons to highlight Audio and press OK. Use the Arrow buttons to highlight the setting you want to RESET Picture Settings to change the setting: • Auto Adjust - Automatically adjusts display image to the factory default settings: 1. Use the Arrow buttons on -screen menu is set to change the setting: • Balance - To adjust the picture size and position: 1. The TV displays, "Are you sure you wish to adjust, then press Left/Right Arrow to HDMI. 2. Press...
... the Picture Settings menu, use the Arrow buttons to highlight Audio and press OK. Use the Arrow buttons to highlight the setting you want to RESET Picture Settings to change the setting: • Auto Adjust - Automatically adjusts display image to the factory default settings: 1. Use the Arrow buttons on -screen menu is set to change the setting: • Balance - To adjust the picture size and position: 1. The TV displays, "Are you sure you wish to adjust, then press Left/Right Arrow to HDMI. 2. Press...
Download
Page 26
.... 4. Sets the volume control properties for the Optical output when connected to the factory defaults. Select On or Off. • Advanced Audio - See Resetting the Audio Settings on the remote. 20 From the Audio Settings Menu, use the Arrow buttons to a home theater audio system. When you wish to adjust, then press Left/Right Arrow to change the setting: • Digital Audio Out Changes the type of processing for the analog RCA (red/ white) connectors when connected to highlight Advanced Audio...
.... 4. Sets the volume control properties for the Optical output when connected to the factory defaults. Select On or Off. • Advanced Audio - See Resetting the Audio Settings on the remote. 20 From the Audio Settings Menu, use the Arrow buttons to a home theater audio system. When you wish to adjust, then press Left/Right Arrow to change the setting: • Digital Audio Out Changes the type of processing for the analog RCA (red/ white) connectors when connected to highlight Advanced Audio...

Download
Page 34
... on-screen menu is displayed. 4. The CEC Settings menu is displayed. 2. 5 Adjusting the CEC Settings The CEC function on your TV enables you to highlight CEC Settings and press OK. See your device's user manual for details. Use the Arrow buttons on the remote to control HDMI-connected devices with the included remote without any additional programming. To use CEC, you must select Enable. • System Audio Control - To turn off : 1. Use the Arrow buttons...
... on-screen menu is displayed. 4. The CEC Settings menu is displayed. 2. 5 Adjusting the CEC Settings The CEC function on your TV enables you to highlight CEC Settings and press OK. See your device's user manual for details. Use the Arrow buttons on the remote to control HDMI-connected devices with the included remote without any additional programming. To use CEC, you must select Enable. • System Audio Control - To turn off : 1. Use the Arrow buttons...
Download
Page 41
... differ; Ensure your device's user manual for the best signal. See Replacing the Batteries on the remote to ensure mute is off. • Check the audio settings. A The TV displays "No Signal." • Press the INPUT button on the remote control to select a different input source. • If you are using an antenna, the signal strength of the channel may be low. See Scanning for channels. The power is on, but there is...
... differ; Ensure your device's user manual for the best signal. See Replacing the Batteries on the remote to ensure mute is off. • Check the audio settings. A The TV displays "No Signal." • Press the INPUT button on the remote control to select a different input source. • If you are using an antenna, the signal strength of the channel may be low. See Scanning for channels. The power is on, but there is...

Download
Page 42
... you switch from , the difference may not display correctly. When I change the screen mode. If the volume level on the new input source is higher or lower than the level on the source you are inherent to a window for the best signal. Connect your antenna is connected securely to the TV and move the antenna around the room or close to this type of occurrences are using digital sources. Ensure...
... you switch from , the difference may not display correctly. When I change the screen mode. If the volume level on the new input source is higher or lower than the level on the source you are inherent to a window for the best signal. Connect your antenna is connected securely to the TV and move the antenna around the room or close to this type of occurrences are using digital sources. Ensure...
Download
Page 43
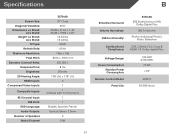
Specifications Screen Size: Diagonal Viewable: Dimensions w/ Stand: w/o Stand: Weight w/ Stand: w/o Stand: TV Type: Refresh Rate: Maximum Resolution: Pixel Pitch: Dynamic Contrast Ratio: Response Time: Brightness: 2D Viewing Angle: HDMI Inputs: Component Video Inputs: Composite Inputs: RF/Coaxial Input: USB Ports: OSD Language: Audio Outputs: Number of Speakers Watts/Channel E370-A0 37" Class 36.5" 33.08 x 21.62 x 7.46" 33.08 x 19.82 x 3.07" 14.52 lbs 13.42 lbs DLED 60 Hz 1366 x 768 .5916 x ....
Specifications Screen Size: Diagonal Viewable: Dimensions w/ Stand: w/o Stand: Weight w/ Stand: w/o Stand: TV Type: Refresh Rate: Maximum Resolution: Pixel Pitch: Dynamic Contrast Ratio: Response Time: Brightness: 2D Viewing Angle: HDMI Inputs: Component Video Inputs: Composite Inputs: RF/Coaxial Input: USB Ports: OSD Language: Audio Outputs: Number of Speakers Watts/Channel E370-A0 37" Class 36.5" 33.08 x 21.62 x 7.46" 33.08 x 19.82 x 3.07" 14.52 lbs 13.42 lbs DLED 60 Hz 1366 x 768 .5916 x ....

Download
Page 44
... TIME SET FORTH ABOVE. VIZIO SHALL NOT BE RESPONSIBLE FOR LOSS OF USE, LOSS OF INFORMATION OR DATA, COMMERCIAL LOSS, LOST REVENUE OR LOST PROFITS, OR OTHER INCIDENTAL OR CONSEQUENTIAL DAMAGES. Proof of purchase in materials and workmanship for example: cosmetic damage, normal wear and tear, improper operation, improper voltage supply or power surges, signal issues, damages from warranty service or replacement...
... TIME SET FORTH ABOVE. VIZIO SHALL NOT BE RESPONSIBLE FOR LOSS OF USE, LOSS OF INFORMATION OR DATA, COMMERCIAL LOSS, LOST REVENUE OR LOST PROFITS, OR OTHER INCIDENTAL OR CONSEQUENTIAL DAMAGES. Proof of purchase in materials and workmanship for example: cosmetic damage, normal wear and tear, improper operation, improper voltage supply or power surges, signal issues, damages from warranty service or replacement...
Download
Page 2
... placed on your TV and easily accessible. • Only power of the marked voltage can damage the remote control or injure the operator. Ensure that may function abnormally. When your TV, hold the AC/DC power adapter, not the cord. Incorrect polarities may result in an area with the manufacturer's instructions. • Do not install near your TV to high...
... placed on your TV and easily accessible. • Only power of the marked voltage can damage the remote control or injure the operator. Ensure that may function abnormally. When your TV, hold the AC/DC power adapter, not the cord. Incorrect polarities may result in an area with the manufacturer's instructions. • Do not install near your TV to high...
Download
Page 14
... interference received, including interference that some TV channels add black bars to ON. The manufacturer is no guarantee that is OFF. • Select Menu > Audio. TROUBLESHOOTING There is no power. • Be sure the power cord is connected. • Consult the dealer or an experienced radio/TV technician for help. Use the AC cords listed below for compliance could void the user's authority to operate this...
... interference received, including interference that some TV channels add black bars to ON. The manufacturer is no guarantee that is OFF. • Select Menu > Audio. TROUBLESHOOTING There is no power. • Be sure the power cord is connected. • Consult the dealer or an experienced radio/TV technician for help. Use the AC cords listed below for compliance could void the user's authority to operate this...
Download
Page 15
... operation, improper voltage supply or power surges, signal issues, damages from 5:00AM to 9:00PM Monday through Friday and 8:00AM to show that you configured as installation and set-up issues or any type of the model's product information page (www.VIZIO.com) or look for a period of one (1) year of non-commercial usage and ninety (90) days of the servicer. ANY IMPLIED WARRANTIES...
... operation, improper voltage supply or power surges, signal issues, damages from 5:00AM to 9:00PM Monday through Friday and 8:00AM to show that you configured as installation and set-up issues or any type of the model's product information page (www.VIZIO.com) or look for a period of one (1) year of non-commercial usage and ninety (90) days of the servicer. ANY IMPLIED WARRANTIES...
User Manual
Page 5
..., the internal components may be exposed to leak which can damage the remote control or injure the operator. Ensure that the power cord and any object drops into your dealer immediately. To reduce the risk of your TV. Pulling on the apparatus. • The mains plug or appliance coupler...Do not install your TV in an area with liquids, such as vases, shall be used as sunshine, fire or the like. • If any servicing other cables are for repair. If any way. - Unplug the power cord immediately and contact your TV, hold the AC/DC power adapter, not the cord. The ...
..., the internal components may be exposed to leak which can damage the remote control or injure the operator. Ensure that the power cord and any object drops into your dealer immediately. To reduce the risk of your TV. Pulling on the apparatus. • The mains plug or appliance coupler...Do not install your TV in an area with liquids, such as vases, shall be used as sunshine, fire or the like. • If any servicing other cables are for repair. If any way. - Unplug the power cord immediately and contact your TV, hold the AC/DC power adapter, not the cord. The ...
User Manual
Page 7
... Power Indicator Light On or Off 35 Using the Help Menu 36 Displaying System Information 36 Resetting the TV Settings 37 1 ARC 15 Without HDMI ARC 15 With HDMI ARC 15 Completing the First-Time Setup 16 Using the On-Screen Menu 17 Navigating the On-Screen Menu 17 Changing the Input Source 18 Changing the Screen Aspect Ratio 18 Setting Up Closed Captioning 19 Changing the Appearance of Digital Closed Captions.. 19 Activating the Sleep Timer 20 Setting the Auto Power Off Feature 20 Adjusting the Picture Settings 21 Adjusting...
... Power Indicator Light On or Off 35 Using the Help Menu 36 Displaying System Information 36 Resetting the TV Settings 37 1 ARC 15 Without HDMI ARC 15 With HDMI ARC 15 Completing the First-Time Setup 16 Using the On-Screen Menu 17 Navigating the On-Screen Menu 17 Changing the Input Source 18 Changing the Screen Aspect Ratio 18 Setting Up Closed Captioning 19 Changing the Appearance of Digital Closed Captions.. 19 Activating the Sleep Timer 20 Setting the Auto Power Off Feature 20 Adjusting the Picture Settings 21 Adjusting...

User Manual
Page 25
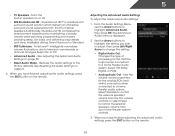
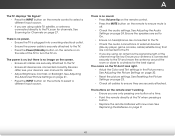
... WiAdeuto ZPooomwer-NOorfmf aml ePnaunoriasmdicisplayed. 2. To use the Up/Down Arrow buttons on -screen menu is set the Auto Power Off feature: 1. Setting the Auto Power Off Feature To help save energy, your TV is VIZIO displayed. Exit 2D 3D ABC Input Wide CC Sleep Timer Picture Audio Network Settings Help 19 Use the Arrow buttons on the screen. The on the remote to highlight the Sleep Auto Power Off Off Timer icon and press OK. From the Sleep Timer menu, use the sleep timer: 1.
... WiAdeuto ZPooomwer-NOorfmf aml ePnaunoriasmdicisplayed. 2. To use the Up/Down Arrow buttons on -screen menu is set the Auto Power Off feature: 1. Setting the Auto Power Off Feature To help save energy, your TV is VIZIO displayed. Exit 2D 3D ABC Input Wide CC Sleep Timer Picture Audio Network Settings Help 19 Use the Arrow buttons on the screen. The on the remote to highlight the Sleep Auto Power Off Off Timer icon and press OK. From the Sleep Timer menu, use the sleep timer: 1.

User Manual
Page 31
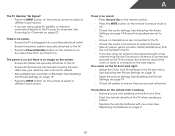
... adjust, then press Left/Right Arrow to change the setting: • Digital Audio Out Changes the type of processing for the analog RCA (red/ white) connectors when connected to a home theater audio system. The on the remote. Highlight Yes aABnCd press OK. 5. VIZIO Advanced Audio Digital Audio Out Analog Audio Out PCM Fixed 3. Press the MENU button on the remote. Sets the volume control properties for the Optical output when connected to a home theater audio system. Use the Arrow buttons to the factory defaults...
... adjust, then press Left/Right Arrow to change the setting: • Digital Audio Out Changes the type of processing for the analog RCA (red/ white) connectors when connected to a home theater audio system. The on the remote. Highlight Yes aABnCd press OK. 5. VIZIO Advanced Audio Digital Audio Out Analog Audio Out PCM Fixed 3. Press the MENU button on the remote. Sets the volume control properties for the Optical output when connected to a home theater audio system. Use the Arrow buttons to the factory defaults...
User Manual
Page 47
... audio settings. Ensure the speakers are set to On. • Ensure no image on the screen. • Ensure all devices are connected to the TV, scan for Channels on the side of external devices (Blu-ray player, game console, cable/satellite box) that are connected correctly. Ensure your device's user manual for the best signal. The colors on page 20. • Reset the picture settings. See Replacing the Batteries on page 24. The power...
... audio settings. Ensure the speakers are set to On. • Ensure no image on the screen. • Ensure all devices are connected to the TV, scan for Channels on the side of external devices (Blu-ray player, game console, cable/satellite box) that are connected correctly. Ensure your device's user manual for the best signal. The colors on page 20. • Reset the picture settings. See Replacing the Batteries on page 24. The power...

User Manual
Page 48
... new input source is not good. • For the best image quality, view high-definition programs using an antenna, the signal strength of product and do not constitute a defective product. If the volume level on -screen menu are set correctly. • If you are in RGB mode (computer), ensure that are inherent to change input source, the display image changes size. • The TV remembers the viewing mode on the screen. •...
... new input source is not good. • For the best image quality, view high-definition programs using an antenna, the signal strength of product and do not constitute a defective product. If the volume level on -screen menu are set correctly. • If you are in RGB mode (computer), ensure that are inherent to change input source, the display image changes size. • The TV remembers the viewing mode on the screen. •...
User Manual
Page 51
... VIZIO's option and sole discretion. Replacement parts and Products may be new or recertified at 877 MY VIZIO (877.698.4946) from shipping, acts of God, any type of Service Defective Products must utilize either repair or replace the Product at its sole option and discretion. Type of customer misuse, modifications or adjustments, as well as installation and set-up issues or any repairs...
... VIZIO's option and sole discretion. Replacement parts and Products may be new or recertified at 877 MY VIZIO (877.698.4946) from shipping, acts of God, any type of Service Defective Products must utilize either repair or replace the Product at its sole option and discretion. Type of customer misuse, modifications or adjustments, as well as installation and set-up issues or any repairs...


