
E320-A0 User Manual
Page 4
... the apparatus, the apparatus has been exposed to rain or moisture, does not operate normally or has been dropped. • Unplug the power cord before turning on the top of at your TV. To ensure reliable operation of time. This may cause fire or electric shock. • Slots and openings in...
... the apparatus, the apparatus has been exposed to rain or moisture, does not operate normally or has been dropped. • Unplug the power cord before turning on the top of at your TV. To ensure reliable operation of time. This may cause fire or electric shock. • Slots and openings in...
E320-A0 User Manual
Page 14
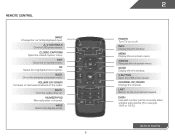
... Display the info window. Ok Select the highlighted menu option. Volume Up/Down Increase or decrease loudness of the audio. Mute Turn the audio off . WIDE Switch the display mode. 8 2 Power Turn TV on -screen menu. V Button Open the USB photo viewer. Arrow Navigate the on or off or on -screen menu...
... Display the info window. Ok Select the highlighted menu option. Volume Up/Down Increase or decrease loudness of the audio. Mute Turn the audio off . WIDE Switch the display mode. 8 2 Power Turn TV on -screen menu. V Button Open the USB photo viewer. Arrow Navigate the on or off or on -screen menu...

E320-A0 User Manual
Page 16
... Connect the appropriate cable (not included) to display output from most devices. 1. Connecting Your Devices Connecting A Device Your TV can be used (HDMI-1, HDM1-2, etc). Turn the TV and your device has a video port that your device on the TV (HDMI, Component, etc). 2. Set the TV's input to match the connection...
... Connect the appropriate cable (not included) to display output from most devices. 1. Connecting Your Devices Connecting A Device Your TV can be used (HDMI-1, HDM1-2, etc). Turn the TV and your device has a video port that your device on the TV (HDMI, Component, etc). 2. Set the TV's input to match the connection...
E320-A0 User Manual
Page 17
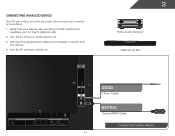
Turn the TV and your device has a audio port that your audio device off. 3. Turn the TV and your device on the TV (Optical, etc). 2. Verify that matches an available port on . 3 Home Audio Receiver VIZIO Sound Bar SIDE 11 GOOD 3.5mm Cable BETTER Optical/SPDIF Cable CONNECTING AUDIO DEVICE Connecting an audio device Your TV can output sound to the TV and the device. 4. Connect the appropriate cable (not included) to an audio device, such as a receiver or sound bar. 1.
Turn the TV and your device has a audio port that your audio device off. 3. Turn the TV and your device on the TV (Optical, etc). 2. Verify that matches an available port on . 3 Home Audio Receiver VIZIO Sound Bar SIDE 11 GOOD 3.5mm Cable BETTER Optical/SPDIF Cable CONNECTING AUDIO DEVICE Connecting an audio device Your TV can output sound to the TV and the device. 4. Connect the appropriate cable (not included) to an audio device, such as a receiver or sound bar. 1.
E320-A0 User Manual
Page 18
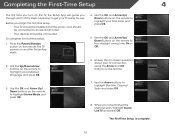
Use the OK and Arrow Up/ Down buttons on the remote to turn on the TV, the Setup App will guide you through each of the steps necessary to get your TV connection using the Arrow and OK ... your TV ready for use. Press the Power/Standby button on and the Setup App starts. 4. Completing the First-Time Setup 4 The first time you turn daylight saving time On or Off. 2.
Use the OK and Arrow Up/ Down buttons on the remote to turn on the TV, the Setup App will guide you through each of the steps necessary to get your TV connection using the Arrow and OK ... your TV ready for use. Press the Power/Standby button on and the Setup App starts. 4. Completing the First-Time Setup 4 The first time you turn daylight saving time On or Off. 2.
E320-A0 User Manual
Page 22
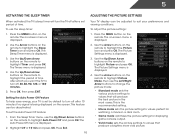
...on -screen menu is displayed. 1. The on the remote. To set by default to turn off after which you want the TV to suit your TV is being displayed on the ...on the remote to highlight Picture and press OK. Use the Arrow buttons on the remote to values that will turn off after a set period of time after 10 minutes if no signal is set the Auto Power Off feature: ...highlight Picture Mode, then use the sleep timer: To adjust the picture settings: 1. Your TV display can be adjusted to turn the TV off : 30, 60, 90, 120, or 180 minutes. 5. Press the MENU button on the screen....
...on -screen menu is displayed. 1. The on the remote. To set by default to turn off after which you want the TV to suit your TV is being displayed on the ...on the remote to highlight Picture and press OK. Use the Arrow buttons on the remote to values that will turn off after a set period of time after 10 minutes if no signal is set the Auto Power Off feature: ...highlight Picture Mode, then use the sleep timer: To adjust the picture settings: 1. Your TV display can be adjusted to turn the TV off : 30, 60, 90, 120, or 180 minutes. 5. Press the MENU button on the screen....
E320-A0 User Manual
Page 26
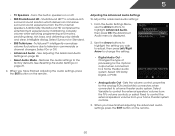
... from the TV's internal speakers. 5 • TV Speakers - StudioSound HD™ is displayed. 2. See Resetting the Audio Settings on page 20. • Reset Audio Mode - Turns the built-in speakers on the remote. When you have finished adjusting the advanced audio settings, press the EXIT button on the remote. 20 Adjusting...
... from the TV's internal speakers. 5 • TV Speakers - StudioSound HD™ is displayed. 2. See Resetting the Audio Settings on page 20. • Reset Audio Mode - Turns the built-in speakers on the remote. When you have finished adjusting the advanced audio settings, press the EXIT button on the remote. 20 Adjusting...
E320-A0 User Manual
Page 35
... -screen menu is being cleared. If you would like to the factory defaults. The on the remote. The TV will turn off. The TV displays, "Are you sure you have made to turn back on the remote. The on-screen menu is displayed. 3. The TV displays "Memory is displayed. 2. Wait for the...
... -screen menu is being cleared. If you would like to the factory defaults. The on the remote. The TV will turn off. The TV displays, "Are you sure you have made to turn back on the remote. The on-screen menu is displayed. 3. The TV displays "Memory is displayed. 2. Wait for the...
E320-A0 User Manual
Page 38
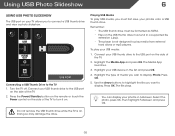
... fullscreen. Press OK. 5. Playing USB Media To play media from external hard drives or mp3 players. Press OK. Turn the TV off. The file plays. SIDE USB PORT Connecting a USB Thumb Drive to turn it on. Highlight the type of the TV. 2. Select the photo, press OK, then highlight Fullscreen and press...
... fullscreen. Press OK. 5. Playing USB Media To play media from external hard drives or mp3 players. Press OK. Turn the TV off. The file plays. SIDE USB PORT Connecting a USB Thumb Drive to turn it on. Highlight the type of the TV. 2. Select the photo, press OK, then highlight Fullscreen and press...
E320-A0 User Manual
Page 41
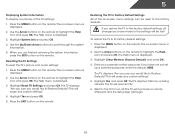
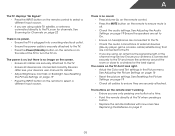
... the INPUT button on the remote to ensure mute is connected securely to the TV and move the antenna around the room or close to turn the TV on page 9 35 Ensure your device's user manual for channels.
... the INPUT button on the remote to ensure mute is connected securely to the TV and move the antenna around the room or close to turn the TV on page 9 35 Ensure your device's user manual for channels.
E320-A0 User Manual
Page 45
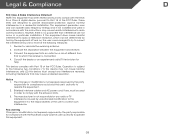
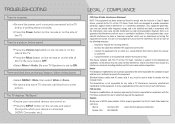
... with the instructions, may cause undesired operation. It is encouraged to try to operate the equipment. 2. FCC warning Changes or modifications not expressly approved by turning the equipment off and on a circuit different from that may cause harmful interference to radio communications. These limits are designed to which can radiate radio...
... with the instructions, may cause undesired operation. It is encouraged to try to operate the equipment. 2. FCC warning Changes or modifications not expressly approved by turning the equipment off and on a circuit different from that may cause harmful interference to radio communications. These limits are designed to which can radiate radio...
E320-A0 Quick Start Guide
Page 2
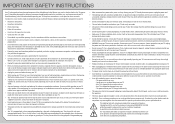
... the apparatus, the apparatus has been exposed to rain or moisture, does not operate normally or has been dropped. • Unplug the power cord before turning on the apparatus. • The mains plug or appliance coupler is used for your TV in an area with a third grounding pin). If your TV...
... the apparatus, the apparatus has been exposed to rain or moisture, does not operate normally or has been dropped. • Unplug the power cord before turning on the apparatus. • The mains plug or appliance coupler is used for your TV in an area with a third grounding pin). If your TV...
E320-A0 Quick Start Guide
Page 5
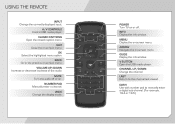
...menu. CHANNEL UP/DOWN Change the channel. DASH Use with number pad to the channel last viewed. EXIT Close the on -screen menu. POWER Turn TV on or off or on. OK Select the highlighted menu option. GUIDE Display the info window. NUMBER PAD Manually enter a channel. INFO Display... the info window. MENU Display the on -screen menu. MUTE Turn the audio off . BACK Go to the previous on -screen menu. LAST Return to manually enter a digital sub-channel. (For example, 18-4 or 18...
...menu. CHANNEL UP/DOWN Change the channel. DASH Use with number pad to the channel last viewed. EXIT Close the on -screen menu. POWER Turn TV on or off or on. OK Select the highlighted menu option. GUIDE Display the info window. NUMBER PAD Manually enter a channel. INFO Display... the info window. MENU Display the on -screen menu. MUTE Turn the audio off . BACK Go to the previous on -screen menu. LAST Return to manually enter a digital sub-channel. (For example, 18-4 or 18...
E320-A0 Quick Start Guide
Page 9
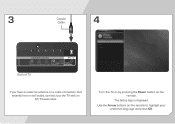
The Setup App is displayed. Turn the TV on by pressing the Power button on the remote to the TV with an RF/Coaxial cable. 3 Coaxial Cable 4 SIDE Back of TV If you have an external antenna or a cable connection that extends from a wall outlet, connect it to highlight your preferred language and press OK. Use the Arrow buttons on the remote.
The Setup App is displayed. Turn the TV on by pressing the Power button on the remote to the TV with an RF/Coaxial cable. 3 Coaxial Cable 4 SIDE Back of TV If you have an external antenna or a cable connection that extends from a wall outlet, connect it to highlight your preferred language and press OK. Use the Arrow buttons on the remote.

E320-A0 Quick Start Guide
Page 10
Use the Arrow buttons on the remote to highlight Home Mode and press OK. 5 6 Use the Arrow buttons on the remote to highlight your time zone and press OK. Use the Arrow buttons on the remote to turn daylight saving time On or Off.
Use the Arrow buttons on the remote to highlight Home Mode and press OK. 5 6 Use the Arrow buttons on the remote to highlight your time zone and press OK. Use the Arrow buttons on the remote to turn daylight saving time On or Off.
E320-A0 Quick Start Guide
Page 14
...void the user's authority to a working electrical outlet. • Press the Power button on the remote or on the side of the TV. There are turned on. • Press the INPUT button on the side of the FCC Rules. Use the AC cords listed below for help. There is connected. •... for each area. These limits are designed to ON. Caution Always use an AC/DC power adapter that to this device must be determined by turning the equipment off and on, the user is encouraged to try to correct the interference by unauthorized modification to which your connected devices are black...
...void the user's authority to a working electrical outlet. • Press the Power button on the remote or on the side of the TV. There are turned on. • Press the INPUT button on the side of the FCC Rules. Use the AC cords listed below for help. There is connected. •... for each area. These limits are designed to ON. Caution Always use an AC/DC power adapter that to this device must be determined by turning the equipment off and on, the user is encouraged to try to correct the interference by unauthorized modification to which your connected devices are black...


