User Manual
Page 3
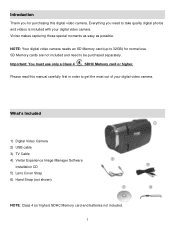
...Video Camera 2) USB cable 3) TV Cable 4) Vivitar Experience Image Manager Software Installation CD 5) Lens Cover Strap 6) Hand Strap (not shown) NOTE: Class 4 (or higher) SDHC Memory card and batteries not included. 2 NOTE: Your digital video camera needs an SD Memory card (up to 32GB) for purchasing this manual carefully... first in order to take quality digital photos and videos is included with your digital video camera. SD Memory cards are not included and need to get the most out of your digital video camera. Please read this digital video camera....
...Video Camera 2) USB cable 3) TV Cable 4) Vivitar Experience Image Manager Software Installation CD 5) Lens Cover Strap 6) Hand Strap (not shown) NOTE: Class 4 (or higher) SDHC Memory card and batteries not included. 2 NOTE: Your digital video camera needs an SD Memory card (up to 32GB) for purchasing this manual carefully... first in order to take quality digital photos and videos is included with your digital video camera. SD Memory cards are not included and need to get the most out of your digital video camera. Please read this digital video camera....

User Manual
Page 4
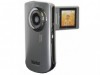
Parts of the Camera 1. Lens Cover 5. Shutter Button 8. Zoom Out / Zoom In 9. USB Port 11. HDMI Port 12. Tripod Mount 14. Macro Switch 6. Hand Strap 13. LED Light 17. LCD Touch Screen 3 Home Button 3. Digital Lens 4. Battery Compartment 16. Power Button 2. SD Memory Card Slot 15. Microphone 18. Speaker 7. LED Light Indicator 10.
Parts of the Camera 1. Lens Cover 5. Shutter Button 8. Zoom Out / Zoom In 9. USB Port 11. HDMI Port 12. Tripod Mount 14. Macro Switch 6. Hand Strap 13. LED Light 17. LCD Touch Screen 3 Home Button 3. Digital Lens 4. Battery Compartment 16. Power Button 2. SD Memory Card Slot 15. Microphone 18. Speaker 7. LED Light Indicator 10.

User Manual
Page 6
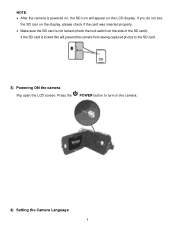
Make sure a Class 4 (or higher) SD card (up to 32GB) has been properly inserted into the slot in the direction as shown SD card icon on the camera. (See images below : 3 and 4.) 5 To properly insert the SD Card: Push the SD card into your camera. 2) Installing the SD Memory Card IMPORTANT: You must use only a Class 4 SDHC Memory card or higher. This indicates the SD card has been inserted correctly. (See images below : 1 and 2.) Push the SD card until you hear a slight clicking sound. SD card not included.
Make sure a Class 4 (or higher) SD card (up to 32GB) has been properly inserted into the slot in the direction as shown SD card icon on the camera. (See images below : 3 and 4.) 5 To properly insert the SD Card: Push the SD card into your camera. 2) Installing the SD Memory Card IMPORTANT: You must use only a Class 4 SDHC Memory card or higher. This indicates the SD card has been inserted correctly. (See images below : 1 and 2.) Push the SD card until you hear a slight clicking sound. SD card not included.
User Manual
Page 7
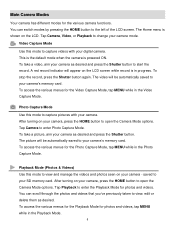
If you do not see the SD icon on the display, please check if the card was inserted properly. Make sure the SD card is not locked (check the lock switch on the camera. 4) Setting the Camera Language 6 NOTE: After the camera is powered on, the SD icon will prevent the camera from saving captured photos to turn on the side of the SD card). Press the POWER button to the SD card. 3) Powering ON the camera Flip open the LCD screen. If the SD card is locked this will appear on the LCD display.
If you do not see the SD icon on the display, please check if the card was inserted properly. Make sure the SD card is not locked (check the lock switch on the camera. 4) Setting the Camera Language 6 NOTE: After the camera is powered on, the SD icon will prevent the camera from saving captured photos to turn on the side of the SD card). Press the POWER button to the SD card. 3) Powering ON the camera Flip open the LCD screen. If the SD card is locked this will appear on the LCD display.
User Manual
Page 9
...left of the LCD screen. You can switch modes by pressing the HOME button to your camera's memory card. To stop the record, press the Shutter button again. saved to your camera's memory card. To access the various menus for the various camera functions. Tap Playback to enter Photo Capture Mode....Use this mode to view and manage the videos and photos seen on your camera as desired and press the Shutter button to change your SD memory card. After turning on your camera as desired and press the Shutter button. To take a video, aim your camera - After turning on the...
...left of the LCD screen. You can switch modes by pressing the HOME button to your camera's memory card. To stop the record, press the Shutter button again. saved to your camera's memory card. To access the various menus for the various camera functions. Tap Playback to enter Photo Capture Mode....Use this mode to view and manage the videos and photos seen on your camera as desired and press the Shutter button to change your SD memory card. After turning on your camera as desired and press the Shutter button. To take a video, aim your camera - After turning on the...
User Manual
Page 12
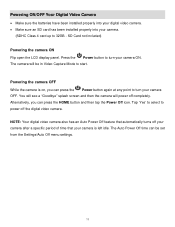
... feature that automatically turns off your camera after a specific period of time that your camera. (SDHC Class 4 card up to 32GB - The camera will power off the digital video camera. Press the Power button to start.... have been installed properly into your digital video camera. Make sure an SD card has been installed properly into your camera is on, you can be in Video Capture Mode to turn your... camera ON. SD Card not included) Powering the camera ON Flip open the LCD display panel. You will see a ...
... feature that automatically turns off your camera after a specific period of time that your camera. (SDHC Class 4 card up to 32GB - The camera will power off the digital video camera. Press the Power button to start.... have been installed properly into your digital video camera. Make sure an SD card has been installed properly into your camera is on, you can be in Video Capture Mode to turn your... camera ON. SD Card not included) Powering the camera ON Flip open the LCD display panel. You will see a ...

User Manual
Page 19
... at the top of the LCD screen: The zoom indicating bar moves up when you Zoom In (T) and moves down , the W button, to the camera's SD memory card. 18 Taking a Video 1) While in on the top of the digital video camera to START the video capture. 4) A red, blinking icon appears at the...
... at the top of the LCD screen: The zoom indicating bar moves up when you Zoom In (T) and moves down , the W button, to the camera's SD memory card. 18 Taking a Video 1) While in on the top of the digital video camera to START the video capture. 4) A red, blinking icon appears at the...
User Manual
Page 30
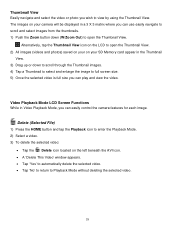
... the Thumbnail View. 3) Drag up or down (W/Zoom Out) to open the Thumbnail View. 2) All images (videos and photos) saved on your on your SD Memory card appear in Video Playback Mode, you can easily control the camera features for each image. Delete (Selected File) 1) Press the HOME button and tap the...
... the Thumbnail View. 3) Drag up or down (W/Zoom Out) to open the Thumbnail View. 2) All images (videos and photos) saved on your on your SD Memory card appear in Video Playback Mode, you can easily control the camera features for each image. Delete (Selected File) 1) Press the HOME button and tap the...

User Manual
Page 34
... the Shutter button on your digital camera. To enter Photo Capture Mode: Press the HOME button. Tap the Camera icon to the SD memory card. 33 The following Digital Zoom Indicator appears on the right side of the LCD screen: The zoom indicating bar moves up when you Zoom In...
... the Shutter button on your digital camera. To enter Photo Capture Mode: Press the HOME button. Tap the Camera icon to the SD memory card. 33 The following Digital Zoom Indicator appears on the right side of the LCD screen: The zoom indicating bar moves up when you Zoom In...

User Manual
Page 49
2) All images (videos and photos) saved on your SD Memory card appear in Photo Playback Mode, you to quickly and easily upload your camera's photos and videos to the social networks of your choice with the accompanying Vivitar Experience Image Manager application. 1) Press the HOME button and tap the Playback icon to enter the...
2) All images (videos and photos) saved on your SD Memory card appear in Photo Playback Mode, you to quickly and easily upload your camera's photos and videos to the social networks of your choice with the accompanying Vivitar Experience Image Manager application. 1) Press the HOME button and tap the Playback icon to enter the...

User Manual
Page 57
...not match your country's electric current, you would like to delete individual images, use the Format SD Card menu to delete all of the electrical current in fluorescent lighting sources in mind that formatting the memory card will delete all of the content on the images taken by your camera's memory... card. If you may see flickering or waves on your locale. Keep in your camera's memory card. If your camera is currently on your camera. Format SD Menu You can use the delete menu in the Frequency menu represent...
...not match your country's electric current, you would like to delete individual images, use the Format SD Card menu to delete all of the electrical current in fluorescent lighting sources in mind that formatting the memory card will delete all of the content on the images taken by your camera's memory... card. If you may see flickering or waves on your locale. Keep in your camera's memory card. If your camera is currently on your camera. Format SD Menu You can use the delete menu in the Frequency menu represent...

User Manual
Page 58
... Options include: YES Formats SD memory card. Tap 'NO' to automatically return to the Setup Main Menu Screen without formatting. 4) From the Setup Main Menu Screen: ..."Connecting the Digital Video Camera to the HDTV" for you to your television. NO Does not format SD memory card. 1) Press the HOME button and then tap the Setup icon. 2) Tap the Format SD menu icon to open the menu options. 3) Tap 'NTSC' or 'PAL' and then tap SAVE ...Menu Screen: Tap another menu icon to select a different menu item. Tap Exit to return to automatically format the SD memory card.
... Options include: YES Formats SD memory card. Tap 'NO' to automatically return to the Setup Main Menu Screen without formatting. 4) From the Setup Main Menu Screen: ..."Connecting the Digital Video Camera to the HDTV" for you to your television. NO Does not format SD memory card. 1) Press the HOME button and then tap the Setup icon. 2) Tap the Format SD menu icon to open the menu options. 3) Tap 'NTSC' or 'PAL' and then tap SAVE ...Menu Screen: Tap another menu icon to select a different menu item. Tap Exit to return to automatically format the SD memory card.
User Manual
Page 60
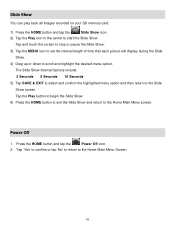
... 'Yes' to confirm or tap 'No' to return to the Home Main Menu screen. Slide Show You can play back all images recorded on your SD memory card. 1) Press the HOME button and tap the Slide Show icon. 2) Tap the Play icon in the center to start the Slide Show.
... 'Yes' to confirm or tap 'No' to return to the Home Main Menu screen. Slide Show You can play back all images recorded on your SD memory card. 1) Press the HOME button and tap the Slide Show icon. 2) Tap the Play icon in the center to start the Slide Show.
User Manual
Page 64
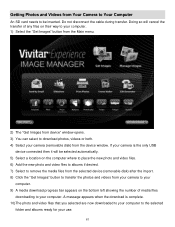
... download photos, videos or both. 4) Select your camera (removable disk) from the device window. Getting Photos and Videos from Your Camera to Your Computer An SD card needs to your computer.
... download photos, videos or both. 4) Select your camera (removable disk) from the device window. Getting Photos and Videos from Your Camera to Your Computer An SD card needs to your computer.
User Manual
Page 66
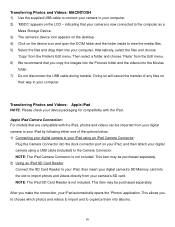
Then select a folder and choose 'Paste' from your camera's SD card. This item may be purchased separately. 2) Using an iPad SD Card Reader: Connect the SD Card Reader to your iPad, then insert your digital camera's SD Memory card into the slot to the Camera Connector. Apple iPad Camera Connection: For models .... 6) We recommend that are compatible with the iPad. This item may be imported from the Finder's Edit menu. NOTE: The iPad SD Card Reader is not included. Alternatively, select the files and choose 'Copy' from your digital camera to your iPad by following either one of...
Then select a folder and choose 'Paste' from your camera's SD card. This item may be purchased separately. 2) Using an iPad SD Card Reader: Connect the SD Card Reader to your iPad, then insert your digital camera's SD Memory card into the slot to the Camera Connector. Apple iPad Camera Connection: For models .... 6) We recommend that are compatible with the iPad. This item may be imported from the Finder's Edit menu. NOTE: The iPad SD Card Reader is not included. Alternatively, select the files and choose 'Copy' from your digital camera to your iPad by following either one of...

User Manual
Page 68
... I recover images that I get a message that you would like to the SD memory card then all the photos should be retrieved from there. Q: I do not appear on the SD memory card. Technical Support For technical support issues please visit our website at support@vivitar.com and one of our technical support team members will happen...
... I recover images that I get a message that you would like to the SD memory card then all the photos should be retrieved from there. Q: I do not appear on the SD memory card. Technical Support For technical support issues please visit our website at support@vivitar.com and one of our technical support team members will happen...


