User Manual
Page 1
Windows and the Windows logo are the property of Microsoft Corporation. All other trademarks are registered trademarks of their respective companies. All rights reserved. DVR 949HD Digital Video Camera User Manual © 2009-2012 Sakar International, Inc.
Windows and the Windows logo are the property of Microsoft Corporation. All other trademarks are registered trademarks of their respective companies. All rights reserved. DVR 949HD Digital Video Camera User Manual © 2009-2012 Sakar International, Inc.
User Manual
Page 2
... the Computer 62 Getting Photos and Videos from Your Camera to Your Computer 63 Get Started!...64 Transferring Images from my Camera to my Computer Manually 64 Camera Maintenance...66 Sakar Warranty Card ...66 Technical Support ...67 Troubleshooting ...67 1
... the Computer 62 Getting Photos and Videos from Your Camera to Your Computer 63 Get Started!...64 Transferring Images from my Camera to my Computer Manually 64 Camera Maintenance...66 Sakar Warranty Card ...66 Technical Support ...67 Troubleshooting ...67 1
User Manual
Page 3
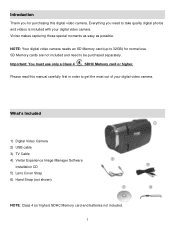
Everything you for normal use only a Class 4 SDHC Memory card or higher. Vivitar makes capturing those special moments as easy as possible. Please read this digital video camera. Introduction Thank you need to be purchased separately. NOTE: Your ... videos is included with your digital video camera. Important: You must use . SD Memory cards are not included and need to 32GB) for purchasing this manual carefully first in order to get the most out of your digital video camera. What's Included 1) Digital Video Camera 2) USB cable 3) TV Cable...
Everything you for normal use only a Class 4 SDHC Memory card or higher. Vivitar makes capturing those special moments as easy as possible. Please read this digital video camera. Introduction Thank you need to be purchased separately. NOTE: Your ... videos is included with your digital video camera. Important: You must use . SD Memory cards are not included and need to 32GB) for purchasing this manual carefully first in order to get the most out of your digital video camera. What's Included 1) Digital Video Camera 2) USB cable 3) TV Cable...
User Manual
Page 8
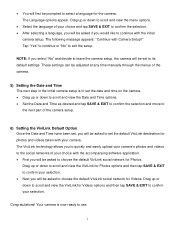
... to choose the default ViviLink social network for photos and videos taken with the initial camera setup. These settings can be adjusted at any time manually through the menus of the camera. 5) Setting the Date and Time The next step in the initial camera setup is now ready to continue with...
... to choose the default ViviLink social network for photos and videos taken with the initial camera setup. These settings can be adjusted at any time manually through the menus of the camera. 5) Setting the Date and Time The next step in the initial camera setup is now ready to continue with...

User Manual
Page 16
... made to these options will remain until you decide to change them again at any time. 1) Press the HOME button to the left of this manual. 15 NOTE: Some menu options are single-use functions that menu. NOTE: To exit the Setup screen without selecting a menu, tap Exit and return to...
... made to these options will remain until you decide to change them again at any time. 1) Press the HOME button to the left of this manual. 15 NOTE: Some menu options are single-use functions that menu. NOTE: To exit the Setup screen without selecting a menu, tap Exit and return to...
User Manual
Page 17
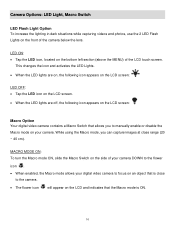
... icon, located on the front of your camera DOWN to the flower icon . When enabled, the Macro mode allows your digital video camera to manually enable or disable the Macro mode on your camera.
... icon, located on the front of your camera DOWN to the flower icon . When enabled, the Macro mode allows your digital video camera to manually enable or disable the Macro mode on your camera.

User Manual
Page 21
... desired size of your camera's memory. 6) An icon reflecting your selection displays on the LCD screen. The setting is saved by your camera until you manually change the setting or restore the camera's default factory settings. The setting is saved by your camera until you... manually change the setting or restore the camera's default factory settings. 20 Resolution Menu The Resolution menu allows you to the right of the LCD screen, ...
... desired size of your camera's memory. 6) An icon reflecting your selection displays on the LCD screen. The setting is saved by your camera until you manually change the setting or restore the camera's default factory settings. The setting is saved by your camera until you... manually change the setting or restore the camera's default factory settings. 20 Resolution Menu The Resolution menu allows you to the right of the LCD screen, ...
User Manual
Page 22
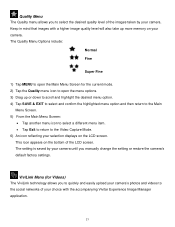
Keep in mind that images with the accompanying Vivitar Experience Image Manager application. 21 The setting is saved by your camera. ViviLink Menu (for the current mode. 2) Tap the Quality menu icon to open ... screen. The Quality Menu Options include: Normal Fine Super Fine 1) Tap MENU to open the Main Menu Screen for Videos) The ViviLink technology allows you manually change the setting or restore the camera's default factory settings. This icon appears on the bottom of your selection displays on your camera.
Keep in mind that images with the accompanying Vivitar Experience Image Manager application. 21 The setting is saved by your camera. ViviLink Menu (for the current mode. 2) Tap the Quality menu icon to open ... screen. The Quality Menu Options include: Normal Fine Super Fine 1) Tap MENU to open the Main Menu Screen for Videos) The ViviLink technology allows you manually change the setting or restore the camera's default factory settings. This icon appears on the bottom of your selection displays on your camera.

User Manual
Page 23
... be assigned to the Video Capture Mode. 6) An icon reflecting your camera until you have previously set it during the initial camera setup or manually set it from this menu or from the ViviLink menu in Playback Mode. 22 Alternatively, you can also change the setting or restore the camera...the Main Menu Screen: Tap another menu icon to select a different menu item. Tap Exit to return to a photo or video if you manually change the ViviLink by tapping the ViviLink icon on the LCD screen. The setting is deactivated by your selection displays on the LCD screen - which...
... be assigned to the Video Capture Mode. 6) An icon reflecting your camera until you have previously set it during the initial camera setup or manually set it from this menu or from the ViviLink menu in Playback Mode. 22 Alternatively, you can also change the setting or restore the camera...the Main Menu Screen: Tap another menu icon to select a different menu item. Tap Exit to return to a photo or video if you manually change the ViviLink by tapping the ViviLink icon on the LCD screen. The setting is deactivated by your selection displays on the LCD screen - which...
User Manual
Page 24
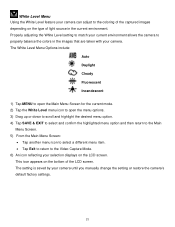
... Using the White Level feature your selection displays on the bottom of light source in the images that are taken with your camera until you manually change the setting or restore the camera's default factory settings. 23
... Using the White Level feature your selection displays on the bottom of light source in the images that are taken with your camera until you manually change the setting or restore the camera's default factory settings. 23

User Manual
Page 25
... Screen: Tap another menu icon to select a different menu item. Tap Exit to return to the images taken with your camera until you manually change the setting or restore the camera's default factory settings. The sharpness level dictates if the edges of sharpness in the image are more or...
... Screen: Tap another menu icon to select a different menu item. Tap Exit to return to the images taken with your camera until you manually change the setting or restore the camera's default factory settings. The sharpness level dictates if the edges of sharpness in the image are more or...
User Manual
Page 26
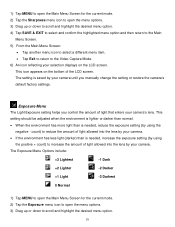
Exposure Menu The Light Exposure setting helps you manually change the setting or restore the camera's default factory settings. The Exposure Menu Options include: +3 Lightest -1 Dark +2 Lighter -2 Darker +1 Light -3 Darkest 0 Normal 1) Tap MENU to ...
Exposure Menu The Light Exposure setting helps you manually change the setting or restore the camera's default factory settings. The Exposure Menu Options include: +3 Lightest -1 Dark +2 Lighter -2 Darker +1 Light -3 Darkest 0 Normal 1) Tap MENU to ...

User Manual
Page 27
... reflecting your selection displays on the bottom of the LCD screen. This icon appears on the LCD screen. ISO Menu The ISO menu allows you manually change the setting or restore the camera's default factory settings. The ISO Menu Options include: ISO Auto ISO 100 ISO 200 ISO 400 1) Tap MENU...
... reflecting your selection displays on the bottom of the LCD screen. This icon appears on the LCD screen. ISO Menu The ISO menu allows you manually change the setting or restore the camera's default factory settings. The ISO Menu Options include: ISO Auto ISO 100 ISO 200 ISO 400 1) Tap MENU...
User Manual
Page 28
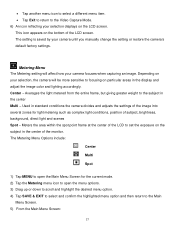
... SAVE & EXIT to select and confirm the highlighted menu option and then return to the Video Capture Mode. 6) An icon reflecting your camera until you manually change the setting or restore the camera's default factory settings. Averages the light metered from the entire frame, but giving greater weight to set the...
... SAVE & EXIT to select and confirm the highlighted menu option and then return to the Video Capture Mode. 6) An icon reflecting your camera until you manually change the setting or restore the camera's default factory settings. Averages the light metered from the entire frame, but giving greater weight to set the...

User Manual
Page 29
... your selection displays on the LCD screen. NOTE: While the Video is displayed on the LCD screen. Videos appear with you camera. When you manually change the setting or restore the camera's default factory settings. Playing Videos on the LCD screen. Tap another menu icon to select a different menu...
... your selection displays on the LCD screen. NOTE: While the Video is displayed on the LCD screen. Videos appear with you camera. When you manually change the setting or restore the camera's default factory settings. Playing Videos on the LCD screen. Tap another menu icon to select a different menu...

User Manual
Page 36
Resolution Menu The Resolution menu allows you to choose the desired size of the images taken by your camera until you manually change the setting or restore the camera's default factory settings. This icon appears on the LCD screen. 5) From the Main Menu Screen: Tap another ...
Resolution Menu The Resolution menu allows you to choose the desired size of the images taken by your camera until you manually change the setting or restore the camera's default factory settings. This icon appears on the LCD screen. 5) From the Main Menu Screen: Tap another ...
User Manual
Page 37
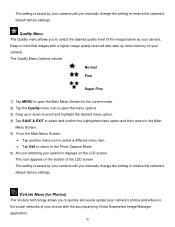
... current mode. 2) Tap the Quality menu icon to select the desired quality level of the LCD screen. Keep in mind that images with the accompanying Vivitar Experience Image Manager application. 36 Quality Menu The Quality menu allows you to open the Main Menu Screen for Photos) The ViviLink technology allows you... return to the Photo Capture Mode. 6) An icon reflecting your selection displays on the LCD screen. The setting is saved by your camera until you manually change the setting or restore the camera's default factory settings. The setting is saved by your camera until you...
... current mode. 2) Tap the Quality menu icon to select the desired quality level of the LCD screen. Keep in mind that images with the accompanying Vivitar Experience Image Manager application. 36 Quality Menu The Quality menu allows you to open the Main Menu Screen for Photos) The ViviLink technology allows you... return to the Photo Capture Mode. 6) An icon reflecting your selection displays on the LCD screen. The setting is saved by your camera until you manually change the setting or restore the camera's default factory settings. The setting is saved by your camera until you...
User Manual
Page 38
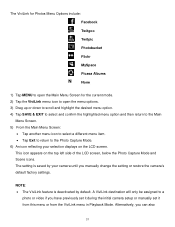
A ViviLink destination will only be assigned to the Photo Capture Mode. 6) An icon reflecting your camera until you manually change the setting or restore the camera's default factory settings. The ViviLink for Photos Menu Options include: Facebook Twitgoo Twitpic Photobucket Flickr MySpace Picasa Albums ...side of the LCD screen, below the Photo Capture Mode and Scene icons. Alternatively, you have previously set it during the initial camera setup or manually set it from this menu or from the ViviLink menu in Playback Mode. NOTE: The ViviLink feature is saved by default.
A ViviLink destination will only be assigned to the Photo Capture Mode. 6) An icon reflecting your camera until you manually change the setting or restore the camera's default factory settings. The ViviLink for Photos Menu Options include: Facebook Twitgoo Twitpic Photobucket Flickr MySpace Picasa Albums ...side of the LCD screen, below the Photo Capture Mode and Scene icons. Alternatively, you have previously set it during the initial camera setup or manually set it from this menu or from the ViviLink menu in Playback Mode. NOTE: The ViviLink feature is saved by default.

User Manual
Page 39
.... (NOTE: The 'Off' option does not appear on the captured image when viewed in the picture yourself. change the ViviLink by your camera until you manually change the setting or restore the camera's default factory settings. 38 Set the desired Self-Timer delay, press the Shutter button on your selection displays...
.... (NOTE: The 'Off' option does not appear on the captured image when viewed in the picture yourself. change the ViviLink by your camera until you manually change the setting or restore the camera's default factory settings. 38 Set the desired Self-Timer delay, press the Shutter button on your selection displays...
User Manual
Page 40
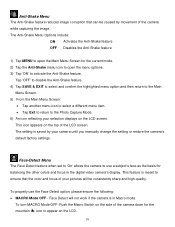
... consistently sharp and high-quality. Anti-Shake Menu The Anti-Shake feature reduces image corruption that the color and focus of your camera until you manually change the setting or restore the camera's default factory settings. This icon appears on the LCD screen. This feature is meant to use the Face...
... consistently sharp and high-quality. Anti-Shake Menu The Anti-Shake feature reduces image corruption that the color and focus of your camera until you manually change the setting or restore the camera's default factory settings. This icon appears on the LCD screen. This feature is meant to use the Face...


