User Manual
Page 3
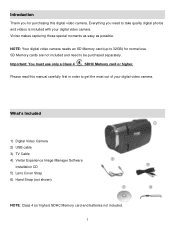
... possible. What's Included 1) Digital Video Camera 2) USB cable 3) TV Cable 4) Vivitar Experience Image Manager Software Installation CD 5) Lens Cover Strap 6) Hand Strap (not shown) NOTE: Class 4 (or higher) SDHC Memory card and batteries not included. 2 Everything you for normal use only a Class 4 SDHC Memory card or higher. NOTE: Your digital video camera needs an SD...
... possible. What's Included 1) Digital Video Camera 2) USB cable 3) TV Cable 4) Vivitar Experience Image Manager Software Installation CD 5) Lens Cover Strap 6) Hand Strap (not shown) NOTE: Class 4 (or higher) SDHC Memory card and batteries not included. 2 Everything you for normal use only a Class 4 SDHC Memory card or higher. NOTE: Your digital video camera needs an SD...

User Manual
Page 4
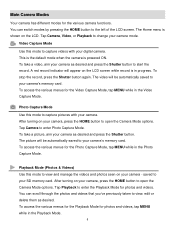
Speaker 7. Tripod Mount 14. Home Button 3. USB Port 11. SD Memory Card Slot 15. LCD Touch Screen 3 Macro Switch 6. LED Light Indicator 10. Lens Cover 5. LED Light 17. Microphone 18. Digital Lens 4. Hand Strap 13. Parts of the Camera 1. Battery Compartment 16. Power Button 2. Shutter Button 8. Zoom Out / Zoom In 9. HDMI Port 12.
Speaker 7. Tripod Mount 14. Home Button 3. USB Port 11. SD Memory Card Slot 15. LCD Touch Screen 3 Macro Switch 6. LED Light Indicator 10. Lens Cover 5. LED Light 17. Microphone 18. Digital Lens 4. Hand Strap 13. Parts of the Camera 1. Battery Compartment 16. Power Button 2. Shutter Button 8. Zoom Out / Zoom In 9. HDMI Port 12.

User Manual
Page 6
SD card not included. 2) Installing the SD Memory Card IMPORTANT: You must use only a Class 4 SDHC Memory card or higher. This indicates the SD card has been inserted correctly. (See images below : 1 and 2.) Push the SD card until you hear a slight clicking sound. To properly insert the SD Card: Push the SD card into your camera. Make sure a Class 4 (or higher) SD card (up to 32GB) has been properly inserted into the slot in the direction as shown SD card icon on the camera. (See images below : 3 and 4.) 5
SD card not included. 2) Installing the SD Memory Card IMPORTANT: You must use only a Class 4 SDHC Memory card or higher. This indicates the SD card has been inserted correctly. (See images below : 1 and 2.) Push the SD card until you hear a slight clicking sound. To properly insert the SD Card: Push the SD card into your camera. Make sure a Class 4 (or higher) SD card (up to 32GB) has been properly inserted into the slot in the direction as shown SD card icon on the camera. (See images below : 3 and 4.) 5
User Manual
Page 9
... default mode when the camera is shown on the LCD screen while record is in the Photo Capture Mode. To take a picture, aim your camera's memory card. The video will be automatically saved to view, edit or delete them as desired and press the Shutter button to open the Camera Mode options.... To take a video, aim your camera's memory card. The picture will appear on the LCD. To access the various menus for photos and videos, tap MENU while in the Video Capture Mode. saved...
... default mode when the camera is shown on the LCD screen while record is in the Photo Capture Mode. To take a picture, aim your camera's memory card. The video will be automatically saved to view, edit or delete them as desired and press the Shutter button to open the Camera Mode options.... To take a video, aim your camera's memory card. The picture will appear on the LCD. To access the various menus for photos and videos, tap MENU while in the Video Capture Mode. saved...

User Manual
Page 10
enough for 1 sample photo Class 4 (or higher) SDHC Memory card (up to 32GB) 2.7 Inch Touch TFT f=6.8mm, F2.8 4X Digital Zoom -3.0EV ~ +3.0EV Auto / Daylight / Cloudy / Fluorescent / Incandescent Auto / 100 / 200 / 400 Auto / ... v10.5.x and above 4 x AAA (1.5V) batteries (not included) 0~40 ℃ 9 Camera Technical Specifications Image Sensor Image Resolution Video Resolution File Format Internal Memory External Memory LCD Display Lens Zoom Exposure White Balance ISO Scene Language Flash Self-Timer Anti-Shake Print Photos Face Detect Macro Switch Interface System Requirements Battery...
enough for 1 sample photo Class 4 (or higher) SDHC Memory card (up to 32GB) 2.7 Inch Touch TFT f=6.8mm, F2.8 4X Digital Zoom -3.0EV ~ +3.0EV Auto / Daylight / Cloudy / Fluorescent / Incandescent Auto / 100 / 200 / 400 Auto / ... v10.5.x and above 4 x AAA (1.5V) batteries (not included) 0~40 ℃ 9 Camera Technical Specifications Image Sensor Image Resolution Video Resolution File Format Internal Memory External Memory LCD Display Lens Zoom Exposure White Balance ISO Scene Language Flash Self-Timer Anti-Shake Print Photos Face Detect Macro Switch Interface System Requirements Battery...

User Manual
Page 19
When the camera is automatically saved to the camera's SD memory card. 18 Taking a Video 1) While in Video Capture Mode. Push the Zoom control button down when you Zoom Out (W). 3) Press the Shutter button on the top ...
When the camera is automatically saved to the camera's SD memory card. 18 Taking a Video 1) While in Video Capture Mode. Push the Zoom control button down when you Zoom Out (W). 3) Press the Shutter button on the top ...

User Manual
Page 29
Scroll through the images on your camera's memory card until you find the video you would like to view. Each captured image (video and photo) is saved by your camera until you first ...
Scroll through the images on your camera's memory card until you find the video you would like to view. Each captured image (video and photo) is saved by your camera until you first ...
User Manual
Page 30
... tap the Playback icon to enter the Playback Mode. 2) Select a video. 3) To delete the selected video: Tap the Delete icon located on your SD Memory card appear in the Thumbnail View. 3) Drag up or down (W/Zoom Out) to full screen size. 5) Once the selected video is full size you can play...
... tap the Playback icon to enter the Playback Mode. 2) Select a video. 3) To delete the selected video: Tap the Delete icon located on your SD Memory card appear in the Thumbnail View. 3) Drag up or down (W/Zoom Out) to full screen size. 5) Once the selected video is full size you can play...

User Manual
Page 34
... saved to capture pictures with your digital camera. After powering on your videos. Photo Capture Mode The Photo Capture Mode allows you to the SD memory card. 33
... saved to capture pictures with your digital camera. After powering on your videos. Photo Capture Mode The Photo Capture Mode allows you to the SD memory card. 33

User Manual
Page 48
... taken with a 'JPG' icon on Your Camera 1) Select your Photo: Once in Playback Mode, view each of your captured images by sliding your camera's memory card until you find the photo you wish to view by default. Press the HOME button to open the Camera Mode options. Tap the...
... taken with a 'JPG' icon on Your Camera 1) Select your Photo: Once in Playback Mode, view each of your captured images by sliding your camera's memory card until you find the photo you wish to view by default. Press the HOME button to open the Camera Mode options. Tap the...

User Manual
Page 49
... social networks of the LCD screen. 2) All images (videos and photos) saved on your on your SD Memory card appear in Photo Playback Mode, you to quickly and easily upload your choice with the accompanying Vivitar Experience Image Manager application. 1) Press the HOME button and tap the Playback icon to enter the Playback...
... social networks of the LCD screen. 2) All images (videos and photos) saved on your on your SD Memory card appear in Photo Playback Mode, you to quickly and easily upload your choice with the accompanying Vivitar Experience Image Manager application. 1) Press the HOME button and tap the Playback icon to enter the Playback...

User Manual
Page 53
... you are ready to rotate the photo each time by 90 clockwise 5) To save , the cropped picture now appears as a new picture to your memory card. 52
... you are ready to rotate the photo each time by 90 clockwise 5) To save , the cropped picture now appears as a new picture to your memory card. 52

User Manual
Page 57
... to delete all of the content that is set to a frequency that does not match your camera's memory card. If your camera is currently on the images taken by your camera's memory card. Frequency Menu The options in your locale. If you may see flickering or waves on your camera. The ... Tap Exit to return to the Home Menu screen. Format SD Menu You can use the delete menu in mind that formatting the memory card will delete all of the electrical current in fluorescent lighting sources in the Frequency menu represent the frequency of the content at one time. Keep...
... to delete all of the content that is set to a frequency that does not match your camera's memory card. If your camera is currently on the images taken by your camera's memory card. Frequency Menu The options in your locale. If you may see flickering or waves on your camera. The ... Tap Exit to return to the Home Menu screen. Format SD Menu You can use the delete menu in mind that formatting the memory card will delete all of the electrical current in fluorescent lighting sources in the Frequency menu represent the frequency of the content at one time. Keep...

User Manual
Page 58
... tap the Setup icon. 2) Tap the TV Out menu icon to open the menu options. 3) Tap 'YES' to your television. NO Does not format SD memory card. 1) Press the HOME button and then tap the Setup icon. 2) Tap the Format SD menu icon to open the menu options. 3) Tap 'NTSC' or 'PAL... Video Camera to the HDTV" for you to view your captured images on how to connect your digital video camera to automatically format the SD memory card. All videos and photos deleted. The Format SD Menu Options include: YES Formats SD...
... tap the Setup icon. 2) Tap the TV Out menu icon to open the menu options. 3) Tap 'YES' to your television. NO Does not format SD memory card. 1) Press the HOME button and then tap the Setup icon. 2) Tap the Format SD menu icon to open the menu options. 3) Tap 'NTSC' or 'PAL... Video Camera to the HDTV" for you to view your captured images on how to connect your digital video camera to automatically format the SD memory card. All videos and photos deleted. The Format SD Menu Options include: YES Formats SD...
User Manual
Page 60
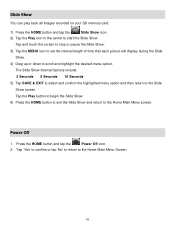
Slide Show You can play back all images recorded on your SD memory card. 1) Press the HOME button and tap the Slide Show icon. 2) Tap the Play icon in the center to the Home Main Menu Screen. 59 Tap '...
Slide Show You can play back all images recorded on your SD memory card. 1) Press the HOME button and tap the Slide Show icon. 2) Tap the Play icon in the center to the Home Main Menu Screen. 59 Tap '...
User Manual
Page 66
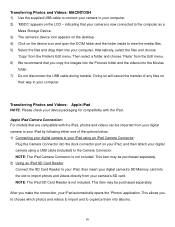
... Transferring Photos and Videos: MACINTOSH 1) Use the supplied USB cable to connect your camera to the Camera Connector. NOTE: The iPad SD Card Reader is not included. This item may be purchased separately. Apple iPad Camera Connection: For models that you copy the images into the ... that are compatible with the iPad. This item may be purchased separately. 2) Using an iPad SD Card Reader: Connect the SD Card Reader to your iPad, then insert your digital camera's SD Memory card into the slot to organize them into the dock connector port on the LCD - Then select a folder...
... Transferring Photos and Videos: MACINTOSH 1) Use the supplied USB cable to connect your camera to the Camera Connector. NOTE: The iPad SD Card Reader is not included. This item may be purchased separately. Apple iPad Camera Connection: For models that you copy the images into the ... that are compatible with the iPad. This item may be purchased separately. 2) Using an iPad SD Card Reader: Connect the SD Card Reader to your iPad, then insert your digital camera's SD Memory card into the slot to organize them into the dock connector port on the LCD - Then select a folder...

User Manual
Page 68
... Australia call from my computer. What do I make sure I deleted images using the Vivitar Experience Image Manager are not stored in the camera's memory. First ensure that you are saved to the SD memory card then all the photos should be retrieved from there. How do I recover images that ... support issues please visit our website at support@vivitar.com and one of our technical support team members will happen to the images stored on my computer. Troubleshooting Q: I get a message that I do not appear on the SD memory card. You can be uploaded quickly before you would...
... Australia call from my computer. What do I make sure I deleted images using the Vivitar Experience Image Manager are not stored in the camera's memory. First ensure that you are saved to the SD memory card then all the photos should be retrieved from there. How do I recover images that ... support issues please visit our website at support@vivitar.com and one of our technical support team members will happen to the images stored on my computer. Troubleshooting Q: I get a message that I do not appear on the SD memory card. You can be uploaded quickly before you would...


