Vivitar DVR 426HD Support Question
Vivitar DVR 426HD Support Question
Find answers below for this question about Vivitar DVR 426HD.Need a Vivitar DVR 426HD manual? We have 2 online manuals for this item!
Question posted by pbaker115 on December 25th, 2015
Vivitar Dvr 426hd Memory Card
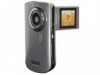
I can turn it on and off but can't push any other buttons. The screen has a memory card on the side with an arrow pointing up under it
Current Answers
Answer #1: Posted by TechSupport101 on December 25th, 2015 11:12 PM
TechSupport101

Member since:
May 24th, 2013 Points: 12,171,305

Member since:
May 24th, 2013 Points: 12,171,305
Hi. See page 12 of the 'V2 Camera Manual' here https://www.helpowl.com/manuals/Vivitar/DVR426HD/176260 for the camera's icons and interpretations.
Related Vivitar DVR 426HD Manual Pages
v2 Camera Manual - Page 1
DVR 426HDv2 Digital Camcorder
with camera
User Manual
© 2009-2012 Sakar International, Inc. All rights reserved. All other trademarks are registered trademarks of their respective companies. Windows and the Windows logo are the property of Microsoft Corporation.
v2 Camera Manual - Page 3
...order to get the most out of your digital video recorder.
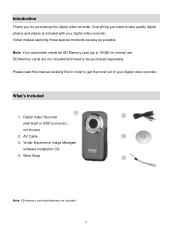
AV Cable 3. Wrist Strap
Note: SD memory card and batteries not included.
2 What's Included
1. Vivitar Experience Image Manager
software Installation CD 4. Please read this digital video recorder. Everything you for normal use. Digital Video Recorder (with your digital video recorder. Introduction
Thank you need to be...
v2 Camera Manual - Page 4
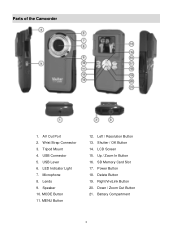
... Resolution Button 13. LCD Screen 15. Delete Button 19. USB Lever 6. Microphone 8. Battery Compartment
3 MENU Button
12. AV Out Port 2. Tripod Mount 4. Speaker 10. Up / Zoom In Button 16. Power Button 18. USB Connector 5. Shutter / OK Button 14. Right/ViviLink Button 20. Lends 9. Down / Zoom Out Button 21. LED Indicator Light 7. MODE Button 11. SD Memory Card Slot...
v2 Camera Manual - Page 5
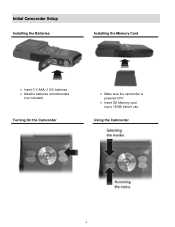
Turning On the Camcorder
Make sure the camcorder is powered OFF.
Insert SD Memory card (up to 16GB) before use.
Using the Camcorder
4 Initial Camcorder Setup
Installing the Batteries
Installing the Memory Card
Insert 3 X AAA (1.5V) batteries. Alkaline batteries recommended
(not included).
v2 Camera Manual - Page 6
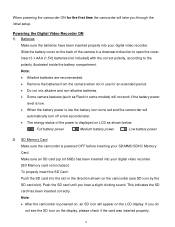
... cover on the display, please check if the card was inserted properly.
5
Make sure an SD card (up to16GB) has been inserted into your digital video recorder. (SD Memory card not included.) To properly insert the SD Card: Push the SD card into your SD/MMC/SDHC Memory Card.
This indicates the SD card has been inserted correctly. If you do...
v2 Camera Manual - Page 8
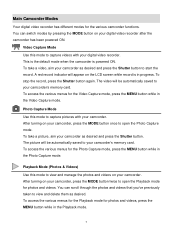
... Mode Use this mode to your camcorder's memory card. The picture will be automatically saved to capture pictures with your camcorder. You can switch modes by pressing the MODE button on the LCD screen while record is powered ON. You can scroll through the photos and videos that you've previously taken to your camcorder...
v2 Camera Manual - Page 9
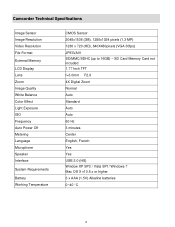
Camcorder Technical Specifications
Image Sensor Image Resolution Video Resolution File Format
External Memory
LCD Display Lens Zoom Image Quality White Balance Color... (1.3 MP) 1280 x 720 (HD), 640X480pixels (VGA 30fps) JPEG/AVI SD/MMC/SDHC (up to 16GB) - SD Card Memory Card not included 1.77 Inch TFT f=3.0mm F2.8 4X Digital Zoom Normal Auto Standard Auto Auto 60 Hz 3 minutes Center English,...
v2 Camera Manual - Page 14

... the size of the SD memory card inserted as well as twist and shoot! When the camcorder is available. When you would like to quickly and easily include yourself in the video, simply flip the LCD display out and hold the camera facing towards you can also capture your digital video recorder.
Note: The amount...
v2 Camera Manual - Page 15
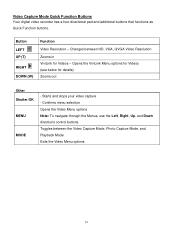
... the Menus, use the Left, Right, Up, and Down directions control buttons. Changes between the Video Capture Mode, Photo Capture Mode, and Playback Mode Exits the Video Menu options
14 Video Capture Mode Quick Function Buttons Your digital video recorder has a four-directional pad and additional buttons that functions as Quick Function buttons. Button LEFT UP (T)
RIGHT DOWN (W)
Function...
v2 Camera Manual - Page 18
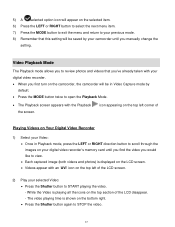
... you first turn on the camcorder, the camcorder will be in Playback mode, press the LEFT or RIGHT direction button to scroll through the images on your digital video recorder's memory card until you find the video you would like to view. Each captured image (both videos and photos) is displayed on the LCD screen. Videos appear...
v2 Camera Manual - Page 19
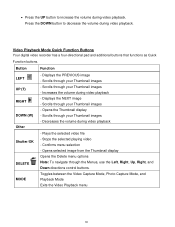
... selected image from the Thumbnail display Opens the Delete menu options Note: To navigate through your Thumbnail images - Press the DOWN button to increase the volume during video playback. Increases the volume during video playback
Shutter/OK DELETE MODE
- Scrolls through the Menus, use the Left, Right, Up, Right, and Down directions control...
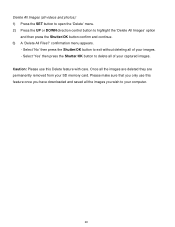
v2 Camera Manual - Page 21
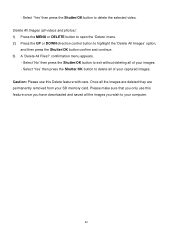
... and continue. 3) A 'Delete All Files?' Delete All Images (all videos and photos): 1) Press the MENU or DELETE button to open the 'Delete' menu. 2) Press the UP or DOWN direction control button to exit without deleting all of your computer.
20 Select 'Yes' then press the Shutter/OK button to delete all of your SD memory card.
v2 Camera Manual - Page 22
... LCD display out and hold out the camera facing towards you
would like to direct the camcorder at higher resolution.
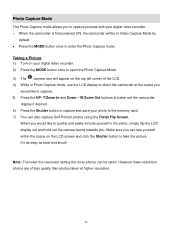
21 Taking a Picture 1) Turn on your digital video recorder. 2) Press the MODE button once to the memory card. 7) You can also capture Self-Portrait photos using the iTwist Flip Screen. Photo Capture Mode
The Photo Capture mode...
v2 Camera Manual - Page 23
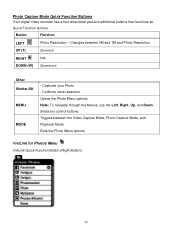
... your Photo - Confirms menu selection Opens the Photo Menu options Note: To navigate through the Menus, use the Left, Right, Up, and Down directions control buttons. Photo Capture Mode Quick Function Buttons Your digital video recorder has a four-directional pad and additional...
v2 Camera Manual - Page 26
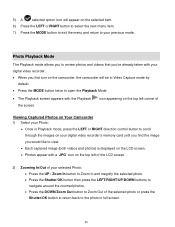
... in Playback mode, press the LEFT or RIGHT direction control button to scroll through the images on your digital video recorder's memory card until you find the image you would like to view.
Each captured image (both videos and photos) is displayed on the LCD screen. Photos appear with a 'JPG' icon on the camcorder...
v2 Camera Manual - Page 27
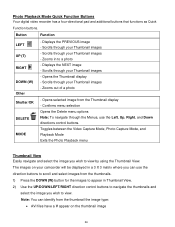
... Opens the Delete menu options Note: To navigate through the Menus, use the direction buttons to scroll and select images from the thumbnails. 1) Press the DOWN (W) button for the images to appear in to a photo - Toggles between the Video Capture Mode, Photo Capture Mode, and Playback Mode Exits the Photo Playback menu
Thumbnail...
v2 Camera Manual - Page 29
... all the images you wish to delete all of your SD memory card. Caution: Please use this Delete feature with care. Delete All Images (all videos and photos): 1) Press the SET button to open the 'Delete' menu. 2) Press the UP or DOWN direction control button to exit without deleting all of your computer.
28 confirmation...
v2 Camera Manual - Page 31
...camera model selection and to install the application. 11) Please wait while the application is being installed on your computer. 12) Please review the license terms.
On PC and Macintosh: Click the "I accept the terms of the digital video....
30
Click the "Launch Vivitar Experience Image Manager" to open the application. 16) On Macintosh: Click the "Quit" button when the installation is complete....
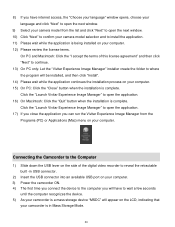
v2 Camera Manual - Page 35
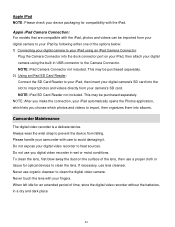
... period of the lens, then use organic cleanser to clean the digital video camera. Do not use lens cleanser. This may be purchased separately. 2) Using an iPad SD Card Reader: Connect the SD Card Reader to your iPad, then insert your digital camera's SD card into the dock connector port on the surface of time, store...
v2 Camera Manual - Page 37
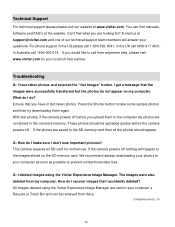
... the photos do not appear on the SD memory card. Press the Shutter button to call from my computer. Q: How do ? We recommend always downloading your photos to the images stored on my computer. Can't find manuals, software and FAQ's at www.vivitar.com. If the camera powers off nothing will answer your computer`s Recycle...
Similar Questions

Vivitar Dvr787-pnk-kit-wm Action Digital Video Recorder, Pink Video Camera With
Vivitar's DVR 787 HD comes on when plugged in and says it has full power but cuts off when you unplu...
Vivitar's DVR 787 HD comes on when plugged in and says it has full power but cuts off when you unplu...
(Posted by jjknott82 8 years ago)


What Type Of Memory Card Should I Buy For The Vivitar Dvr 426hd
(Posted by Siculon 10 years ago)
Memory Card Locked!
I inserted the memory card and the camera is saying card locked. Checked the card and it is not lock...
I inserted the memory card and the camera is saying card locked. Checked the card and it is not lock...
(Posted by flnaguy 10 years ago)