Warranty
Page 1
During the period, Vivitar will repair or replace the product at no charge for a period of one ... in accordance with relevant instructions, neglect, immersion in material and workmanship for parts or labor. Limited One Year Warranty Vivitar warrants this quality product to be free of defects in or exposure to chemicals or liquids, extremes of climate, fungus...first anniversary date of such damages. TIME PERIOD OF THIS WARRANTY The time period of this product even if Vivitar has been advised of purchase. The laws of some countries and some States thereof do not allow the limitation ...
During the period, Vivitar will repair or replace the product at no charge for a period of one ... in accordance with relevant instructions, neglect, immersion in material and workmanship for parts or labor. Limited One Year Warranty Vivitar warrants this quality product to be free of defects in or exposure to chemicals or liquids, extremes of climate, fungus...first anniversary date of such damages. TIME PERIOD OF THIS WARRANTY The time period of this product even if Vivitar has been advised of purchase. The laws of some countries and some States thereof do not allow the limitation ...
Warranty
Page 2
c) When possible, a sample evidencing the problem. If you shipping prepaid. Package the product and relevant accessories carefully, using ample padding materials and a sturdy mailing container to call 0800 917 4831. b) Detailed description of your local toll free number....: a) Evidence of date and place of original purchase (for example, a copy of your questions. For more information visit our website www.vivitar.com TECHNICAL SUPPORT support team members will be not faulty or the defect is complete, the product will answer your problem. STEP 3. Include ...
c) When possible, a sample evidencing the problem. If you shipping prepaid. Package the product and relevant accessories carefully, using ample padding materials and a sturdy mailing container to call 0800 917 4831. b) Detailed description of your local toll free number....: a) Evidence of date and place of original purchase (for example, a copy of your questions. For more information visit our website www.vivitar.com TECHNICAL SUPPORT support team members will be not faulty or the defect is complete, the product will answer your problem. STEP 3. Include ...
User Manual
Page 3
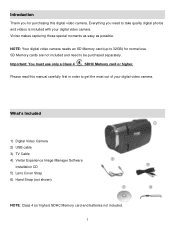
...Digital Video Camera 2) USB cable 3) TV Cable 4) Vivitar Experience Image Manager Software Installation CD 5) Lens Cover Strap 6) Hand Strap (not shown) NOTE: Class 4 (or higher) SDHC Memory card and batteries not included. 2 Everything you for normal use only a Class 4 SDHC Memory card or higher. ...Important: You must use . SD Memory cards are not included and need to take quality digital photos and videos is included ...
...Digital Video Camera 2) USB cable 3) TV Cable 4) Vivitar Experience Image Manager Software Installation CD 5) Lens Cover Strap 6) Hand Strap (not shown) NOTE: Class 4 (or higher) SDHC Memory card and batteries not included. 2 Everything you for normal use only a Class 4 SDHC Memory card or higher. ...Important: You must use . SD Memory cards are not included and need to take quality digital photos and videos is included ...

User Manual
Page 5
Alkaline batteries are recommended. (Batteries not included.) NOTE: Remove the batteries from the camera when not in use for the first time, the camera takes you through the Initial Camera Setup. 1) Installing the Batteries Make sure the batteries have been ...inserted properly into your digital camera, according to the polarity shown inside the battery compartment. (See photo above.) Use 4 x AAA (1.5V) batteries. Initial Camera Setup After flipping open the LCD Touch Screen and powering the camera ON for an extended period. ...
Alkaline batteries are recommended. (Batteries not included.) NOTE: Remove the batteries from the camera when not in use for the first time, the camera takes you through the Initial Camera Setup. 1) Installing the Batteries Make sure the batteries have been ...inserted properly into your digital camera, according to the polarity shown inside the battery compartment. (See photo above.) Use 4 x AAA (1.5V) batteries. Initial Camera Setup After flipping open the LCD Touch Screen and powering the camera ON for an extended period. ...

User Manual
Page 6
This indicates the SD card has been inserted correctly. (See images below : 1 and 2.) Push the SD card until you hear a slight clicking sound. To properly insert the SD Card: Push the SD card into your camera. SD card not included. Make sure a Class 4 (or higher) SD card (up to 32GB) has been properly inserted into the slot in the direction as shown SD card icon on the camera. (See images below : 3 and 4.) 5 2) Installing the SD Memory Card IMPORTANT: You must use only a Class 4 SDHC Memory card or higher.
This indicates the SD card has been inserted correctly. (See images below : 1 and 2.) Push the SD card until you hear a slight clicking sound. To properly insert the SD Card: Push the SD card into your camera. SD card not included. Make sure a Class 4 (or higher) SD card (up to 32GB) has been properly inserted into the slot in the direction as shown SD card icon on the camera. (See images below : 3 and 4.) 5 2) Installing the SD Memory Card IMPORTANT: You must use only a Class 4 SDHC Memory card or higher.
User Manual
Page 8
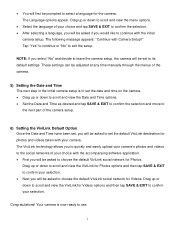
... tap SAVE & EXIT to confirm the selection and move to the next part of your selection. Next you will be asked to set to use. 7
... tap SAVE & EXIT to confirm the selection and move to the next part of your selection. Next you will be asked to set to use. 7
User Manual
Page 9
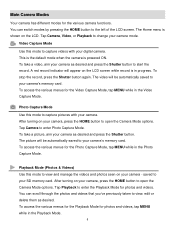
... shown on the LCD screen while record is powered ON. Photo Capture Mode Use this mode to capture videos with your digital camera. Playback Mode (Photos & Videos) Use this mode to capture pictures with your camera. Video Capture Mode Use this mode to enter Photo Capture Mode. A red record indicator will be automatically...
... shown on the LCD screen while record is powered ON. Photo Capture Mode Use this mode to capture videos with your digital camera. Playback Mode (Photos & Videos) Use this mode to capture pictures with your camera. Video Capture Mode Use this mode to enter Photo Capture Mode. A red record indicator will be automatically...
User Manual
Page 13
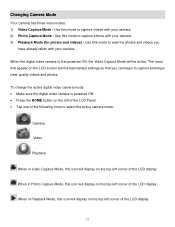
Use this mode to view the photos and videos you can begin to select the active camera mode: Camera Video... LCD Panel. Tap one of the following icons to capture and enjoy clear quality videos and photos. Use this mode to capture photos with your camera. The icons that you have already taken with your camera. 2) Photo Capture Mode... - Use this icon will be active. To change the active digital video camera mode: Make sure the digital video camera...
Use this mode to view the photos and videos you can begin to select the active camera mode: Camera Video... LCD Panel. Tap one of the following icons to capture and enjoy clear quality videos and photos. Use this mode to capture photos with your camera. The icons that you have already taken with your camera. 2) Photo Capture Mode... - Use this icon will be active. To change the active digital video camera mode: Make sure the digital video camera...
User Manual
Page 15
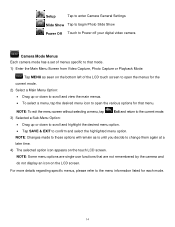
NOTE: Some menu options are single-use functions that menu. For more details regarding specific menus, please refer to the menu information listed for each mode. 14 NOTE: To exit the menu ...
NOTE: Some menu options are single-use functions that menu. For more details regarding specific menus, please refer to the menu information listed for each mode. 14 NOTE: To exit the menu ...

User Manual
Page 16
.... Alternatively, simply tap and highlight the desired option. Tap SAVE & EXIT to the left of this manual. 15 NOTE: Some menu options are single-use functions that menu. For more details regarding specific Setup menus, please refer to the 'Setup Menu' section of the LCD touch screen to open the...
.... Alternatively, simply tap and highlight the desired option. Tap SAVE & EXIT to the left of this manual. 15 NOTE: Some menu options are single-use functions that menu. For more details regarding specific Setup menus, please refer to the 'Setup Menu' section of the LCD touch screen to open the...
User Manual
Page 17
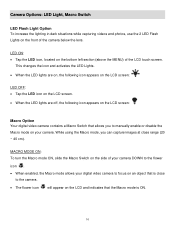
... Light, Macro Switch LED Flash Light Option To increase the lighting in dark situations while capturing videos and photos, use the 2 LED Flash Lights on the front of the LCD touch screen. While using the Macro mode, you can capture images at close to the camera. The flower icon will appear...
... Light, Macro Switch LED Flash Light Option To increase the lighting in dark situations while capturing videos and photos, use the 2 LED Flash Lights on the front of the LCD touch screen. While using the Macro mode, you can capture images at close to the camera. The flower icon will appear...
User Manual
Page 18
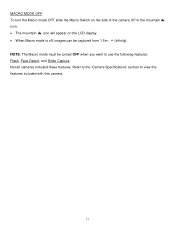
Not all cameras included these features. Refer to the 'Camera Specifications' section to use the following features: Flash, Face Detect, and Smile Capture. NOTE: The Macro mode must be captured from 1.5m - ∞ (infinity). MACRO MODE OFF: To turn the Macro mode OFF slide the Macro Switch on the side of the camera UP to the mountain icon. The mountain icon will appear on the LCD display. When Macro mode is off, images can be turned OFF when you want to view the features included with this camera. 17
Not all cameras included these features. Refer to the 'Camera Specifications' section to use the following features: Flash, Face Detect, and Smile Capture. NOTE: The Macro mode must be captured from 1.5m - ∞ (infinity). MACRO MODE OFF: To turn the Macro mode OFF slide the Macro Switch on the side of the camera UP to the mountain icon. The mountain icon will appear on the LCD display. When Macro mode is off, images can be turned OFF when you want to view the features included with this camera. 17

User Manual
Page 19
.... When the camera is first powered ON, the camera will be in on the object. Push the Zoom control button up, the T button, to 4 times using the digital zoom while capturing your photos and recording your digital video camera. Push the Zoom control button down when you Zoom Out (W). 3) Press the... elapsed time as the video is being captured. 5) To STOP the video record, press the Shutter button again. 6) The video is in Video Capture Mode use the LCD display to direct the camera at the scene you would like to capture. 2) You can magnify your subject up when you to the...
.... When the camera is first powered ON, the camera will be in on the object. Push the Zoom control button up, the T button, to 4 times using the digital zoom while capturing your photos and recording your digital video camera. Push the Zoom control button down when you Zoom Out (W). 3) Press the... elapsed time as the video is being captured. 5) To STOP the video record, press the Shutter button again. 6) The video is in Video Capture Mode use the LCD display to direct the camera at the scene you would like to capture. 2) You can magnify your subject up when you to the...
User Manual
Page 24
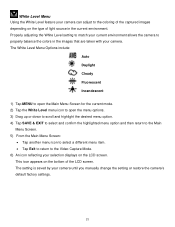
... Video Capture Mode. 6) An icon reflecting your camera until you manually change the setting or restore the camera's default factory settings. 23 White Level Menu Using the White Level feature your camera. The setting is saved by your selection displays on the type of the LCD screen. The White Level Menu...
... Video Capture Mode. 6) An icon reflecting your camera until you manually change the setting or restore the camera's default factory settings. 23 White Level Menu Using the White Level feature your camera. The setting is saved by your selection displays on the type of the LCD screen. The White Level Menu...
User Manual
Page 26
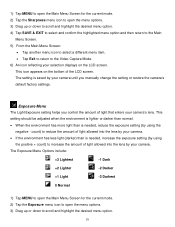
... you control the amount of light allowed into the lens by your camera. If the environment has less light (darker) than is saved by using the positive + count) to increase the amount of light that enters your camera's lens. The setting is needed , increase the exposure setting (by... using the negative - count) to reduce the amount of light allowed into the lens by your camera. 1) Tap MENU to open the Main Menu Screen for ...
... you control the amount of light allowed into the lens by your camera. If the environment has less light (darker) than is saved by using the positive + count) to increase the amount of light that enters your camera's lens. The setting is needed , increase the exposure setting (by... using the negative - count) to reduce the amount of light allowed into the lens by your camera. 1) Tap MENU to open the Main Menu Screen for ...
User Manual
Page 28
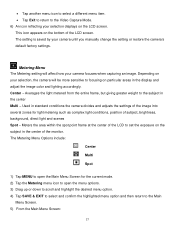
... to the subject in the center Multi - This icon appears on particular areas in the display and adjust the image color and lighting accordingly. Center - Used in standard conditions the camera divides and adjusts the settings of the image into several zones for the current mode. 2) Tap the Metering menu icon...
... to the subject in the center Multi - This icon appears on particular areas in the display and adjust the image color and lighting accordingly. Center - Used in standard conditions the camera divides and adjusts the settings of the image into several zones for the current mode. 2) Tap the Metering menu icon...
User Manual
Page 30
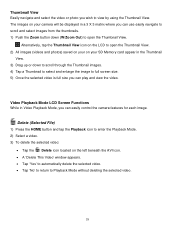
... through the Thumbnail images. 4) Tap a Thumbnail to select and enlarge the image to full screen size. 5) Once the selected video is full size you can use easily navigate to scroll and select images from the thumbnails. 1) Push the Zoom button down (W/Zoom Out) to open the Thumbnail View. Thumbnail View Easily... AVI icon. A 'Delete This Video' window appears. Tap 'Yes' to automatically delete the selected video. Tap 'No' to return to view by using the Thumbnail View.
... through the Thumbnail images. 4) Tap a Thumbnail to select and enlarge the image to full screen size. 5) Once the selected video is full size you can use easily navigate to scroll and select images from the thumbnails. 1) Push the Zoom button down (W/Zoom Out) to open the Thumbnail View. Thumbnail View Easily... AVI icon. A 'Delete This Video' window appears. Tap 'Yes' to automatically delete the selected video. Tap 'No' to return to view by using the Thumbnail View.

User Manual
Page 34
... to the SD memory card. 33 After powering on the object. Push the Zoom control button up, the T button, to zoom in Photo Capture Mode, use the LCD display to direct the camera at the scene you would like to capture. 2) You can magnify your subject up when you Zoom In... Capture Mode displays. The following Digital Zoom Indicator appears on the right side of the LCD screen: The zoom indicating bar moves up to 4 times using the digital zoom while capturing your photos and recording your digital camera. Photo Capture Mode The Photo Capture Mode allows you to capture pictures with...
... to the SD memory card. 33 After powering on the object. Push the Zoom control button up, the T button, to zoom in Photo Capture Mode, use the LCD display to direct the camera at the scene you would like to capture. 2) You can magnify your subject up when you Zoom In... Capture Mode displays. The following Digital Zoom Indicator appears on the right side of the LCD screen: The zoom indicating bar moves up to 4 times using the digital zoom while capturing your photos and recording your digital camera. Photo Capture Mode The Photo Capture Mode allows you to capture pictures with...
User Manual
Page 40
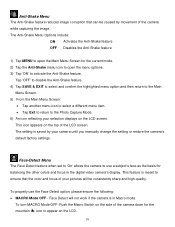
... in Macro mode. Face-Detect Menu The Face Detect feature when set to 'On' allows the camera to appear on the LCD screen. To properly use a subject's face as the basis for the current mode. 2) Tap the Anti-Shake menu icon to open the menu options. 3) Tap 'ON' to ensure that...-quality. This feature is in the digital video camera's display. The setting is saved by movement of the camera down for the mountain icon to use the Face Detect option, please ensure the following: MACRO Mode OFF - This icon appears on the top of your camera until you manually change...
... in Macro mode. Face-Detect Menu The Face Detect feature when set to 'On' allows the camera to appear on the LCD screen. To properly use a subject's face as the basis for the current mode. 2) Tap the Anti-Shake menu icon to open the menu options. 3) Tap 'ON' to ensure that...-quality. This feature is in the digital video camera's display. The setting is saved by movement of the camera down for the mountain icon to use the Face Detect option, please ensure the following: MACRO Mode OFF - This icon appears on the top of your camera until you manually change...
User Manual
Page 41
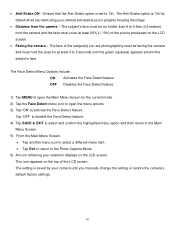
... hold the pose for the current mode. 2) Tap the Face Detect menu icon to open the menu options. 3) Tap 'ON' to 5 seconds until you start using your camera until the green square(s) appears around the subject's face. Tap 'OFF' to disable the Face Detect feature. 4) Tap SAVE & EXIT to select and...
... hold the pose for the current mode. 2) Tap the Face Detect menu icon to open the menu options. 3) Tap 'ON' to 5 seconds until you start using your camera until the green square(s) appears around the subject's face. Tap 'OFF' to disable the Face Detect feature. 4) Tap SAVE & EXIT to select and...


