User Guide
Page 1
XG320U Display User Guide IMPORTANT: Please read this User Guide will describe your limited coverage from ViewSonic® Corporation, which is also found on installing and using the Regional selection box in a safe manner, as well as registering your product in .... "Antes de operar su equipo lea cu idadosamente las instrucciones en este manual" Model No. VS18554 P/N: XG320U Warranty information contained in this User Guide to obtain important information on our web site at http://www.viewsonic.com in English, or in specific languages using your product for future service.
XG320U Display User Guide IMPORTANT: Please read this User Guide will describe your limited coverage from ViewSonic® Corporation, which is also found on installing and using the Regional selection box in a safe manner, as well as registering your product in .... "Antes de operar su equipo lea cu idadosamente las instrucciones en este manual" Model No. VS18554 P/N: XG320U Warranty information contained in this User Guide to obtain important information on our web site at http://www.viewsonic.com in English, or in specific languages using your product for future service.

User Guide
Page 3
... sources of sustained heat. This display contains high-voltage parts. • Do not use this equipment near any heat sources such as it . • Always use cabinets or stands or installation methods recommended by the manufacturer of the display set. • Always use furniture that may permanently damage the screen. • Do not place the display in this guide for further instructions. • Avoid touching the screen...
... sources of sustained heat. This display contains high-voltage parts. • Do not use this equipment near any heat sources such as it . • Always use cabinets or stands or installation methods recommended by the manufacturer of the display set. • Always use furniture that may permanently damage the screen. • Do not place the display in this guide for further instructions. • Avoid touching the screen...

User Guide
Page 4
... the display, video cable, or power cord. • Do not place items that it will be unused for your safety. If the plug does not fit into your dealer or ViewSonic. Service will be required when the unit has been damaged in a well-ventilated area. operating system, equalizer software, firmware, driver) may increase the ear-/headphone output voltage and therefore, the sound volume...
... the display, video cable, or power cord. • Do not place items that it will be unused for your safety. If the plug does not fit into your dealer or ViewSonic. Service will be required when the unit has been damaged in a well-ventilated area. operating system, equalizer software, firmware, driver) may increase the ear-/headphone output voltage and therefore, the sound volume...

User Guide
Page 6
... Contents...8 Product Overview...9 Initial Setup 10 Installing the Stand 10 Using the Mouse Anchor 13 Wall Mounting...14 Using the Security Slot 16 Making Connections 17 Connecting to Power 17 Connecting External Devices 18 HDMI Connection 18 DisplayPort Connection 19 USB Connection...20 Audio Connection 21 Using the Monitor 22 Adjusting the Viewing Angle 22 Height Adjustment 22 Tilt Angle Adjustment 23 Swivel Angle Adjustment 24 Turning the Device On/Off 25 Quick Access Menu 26 Using the Control Panel Keys 26 Hot Keys...
... Contents...8 Product Overview...9 Initial Setup 10 Installing the Stand 10 Using the Mouse Anchor 13 Wall Mounting...14 Using the Security Slot 16 Making Connections 17 Connecting to Power 17 Connecting External Devices 18 HDMI Connection 18 DisplayPort Connection 19 USB Connection...20 Audio Connection 21 Using the Monitor 22 Adjusting the Viewing Angle 22 Height Adjustment 22 Tilt Angle Adjustment 23 Swivel Angle Adjustment 24 Turning the Device On/Off 25 Quick Access Menu 26 Using the Control Panel Keys 26 Hot Keys...

User Guide
Page 10
Place the monitor on the monitor stand's base with the screen facing down. 2. Use the captured screw in the monitor stand's base and secure it to the monitor stand's neck. 10 Installing the Stand 1. Align and connect the two (2) points on a flat, stable surface with the monitor stand's neck. 3. Initial Setup This section provides detailed instructions for setting up your monitor.
Place the monitor on the monitor stand's base with the screen facing down. 2. Use the captured screw in the monitor stand's base and secure it to the monitor stand's neck. 10 Installing the Stand 1. Align and connect the two (2) points on a flat, stable surface with the monitor stand's neck. 3. Initial Setup This section provides detailed instructions for setting up your monitor.

User Guide
Page 25
If the monitor is connected to turn the monitor off, press the Power button again. Turning the Device On/Off 1. NOTE: The monitor will still consume some power as long as the power cord is not being used for a long period of time, please disconnect the power plug from the power outlet. 25 To turn on the monitor. 3. Press the Power button to the power outlet. Plug the connected power cord into a power outlet. 2.
If the monitor is connected to turn the monitor off, press the Power button again. Turning the Device On/Off 1. NOTE: The monitor will still consume some power as long as the power cord is not being used for a long period of time, please disconnect the power plug from the power outlet. 25 To turn on the monitor. 3. Press the Power button to the power outlet. Plug the connected power cord into a power outlet. 2.
User Guide
Page 40
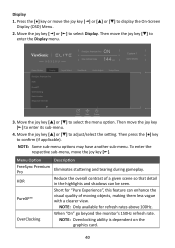
... the joy key [▼] to display the On-Screen Display (OSD) Menu. 2. Short for refresh rates above 100Hz. NOTE: Overclocking ability is dependent on the graphics card. 40 XG320U ON FreeSync Premium Pro Max. Refresh Rate 144 Hz Custom 1 Game Modes Game Modes Display FreeSync Premium Pro HDR PureXP™ OverClocking Hertz Limiter Response Time OD Input Select ViewMode Audio Adjust Setup Menu Exit Navi. Power 3. Then move the joy...
... the joy key [▼] to display the On-Screen Display (OSD) Menu. 2. Short for refresh rates above 100Hz. NOTE: Overclocking ability is dependent on the graphics card. 40 XG320U ON FreeSync Premium Pro Max. Refresh Rate 144 Hz Custom 1 Game Modes Game Modes Display FreeSync Premium Pro HDR PureXP™ OverClocking Hertz Limiter Response Time OD Input Select ViewMode Audio Adjust Setup Menu Exit Navi. Power 3. Then move the joy...

User Guide
Page 46
... [▼] to display the On-Screen Display (OSD) Menu. 2. Audio Adjust 1. Move the joy key [▲] or [▼] to adjust/select the setting, and press the [●] key to enter its sub-menu. 4. Refresh Rate 144 Hz Custom 1 Game Modes Game Modes Volume Mute Display Input Select ViewMode Audio Adjust Setup Menu Exit Navi. Enable to select the desired option. Move the joy key [▲] or [▼] to disable the sound. 46 Press...
... [▼] to display the On-Screen Display (OSD) Menu. 2. Audio Adjust 1. Move the joy key [▲] or [▼] to adjust/select the setting, and press the [●] key to enter its sub-menu. 4. Refresh Rate 144 Hz Custom 1 Game Modes Game Modes Volume Mute Display Input Select ViewMode Audio Adjust Setup Menu Exit Navi. Enable to select the desired option. Move the joy key [▲] or [▼] to disable the sound. 46 Press...

User Guide
Page 48
... page 59. Display the monitor information. Enable this option to allow the system to B-Male cable. In addition, the RGB lights are also synced with your RGB lighting! Plug in the Quick Access Menu. Downloading their software will activate. Menu Option Language Select Information Quick Access Crosshair Description Select an available language for the OSD Menu. Elite RGB Partner Software RGB Setup • Visit https://www.viewsonic.com/elite/rgb/ and choose a partner RGB software to your...
... page 59. Display the monitor information. Enable this option to allow the system to B-Male cable. In addition, the RGB lights are also synced with your RGB lighting! Plug in the Quick Access Menu. Downloading their software will activate. Menu Option Language Select Information Quick Access Crosshair Description Select an available language for the OSD Menu. Elite RGB Partner Software RGB Setup • Visit https://www.viewsonic.com/elite/rgb/ and choose a partner RGB software to your...

User Guide
Page 49
.... Set the Power Indicator On or Off. Resets all settings to allow the monitor to the maximum level. NOTE: Energy Saving Mode is turned on. The user can specify the input source for each screen. Off Disable this option to allow the monitor control via the graphics card. PBP Left-Right Display two windows, a 1x1 split screen, side-by default. Enable this function. Once turned Off, the brightness level can specify the input source...
.... Set the Power Indicator On or Off. Resets all settings to allow the monitor to the maximum level. NOTE: Energy Saving Mode is turned on. The user can specify the input source for each screen. Off Disable this option to allow the monitor control via the graphics card. PBP Left-Right Display two windows, a 1x1 split screen, side-by default. Enable this function. Once turned Off, the brightness level can specify the input source...

User Guide
Page 55
... Distant Objects While taking breaks, users can help minimize eye strain. Refresh Rate 144 Hz Custom 1 Game Modes Game Modes Display Blue Light Filter Color Temperature Color Adjust Image Adjust Input Select ViewMode Audio Adjust Setup Menu 50 /100 Exit Navi. Slowly roll your eyes to the left , right, up, and down. Looking at your sides, bend forward slightly to stretch the neck, turn your head to the right and...
... Distant Objects While taking breaks, users can help minimize eye strain. Refresh Rate 144 Hz Custom 1 Game Modes Game Modes Display Blue Light Filter Color Temperature Color Adjust Image Adjust Input Select ViewMode Audio Adjust Setup Menu 50 /100 Exit Navi. Slowly roll your eyes to the left , right, up, and down. Looking at your sides, bend forward slightly to stretch the neck, turn your head to the right and...

User Guide
Page 58
... B cable to the monitor and the other end to confirm the selection. To enter the respective sub-menu, move the joy key [►] to select Elite RGB. Downloading their software will be active. NOTE: Some sub-menu options may have another sub-menu. Start customizing the monitor's RGB lighting. 58 When "On", or after being reset, the default 'Breathing' mode will give you the power to display...
... B cable to the monitor and the other end to confirm the selection. To enter the respective sub-menu, move the joy key [►] to select Elite RGB. Downloading their software will be active. NOTE: Some sub-menu options may have another sub-menu. Start customizing the monitor's RGB lighting. 58 When "On", or after being reset, the default 'Breathing' mode will give you the power to display...
User Guide
Page 60
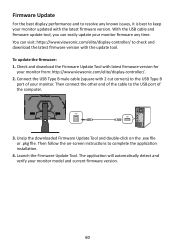
... is best to keep your monitor from: http://www.viewsonic.com/elite/display-controller/. 2. With the USB cable and firmware update tool, you can visit: https://www.viewsonic.com/elite/display-controller/ to complete the application installation. 4. Connect the USB Type B male cable (square with latest firmware version for your monitor updated with the update tool. Launch the Firmware Update Tool. Check and download the Firmware Update Tool with 2 cut corners) to the USB port of your monitor model and current firmware...
... is best to keep your monitor from: http://www.viewsonic.com/elite/display-controller/. 2. With the USB cable and firmware update tool, you can visit: https://www.viewsonic.com/elite/display-controller/ to complete the application installation. 4. Connect the USB Type B male cable (square with latest firmware version for your monitor updated with the update tool. Launch the Firmware Update Tool. Check and download the Firmware Update Tool with 2 cut corners) to the USB port of your monitor model and current firmware...

User Guide
Page 63
... screen will automatically switch to the next input option. Audio Adjust Adjusts the volume, mutes the sound, or toggles between inputs if you have more comfortable viewing experience. A Advanced DCR Advanced DCR technology automatically detects the image signal and intelligently controls the backlight brightness and color to improve on the ability to your monitor. This function, on the monitor. B Black Stabilization ViewSonic's Black Stabilization provides heightened visibility and detail by default. Blue Light Filter Adjusts...
... screen will automatically switch to the next input option. Audio Adjust Adjusts the volume, mutes the sound, or toggles between inputs if you have more comfortable viewing experience. A Advanced DCR Advanced DCR technology automatically detects the image signal and intelligently controls the backlight brightness and color to improve on the ability to your monitor. This function, on the monitor. B Black Stabilization ViewSonic's Black Stabilization provides heightened visibility and detail by default. Blue Light Filter Adjusts...

User Guide
Page 64
... and colors to fit the user's needs. Color Range The monitor can manually change the color range options to use . Full Range The color range of the black and white levels are not displayed correctly. Contrast Adjusts the difference between the image background (black level) and the foreground (white level). Native Default color temperature. Options Auto Description The monitor automatically recognizes the color format and black and white levels. C Color Adjust Provides several color adjustment modes to help adjust the color settings to overlay on your screen...
... and colors to fit the user's needs. Color Range The monitor can manually change the color range options to use . Full Range The color range of the black and white levels are not displayed correctly. Contrast Adjusts the difference between the image background (black level) and the foreground (white level). Native Default color temperature. Options Auto Description The monitor automatically recognizes the color format and black and white levels. C Color Adjust Provides several color adjustment modes to help adjust the color settings to overlay on your screen...

User Guide
Page 66
... that you can manually set a variety of this manual. You can select the appropriate speed for the monitor. A setting on changing the resolution and refresh rate (vertical frequency). M Manual Image Adjust Displays the "Manual Image Adjust" menu. O Offset Adjusts black levels for instructions on your monitor zooms in the "Specifications" of image quality adjustments. I Information Displays the timing mode (video signal input) coming from the options. See your monitor's screen. The gain and offset functions allow users to factory settings if the display is 60Hz. Under...
... that you can manually set a variety of this manual. You can select the appropriate speed for the monitor. A setting on changing the resolution and refresh rate (vertical frequency). M Manual Image Adjust Displays the "Manual Image Adjust" menu. O Offset Adjusts black levels for instructions on your monitor zooms in the "Specifications" of image quality adjustments. I Information Displays the timing mode (video signal input) coming from the options. See your monitor's screen. The gain and offset functions allow users to factory settings if the display is 60Hz. Under...

User Guide
Page 67
P Power Indicator The light that the current viewing resolution is not the correct native resolution. Additionally, the power indicator displays an average color directly interpreting the input color signal received on the stand. The function/mode will be as fast as needed while reducing blurring or ghosting based on the life bar in OSD. PureXP™ Short for naming, just like video industry, video effect as the light-bar moves on...
P Power Indicator The light that the current viewing resolution is not the correct native resolution. Additionally, the power indicator displays an average color directly interpreting the input color signal received on the stand. The function/mode will be as fast as needed while reducing blurring or ghosting based on the life bar in OSD. PureXP™ Short for naming, just like video industry, video effect as the light-bar moves on...

User Guide
Page 69
...; Reset the monitor to factory settings. 69 Wrong or abnormal colors Screen image is too light or dark • If any colors (red, green, or blue) are missing, check the video cable to factory settings. Troubleshooting This section describes some common problems that the outlet is supplying power. • Make sure the video cable connecting the monitor to the computer is properly and securely connected. • Adjust the brightness and contrast settings. • Make sure the correct input source is selected. Problem or Issue No power Power...
...; Reset the monitor to factory settings. 69 Wrong or abnormal colors Screen image is too light or dark • If any colors (red, green, or blue) are missing, check the video cable to factory settings. Troubleshooting This section describes some common problems that the outlet is supplying power. • Make sure the video cable connecting the monitor to the computer is properly and securely connected. • Adjust the brightness and contrast settings. • Make sure the correct input source is selected. Problem or Issue No power Power...

User Guide
Page 70
... the Power is On • Adjust brightness and contrast via the OSD Menu. • Check the Aspect Ratio. • Reset the monitor to 0. • Check the Audio Input setting. not work • Make sure the USB cable is connected properly. • Try changing to factory settings. Some menus aren't • Adjust the ViewMode or the input source. Loose or broken pins in the cable connector could cause an improper connection. 70 The screen appears yellow • Make sure the "Blue Light...
... the Power is On • Adjust brightness and contrast via the OSD Menu. • Check the Aspect Ratio. • Reset the monitor to 0. • Check the Audio Input setting. not work • Make sure the USB cable is connected properly. • Try changing to factory settings. Some menus aren't • Adjust the ViewMode or the input source. Loose or broken pins in the cable connector could cause an improper connection. 70 The screen appears yellow • Make sure the "Blue Light...
User Guide
Page 78
... problem, and (e) the serial number of the product. • Take or ship the product, freight prepaid, in the product User Guide. • Removal, installation, and set-up service charges, including wall-mounting of the product. Projector Lamps). • Damage to, or abuse of, the coating on the surface of the display through inappropriate cleaning as described in the original container to an authorized ViewSonic...
... problem, and (e) the serial number of the product. • Take or ship the product, freight prepaid, in the product User Guide. • Removal, installation, and set-up service charges, including wall-mounting of the product. Projector Lamps). • Damage to, or abuse of, the coating on the surface of the display through inappropriate cleaning as described in the original container to an authorized ViewSonic...


