User Guide
Page 1
... instrucciones en este manual" Model No. Warranty information contained in this User Guide to obtain important information on our web site at http://www.viewsonic.com in English, or in specific languages using your product for future service. VS17961 P/N: XG270 XG270 Display User Guide IMPORTANT: Please read this User Guide will describe your limited coverage from ViewSonic® Corporation, which is also found on installing and using the Regional selection...
... instrucciones en este manual" Model No. Warranty information contained in this User Guide to obtain important information on our web site at http://www.viewsonic.com in English, or in specific languages using your product for future service. VS17961 P/N: XG270 XG270 Display User Guide IMPORTANT: Please read this User Guide will describe your limited coverage from ViewSonic® Corporation, which is also found on installing and using the Regional selection...

User Guide
Page 5
......7 Product Overview...8 Initial Setup 9 Installing the Stand 9 Installing and Removing the Elite Hood 12 Wall Mounting...13 Using the Security Slot 15 Making Connections 16 Connecting to Power 16 Connecting External Devices 17 HDMI Connection 17 DisplayPort Connection 18 USB Connection...19 Audio Connection 20 Using the Monitor 21 Adjusting the Viewing Angle 21 Height Adjustment 21 Tilt Angle Adjustment 22 Screen Orientation Adjustment (Monitor Pivot 22 Swivel Angle Adjustment 24 Turning the Device On/Off 25 Quick Access Menu 26 Using the Control Panel Keys 26 Hot...
......7 Product Overview...8 Initial Setup 9 Installing the Stand 9 Installing and Removing the Elite Hood 12 Wall Mounting...13 Using the Security Slot 15 Making Connections 16 Connecting to Power 16 Connecting External Devices 17 HDMI Connection 17 DisplayPort Connection 18 USB Connection...19 Audio Connection 20 Using the Monitor 21 Adjusting the Viewing Angle 21 Height Adjustment 21 Tilt Angle Adjustment 22 Screen Orientation Adjustment (Monitor Pivot 22 Swivel Angle Adjustment 24 Turning the Device On/Off 25 Quick Access Menu 26 Using the Control Panel Keys 26 Hot...

User Guide
Page 9
Place the monitor on the monitor stand's base with the screen facing down. 2. Installing the Stand 1. Align and connect the two (2) points on a flat, stable surface with the monitor stand's neck. 3. Initial Setup This section provides detailed instructions for setting up your monitor. Use the captured screw in the monitor stand's base and secure it to the monitor stand's neck. 9
Place the monitor on the monitor stand's base with the screen facing down. 2. Installing the Stand 1. Align and connect the two (2) points on a flat, stable surface with the monitor stand's neck. 3. Initial Setup This section provides detailed instructions for setting up your monitor. Use the captured screw in the monitor stand's base and secure it to the monitor stand's neck. 9

User Guide
Page 25
To turn on the monitor. 3. NOTE: The monitor will still consume some power as long as the power cord is not being used for a long period of time, please disconnect the power plug from the power outlet. 25 Plug the connected power cord into a power outlet. 2. Press the Power button to the power outlet. Turning the Device On/Off 1. If the monitor is connected to turn the monitor off, press the Power button again.
To turn on the monitor. 3. NOTE: The monitor will still consume some power as long as the power cord is not being used for a long period of time, please disconnect the power plug from the power outlet. 25 Plug the connected power cord into a power outlet. 2. Press the Power button to the power outlet. Turning the Device On/Off 1. If the monitor is connected to turn the monitor off, press the Power button again.
User Guide
Page 30
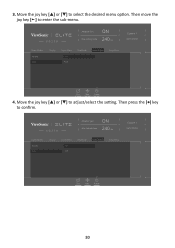
... joy key [►] to adjust/select the setting. Move the joy key [▲] or [▼] to enter the sub-menu. Refresh Rate Hz Custom 1 Game Modes Game Modes Volume Mute Display Input Select On Off ViewMode Audio Adjust Setup Menu Exit Navi. 3. XG270 Adaptive Sync ON 240 Max. Power 4. XG270 Adaptive Sync ON 240 Max. Refresh Rate Hz Custom 1 Game Modes Game Modes Volume Mute Display Input Select On Off ViewMode Audio Adjust Setup Menu Exit Navi. Power 30 Then press the [●...
... joy key [►] to adjust/select the setting. Move the joy key [▲] or [▼] to enter the sub-menu. Refresh Rate Hz Custom 1 Game Modes Game Modes Volume Mute Display Input Select On Off ViewMode Audio Adjust Setup Menu Exit Navi. 3. XG270 Adaptive Sync ON 240 Max. Power 4. XG270 Adaptive Sync ON 240 Max. Refresh Rate Hz Custom 1 Game Modes Game Modes Volume Mute Display Input Select On Off ViewMode Audio Adjust Setup Menu Exit Navi. Power 30 Then press the [●...
User Guide
Page 39
XG270 Adaptive Sync ON 240 Max. Refresh Rate Hz Custom 1 Game Modes Game Modes Display Adaptive Sync HDR10 PureXP™ OverClocking Hertz Limiter Response Time OD Input Select ViewMode Audio Adjust Setup Menu Exit Navi. HDR10 Reduce the overall contrast of moving objects, making them less vague with a clearer view. PureXP™ Short for users that detail in the highlights and shadows can output. Press the [●] key or move...
XG270 Adaptive Sync ON 240 Max. Refresh Rate Hz Custom 1 Game Modes Game Modes Display Adaptive Sync HDR10 PureXP™ OverClocking Hertz Limiter Response Time OD Input Select ViewMode Audio Adjust Setup Menu Exit Navi. HDR10 Reduce the overall contrast of moving objects, making them less vague with a clearer view. PureXP™ Short for users that detail in the highlights and shadows can output. Press the [●] key or move...

User Guide
Page 45
... volume level. Power 3. Move the joy key [◄] or [►] to enter its sub-menu. 4. Then move the joy key [◄] or [▲] or [▼] to disable the sound. 45 Press the [●] key or move the joy key [►] to select Audio Adjust. Refresh Rate Hz Custom 1 Game Modes Game Modes Volume Mute Display Input Select ViewMode Audio Adjust Setup Menu Exit Navi. Enable to display the On-Screen Display (OSD) Menu. 2. XG270 Adaptive Sync...
... volume level. Power 3. Move the joy key [◄] or [►] to enter its sub-menu. 4. Then move the joy key [◄] or [▲] or [▼] to disable the sound. 45 Press the [●] key or move the joy key [►] to select Audio Adjust. Refresh Rate Hz Custom 1 Game Modes Game Modes Volume Mute Display Input Select ViewMode Audio Adjust Setup Menu Exit Navi. Enable to display the On-Screen Display (OSD) Menu. 2. XG270 Adaptive Sync...
User Guide
Page 46
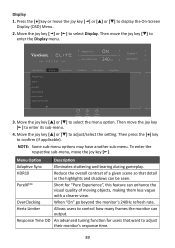
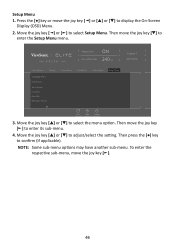
Refresh Rate Hz Custom 1 Game Modes Game Modes Display Language Select Information Quick Access Crosshair Elite RGB Resolution Notice Input Select ViewMode Audio Adjust Setup Menu Exit Navi. Move the joy key [▲] or [▼] to display the On-Screen Display (OSD) Menu. 2. NOTE: Some sub-menu options may have another sub-menu. Press the [●] key or move the joy key [▼] to select Setup Menu. Move the joy key [◄] or [►...
Refresh Rate Hz Custom 1 Game Modes Game Modes Display Language Select Information Quick Access Crosshair Elite RGB Resolution Notice Input Select ViewMode Audio Adjust Setup Menu Exit Navi. Move the joy key [▲] or [▼] to display the On-Screen Display (OSD) Menu. 2. NOTE: Some sub-menu options may have another sub-menu. Press the [●] key or move the joy key [▼] to select Setup Menu. Move the joy key [◄] or [►...
User Guide
Page 47
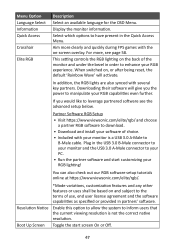
...; Download and install your RGB capabilities even further. Toggle the start customizing your RGB experience. Aim more , see the advanced setup below. Partner Software RGB Setup • Visit https://www.viewsonic.com/elite/rgb/ and choose a partner RGB software to B-Male cable. Menu Option Language Select Information Quick Access Crosshair Elite RGB Description Select an available language for the OSD Menu. Select which options to enhance your RGB lighting! Downloading their software will activate. Display the monitor...
...; Download and install your RGB capabilities even further. Toggle the start customizing your RGB experience. Aim more , see the advanced setup below. Partner Software RGB Setup • Visit https://www.viewsonic.com/elite/rgb/ and choose a partner RGB software to B-Male cable. Menu Option Language Select Information Quick Access Crosshair Elite RGB Description Select an available language for the OSD Menu. Select which options to enhance your RGB lighting! Downloading their software will activate. Display the monitor...

User Guide
Page 54
... to take periodic breaks from viewing to allow the eyes to relax. • Users can further reduce eye strain and dryness by focusing on objects that are generally more frequent breaks are further away from viewing. Repeat as many times as needed . Refresh Rate Hz Custom 1 Game Modes Game Modes Display Blue Light Filter Color Temperature Color Adjust Image Adjust Input Select ViewMode Audio Adjust Setup Menu 50 /100 Exit Navi...
... to take periodic breaks from viewing to allow the eyes to relax. • Users can further reduce eye strain and dryness by focusing on objects that are generally more frequent breaks are further away from viewing. Repeat as many times as needed . Refresh Rate Hz Custom 1 Game Modes Game Modes Display Blue Light Filter Color Temperature Color Adjust Image Adjust Input Select ViewMode Audio Adjust Setup Menu 50 /100 Exit Navi...
User Guide
Page 57
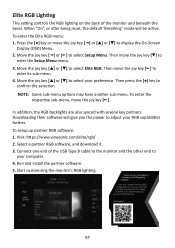
...-Screen Display (OSD) Menu. 2. Then move the joy key [►] to enter its sub-menu. 4. Move the joy key [▲] or [▼] to select Setup Menu. Select a partner RGB software, and download it. 3. When "On", or after being reset, the default 'Breathing' mode will give you the power to adjust your computer. 4. Move the joy key [◄] or [►] to select Elite RGB. Visit: https://www.viewsonic...
...-Screen Display (OSD) Menu. 2. Then move the joy key [►] to enter its sub-menu. 4. Move the joy key [▲] or [▼] to select Setup Menu. Select a partner RGB software, and download it. 3. When "On", or after being reset, the default 'Breathing' mode will give you the power to adjust your computer. 4. Move the joy key [◄] or [►] to select Elite RGB. Visit: https://www.viewsonic...
User Guide
Page 59
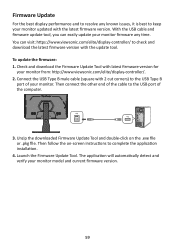
... double-click on -screen instructions to check and download the latest firmware version with the latest firmware version. You can easily update your monitor firmware any known issues, it is best to keep your monitor model and current firmware version. 59 Firmware Update For the best display performance and to resolve any time. With the USB cable and firmware update tool, you can visit: https://www.viewsonic.com/elite/display-controller/ to complete the application installation. 4.
... double-click on -screen instructions to check and download the latest firmware version with the latest firmware version. You can easily update your monitor firmware any known issues, it is best to keep your monitor model and current firmware version. 59 Firmware Update For the best display performance and to resolve any time. With the USB cable and firmware update tool, you can visit: https://www.viewsonic.com/elite/display-controller/ to complete the application installation. 4.

User Guide
Page 62
.... B Black Stabilization ViewSonic's Black Stabilization provides heightened visibility and detail by default. Boot Up Screen Turning off the boot screen will automatically switch to your monitor. Brightness Adjusts background black levels of terms used in all LCD display models. Adaptive Sync Adaptive Sync technology puts an end to make the black blacker in a dark scene, and make the white whiter in alphabetical order. A Advanced DCR Advanced DCR technology automatically detects the image signal and intelligently controls the backlight brightness...
.... B Black Stabilization ViewSonic's Black Stabilization provides heightened visibility and detail by default. Boot Up Screen Turning off the boot screen will automatically switch to your monitor. Brightness Adjusts background black levels of terms used in all LCD display models. Adaptive Sync Adaptive Sync technology puts an end to make the black blacker in a dark scene, and make the white whiter in alphabetical order. A Advanced DCR Advanced DCR technology automatically detects the image signal and intelligently controls the backlight brightness...

User Guide
Page 63
... not displayed correctly. Warm Set the color temperature to fit the user's needs. You can detect the input signal color range automatically. Color Range The monitor can manually change the color range options to use . Native Default color temperature. Best for monitor color output (RGB, YUV). Contrast Adjusts the difference between the image background (black level) and the foreground (white level). Options Auto Description The monitor automatically recognizes the color format and black and white levels. C Color Adjust Provides several color adjustment modes to help adjust...
... not displayed correctly. Warm Set the color temperature to fit the user's needs. You can detect the input signal color range automatically. Color Range The monitor can manually change the color range options to use . Native Default color temperature. Best for monitor color output (RGB, YUV). Contrast Adjusts the difference between the image background (black level) and the foreground (white level). Options Auto Description The monitor automatically recognizes the color format and black and white levels. C Color Adjust Provides several color adjustment modes to help adjust...
User Guide
Page 64
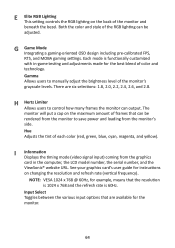
... Allows users to manually adjust the brightness level of the monitor and beneath the bezel. See your graphics card's user guide for the best blend of color and technology. E Elite RGB Lighting This setting controls the RGB lighting on changing the resolution and refresh rate (vertical frequency). Each mode is 60Hz. The monitor will put a cap on the maximum amount of each color (red, green, blue, cyan, magenta, and yellow). I Information Displays the timing mode (video signal input) coming from the monitor's side. Input Select...
... Allows users to manually adjust the brightness level of the monitor and beneath the bezel. See your graphics card's user guide for the best blend of color and technology. E Elite RGB Lighting This setting controls the RGB lighting on changing the resolution and refresh rate (vertical frequency). Each mode is 60Hz. The monitor will put a cap on the maximum amount of each color (red, green, blue, cyan, magenta, and yellow). I Information Displays the timing mode (video signal input) coming from the monitor's side. Input Select...

User Guide
Page 65
... that displays whether the monitor is a common & cool way for red, green, and blue. PureXP™ Short for your monitor zooms in the "Language Select" or "Power Lock" setting. You can enhance the visual quality of image quality adjustments. Overscan Refers to control the white balance for the upmost control when manipulating contrast and dark scenes. Additionally, the power indicator displays an average color directly interpreting the input color signal received on...
... that displays whether the monitor is a common & cool way for red, green, and blue. PureXP™ Short for your monitor zooms in the "Language Select" or "Power Lock" setting. You can enhance the visual quality of image quality adjustments. Overscan Refers to control the white balance for the upmost control when manipulating contrast and dark scenes. Additionally, the power indicator displays an average color directly interpreting the input color signal received on...

User Guide
Page 66
... the Quick Access Menu via the Setup Menu in the display settings window when setting up the display resolution. Resolution Notice The notice tells users that want to adjust the display size of the image on -screen display notifications so users do not have the ability to adjust their monitor's response time. Many of the monitor. S Setup Menu Adjusts On-Screen Display (OSD) Menu settings. V ViewMode ViewSonic's unique ViewMode feature offers "Game", "Movie", "Web", "Text", "MAC", and "Mono" presets. These presets are specifically...
... the Quick Access Menu via the Setup Menu in the display settings window when setting up the display resolution. Resolution Notice The notice tells users that want to adjust the display size of the image on -screen display notifications so users do not have the ability to adjust their monitor's response time. Many of the monitor. S Setup Menu Adjusts On-Screen Display (OSD) Menu settings. V ViewMode ViewSonic's unique ViewMode feature offers "Game", "Movie", "Web", "Text", "MAC", and "Mono" presets. These presets are specifically...

User Guide
Page 67
.... • If any colors (red, green, or blue) are missing, check the video cable to factory settings. 67 Loose or broken pins in the cable connector could cause an improper connection. • Connect the monitor to another computer. • If you have an older graphics card, contact ViewSonic® for a non-DDC adapter. • Adjust brightness and contrast settings via the OSD Menu. • Reset the monitor to factory settings. • Make sure the correct input source is selected. •...
.... • If any colors (red, green, or blue) are missing, check the video cable to factory settings. 67 Loose or broken pins in the cable connector could cause an improper connection. • Connect the monitor to another computer. • If you have an older graphics card, contact ViewSonic® for a non-DDC adapter. • Adjust brightness and contrast settings via the OSD Menu. • Reset the monitor to factory settings. • Make sure the correct input source is selected. •...

User Guide
Page 68
...; Adjust brightness and contrast via the OSD Menu. • Check the Aspect Ratio. • Reset the monitor to another USB port (if applicable). • Some USB devices require a higher electric current; Control panel keys do not work • Restart the computer. The OSD Menu does not appear on the monitor. • Reset the monitor to factory settings. The screen appears yellow • Make sure the "Blue Light Filter" is locked. • Turn off the monitor, unplug the power cord, plug it...
...; Adjust brightness and contrast via the OSD Menu. • Check the Aspect Ratio. • Reset the monitor to another USB port (if applicable). • Some USB devices require a higher electric current; Control panel keys do not work • Restart the computer. The OSD Menu does not appear on the monitor. • Reset the monitor to factory settings. The screen appears yellow • Make sure the "Blue Light Filter" is locked. • Turn off the monitor, unplug the power cord, plug it...
User Guide
Page 78
... described in the product User Guide. • Removal, installation, and set-up service charges, including wall-mounting of the nearest ViewSonic® service center, contact ViewSonic®. How to get service: • For information about receiving service under warranty, contact ViewSonic® Customer Support (Please refer to the "Customer Service" page). Any third-party software included with the product or installed by static (non-moving) images displayed for a particular purpose...
... described in the product User Guide. • Removal, installation, and set-up service charges, including wall-mounting of the nearest ViewSonic® service center, contact ViewSonic®. How to get service: • For information about receiving service under warranty, contact ViewSonic® Customer Support (Please refer to the "Customer Service" page). Any third-party software included with the product or installed by static (non-moving) images displayed for a particular purpose...


